
Salmon Sushi Bake Viral Recipe
Okay, friends, let me tell you about the culinary sensation that has taken the internet by storm and, honestly, my kitchen too! The Salmon Sushi Bake Viral Recipe is an absolute game-changer. What makes this dish so incredibly special? It’s the magical marriage of everything you love about sushi – the fresh salmon, the seasoned rice, the creamy sauce, and savory toppings – all without the fussy rolling. Seriously, if you’ve ever dreamt of devouring a sushi roll without the sticky mess or the intricate technique, this is your dream come true!
You are going to absolutely adore this recipe because it delivers all the vibrant flavors and textures of your favorite salmon sushi in a comforting, easy-to-make casserole. It’s perfect for a weeknight dinner when you’re craving something exciting, for impressing guests with minimal effort, or just for a satisfying treat. Plus, it’s endlessly customizable with your favorite toppings!
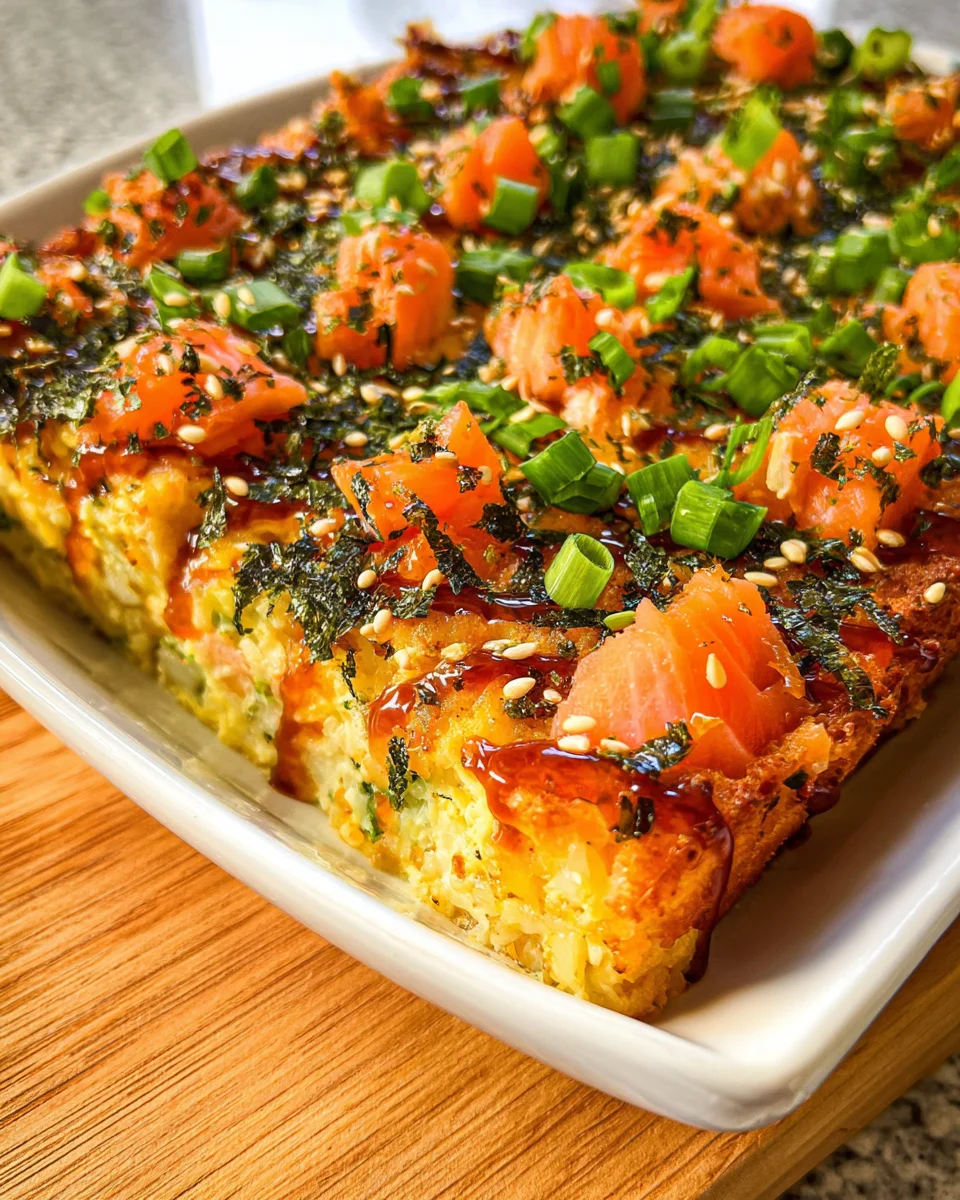
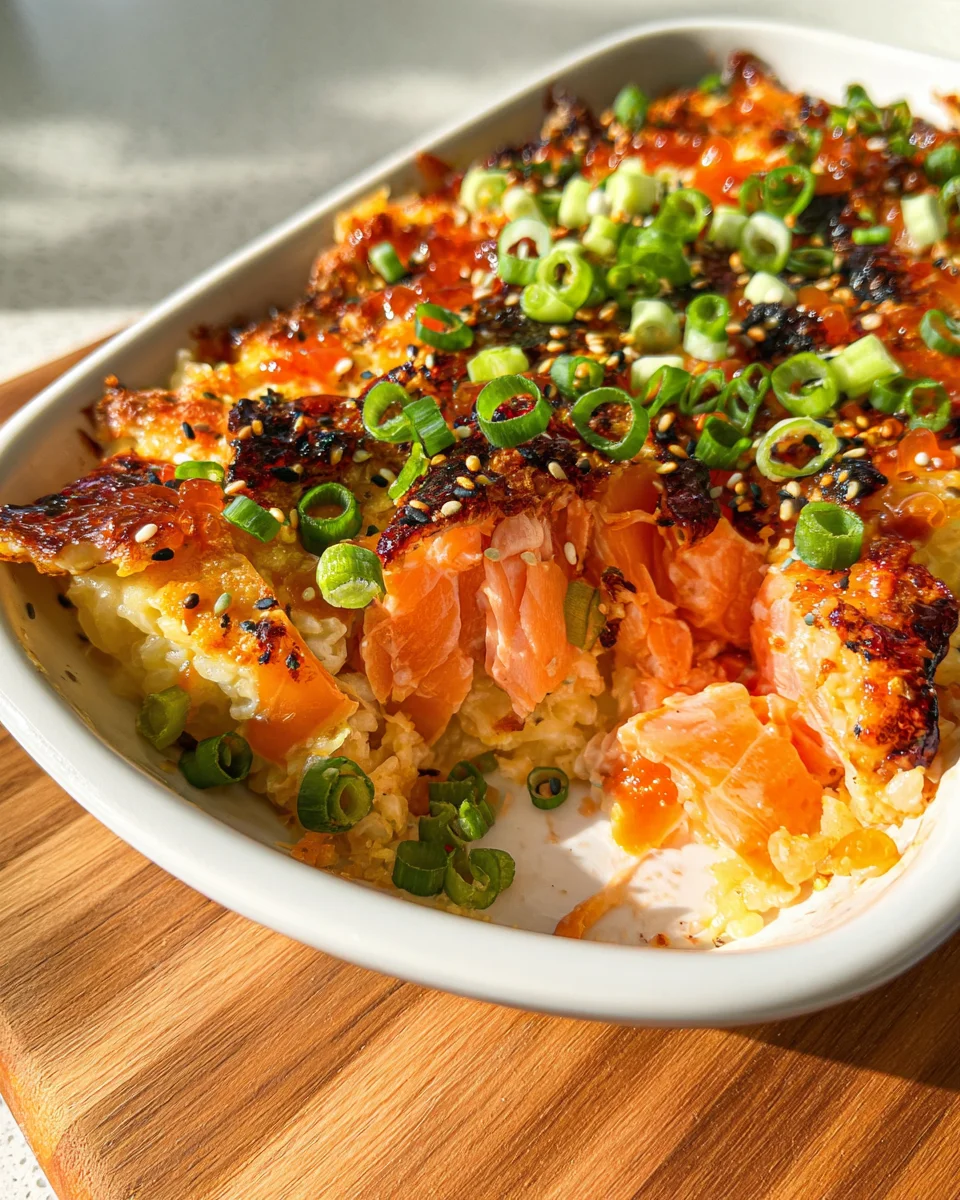
So, what exactly is this delightful dish? Imagine a base of perfectly seasoned sushi rice, topped with a luscious, creamy mixture of flaked salmon, mixed with a tangy, spicy, and irresistible sauce. This beautiful concoction is then baked until it’s golden brown and bubbly, creating warm, comforting layers of flavor. We finish it off with a sprinkle of crispy nori (seaweed), fresh green onions, and a drizzle of sriracha mayo, ready to be scooped onto individual seaweed sheets for the ultimate bite. Get ready, because your taste buds are in for an incredible journey!
Ingredient Notes
Hey there, fellow foodies! I’m so excited to share all the delicious details for making your very own Salmon Sushi Bake, a dish that has taken the internet by storm for good reason. It’s absolutely packed with flavor and so fun to eat. Let’s dive into the key ingredients you’ll need to make this viral sensation truly shine in your kitchen.
- Salmon: This is our star! I always recommend using fresh salmon fillets, about 1-1.5 pounds, skin on or off – your preference. If you’re using frozen, make sure to thaw it completely before cooking. You can bake, pan-fry, or even air-fry your salmon until it’s cooked through and flakes easily. Once cooked, let it cool slightly and then flake it into small pieces with a fork. If you’re looking for a quick shortcut, canned salmon (drained well) works wonderfully too!
- Sushi Rice: Don’t skip this! Short-grain sushi rice is essential for that signature sticky, slightly chewy texture that holds everything together. Cook it according to package directions, and then, while it’s still warm, season it with a mixture of rice vinegar, a pinch of sugar, and a touch of salt. This “sushi vinegar” is what gives the rice its characteristic tangy flavor and perfect stickiness.
- Japanese Mayonnaise (Kewpie Mayo): This is a non-negotiable for me! Kewpie mayo has a richer, creamier texture and a slightly sweeter, tangier flavor profile compared to regular mayonnaise, thanks to its use of only egg yolks. It truly elevates the creamy salmon mixture. If you absolutely can’t find it, regular full-fat mayonnaise can work in a pinch, but I highly encourage seeking out Kewpie.
- Sriracha: For that perfect kick! Adjust the amount to your personal spice preference. If you like it extra fiery, add more; if you prefer it milder, start with less. You can also use chili garlic sauce for a similar heat and flavor.
- Soy Sauce: A splash of low-sodium soy sauce adds that essential umami depth to the salmon mixture.
- Non-Alcohol Mirin Alternative: This sweet cooking seasoning is vital for traditional Japanese flavor. Look for “mirin-style condiment” or “aji-mirin” which are typically non-alcoholic. It adds a subtle sweetness and gloss to the salmon mixture. If you can’t find a non-alcohol mirin alternative, a little extra sugar dissolved in soy sauce can mimic some of its sweetness.
- Cream Cheese: While optional, a block of softened cream cheese really pushes this dish into ultra-creamy, decadent territory, which is why it’s so popular in the viral versions. It binds the salmon mixture beautifully.
- Nori (Seaweed Sheets): These are not only used within the bake but also for serving! Cut them into convenient squares or strips for wrapping your bites.
- Garnishes: Fresh avocado (sliced or diced), thinly sliced green onions, toasted sesame seeds, and furikake (Japanese rice seasoning) are my go-to toppings. They add texture, freshness, and another layer of flavor that makes each bite irresistible.
Step-by-Step Instructions
Alright, let’s get down to business and assemble this glorious Salmon Sushi Bake! It’s easier than you might think, and the payoff is absolutely worth it. Follow these steps for a perfect bake every time:
- Prepare the Salmon: First things first, cook your salmon. As I mentioned, you can bake, pan-fry, or air-fry it until it’s cooked through and flakes easily. For baking, preheat your oven to 400°F (200°C), lightly oil a baking sheet, season your salmon fillets with salt and pepper, and bake for 12-15 minutes, or until an internal temperature of 145°F (63°C) is reached. Once cooked, let it cool slightly, then gently flake the salmon into a large bowl using a fork.
- Make the Creamy Salmon Mixture: To the flaked salmon, add your softened cream cheese (if using), Japanese mayonnaise, Sriracha (start with a tablespoon or two and adjust to taste), soy sauce, and non-alcohol mirin alternative. Mix everything together thoroughly until the salmon is well coated and the mixture is creamy and cohesive. Give it a taste and adjust seasonings if needed – perhaps a little more Sriracha for heat or a dash more soy sauce for umami.
- Prepare the Sushi Rice: Cook your sushi rice according to package directions. While it’s still warm, transfer it to a large bowl. In a small separate bowl, whisk together your rice vinegar, a pinch of sugar, and a pinch of salt until dissolved. Pour this mixture over the warm rice and gently fold it in with a rice paddle or spoon. The goal is to evenly coat the grains without mashing them.
- Assemble the Bake: Now for the fun part – layering! Get an 8×8 or 9×13 inch baking dish (depending on how thick you want your layers and how much you’re making). Spread the seasoned sushi rice evenly across the bottom of the dish, pressing it down firmly with the back of a spoon or your hands. This creates a solid base.
- Add Nori and Salmon: If you like, you can lay a sheet or two of nori directly over the pressed rice layer for an extra layer of seaweed flavor and texture, though this is optional. Next, spoon the creamy salmon mixture evenly over the rice layer, spreading it right to the edges.
- Drizzle and Bake: For extra visual appeal and flavor, drizzle a little extra Japanese mayonnaise and Sriracha over the top of the salmon layer in a decorative pattern. Now, place your sushi bake in a preheated oven at 375°F (190°C) and bake for 15-20 minutes, or until the top is slightly golden and bubbly. You want it warmed through and the flavors melded.
- Garnish and Serve: Once out of the oven, let it cool for just a few minutes. Then, sprinkle generously with furikake, toasted sesame seeds, and fresh green onions. Arrange sliced avocado artfully over the top. Serve immediately, providing plenty of nori sheets (cut into snack-sized rectangles) for everyone to use as wraps. Scoop a portion of the warm sushi bake onto a nori sheet, add a slice of avocado, and enjoy!
Tips & Suggestions
Making a Salmon Sushi Bake is already a fantastic culinary adventure, but I’ve got a few extra tips and suggestions to help you make it even more incredible and truly your own. Think of these as my little secrets for taking your bake from great to absolutely unforgettable!
- Don’t Skimp on Rice Quality: Seriously, good quality short-grain sushi rice makes all the difference. It absorbs the seasoning beautifully and achieves that ideal sticky, yet individual grain texture. Long-grain rice won’t give you the right consistency, so stick with sushi rice for the best results. Also, make sure to season your rice while it’s still warm; this helps it absorb the sushi vinegar mixture more effectively.
- Customizing the Spice Level: The amount of Sriracha I suggest is a good starting point, but don’t be afraid to make it your own! If you love heat, go wild. If you’re serving little ones or those sensitive to spice, you can reduce the Sriracha in the salmon mixture and offer it on the side for individual drizzling. A touch of sweet chili sauce can also be a nice alternative if Sriracha isn’t your preferred heat.
- Flavor Boosters: For an extra layer of umami, try adding a tiny pinch of garlic powder or onion powder to your salmon mixture. A squeeze of fresh lime juice over the top just before serving can also add a bright, zesty contrast that cuts through the richness beautifully.
- Press That Rice Firmly: When you’re laying down your rice base, make sure to press it down really well. This creates a sturdy foundation for your bake, ensuring that each scoop holds together nicely and makes for easier serving. Use the back of a spoon or even a piece of plastic wrap over your hand to get a nice, compact layer.
- Serving Experience: The best part about this dish is wrapping it in nori! Make sure you have plenty of nori sheets on hand, cut into manageable rectangles. Arrange your garnishes like avocado, cucumber, and extra green onions in separate bowls so everyone can customize their wraps. It turns eating into an interactive and fun experience, much like building your own sushi roll.
- Veggie Add-ins: Want to sneak in some more veggies? Cooked corn kernels, diced cucumber (added after baking), or even finely diced bell peppers can be folded into the salmon mixture or sprinkled over the top before baking. Just make sure they’re cooked if they need to be, so they don’t release too much moisture.
- Alternative Protein Ideas: While this is a “Salmon Sushi Bake,” the creamy base mixture is incredibly versatile! If you’re looking for variations, try it with cooked imitation crab meat, cooked and shredded chicken, or even crumbled firm tofu for a vegetarian option. Just make sure the protein is cooked and flaked similar to the salmon.
Storage
Once you’ve indulged in your delicious Salmon Sushi Bake, you might have some leftovers (though I doubt it, this dish is usually devoured quickly!). Proper storage is key to enjoying it safely and keeping it as tasty as possible for future meals. Here’s what I recommend:
- Refrigeration: Any leftover Salmon Sushi Bake should be transferred to an airtight container immediately after cooling down to room temperature. Do not leave it out on the counter for more than two hours. Once sealed, place it in the refrigerator.
- Shelf Life: Stored correctly in the fridge, your sushi bake will typically last for up to 2-3 days. While it might still be safe beyond that, the texture of the rice can become firmer and the salmon mixture might lose some of its freshness, so I recommend enjoying it within this timeframe.
- Reheating:
- Oven Method (Recommended): For the best results, I highly recommend reheating your sushi bake in the oven. Preheat your oven to 300°F (150°C). Place the desired portion in an oven-safe dish, cover it loosely with foil to prevent drying out, and bake for about 15-20 minutes, or until warmed through. This method helps the rice stay soft and prevents the salmon mixture from becoming rubbery.
- Microwave Method: If you’re in a hurry, the microwave works too! Place a portion on a microwave-safe plate, cover it with a microwave-safe lid or a damp paper towel, and heat in 30-second intervals until it’s heated through. Be aware that the microwave can sometimes make the rice a bit tougher and the salmon mixture can become slightly drier, but it’s a convenient option.
- Texture Considerations: Keep in mind that the texture of the sushi bake will change slightly upon refrigeration and reheating. The rice might become a bit firmer, and the salmon mixture won’t be quite as creamy as when it was freshly baked. However, the flavors will still be absolutely delicious! The nori for wrapping is best added fresh when serving, as stored nori can become soft and chewy.
- Freezing: I generally do not recommend freezing the Salmon Sushi Bake. The creamy texture of the salmon mixture, especially with mayonnaise and cream cheese, can separate upon thawing, and the rice can become mushy. It’s truly best enjoyed fresh or from the fridge within a few days.
There you have it! With these tips, you’re all set to make and enjoy your very own viral Salmon Sushi Bake. Happy cooking!
Final Thoughts
Well, there you have it! My take on the incredibly popular Salmon Sushi Bake Viral Recipe. I truly believe this dish is a game-changer for anyone craving the irresistible flavors of sushi without the traditional rolling fuss. It’s so unbelievably easy to assemble, yet the results are gourmet-level delicious and incredibly satisfying.
What makes the Salmon Sushi Bake Viral Recipe a total must-try, you ask? It’s the perfect harmony of creamy, savory baked salmon, perfectly seasoned rice, and that delightful umami crunch from the nori. It’s not just a meal; it’s an experience, bringing that beloved sushi taste right into your kitchen with minimal effort and maximum impact. Plus, it’s an absolute showstopper and a fantastic crowd-pleaser, perfect for potlucks, family dinners, or simply a delightful treat for yourself.
So, go ahead and give this Salmon Sushi Bake Viral Recipe a whirl. I promise you’ll be joining the legions of fans who have fallen in love with its irresistible charm and ease. Happy baking, and enjoy every amazing bite!


Leave a Comment