
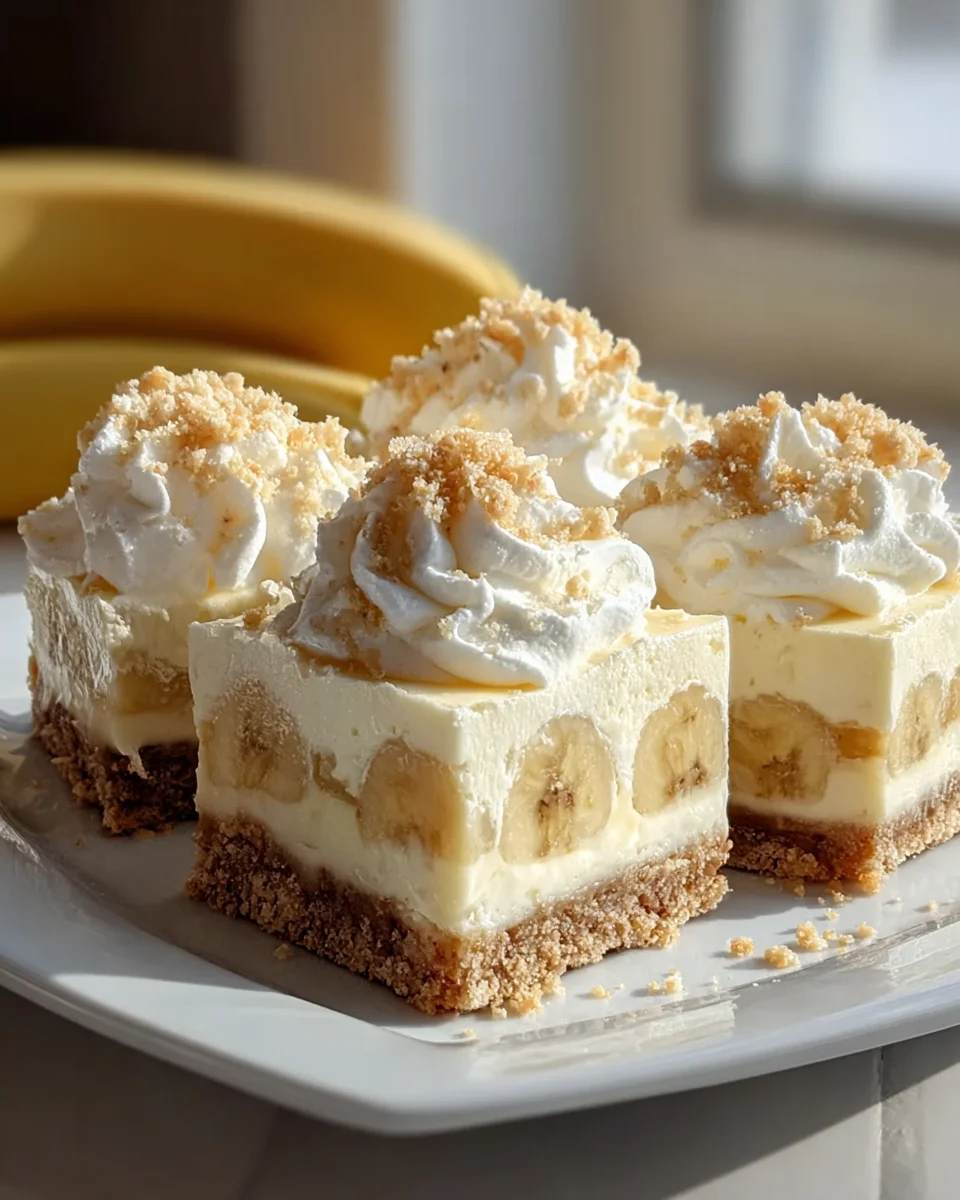
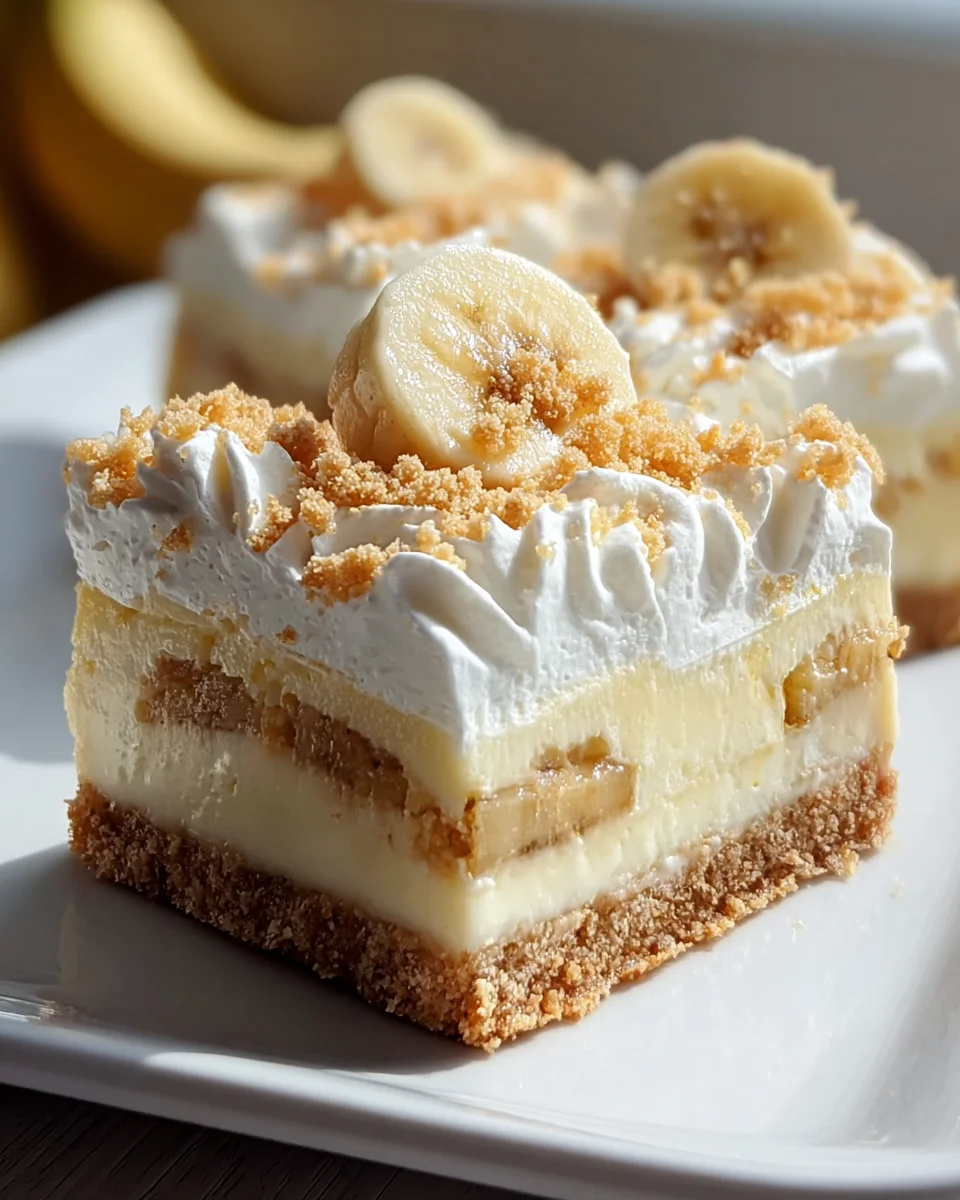
Banana Pudding Cheesecake Squares Oh my goodness, do I have a treat for you today! I’ve been dreaming up a dessert that combines two of my absolute favorite things: classic, comforting banana pudding and rich, creamy cheesecake. And guess what? I’ve finally perfected it into these incredible Banana Pudding Cheesecake Squares! This isn’t just a dessert; it’s a nostalgic trip with a gourmet twist.
You are going to absolutely adore these squares because they bring together the best of both worlds. Imagine a buttery Nilla wafer crust, topped with a luscious, tangy cheesecake layer, and then crowned with a dreamy, homemade banana pudding full of fresh banana slices. We finish it all off with a swirl of whipped topping and a sprinkle of those irresistible Nilla wafer crumbs. Every bite is a symphony of textures and flavors – creamy, smooth, sweet, with just the right amount of crunch. They’re perfect for impressing guests at your next potluck, delightful for a family gathering, or simply a divine indulgence when you need something truly special. Get ready to fall in love with your new favorite dessert!
Ingredient Notes
Oh, you’re in for such a treat with these Banana Pudding Cheesecake Squares! The magic truly happens when classic banana pudding meets creamy cheesecake, all nestled on a delightful crust. Let me walk you through the key players you’ll need to make this dessert an absolute showstopper.
For the Graham Cracker Crust:
- Graham Cracker Crumbs: These form the perfect base. I find pre-crushed crumbs super convenient, but you can always crush whole crackers yourself in a food processor. About 1 ½ cups is usually right for a 9×13 inch pan.
- Melted Unsalted Butter: This binds everything together. I always opt for unsalted so I can control the salt content in the entire recipe. If you only have salted, just omit any additional salt elsewhere.
- Granulated Sugar: A touch of sweetness really elevates the crust.
- A Pinch of Cinnamon (Optional): I love adding just a little bit of cinnamon; it complements the banana and vanilla beautifully, adding a warm undertone.
For the Cheesecake Layer:
- Full-Fat Cream Cheese: This is non-negotiable for that rich, velvety texture. Make sure it’s completely softened to room temperature – this is critical for a smooth, lump-free batter. Trust me, cold cream cheese will give you a lumpy mess, and nobody wants that!
- Granulated Sugar: To sweeten our creamy cheesecake base.
- Large Eggs: These are the binders for our cheesecake. Again, room temperature is best for emulsifying evenly into the batter. I always add them one at a time, mixing just until combined to avoid overmixing, which can lead to cracks.
- Sour Cream or Heavy Cream: I love adding either of these for an extra layer of richness and to ensure the cheesecake is incredibly moist and tender. It also helps prevent cracking.
- Pure Vanilla Extract: Use the good stuff! Vanilla is a key flavor that enhances both the cheesecake and the banana pudding layers.
For the Banana Pudding Layer:
- Instant Vanilla Pudding Mix: While banana pudding mix is an obvious choice, I often use instant vanilla pudding mix because it provides a fantastic base, allowing the fresh banana flavor to shine through without being artificial. Make sure it’s instant, not cook-and-serve, for quick setting.
- Whole Milk: For the creamiest pudding! Using whole milk makes a significant difference in the richness and texture compared to lower-fat options. You might even use slightly less than the package recommends for a thicker pudding, perfect for layering.
- Fresh Ripe Bananas: The star of the show! Choose bananas that are ripe (yellow with a few brown spots) but still firm enough to slice easily without turning mushy. You’ll need enough for layering within the pudding and for a fresh garnish.
For the Topping and Garnish:
- Whipped Cream or Cool Whip: For a light, airy topping. You can make your own sweetened whipped cream (heavy cream + a little powdered sugar + vanilla) or use a store-bought whipped topping for convenience.
- Nilla Wafers: These are iconic with banana pudding and truly a must-have! You’ll want some whole for garnish and perhaps a few crushed for a textural sprinkle.
- Extra Banana Slices: For that final flourish. Be sure to prepare them right before serving to prevent browning. A quick dip in lemon juice or pineapple juice can help if you’re prepping a little ahead.
That’s our ingredient lineup! Gather everything, and let’s get baking!
Step-by-Step Instructions
Alright, let’s get to the fun part: making these incredible Banana Pudding Cheesecake Squares! Follow these steps, and you’ll be enjoying a slice of heaven in no time.
Step 1: Prepare Your Pan and Preheat Oven
- First things first, preheat your oven to 325°F (160°C).
- Line a 9×13 inch baking pan with parchment paper, leaving an overhang on the sides. This will make it super easy to lift the entire cheesecake out of the pan once it’s chilled and set. I also lightly grease the pan before placing the parchment for good measure.
Step 2: Make the Graham Cracker Crust
- In a medium bowl, combine the graham cracker crumbs, granulated sugar, and optional cinnamon.
- Pour in the melted butter and mix until all the crumbs are moistened and resemble wet sand.
- Press this mixture evenly into the bottom of your prepared pan. Use the bottom of a flat glass or a measuring cup to get a really firm, even crust.
- Bake the crust for 8-10 minutes, just until lightly golden and fragrant. This par-baking helps it set and prevents it from getting soggy.
- Remove from the oven and set aside to cool slightly while you prepare the cheesecake batter. Keep the oven on!
Step 3: Prepare the Cheesecake Batter
- In a large mixing bowl, using an electric mixer (stand or hand-held), beat the softened cream cheese on medium speed until completely smooth and creamy, about 2-3 minutes. Make sure there are no lumps!
- Gradually add the granulated sugar, beating until well combined and fluffy, scraping down the sides of the bowl as needed.
- Beat in the sour cream (or heavy cream) and vanilla extract until just combined.
- Add the eggs, one at a time, beating on low speed only until each egg is just incorporated. Overmixing after adding the eggs can incorporate too much air, which can lead to cracks in your cheesecake. So, mix gently!
Step 4: Bake the Cheesecake Layer
- Pour the smooth cheesecake batter over the cooled, par-baked graham cracker crust in your pan.
- Gently tap the pan a few times on the counter to release any large air bubbles.
- Bake for 45-55 minutes, or until the edges are set and lightly golden, but the center still has a slight “jiggle” when you gently shake the pan. It will firm up completely as it cools.
- Turn off the oven, crack the door open slightly, and let the cheesecake cool inside the oven for about an hour. This slow cooling helps prevent cracks.
- Remove the cheesecake from the oven and let it cool completely on a wire rack at room temperature. This can take 1-2 hours.
- Once completely cool, cover the pan loosely with plastic wrap and refrigerate for at least 4 hours, or preferably overnight, until thoroughly chilled and firm. This is crucial for slicing!
Step 5: Prepare the Banana Pudding Layer
- Once your cheesecake is fully chilled, it’s time for the banana pudding layer!
- In a medium bowl, whisk together the instant vanilla pudding mix and the cold whole milk. Whisk vigorously for 2-3 minutes until the mixture starts to thicken. Don’t worry if it’s not super thick right away; it will continue to set as it chills.
- Let the pudding sit for 5 minutes to thicken further.
Step 6: Assemble the Layers
- Take your chilled cheesecake out of the fridge.
- Spread about half of the prepared pudding evenly over the top of the cheesecake layer.
- Arrange a single layer of freshly sliced bananas over the pudding.
- Carefully spread the remaining pudding over the bananas, ensuring they are mostly covered.
- You can gently press a few Nilla wafers into the top pudding layer now if you like a softer wafer, or save them for garnish.
- Cover the pan loosely with plastic wrap and return it to the refrigerator for at least another 2 hours to allow the pudding to fully set.
Step 7: Garnish and Serve
- When you’re ready to serve, lift the entire cheesecake out of the pan using the parchment paper overhangs.
- Carefully peel back the parchment paper.
- Top the chilled banana pudding cheesecake with a generous layer of whipped cream or Cool Whip.
- Arrange whole Nilla wafers, crushed Nilla wafers, and fresh banana slices (tossed in lemon juice to prevent browning) over the whipped cream for a beautiful presentation.
- Using a sharp knife, run under hot water and wiped clean between each cut, slice the cheesecake into squares.
- Serve immediately and enjoy the applause!
Tips & Suggestions
Making Banana Pudding Cheesecake Squares is incredibly rewarding, and with a few insider tips, you can ensure yours turn out absolutely perfect every single time. Here are my go-to suggestions:
- Room Temperature Ingredients are Key: This is probably the most important tip for any cheesecake! Ensure your cream cheese and eggs are at room temperature. Cold ingredients don’t emulsify properly, leading to a lumpy batter and a less smooth cheesecake texture. Plan ahead and take them out of the fridge at least an hour before you start mixing.
- Don’t Overmix the Cheesecake Batter: Once you add the eggs, mix only until they are just incorporated. Overmixing introduces too much air, which can cause the cheesecake to puff up in the oven and then sink and crack as it cools. Gentle mixing is best.
- The Gentle Bake and Cool: Cheesecake loves a gentle baking environment. A slightly lower oven temperature (like 325°F/160°C) helps prevent cracks. More importantly, don’t shock your cheesecake by taking it straight from a hot oven to a cold counter. Let it cool slowly in the oven with the door ajar, then on a wire rack, and finally in the fridge. This gradual cooling is your best defense against cracking.
- Choose Your Bananas Wisely: For the slices layered within the pudding, use ripe but still firm bananas. They should have a few brown spots, indicating sweetness, but not be overly soft or mushy, as they need to hold their shape. For the garnish, use slightly less ripe, perfectly yellow bananas.
- Prevent Banana Browning: Bananas, unfortunately, brown quickly when exposed to air. For your garnish bananas, a quick dip or brush with a little lemon juice or pineapple juice will slow down the oxidation process. Do this right before serving, not hours in advance. For the bananas layered inside, they’re mostly protected by the pudding, but still best to assemble shortly before the final chill.
- Thicker Pudding for Layering: If you want a really firm pudding layer that won’t squish out when you slice, consider using slightly less milk than the pudding package instructions recommend (e.g., 2 ½ cups milk instead of 3 cups). This results in a sturdier pudding perfect for this layered dessert.
- Chill, Chill, Chill!: Seriously, don’t rush the chilling process. Both the cheesecake and the pudding layers need ample time in the refrigerator to set up properly. An overnight chill is always ideal for the cheesecake, and at least 2 hours for the pudding layer. This ensures clean, beautiful slices.
- For Clean Slices: When cutting your squares, use a sharp, thin-bladed knife. For extra clean cuts, run the knife under hot water for a few seconds, wipe it dry, and then make each cut. Repeat this process for every slice. It makes a huge difference!
- Customizing Your Crust: While graham crackers are classic, feel free to experiment! Vanilla wafers (Nilla Wafers) crushed up make an excellent crust for this recipe too, doubling down on that banana pudding flavor. Or, for a different twist, try shortbread cookies.
- Presentation Matters: When garnishing, don’t be shy! A generous swirl of whipped cream, a mix of whole and crushed Nilla wafers, and a few perfectly sliced bananas create a visually stunning dessert that’s just as appealing to the eyes as it is to the taste buds.
Following these tips will help you create a show-stopping Banana Pudding Cheesecake Square that will impress everyone!
Storage
Once you’ve gone to all the effort of making these delicious Banana Pudding Cheesecake Squares, you’ll want to make sure they stay fresh and delicious for as long as possible. Proper storage is key, especially with fresh bananas and dairy involved.
- Refrigeration is a Must: Due to the cream cheese, milk, and fresh bananas, these squares are highly perishable and absolutely must be stored in the refrigerator. Do not leave them at room temperature for more than an hour or two.
- Airtight Container: To prevent your cheesecake squares from drying out, absorbing odors from other foods in your fridge, or developing a film on the surface, store them in an airtight container. If you have a large container that fits the entire pan, that’s ideal. Otherwise, transfer individual squares to smaller airtight containers.
- Best Enjoyed Fresh: While the cheesecake portion holds up well, the fresh bananas on top and within the pudding layer are the most time-sensitive component. They will start to soften and brown over time. For the best quality and presentation, I recommend enjoying these squares within 2-3 days of assembly.
- Garnish Just Before Serving: If you plan to make these ahead of time, hold off on adding the fresh banana slices and whipped cream garnish until just before you’re ready to serve. The bananas will look their best, and the whipped cream will be perfectly fluffy.
- Freezing (with caution): While you can technically freeze cheesecake, I generally don’t recommend freezing these specific Banana Pudding Cheesecake Squares due to the fresh banana and pudding layers. The texture of the bananas can become mushy and watery upon thawing, and the pudding might separate. However, if you wanted to freeze just the baked cheesecake layer (before adding the pudding and bananas), you could wrap it tightly in plastic wrap and then foil, and freeze for up to a month. Thaw in the refrigerator overnight before adding the remaining layers. But for the full dessert, stick to refrigeration.
Enjoy your delightful Banana Pudding Cheesecake Squares while they’re at their peak freshness!
Final Thoughts
And there you have it! I truly hope you embark on the delightful journey of making these Banana Pudding Cheesecake Squares. For me, this recipe is more than just a dessert; it’s a celebration of beloved flavors coming together in a surprisingly harmonious way. The irresistible combination of a buttery vanilla wafer crust, the creamy richness of cheesecake, and the familiar, comforting sweetness of banana pudding creates an absolutely unforgettable treat.
Each square offers a perfect balance of textures and tastes, from the satisfying crunch of the base to the silky-smooth filling, all infused with that distinct banana goodness. Whether you’re looking to impress guests, bring a showstopper to a potluck, or simply treat yourself to something extraordinary, these Banana Pudding Cheesecake Squares are an absolute must-try. I promise, one bite and you’ll understand why I’m so enthusiastic about this unique and utterly delicious creation!
Leave a Comment