
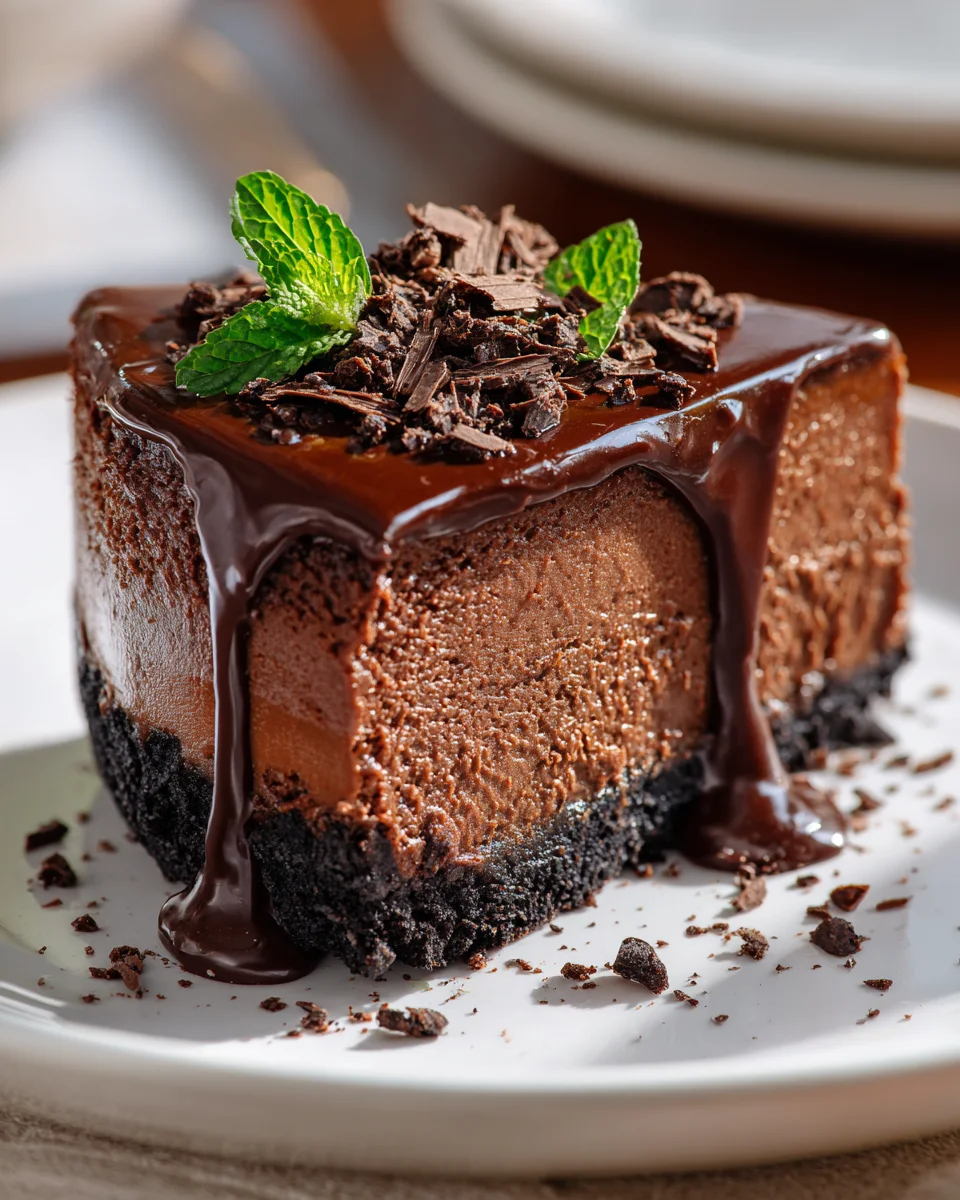
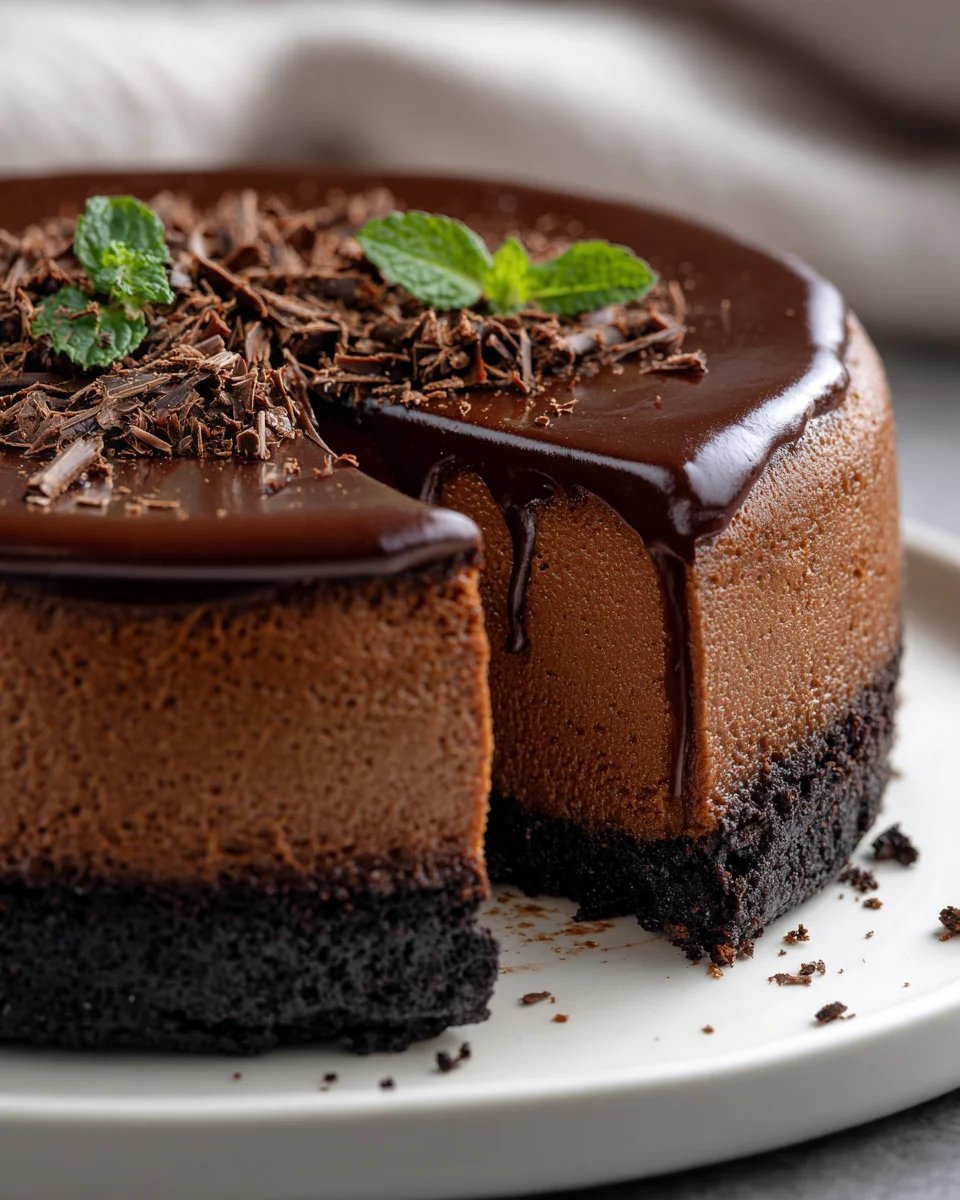
Classic Chocolate Cheesecake With Oreo Crust
Oh my goodness, get ready to experience dessert heaven! I’m so excited to share my recipe for Classic Chocolate Cheesecake With Oreo Crust with you. This isn’t just any cheesecake; it’s a celebration of all things rich, creamy, and wonderfully chocolatey, perfectly balanced with that irresistible crunch of an Oreo cookie crust. What makes this recipe truly special, you ask? It’s the ultimate marriage of two beloved classics: a decadent, velvety smooth chocolate cheesecake filling that melts in your mouth, paired with a sturdy, sweet, and slightly salty crust made from everyone’s favorite sandwich cookie. You’re going to absolutely adore how this cheesecake transforms any ordinary moment into an extraordinary one. Imagine slicing into that dark, rich chocolate, hearing the slight crunch of the Oreo base, and taking that first blissful bite. It’s the kind of dessert that gets rave reviews, makes you feel like a master baker, and most importantly, satisfies every single chocolate craving you might have. We’ll be creating a luxurious, dense chocolate cheesecake baked to perfection, then chilled until it’s wonderfully firm and ready to be devoured, all resting on a buttery foundation of crushed Oreos.
Ingredient Notes
Creating a truly classic Chocolate Cheesecake with an Oreo crust starts with understanding the role each ingredient plays. I’ve found that using high-quality components makes all the difference in achieving that rich, creamy texture and intense chocolate flavor we all crave.
- Oreo Cookies: For the crust, I always recommend using full-fat, original Oreos. Don’t skimp on these! The creme filling contributes to the binding of the crust, making it sturdy yet crumbly. You’ll need to crush them finely; a food processor is your best friend here.
- Unsalted Butter: Melted butter is what binds our Oreo crumbs together. Using unsalted butter allows you to control the overall saltiness of the dish. If you only have salted butter, you can use it, but perhaps reduce any added salt in the filling if your recipe calls for it.
- Full-Fat Cream Cheese: This is the backbone of your cheesecake. Absolutely critical! I insist on using full-fat, brick-style cream cheese, not the spreadable kind from a tub. It must be at room temperature – this is non-negotiable for a smooth, lump-free batter. Cold cream cheese will result in a lumpy filling and overmixing, which can lead to cracks.
- Granulated Sugar: Sweetness, of course! It also helps with the cheesecake’s structure and creamy consistency.
- Unsweetened Cocoa Powder: For that deep, intense chocolate flavor in the filling. Dutch-processed cocoa powder often yields a darker color and milder chocolate flavor, which I personally love for a “classic” chocolate cheesecake.
- High-Quality Chocolate: I typically use bittersweet or semi-sweet chocolate (around 60-70% cacao) for melting into the filling. A good quality chocolate will elevate the flavor significantly. Avoid chocolate chips if possible, as they contain stabilizers that prevent them from melting as smoothly. Opt for baking bars or discs.
- Large Eggs: Eggs provide structure and richness to the cheesecake. Just like the cream cheese, they should be at room temperature. Adding them one at a time and mixing just until combined prevents incorporating too much air, which can cause cracks during baking.
- Sour Cream or Heavy Cream: A touch of sour cream or heavy cream adds a delightful tang, extra moisture, and an even creamier texture. Full-fat options are always preferred for the best results. If you don’t have sour cream, plain full-fat Greek yogurt can be a good substitute in a pinch.
- Non-Alcohol Vanilla Extract: Enhances all the other flavors without adding an alcoholic note. I prefer using a good quality non-alcohol vanilla extract for the best aromatic finish.
- Pinch of Salt: A tiny bit of salt balances the sweetness and brings out the chocolate flavor.
Substitutions:
- For the Crust: While I highly recommend original Oreos, you could experiment with other chocolate sandwich cookies. However, the fat content of the filling might differ, so you might need to adjust the amount of melted butter slightly.
- For the Chocolate: If you prefer a less intense chocolate flavor, you can use milk chocolate, but be aware it will make the cheesecake sweeter and potentially less “classic” in its richness. Adjust sugar slightly if using sweeter chocolate.
- For Sour Cream: As mentioned, full-fat plain Greek yogurt can work, but it might alter the tanginess slightly.
Step-by-Step Instructions
Baking a Classic Chocolate Cheesecake with an Oreo Crust might seem daunting, but by following these steps carefully, you’ll achieve a show-stopping dessert that’s perfectly creamy and utterly delicious. Take your time, and enjoy the process!
- Prepare the Oreo Crust:
- Preheat your oven to 325°F (160°C).
- In a food processor, pulse your whole Oreo cookies (no need to remove the filling) until you have fine crumbs.
- Transfer the crumbs to a medium bowl and mix thoroughly with the melted unsalted butter.
- Press the mixture firmly and evenly into the bottom of a 9-inch springform pan. I like to use the bottom of a flat glass or measuring cup to get a really compact crust.
- Bake the crust for 8-10 minutes, then remove from the oven and let it cool completely while you prepare the filling. This pre-baking helps set the crust and prevents it from becoming soggy.
- Prepare the Chocolate Cheesecake Filling:
- Melt the high-quality chocolate (bittersweet or semi-sweet) in a microwave-safe bowl in 30-second intervals, stirring in between, or over a double boiler, until smooth. Let it cool slightly but remain liquid.
- In a large mixing bowl, using an electric mixer on medium speed, beat the room-temperature full-fat cream cheese until it’s completely smooth and creamy, about 2-3 minutes. Scrape down the sides of the bowl often.
- Gradually add the granulated sugar and cocoa powder to the cream cheese, continuing to beat on low speed until just combined and smooth. Be careful not to overmix.
- Pour in the slightly cooled melted chocolate and mix on low speed until fully incorporated.
- Add the non-alcohol vanilla extract, sour cream (or Greek yogurt), and a pinch of salt. Mix on low speed until just combined and smooth.
- Finally, add the room-temperature large eggs, one at a time, mixing on very low speed just until each egg is incorporated. Stop mixing as soon as the last egg is blended in. Overmixing at this stage can incorporate too much air, leading to cracks in your baked cheesecake.
- Prepare for Baking (Water Bath):
- Tightly wrap the outside of your springform pan with several layers of heavy-duty aluminum foil. This is crucial for preventing water from seeping into the crust when using a water bath.
- Pour the cheesecake filling over the cooled Oreo crust in the prepared springform pan.
- Place the foil-wrapped springform pan into a larger roasting pan.
- Carefully pour hot water into the roasting pan, making sure it comes about halfway up the sides of the springform pan. This water bath creates a moist, even baking environment, which is key to preventing cracks and achieving that super creamy texture.
- Bake the Cheesecake:
- Carefully transfer the roasting pan with the cheesecake to your preheated 325°F (160°C) oven.
- Bake for 60-75 minutes, or until the edges are set, but the center 2-3 inches still have a slight jiggle when gently shaken. Resist the urge to open the oven door frequently.
- Cool and Chill:
- Once baked, turn off the oven but leave the cheesecake inside with the oven door propped open slightly (I use a wooden spoon). Let it cool in the cooling oven for 1 hour. This gradual cooling process further helps prevent cracks.
- Carefully remove the springform pan from the water bath and the roasting pan. Remove the foil.
- Let the cheesecake cool completely on a wire rack at room temperature for another 1-2 hours.
- Once fully cooled, cover the cheesecake loosely with plastic wrap and refrigerate for at least 6 hours, but ideally overnight. Chilling is essential for the cheesecake to fully set and for the flavors to meld.
- Serve and Garnish (Optional):
- Once chilled, run a thin knife around the edge of the pan before releasing the springform sides.
- Serve plain, or with a dusting of cocoa powder, chocolate shavings, a dollop of whipped cream, or a simple chocolate ganache.
Tips & Suggestions
Achieving cheesecake perfection, especially with a rich chocolate and Oreo base, involves a few key techniques. These tips are what I’ve learned through trial and error, and they’ll help you get that beautifully smooth, crack-free, and incredibly delicious dessert every time.
- Room Temperature Ingredients are Paramount: I cannot stress this enough! Cream cheese and eggs that are at room temperature will combine smoothly, without lumps, and without needing to overmix. Cold ingredients require more mixing, which incorporates too much air, leading to a puffy cheesecake that often cracks as it cools. Plan ahead and take them out of the fridge at least 1-2 hours before you start baking.
- Do Not Overmix the Batter: This is the golden rule for cheesecake. Beat the cream cheese until smooth first, then add sugar and cocoa. When you add the eggs, mix just until they are incorporated. Overmixing introduces excess air, which expands during baking and then collapses during cooling, causing those dreaded cracks. A slow, gentle hand is best, especially after the eggs go in.
- The Water Bath is Your Best Friend: While some cheesecake recipes skip this, for a truly classic and creamy texture, a water bath is invaluable. It provides a moist, humid environment that ensures the cheesecake bakes slowly and evenly, preventing it from drying out and cracking. It also helps achieve that signature silky-smooth custard-like consistency. Make sure your springform pan is wrapped very securely with heavy-duty foil to prevent any leaks!
- Cooling Gradually Prevents Cracks: The sudden change in temperature is a major culprit for cheesecake cracks. After baking, resist the urge to pull the cheesecake out of the oven immediately. Turn off the oven, prop the door open slightly, and let it cool inside for an hour. This slow transition from hot to warm helps the cheesecake settle gently.
- Chill for Success: A fully chilled cheesecake is a happy cheesecake. Allowing it to chill for at least 6 hours, or preferably overnight, allows it to firm up completely, enhances the flavors, and makes for clean, beautiful slices. Patience is key here!
- Quality Chocolate Matters: Since chocolate is a star in this recipe, use the best quality bittersweet or semi-sweet chocolate you can find. It truly impacts the depth and richness of the final flavor.
- Avoid Opening the Oven Door: Every time you open the oven door during baking, you let out heat and humidity, which can disrupt the baking process and contribute to uneven baking and cracks. Peek through the oven window if you must, but try to keep it closed.
- Doneness Test: The cheesecake is done when the outer 2-3 inches appear set, but the very center still has a slight wobble or jiggle, like gelatin. It will continue to set as it cools.
- Run a Knife Around the Edge: Before removing the springform collar, run a thin, sharp knife gently around the perimeter of the cheesecake. This helps prevent the edges from sticking and tearing as you release the pan.
Storage
You’ve put in the effort to bake a beautiful Classic Chocolate Cheesecake with an Oreo Crust, so let’s make sure you store it properly to keep it fresh and delicious for as long as possible. Good storage means you can enjoy that creamy goodness for days!
- Refrigeration:
- After your cheesecake has fully cooled and chilled overnight, it should always be stored in the refrigerator.
- If the cheesecake is whole, cover it loosely but completely with plastic wrap or aluminum foil. You want to prevent it from absorbing any odors from other foods in your fridge and to keep it from drying out.
- If you’ve already cut into it, cover the exposed slices with plastic wrap directly against the cut surface, then cover the entire cheesecake. This helps maintain moisture.
- Properly stored, your Classic Chocolate Cheesecake with Oreo Crust will last for 5-7 days in the refrigerator.
- Freezing (Whole Cheesecake):
- Cheesecake freezes remarkably well! This is a great option if you’ve made it in advance or have leftovers you want to save.
- First, ensure the cheesecake is completely chilled and firm.
- Remove the cheesecake from the springform pan and place it on a cardboard cake round or a flat plate.
- Wrap the entire cheesecake tightly in at least two layers of plastic wrap, making sure there are no air gaps.
- Then, wrap it again in a layer of aluminum foil. This double layer of protection prevents freezer burn and keeps out freezer odors.
- Place the wrapped cheesecake in the freezer. It can be stored for up to 1-2 months.
- Freezing (Individual Slices):
- If you prefer to freeze individual portions for easy access, cut the chilled cheesecake into slices.
- Place the slices on a baking sheet lined with parchment paper and freeze for about 1-2 hours until firm.
- Once frozen solid, wrap each slice individually in plastic wrap, then again in aluminum foil.
- Store the wrapped slices in an airtight freezer-safe container or a freezer bag. This method is great for portion control and quick thawing.
- Individual slices can also be frozen for up to 1-2 months.
- Thawing Frozen Cheesecake:
- To thaw a whole frozen cheesecake, transfer it (still wrapped) from the freezer to the refrigerator and let it thaw slowly overnight, or for about 12-24 hours.
- For individual slices, you can thaw them in the refrigerator for a few hours, or on the counter at room temperature for about 30-60 minutes for a quicker treat.
- Avoid thawing at room temperature for too long, as this can affect the texture and potentially encourage bacterial growth.
- Once thawed, consume within a few days and do not refreeze.
Final Thoughts
And there you have it! I hope you’re as excited as I am about this incredible dessert. The Classic Chocolate Cheesecake With Oreo Crust truly is a masterpiece. That rich, velvety chocolate cheesecake filling, perfectly balanced in sweetness and intensity, meets the irresistible crunch and distinct flavor of the Oreo crust. It’s a match made in dessert heaven, offering a delightful contrast in textures and a symphony of flavors in every bite. This isn’t just any cheesecake; it’s a guaranteed crowd-pleaser, a showstopper for any occasion, or simply the perfect indulgence for yourself. Trust me, once you experience the magic of this Classic Chocolate Cheesecake With Oreo Crust, you’ll understand why it’s destined to become a staple in your recipe collection. Go on, give it a try – you deserve this deliciousness!
Leave a Comment