
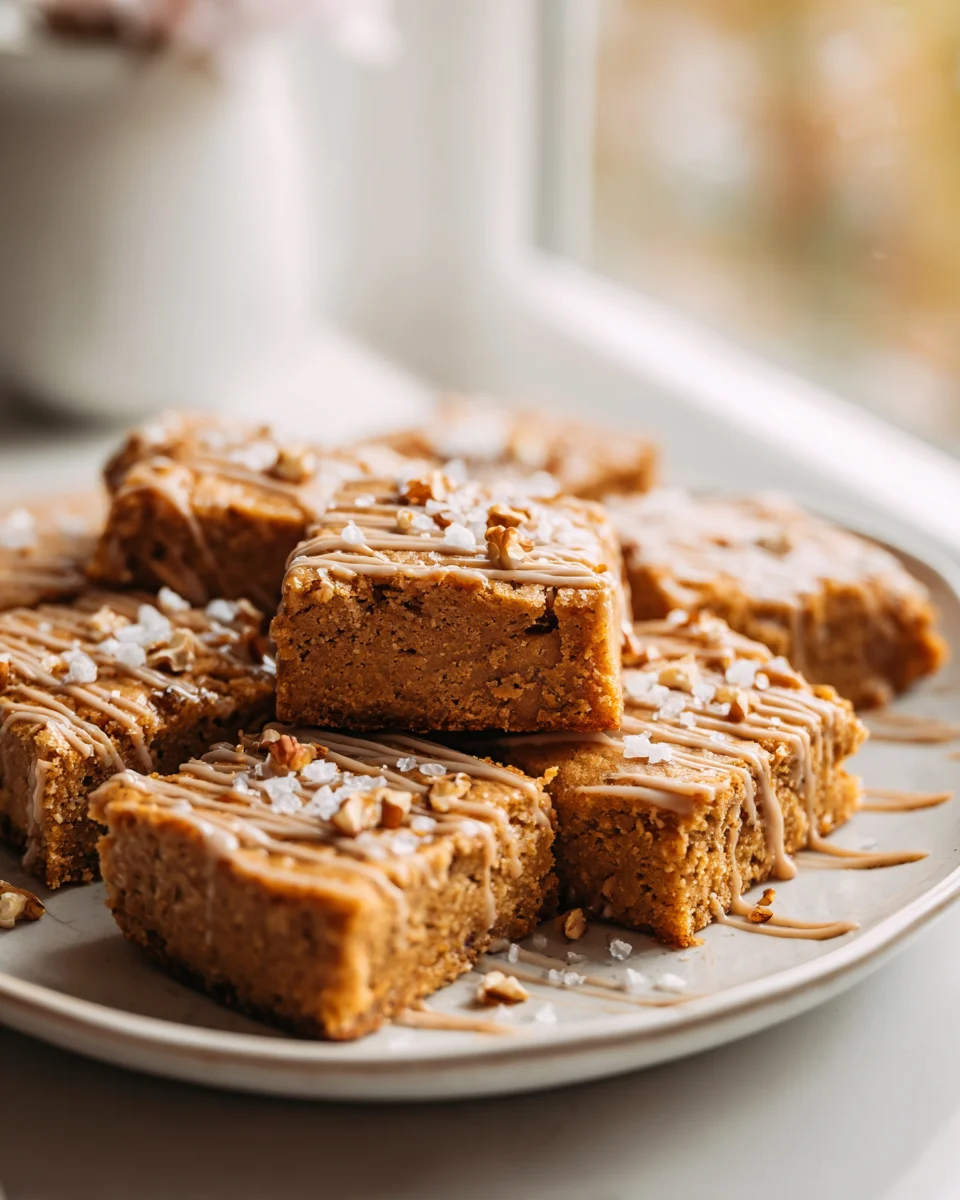
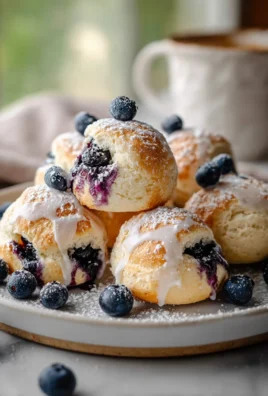
Chewy Brown Butter Coffee Cookie Bars With Glaze
Oh, my goodness, have I got a treat for you! We’re talking about my absolute favorite, Chewy Brown Butter Coffee Cookie Bars With Glaze. Trust me when I say this isn’t just another cookie bar recipe; it’s an experience. What makes these bars so incredibly special, you ask? Well, it all starts with the magical alchemy of brown butter. That nutty, caramelized aroma that fills your kitchen as it simmers? Pure heaven, and it infuses every single crumb of these bars with a depth of flavor you just can’t get any other way. Then, we layer in the rich, invigorating essence of coffee, perfectly complementing that browned butter goodness and giving these bars a sophisticated edge, while the chewy texture ensures every bite is pure bliss.
You are absolutely going to adore these for so many reasons. If you’re a coffee enthusiast, this is your new go-to dessert. The chewy texture is utterly irresistible, providing that satisfying bite that makes you reach for “just one more.” Plus, they’re bars! That means less scooping, more baking, and a wonderfully easy way to feed a crowd or simply have delicious treats ready for your afternoon pick-me-up. Imagine a perfectly chewy, buttery cookie base, rich with the subtle nuttiness of browned butter and a delightful coffee kick, all baked into a convenient slice and then crowned with a sweet, complementary glaze. It’s comforting, it’s sophisticated, and it’s unbelievably delicious. Get ready to fall in love!
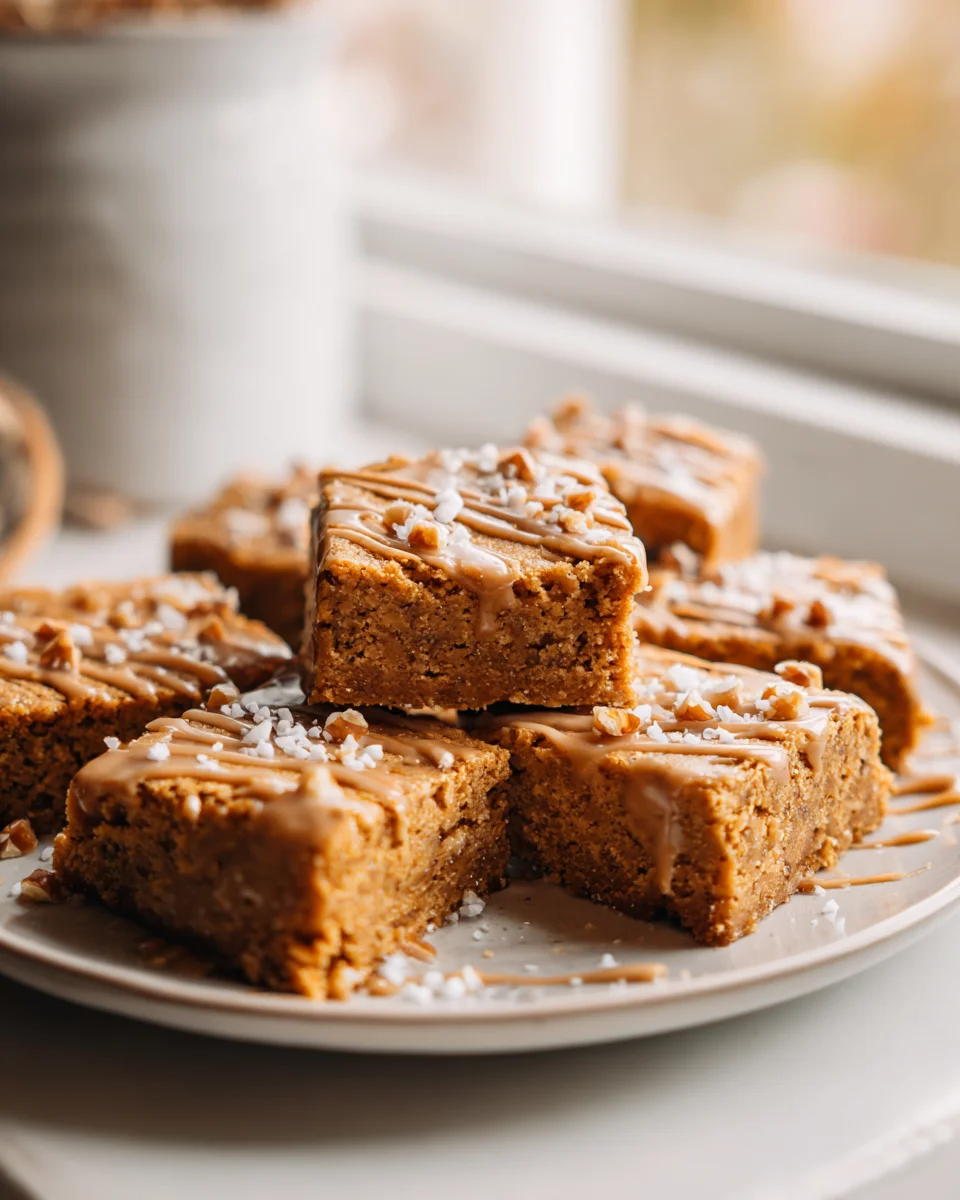
Welcome to one of my absolute favorite recipes! These Chewy Brown Butter Coffee Cookie Bars with Glaze are truly something special. Imagine a fudgy, chewy base infused with the rich, nutty notes of brown butter and a delightful kick of coffee, all topped with a sweet, subtly coffee-flavored glaze. They’re easier than individual cookies and perfect for sharing (or not sharing, I won’t tell!). Let’s dive into how you can make these incredible bars right in your own kitchen.
Ingredient Notes
Crafting the perfect Chewy Brown Butter Coffee Cookie Bar relies on a few star ingredients. Here’s what you’ll need and some thoughts on why they’re important and potential substitutions.
- Unsalted Butter: This is the foundation of our ‘brown butter’ magic. Browning the butter isn’t just about melting it; it’s about gently toasting the milk solids until they turn amber and release a wonderfully nutty, caramel-like aroma and flavor. This depth is absolutely crucial for the unique taste of these bars. I recommend unsalted so you can control the salt content precisely. If you only have salted, you can use it, but reduce the added salt in the recipe by about half.
- Brown Sugar (Light or Dark): Brown sugar is essential for both flavor and texture. Its molasses content contributes to the deep, caramel notes that perfectly complement the brown butter and coffee, and it also ensures a wonderfully chewy, moist texture in the finished bars. Dark brown sugar will give a slightly richer, more intense molasses flavor, while light brown sugar is a bit milder. Either works beautifully.
- Granulated Sugar: Paired with brown sugar, granulated sugar helps with the spread and structure of the bars, providing a crispness around the edges while maintaining a soft interior.
- Large Eggs: Eggs act as a binder, provide structure, and contribute to the richness and chewiness of the bars. Ensure they are at room temperature, as this helps them emulsify better with the other ingredients, leading to a smoother batter.
- Vanilla Extract: A splash of good quality vanilla extract enhances all the other flavors, adding a warm, aromatic note that brings everything together. Don’t skip it!
- Instant Espresso Powder (or Instant Coffee Granules): This is where our coffee flavor truly shines. Instant espresso powder dissolves beautifully and provides a concentrated, intense coffee flavor without adding extra liquid that could mess with the texture. It really elevates the chocolate notes and adds a wonderful depth. Instant coffee granules can be used as a substitute; just make sure to crush them finely or dissolve them in a tiny bit of hot water first to ensure they blend seamlessly into the batter. Do not use brewed coffee, as it will add too much moisture.
- All-Purpose Flour: Standard all-purpose flour is perfect here. It provides the necessary structure without making the bars tough. I don’t recommend substituting with other flours unless you’re experienced in gluten-free baking, as it can significantly change the texture.
- Baking Soda: This leavening agent helps the bars rise slightly and contributes to their chewy texture, reacting with the acidic brown sugar.
- Salt: A pinch of salt is vital to balance the sweetness and enhance all the other flavors, making the coffee and brown butter notes pop.
- For the Glaze:
- Powdered Sugar (Confectioners’ Sugar): This is the base of our smooth, pourable glaze. Make sure it’s sifted to avoid lumps.
- Milk (or Cream/Coffee): A small amount of liquid to thin the glaze. Whole milk or even a touch of cream will give you a richer glaze. For an extra coffee punch, you can use cold brewed coffee, a little strongly brewed instant coffee, or even a non-alcohol coffee liqueur substitute. Just a tiny amount is needed.
- Vanilla Extract: Again, for enhanced flavor in the glaze.
Step-by-Step Instructions
Let’s get baking! Follow these steps carefully to ensure your Chewy Brown Butter Coffee Cookie Bars come out perfectly chewy, flavorful, and beautifully glazed.
- Prepare Your Pan: First things first, preheat your oven to 350°F (175°C). Line a 9×13-inch baking pan with parchment paper, leaving an overhang on the sides. This “sling” will make it incredibly easy to lift the cooled bars out of the pan for cutting. Lightly grease the parchment paper for extra insurance against sticking.
- Brown the Butter: In a light-colored saucepan, melt your unsalted butter over medium heat. Keep a close eye on it! It will melt, then foam, and then the milk solids at the bottom will start to turn golden brown. Swirl the pan occasionally and continue cooking until the butter is a rich amber color with fragrant, nutty brown bits at the bottom. This usually takes about 5-8 minutes. Immediately pour the browned butter (including the solids!) into a large, heatproof bowl and let it cool slightly for about 10-15 minutes. It needs to be warm, not hot, to avoid scrambling the eggs.
- Whisk Wet Ingredients: To the slightly cooled brown butter, add both the granulated sugar and brown sugar. Whisk them vigorously until well combined and smooth. Next, crack in your room-temperature eggs, one at a time, whisking well after each addition until fully incorporated and the mixture is light and fluffy. Stir in the vanilla extract and the instant espresso powder (or finely crushed instant coffee granules). Make sure the coffee powder dissolves thoroughly.
- Combine Dry Ingredients: In a separate medium bowl, whisk together the all-purpose flour, baking soda, and salt. Whisk well to ensure everything is evenly distributed.
- Combine Wet and Dry: Gradually add the dry ingredient mixture to the wet ingredient mixture. Using a spatula or wooden spoon, mix until just combined. Be careful not to overmix the batter; overmixing can develop the gluten too much, leading to tough bars instead of chewy ones. A few streaks of flour are perfectly fine.
- Spread into Pan: Pour the cookie bar batter into your prepared 9×13-inch baking pan. Use an offset spatula or the back of a spoon to spread it evenly into the corners. The batter will be thick.
- Bake: Bake for 22-28 minutes, or until the edges are set and lightly golden brown, and the center still looks slightly soft and puffed. A toothpick inserted into the center should come out with moist crumbs, not wet batter. Overbaking will lead to dry, crumbly bars, so keep an eye on them!
- Cool Completely: Remove the pan from the oven and place it on a wire rack to cool completely. This is a crucial step! The bars need to be entirely cool before glazing, otherwise, the glaze will melt and run off. This usually takes at least 1-2 hours, or even longer.
- Prepare the Glaze: Once the bars are cool, it’s time for the glaze. In a small bowl, whisk together the powdered sugar, your chosen liquid (milk, cream, or coffee), and vanilla extract until smooth. If the glaze is too thick, add more liquid, a tiny bit at a time, until you reach a pourable consistency. If it’s too thin, whisk in a bit more powdered sugar.
- Glaze and Set: Drizzle or spread the glaze evenly over the cooled cookie bars. You can use an offset spatula or the back of a spoon to spread it out. Let the glaze set for at least 15-20 minutes, or until firm to the touch.
- Cut and Serve: Once the glaze is set, use the parchment paper sling to lift the entire slab of bars out of the pan. Place it on a cutting board and slice into squares or rectangles using a sharp knife. Enjoy your delicious Chewy Brown Butter Coffee Cookie Bars!
Tips & Suggestions
Making these Chewy Brown Butter Coffee Cookie Bars is a delightful process, and here are a few extra tips and suggestions to help you achieve absolute perfection every time:
- Don’t Rush the Brown Butter: Browning butter is an art, not a race. Keep the heat at medium, stir frequently, and watch for the color change. The moment those milk solids turn amber and smell nutty, remove it from the heat. Burnt butter tastes bitter, so err on the side of caution. If you are new to it, a light-bottomed pan helps you see the color change more clearly.
- Cool the Brown Butter: While you want the brown butter to still be warm when you add the sugars, it shouldn’t be piping hot. If it’s too hot, it can start to cook your eggs when you add them, leading to a scrambled egg texture in your batter. Cooling it slightly to just warm to the touch is ideal for achieving that smooth, emulsified batter.
- Use Instant Espresso Powder for Best Flavor: I can’t stress this enough! Instant espresso powder (or a very fine instant coffee powder) really delivers a concentrated coffee flavor without introducing excess liquid. It blends seamlessly into the batter. Regular instant coffee granules can work, but make sure they are finely crushed or dissolved in a tiny bit of hot water first.
- Avoid Overmixing: Once you add the flour to the wet ingredients, mix only until no dry streaks remain. Overmixing develops the gluten in the flour, which can lead to tough, dense bars instead of the wonderfully chewy texture we’re aiming for. A gentle hand is key!
- Don’t Overbake! This is probably the most critical tip for chewy bars. If you bake them too long, they will become dry and cakey rather than soft and fudgy. The center might still look slightly soft or even a little underbaked when you pull them out – that’s perfect! They will continue to set as they cool.
- Cool Completely Before Glazing and Cutting: Patience is a virtue when it comes to bars. Cooling them fully ensures they are firm enough to cut without crumbling and that the glaze sets properly without melting. Trying to cut warm bars often results in a messy, crumbly experience.
- Adjust Glaze Consistency: The beauty of a simple glaze is how adaptable it is. If your glaze seems too thick, add half a teaspoon of liquid (milk or coffee) at a time until it reaches your desired pourable consistency. If it’s too thin, whisk in a tablespoon of powdered sugar until it thickens.
- Mix-in Ideas: Want to add another layer of deliciousness? Consider folding in a cup of chocolate chips (milk, semi-sweet, or dark), chopped pecans, or walnuts into the batter before baking. These additions would create a wonderful mocha nut bar!
Storage
So, you’ve successfully baked your beautiful batch of Chewy Brown Butter Coffee Cookie Bars. Now, how do you keep them fresh and delicious for as long as possible? Here are my best tips for storage:
- At Room Temperature: These bars store wonderfully at room temperature. Once the glaze has fully set, place the cut bars in an airtight container. They will stay fresh, chewy, and delicious for up to 3-4 days. For optimal freshness, you might want to place a piece of parchment paper between layers if stacking them, to prevent sticking, especially if your kitchen is a bit warm.
- In the Refrigerator: If you prefer your bars chilled or live in a very warm climate, you can store them in an airtight container in the refrigerator for up to a week. Be aware that refrigeration can sometimes make the glaze slightly stickier or cause the bars to firm up a bit more. I recommend letting them come to room temperature for about 15-20 minutes before serving for the best texture.
- Freezing for Longer Storage: These bars freeze beautifully!
- Without Glaze: If you plan to freeze a batch, consider baking the bars and cooling them completely without glazing. Wrap the unglazed slab tightly in plastic wrap, then again in aluminum foil. Place in a freezer-safe bag or container. They can be frozen for up to 2-3 months. When ready to serve, thaw overnight in the refrigerator, then bring to room temperature before preparing and applying the fresh glaze.
- With Glaze: If you’ve already glazed the bars, ensure the glaze is fully set and firm. Place the individual cut bars (or the whole slab, if preferred) on a parchment-lined baking sheet and freeze for about an hour, just until firm. This prevents them from sticking together. Then, transfer the frozen bars to an airtight, freezer-safe container or bag, placing parchment paper between layers. They can be frozen for up to 1-2 months.
- Thawing Frozen Bars: To thaw frozen bars, simply transfer them from the freezer to the refrigerator overnight, or let them sit at room temperature for a few hours. Once thawed, they’re ready to enjoy!
Final Thoughts
And just like that, you’ve arrived at the grand finale: your very own batch of Chewy Brown Butter Coffee Cookie Bars With Glaze! I truly believe this recipe is an absolute game-changer. What sets these bars apart isn’t just one element, but the masterful symphony of flavors and textures working in perfect harmony. That rich, nutty brown butter deepens the flavor wonderfully, the coffee adds an unexpected yet utterly harmonious warmth, and the chewiness? Oh, that perfect, satisfying chew will have you coming back for more. Capped with a simple, sweet glaze, these aren’t merely cookie bars; they’re a moment of pure, delightful indulgence.
I can confidently say that once you take that first bite of your Chewy Brown Butter Coffee Cookie Bars With Glaze, you’ll understand why they’re destined to become a staple in your baking repertoire. They’re fantastic for sharing with loved ones, for brightening up an afternoon coffee (or non-alcohol alternative beverage) break, or simply for treating yourself to something truly extraordinary. Go ahead, experience the unique magic of these bars – you absolutely deserve this delicious adventure!
Leave a Comment