
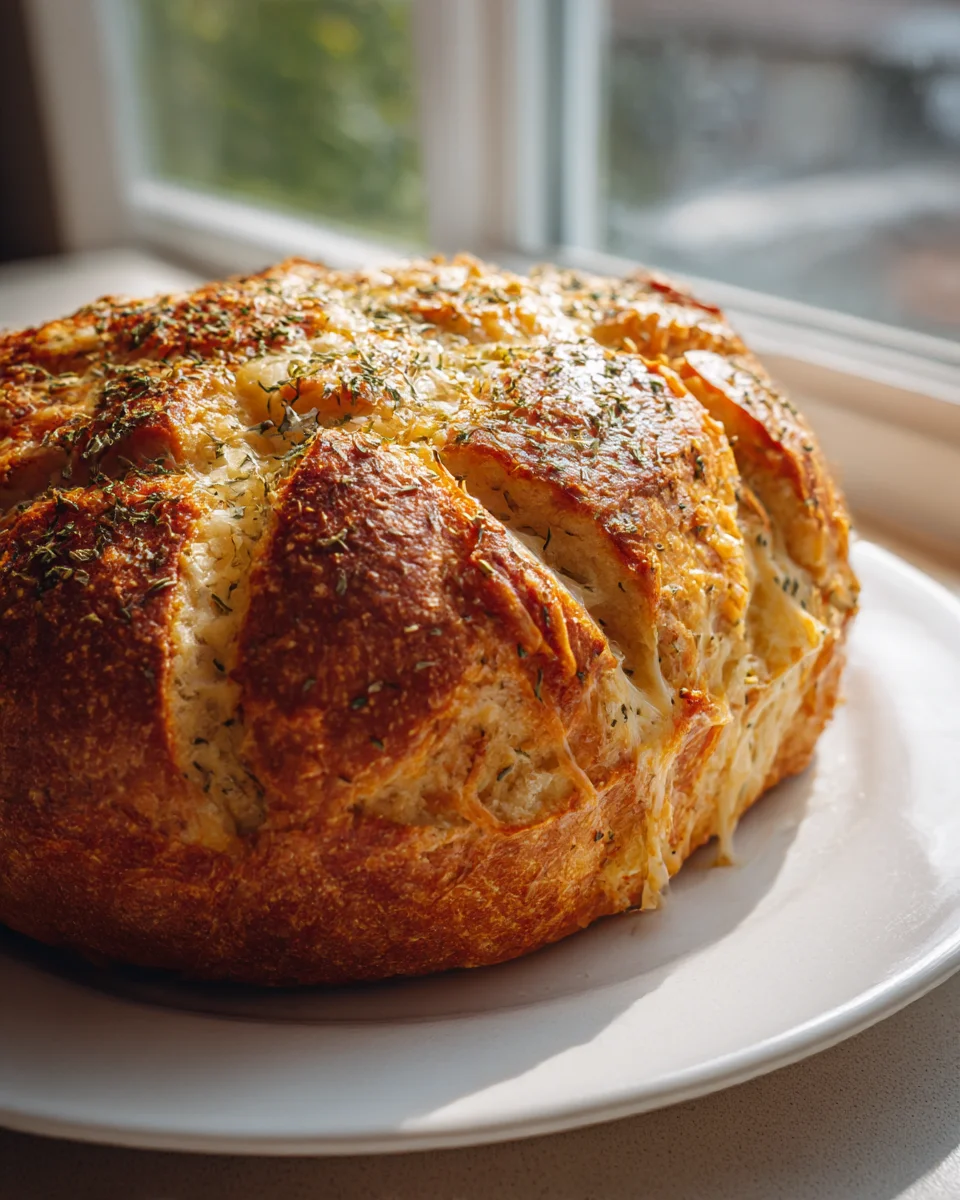
Italian Herb Cheese Bread Recipe
There’s something truly magical about the aroma of freshly baked bread filling your kitchen, isn’t there? And when that bread is brimming with aromatic Italian herbs and gooey, melted cheese? Well, that’s when you know you’ve hit culinary gold. I’m so excited to share my Italian Herb Cheese Bread Recipe with you today!
What makes this particular recipe so special, you ask? It’s the perfect harmony of robust Italian herbs – think fragrant oregano, earthy basil, and a hint of garlic – combined with a generous helping of your favorite melty cheese, all baked into a wonderfully soft and golden loaf. It’s not just a side dish; it’s an experience. Every bite is a comforting hug, a little taste of Italy right in your home.
You’re going to absolutely love this because it’s incredibly versatile and always a crowd-pleaser. Whether you’re serving it alongside a hearty beef ragu (no alcohol needed, a rich beef broth works wonders!), a simple bowl of soup, or just tearing into it warm as an irresistible snack, it never disappoints. Get ready to bake a loaf that will have everyone reaching for “just one more slice.” This is more than just bread; it’s a celebration of flavor and comfort, and I can’t wait for you to try it!
Ingredient Notes
Crafting the perfect Italian Herb Cheese Bread starts with understanding the role each ingredient plays. When I’m baking this, I always emphasize quality because every component contributes to that incredibly savory, aromatic, and comforting experience.
The Foundation: Flour, Yeast, and Liquids
- All-Purpose Flour: This is my go-to for a reliably tender and slightly chewy crumb. If you’re looking for an even chewier texture, you could absolutely swap out a quarter to a third of the all-purpose flour for bread flour. I find it adds a lovely bite!
- Active Dry Yeast: I prefer active dry yeast because I love seeing it bloom and know it’s alive and ready to work its magic. Remember to proof it in warm water with a touch of sugar first. If you have instant yeast, you can often skip the proofing step and just mix it directly with your dry ingredients, but I usually still give it a quick test to be sure.
- Warm Water or Milk: Warm water is perfectly fine and keeps the bread light, but I often use warm milk (dairy or a plain, unsweetened non-dairy alternative like almond or oat milk) because it yields a softer, richer crumb. The fats and sugars in milk contribute to a more tender texture and a beautiful golden-brown crust. Make sure it’s around 105-115°F (40-46°C) for optimal yeast activation.
- Granulated Sugar: Just a small amount. It’s not primarily for sweetness, but rather to “wake up” and feed the yeast, helping your dough rise beautifully.
- Salt: Crucial for flavor! Don’t skimp on the salt; it truly brings out all the other wonderful flavors and also helps regulate yeast activity and strengthen the gluten structure.
The Flavor Powerhouses: Herbs, Garlic, and Olive Oil
- Extra Virgin Olive Oil: This is non-negotiable for me in Italian-inspired bread. It adds a wonderful depth of flavor, richness, and contributes to a tender crumb. I also use it to grease my bowl for rising and sometimes brush a little on top for extra aroma and shine.
- Dried Italian Seasoning: A good quality blend makes things easy, but I also love to mix my own! My personal blend includes dried oregano, basil, thyme, and a touch of rosemary. Using separate herbs lets me adjust the proportions to my liking.
- Garlic Powder & Fresh Garlic: I use garlic powder in the dough for an even distribution of garlicky goodness, but I often include minced fresh garlic in the cheese filling or brush it on top with melted butter for that pungent, aromatic kick. It’s truly the best of both worlds!
- Red Pepper Flakes (Optional): If you like a little warmth and subtle heat, a pinch of red pepper flakes mixed into the herb and cheese filling adds a delightful zing without being overtly spicy.
The Star: Cheese
- Low-Moisture Part-Skim Mozzarella: This is my primary cheese for its fantastic melt and mild, creamy flavor that complements the herbs without overpowering them. I prefer to shred my own from a block, as pre-shredded cheeses often contain anti-caking agents that can hinder the melt and texture.
- Grated Parmesan Cheese: Essential for that salty, nutty, umami punch! I mix this into the dough and also sprinkle it generously with the mozzarella in the layers. Freshly grated is always superior to the pre-shaked varieties.
- Provolone or Fontina (Optional): For an even richer, more complex cheesy flavor, I sometimes add a small amount of shredded provolone or fontina to the mix. They melt beautifully and add another dimension of taste.
Step-by-Step Instructions
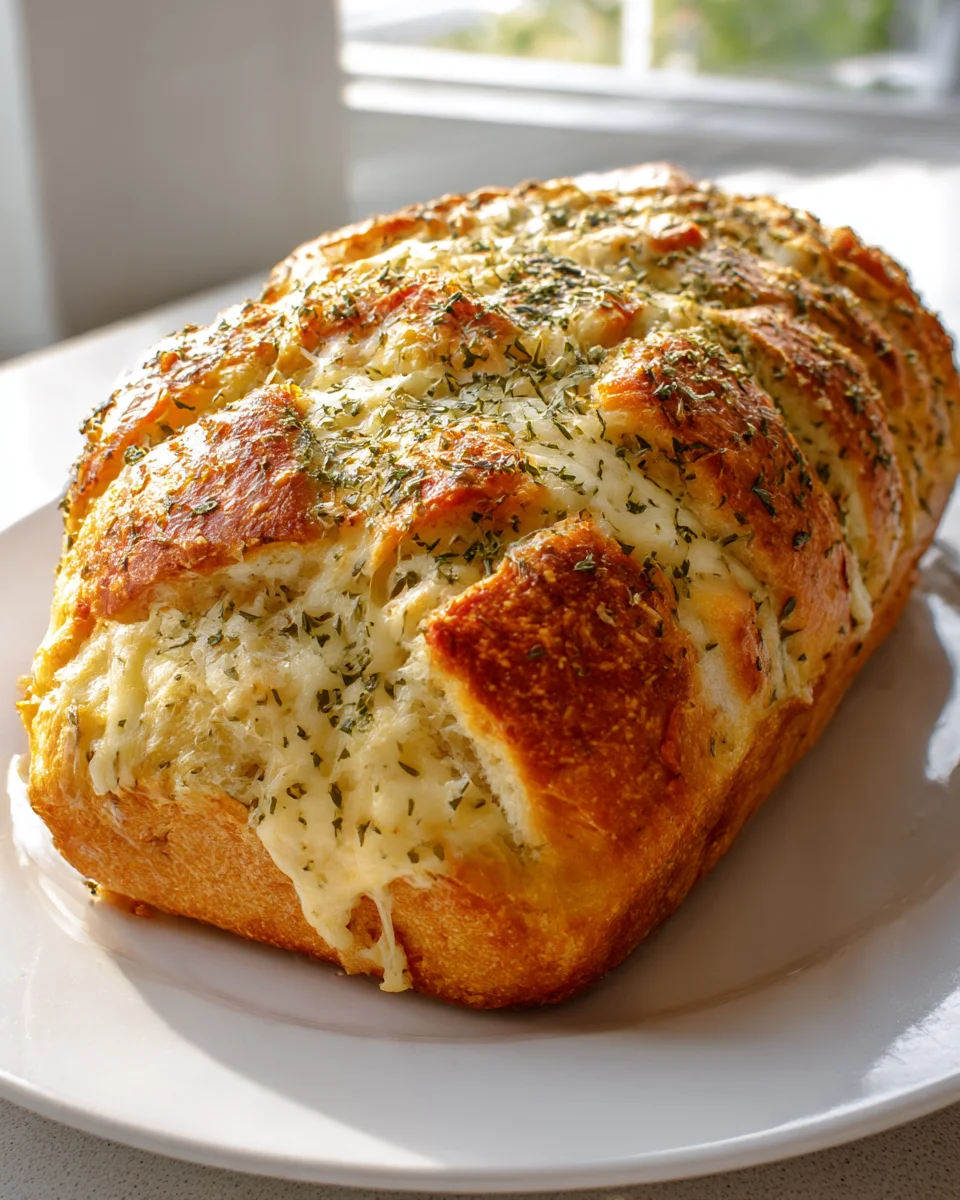
Making this Italian Herb Cheese Bread is a joy, and I promise you, the aroma filling your kitchen will be worth every moment! Here’s how I bring it all together, making a delicious pull-apart style loaf that’s perfect for sharing.
1. Activate the Yeast (if using active dry)
- In a large mixing bowl, combine 1 ½ cups warm water (or milk) with 1 tablespoon of granulated sugar and 2 ¼ teaspoons (one packet) of active dry yeast. Give it a gentle stir.
- Let this mixture sit for 5-10 minutes, or until it becomes foamy on top. This tells me my yeast is alive and ready to make our bread rise beautifully. If it doesn’t foam, your yeast might be old or the water temperature was off, and it’s best to start again.
2. Mix the Dough
- To the activated yeast mixture, add 2 tablespoons of extra virgin olive oil, 1 ½ teaspoons of salt, 1 tablespoon of dried Italian seasoning, and ½ teaspoon of garlic powder. Stir them in.
- Gradually add 4 to 4 ½ cups of all-purpose flour, one cup at a time, mixing with a wooden spoon or a stand mixer with a dough hook until a shaggy dough forms.
- Once the dough starts to come together, transfer it to a lightly floured surface (or continue in the stand mixer).
3. Knead the Dough
- Knead the dough for 8-10 minutes. If kneading by hand, push the dough away from you with the heels of your hands, fold it back, rotate, and repeat. If using a stand mixer, let the dough hook do the work until the dough is smooth, elastic, and pulls away cleanly from the sides of the bowl.
- I know it’s ready when it passes the “windowpane test”: you can stretch a small piece of dough thin enough to see light through it without tearing.
4. First Rise (Bulk Fermentation)
- Lightly grease a large bowl with a little olive oil. Place the kneaded dough in the bowl, turning it once to coat the top.
- Cover the bowl tightly with plastic wrap or a clean kitchen towel.
- Let the dough rise in a warm, draft-free place for 1 to 1 ½ hours, or until it has doubled in size. I often put mine in a slightly warm oven that’s turned off, or near a sunny window.
5. Prepare the Filling and Shape the Bread
- While the dough is rising, prepare your cheese and herb filling. In a medium bowl, combine 2 cups shredded low-moisture mozzarella cheese, ½ cup grated Parmesan cheese, 1 tablespoon dried Italian seasoning, ½ teaspoon garlic powder, and a pinch of red pepper flakes if you’re using them. Mix well.
- Once the dough has doubled, gently punch it down to release the air. Turn it out onto a lightly floured surface.
- Roll the dough into a large rectangle, roughly 18×12 inches, or to about ¼-inch thickness.
- Brush the surface of the dough with 1 tablespoon of olive oil. Evenly sprinkle the entire surface with your prepared cheese and herb mixture, leaving a small border (about ½ inch) along one long edge.
- Using a sharp knife or a pizza cutter, cut the dough into 6 equal strips vertically (each about 2 inches wide).
- Stack these strips on top of each other. Then, cut the stacked strips into 6-8 smaller squares/rectangles (depending on your desired size for pull-apart pieces).
- Lightly grease a 9×5 inch loaf pan. Arrange the stacked, cut dough pieces vertically in the loaf pan, standing them on their sides, like dominoes. Pack them gently but don’t squish too much.
6. Second Rise (Proofing)
- Cover the loaf pan loosely with plastic wrap or a clean kitchen towel.
- Let the dough rise again in a warm, draft-free place for another 30-45 minutes, or until the bread has risen significantly and looks puffy. It should nearly reach the top of the pan.
- Preheat your oven to 375°F (190°C) about 15 minutes before the end of the second rise.
7. Bake the Bread
- Bake in the preheated oven for 30-35 minutes, or until the top is golden brown and the cheese is bubbly and melted. If you notice it browning too quickly, you can loosely tent it with foil.
- For an extra touch, I sometimes melt 2 tablespoons of butter with 1 minced clove of fresh garlic and brush it over the hot bread as soon as it comes out of the oven. It adds an incredible aroma and shine!
8. Cool and Serve
- Let the bread cool in the pan for 10-15 minutes before carefully removing it to a wire rack. This helps the cheese set a bit and makes it easier to remove.
- Serve warm and let everyone pull apart their own cheesy, herby piece! It’s truly divine.
Tips & Suggestions
Over the years of baking this Italian Herb Cheese Bread, I’ve picked up a few tricks that I love to share. These tips will help ensure your bread turns out perfectly every time and even inspire you to experiment a bit!
Dough Handling & Rising
- Don’t Rush the Rise: Patience is key in bread making! If your kitchen is cool, your dough might take longer to rise. A slow, steady rise actually develops more flavor. Don’t worry if it takes a bit longer than the recipe states.
- The Poke Test: To tell if your dough has risen enough (for both rises), gently poke it with a floured finger. If the indentation springs back slowly and partially, it’s ready. If it springs back immediately, it needs more time. If it collapses, it’s over-proofed (though for this recipe, a little over-proofing won’t ruin it).
- Warm Environment: If you struggle to find a warm place for your dough to rise, try placing it in a turned-off oven with just the oven light on. The warmth from the bulb is often enough to create a perfect proofing environment.
Flavor Boosters & Variations
- Fresh Garlic Punch: While garlic powder is great for the dough, I highly recommend adding freshly minced garlic (about 1-2 cloves) to the cheese mixture, or mixing it into melted butter for brushing on the bread right after it bakes. The aroma is heavenly!
- Toasted Herbs: For an even deeper flavor, lightly toast your dried herbs in a dry skillet for about 30 seconds before adding them to the dough or cheese mixture. This awakens their aromatic oils.
- Add-Ins Galore: This bread is incredibly versatile! Try adding other Italian-inspired ingredients to your cheese mixture:
- Sun-Dried Tomatoes: Chopped and drained oil-packed sun-dried tomatoes add a lovely tangy sweetness.
- Olives: Pitted and chopped Kalamata or green olives provide a briny kick.
- Roasted Red Peppers: Diced roasted red peppers (from a jar, drained) add sweetness and color.
- Different Cheeses: Don’t be afraid to experiment with other good melting cheeses like smoked provolone, Gruyère, or even a sharp white cheddar for a different profile.
- Herb Butter Brush: My absolute favorite finishing touch! Melt 2 tablespoons of unsalted butter with 1 minced clove of garlic and a pinch of dried parsley. Brush this generously over the hot bread as soon as it comes out of the oven. It adds a glossy finish, incredible aroma, and even more flavor.
Serving Suggestions
- With Italian Meals: This bread is a natural partner for any pasta dish, especially a rich lasagna or a simple spaghetti with marinara.
- Soup & Salad Companion: It’s perfect for dipping into a hearty beef minestrone or serving alongside a crisp Caesar salad.
- Appetizer with Dips: Serve it as an impressive appetizer with a side of warm marinara sauce for dipping, or even a good quality balsamic glaze.
Storage
While this Italian Herb Cheese Bread is undeniably best enjoyed warm and fresh from the oven, I totally understand the need for storage. Here’s how I keep mine tasting great for as long as possible:
Room Temperature (Short-Term)
- Airtight Container: Once completely cooled, store any leftover bread in an airtight container or a heavy-duty resealable bag at room temperature. This will help prevent it from drying out.
- Duration: It will stay fresh and delicious for 1-2 days. After that, it tends to start drying out and losing its tender texture.
- Reheating: To refresh, I usually wrap individual pieces or the whole loaf loosely in foil and reheat it in a preheated oven at 350°F (175°C) for 10-15 minutes, or until warmed through and the cheese is soft again. A quick toast in a toaster oven also works wonders for individual slices!
Freezing (Long-Term)
Freezing is my preferred method for long-term storage, as it preserves the bread’s quality much better than refrigeration (which can actually make bread go stale faster).
- Cool Completely: Before freezing, it’s absolutely crucial that the bread has cooled completely to room temperature. Freezing warm bread can lead to ice crystals and a soggy texture upon thawing.
- Wrap Properly: I like to slice the bread first, which makes it easier to grab just what you need. Wrap individual slices or small portions tightly in plastic wrap, then place them in a freezer-safe bag or an airtight freezer container. For a whole loaf, wrap it very tightly in plastic wrap, then again in aluminum foil. This double layer protects against freezer burn.
- Duration: Properly stored, this bread can be frozen for up to 2-3 months without significant loss of quality.
- Thawing & Reheating:
- Individual Slices: You can often pop frozen slices directly into a toaster oven or even a regular toaster on a low setting until warmed and slightly crisp.
- Whole Loaf/Larger Portions: For a whole loaf, I recommend thawing it overnight in the refrigerator or for a few hours at room temperature. Once thawed, reheat it wrapped in foil in a 350°F (175°C) oven for 15-20 minutes, or until thoroughly heated and soft. If you like a slightly crispier crust, remove the foil for the last 5 minutes of reheating.
Final Thoughts
Finally, as we wrap up our journey through the making of the Italian Herb Cheese Bread Recipe, I truly hope you feel inspired to get baking! This isn’t just any ordinary bread; it’s a delightful experience that brings together the best of savory Italian herbs and rich, melted cheese, all within a wonderfully soft and golden crust. The moment that incredible aroma fills your kitchen, you’ll understand why this particular Italian Herb Cheese Bread Recipe is so special.
I promise you, the reward of pulling a warm, aromatic loaf of this Italian Herb Cheese Bread Recipe from your oven is truly unparalleled. It’s the perfect accompaniment to a hearty beef stew, a delightful partner for a simple salad, or simply divine enjoyed on its own with your favorite non-alcohol alternative beverage. It’s comforting, incredibly flavorful, and surprisingly simple to master, making it a definite must-try for any home baker. Go on, give this Italian Herb Cheese Bread Recipe a whirl – your taste buds, and anyone you share it with, will absolutely thank you!


Leave a Comment