
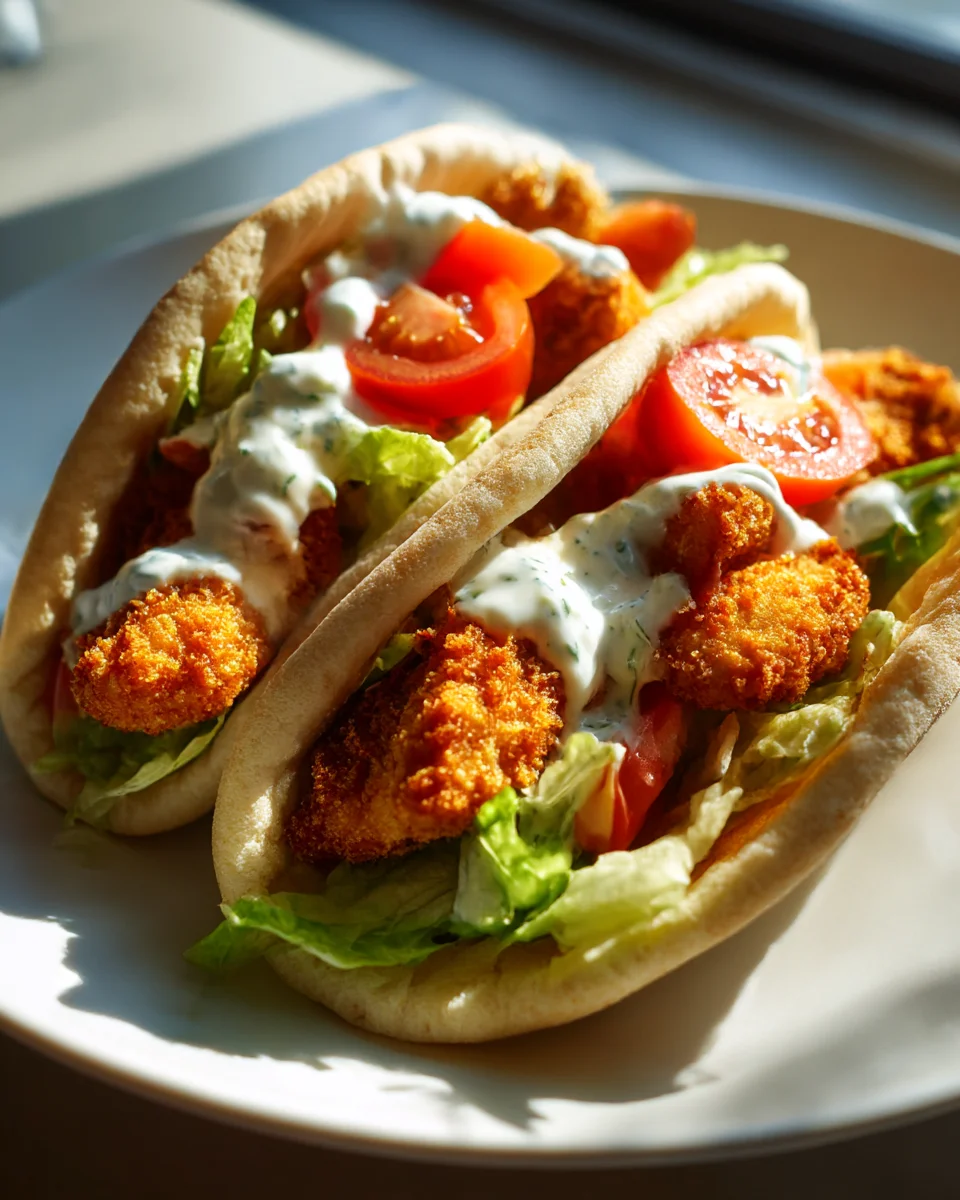
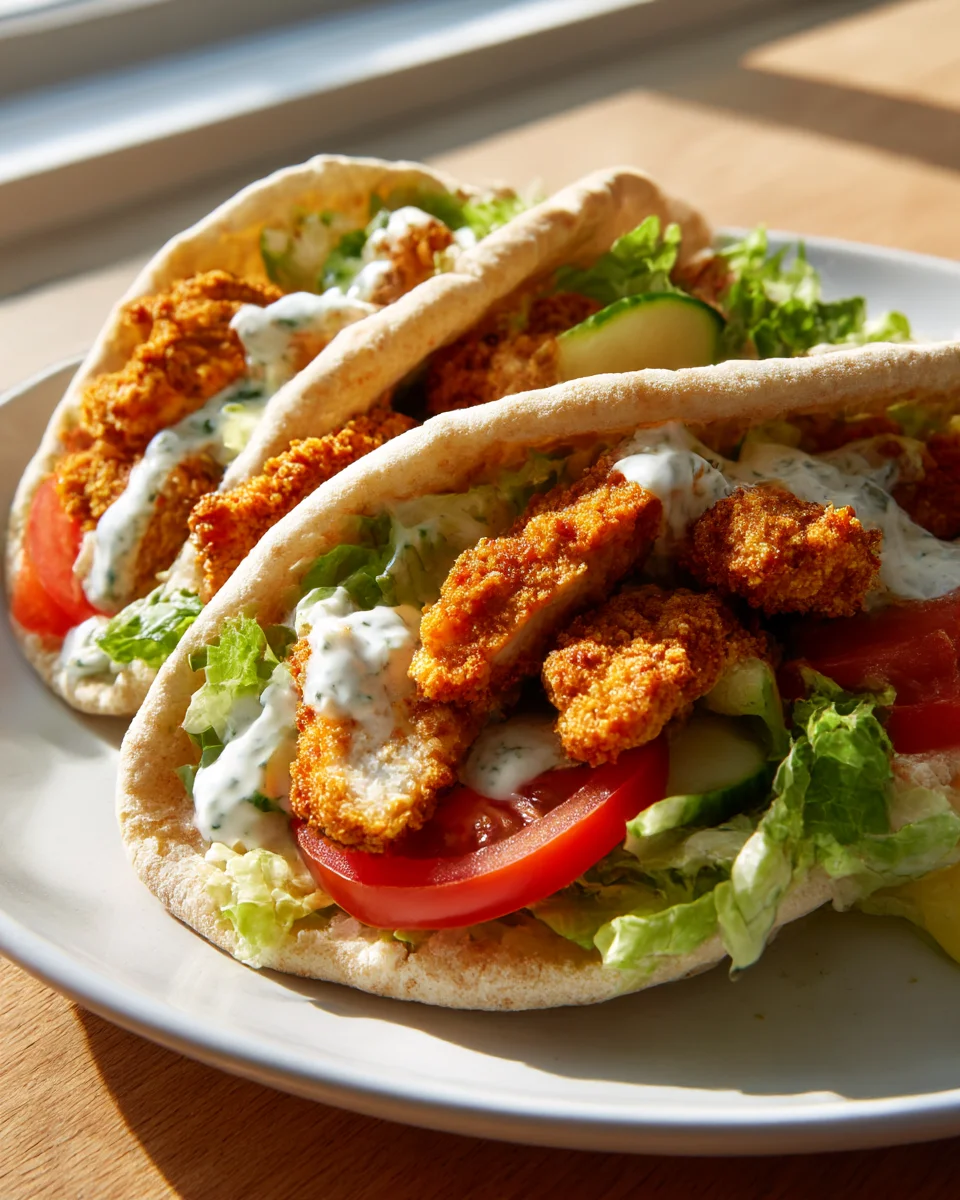
Crispy Breaded Chicken Pitas
Oh, get ready, because I’m about to introduce you to your new favorite weeknight meal: Crispy Breaded Chicken Pitas! This isn’t just another chicken dish; it’s a symphony of textures and flavors that will make your taste buds sing. What makes these pitas so incredibly special, you ask? It’s that perfect harmony of golden, crunchy breaded chicken nestled inside a warm, soft pita pocket, all brought to life with your favorite creamy sauces and crisp, fresh veggies. Trust me, you’re going to absolutely adore how simple yet utterly satisfying these are. Imagine sinking your teeth into tender, juicy chicken encased in a perfectly seasoned, crispy coating, complemented by the pillowy softness of the pita and the vibrant crunch of fresh toppings. It’s a complete meal, all in one delightful handheld package, perfect for a quick dinner, a fun lunch, or even a picnic. This dish offers comfort, flavor, and incredible ease, making it a guaranteed hit at your table every time.
Ingredient Notes
Crafting truly delicious Crispy Breaded Chicken Pitas starts with selecting the right ingredients. Each component plays a vital role in achieving that perfect balance of crispy, creamy, and fresh flavors we’re aiming for. Here’s what I find works best and some handy substitutions:
For the Crispy Breaded Chicken
- Chicken Breast: I always opt for boneless, skinless chicken breasts. The trick is to slice them horizontally or pound them thin, about ½-inch thick. This ensures they cook quickly and evenly, becoming wonderfully tender inside while staying super crispy outside. If you prefer, chicken thighs can also be used, but they’ll be juicier and less uniform in texture.
- Breading Ingredients: My go-to is a classic three-stage breading station: all-purpose flour seasoned with salt, black pepper, paprika, and garlic powder; beaten eggs; and finally, panko breadcrumbs. Panko is essential for that extra-crispy, light texture – regular breadcrumbs just don’t quite compare for this dish! For a gluten-free option, look for gluten-free panko or finely crushed cornflakes.
- Frying Oil: A neutral-flavored oil with a high smoke point is key. Vegetable oil, canola oil, or sunflower oil are all excellent choices. You’ll need enough to reach about ½ to ¾ inch deep in your skillet.
For the Pita Bread
- Pita Bread: Fresh, soft pita breads are a must. They should be pliable enough to open into a pocket without tearing. Whole wheat pitas are a great alternative for added fiber and a slightly nuttier flavor. If you can’t find good pitas, warm flatbreads or even larger flour tortillas can work in a pinch, though they won’t have that classic pita pocket feel.
For the Creamy Garlic-Lemon Yogurt Sauce
- Greek Yogurt: Full-fat plain Greek yogurt provides the perfect creamy, tangy base. It holds up well without making the pita soggy. If you don’t have Greek yogurt, regular plain yogurt can work, but you might want to strain it first to remove excess water.
- Fresh Lemon Juice: This brightens up the whole sauce and cuts through the richness of the fried chicken. Always use fresh-squeezed!
- Garlic: Freshly minced garlic is non-negotiable for that aromatic kick.
- Fresh Dill or Parsley: A sprinkle of fresh herbs adds another layer of freshness and flavor.
For the Fresh Fillings
- Crisp Lettuce: Shredded iceberg or romaine lettuce adds a fantastic crunch and freshness.
- Diced Tomatoes: Ripe, juicy tomatoes are perfect. Cherry or grape tomatoes halved also work wonderfully.
- Cucumber: Diced or thinly sliced cucumber provides a cool, refreshing contrast.
- Red Onion: Thinly sliced red onion adds a mild sharpness and a beautiful pop of color. If you find raw red onion too strong, you can soak it in ice water for 10-15 minutes to mellow its flavor.
- Optional Additions: Crumbled feta cheese for a salty tang, or a few slices of pickled jalapeños if you like a little heat, are always welcome.
Step-by-Step Instructions
Let’s get cooking! This is my tried-and-true method for making incredible Crispy Breaded Chicken Pitas that are bursting with flavor and texture. Follow these steps, and you’ll have a fantastic meal ready in no time.
- Prepare the Chicken:
- First, pat your boneless, skinless chicken breasts completely dry with paper towels. This is a crucial step for crispy breading.
- Slice each chicken breast horizontally into two thinner cutlets, or pound them to about ½-inch thickness. This ensures quick and even cooking.
- Season both sides of the chicken liberally with salt and freshly ground black pepper.
- Set Up Your Breading Station:
- In a shallow dish, combine ½ cup all-purpose flour with 1 teaspoon salt, ½ teaspoon black pepper, ½ teaspoon paprika, and ½ teaspoon garlic powder. Mix well.
- In a second shallow dish, whisk 2 large eggs until well combined.
- In a third shallow dish, add 1 ½ cups panko breadcrumbs.
- Bread the Chicken:
- Working with one piece of chicken at a time, first dredge it in the seasoned flour, ensuring it’s fully coated. Shake off any excess.
- Next, dip the floured chicken into the beaten egg, letting any excess drip off.
- Finally, press the chicken into the panko breadcrumbs, making sure every surface is thoroughly coated. Press gently to help the panko adhere. Set the breaded chicken aside on a wire rack while you bread the remaining pieces.
- Prepare the Creamy Garlic-Lemon Yogurt Sauce:
- In a small bowl, combine 1 cup plain full-fat Greek yogurt, 2 tablespoons fresh lemon juice, 1 large clove garlic (minced), and 1 tablespoon chopped fresh dill or parsley.
- Stir everything together until well combined. Taste and adjust seasoning with salt and pepper as needed. Cover and refrigerate until ready to use.
- Chop Your Fillings:
- While the chicken is being breaded or resting, prepare your fresh fillings. Shred your lettuce, dice your tomatoes, finely dice or slice your cucumber, and thinly slice your red onion. Keep these separate and chilled.
- Cook the Crispy Chicken:
- Heat about ½ to ¾ inch of a neutral oil (like vegetable or canola oil) in a large skillet or non-stick pan over medium-high heat. The oil is ready when a sprinkle of panko sizzles immediately upon contact.
- Carefully place 2-3 pieces of breaded chicken into the hot oil, ensuring you don’t overcrowd the pan. Give them space to get crispy.
- Fry for 3-5 minutes per side, or until golden brown, crispy, and cooked through (internal temperature reaches 165°F or 74°C).
- Remove the cooked chicken to a wire rack set over a paper towel-lined baking sheet to drain any excess oil. Repeat with the remaining chicken.
- Once slightly cooled, slice the crispy chicken cutlets into strips or bite-sized pieces.
- Warm the Pita Breads:
- Lightly warm the pita breads. You can do this by placing them directly over a gas flame for a few seconds per side, or by warming them in a dry skillet over medium heat for 30 seconds per side, or even briefly in the microwave (10-15 seconds per pita). They should be soft and pliable. Gently open each pita to form a pocket.
- Assemble Your Pitas:
- Spread a generous amount of the creamy garlic-lemon yogurt sauce inside each warmed pita pocket.
- Layer in a handful of your crispy chicken strips.
- Top with shredded lettuce, diced tomatoes, cucumber, and red onion.
- Add any optional toppings like feta cheese or pickled jalapeños.
- Serve immediately and enjoy your homemade Crispy Breaded Chicken Pitas!
Tips & Suggestions
To truly master the art of Crispy Breaded Chicken Pitas, I’ve gathered some of my favorite tips and tricks that make all the difference. These will help you achieve maximum flavor and that irresistible crunch.
- Achieving Peak Crispiness: My number one tip for super crispy chicken is to really press those panko breadcrumbs onto the chicken. Don’t be shy! Also, ensure your oil is hot enough before you start frying – a quick test with a tiny pinch of panko should result in an immediate sizzle. Don’t overcrowd the pan; this lowers the oil temperature and steams the chicken instead of frying it, resulting in a less crispy crust. Cook in batches if necessary.
- Flavor Boost for Chicken: For an extra layer of flavor, consider marinating your chicken briefly before breading. A quick dip in buttermilk or a mixture of lemon juice, garlic powder, and a touch of olive oil for 15-20 minutes can add moisture and tenderness, though this is optional as the breading itself is flavorful.
- Perfect Pita Preparation: Don’t overheat your pitas! They should be just warm and pliable enough to open easily. Overheating can make them tough and prone to cracking, which nobody wants when trying to stuff them. A quick toast in a dry pan or a few seconds in the microwave is usually sufficient.
- Customizing Your Sauce: While my creamy garlic-lemon yogurt sauce is a winner, feel free to experiment! A spicy mayo (mayo mixed with sriracha and a touch of lime), a tangy honey mustard, or even a classic hummus can be fantastic alternatives if you want to switch things up. Fresh herbs like mint or cilantro can also be folded into the yogurt sauce for different flavor profiles.
- Vary Your Veggies: Don’t limit yourself to the standard lettuce, tomato, and onion. Sliced bell peppers, kalamata olives, banana peppers, or even a sprinkle of fresh parsley or mint can add exciting new dimensions to your pita.
- Make It a Meal: These pitas are hearty on their own, but they also pair wonderfully with a simple side salad, a bowl of lentil soup, or some homemade sweet potato fries.
Storage
While Crispy Breaded Chicken Pitas are definitely at their best when served fresh, you can absolutely enjoy them later with a little careful planning. Here’s my advice for storing any leftovers:
- Assembled Pitas: Not Recommended. I strongly advise against storing fully assembled pitas. The breaded chicken will lose its crispiness, and the pita bread will become soggy from the sauce and fresh vegetables. It just won’t have that fresh, vibrant appeal.
- Store Components Separately: Your best bet for enjoying these later is to store each component individually.
- Cooked Crispy Chicken: Let the cooked chicken cool completely before storing it. Place the chicken strips or pieces in an airtight container in the refrigerator for up to 2-3 days.
- Creamy Garlic-Lemon Yogurt Sauce: Store the sauce in a separate airtight container in the refrigerator for up to 3-4 days. Give it a good stir before serving, as it might separate slightly.
- Chopped Vegetables: Keep your prepped lettuce, tomatoes, cucumbers, and red onions in separate airtight containers in the refrigerator. The lettuce should stay crisp for 2-3 days, while the other veggies can last 3-4 days.
- Reheating Crispy Chicken: To bring your breaded chicken back to life with its lovely crispiness, avoid the microwave! I highly recommend reheating it in an air fryer at 350°F (175°C) for 5-7 minutes, or in a conventional oven at 375°F (190°C) for 8-12 minutes, flipping halfway. This will help restore its golden-brown crust.
- Reassemble Just Before Serving: When you’re ready to enjoy your leftovers, simply reheat the chicken, warm your pita bread, and then assemble with the fresh veggies and chilled sauce. It’s almost as good as the first time!
Final Thoughts
And there you have it! I truly hope you’re as excited as I am about making these incredible Crispy Breaded Chicken Pitas. What I love most about this recipe is the perfect harmony of textures and flavors. You get that irresistible crunch from the perfectly breaded chicken, perfectly complemented by the soft warmth of the pita bread and the fresh, vibrant fillings.
It’s more than just a meal; it’s a delightful experience that’s surprisingly easy to put together. Whether you’re looking for a quick weeknight dinner, a fantastic lunch option, or something special to impress friends and family, these Crispy Breaded Chicken Pitas tick all the boxes. They’re satisfying, fresh, and undeniably delicious. So go ahead, gather your ingredients, and prepare to enjoy a truly standout dish that I’m sure will become a new favorite in your kitchen!
Leave a Comment