
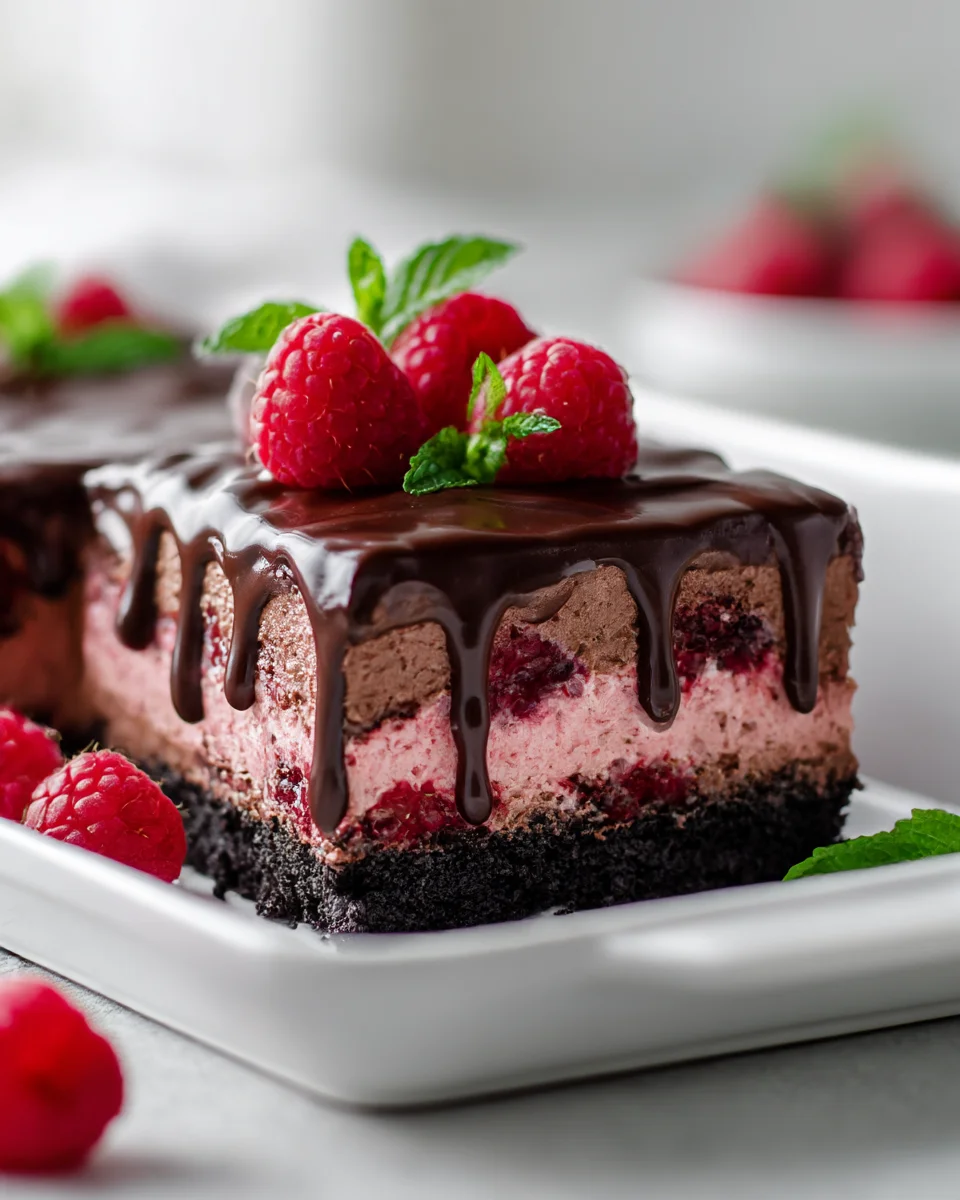
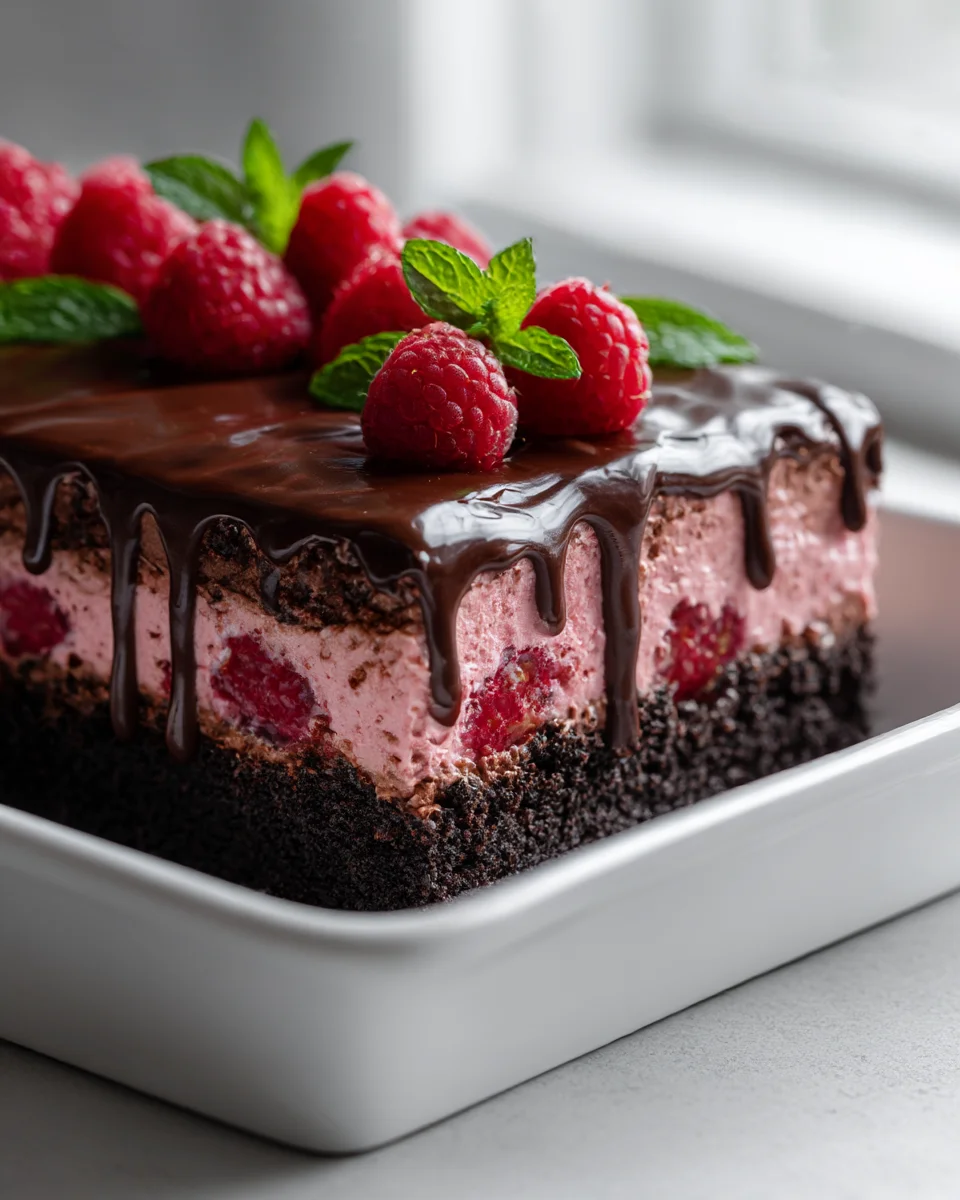
No Bake Raspberry Chocolate Lasagna With Oreo Crust
No Bake Raspberry Chocolate Lasagna With Oreo Crust – oh my goodness, just saying the name makes my mouth water! If you’re looking for a show-stopping dessert that requires zero oven time and delivers maximum flavor, then you’ve absolutely found your new favorite. What makes this recipe so incredibly special, you ask? Well, for starters, it’s the magical combination of rich, decadent chocolate and bright, tangy raspberries, all piled high in luscious layers. And did I mention the foundation is a crunchy, buttery Oreo crust? Yes, dreams do come true!
I know you’re going to adore this dessert because it’s not only ridiculously easy to prepare – truly, anyone can make it – but it also looks absolutely stunning, making it perfect for impressing guests or simply treating yourself to something extraordinary. Imagine sinking your fork through a sweet, crumbly Oreo base, into a smooth, creamy chocolate layer, followed by a vibrant burst of raspberry goodness, and perhaps another fluffy, dreamy layer on top. It’s pure dessert bliss, chilled to perfection, and ready to be devoured without ever having to turn on your oven. Get ready to experience a symphony of textures and flavors that will have everyone asking for seconds!
Ingredient Notes
Creating my No Bake Raspberry Chocolate Lasagna with Oreo Crust is always a joy, and it all starts with gathering the right ingredients. Each component plays a crucial role in building those delightful layers of flavor and texture. Here’s what you’ll need to make this dreamy dessert, along with a few thoughts on substitutions:
- Oreo Cookies: These are the undisputed heroes of our crust! You’ll want about 36 sandwich cookies, which is typically one standard family-size package. I use the classic chocolate ones, but if you’re feeling adventurous, a chocolate-flavored “Golden Oreo” could work for a different twist. Make sure to crush them finely – a food processor is your best friend here, or you can go old-school with a freezer bag and a rolling pin. Don’t remove the cream filling; it adds to the richness of the crust!
- Unsalted Butter: Melted butter is what binds our Oreo crumbs together to form that perfect, sturdy base. I always recommend unsalted so you can control the overall saltiness, but if salted is all you have, it’s not a deal-breaker for this recipe.
- Cream Cheese: For that wonderfully tangy and creamy first layer, full-fat block cream cheese is a must. Make sure it’s softened to room temperature before you start mixing. This is super important to avoid lumps and ensure a silky-smooth texture. Low-fat cream cheese might work, but it can make the layer a bit less rich and firm.
- Powdered Sugar (Confectioners’ Sugar): This fine sugar is what sweetens our cream cheese layer without adding any grainy texture. Don’t try to substitute with granulated sugar here, as it won’t dissolve properly.
- Whipped Topping (like Cool Whip): This convenience ingredient is key for making our layers light, airy, and stable. You’ll need two 8-ounce tubs, thawed in the refrigerator. While you could try to use freshly whipped cream, it tends to be less stable and might not hold up as well over time in a no-bake dessert like this. If you do opt for homemade, make sure it’s very stiffly whipped.
- Cold Milk: This is for preparing our instant pudding. Whole milk will give you the creamiest, richest pudding, but 2% will also work perfectly fine. Skim milk might result in a slightly less luxurious pudding consistency.
- Instant Chocolate Pudding Mix: I prefer a 5.9-ounce package of instant dark chocolate pudding mix for a deeper, richer chocolate flavor that really complements the raspberry. However, classic milk chocolate pudding mix also works beautifully. Make sure it’s “instant” – the cook-and-serve type won’t set up correctly for this recipe.
- Fresh Raspberries: These are the star of the show and provide that vibrant, tart counterpoint to all the richness. Choose firm, bright red raspberries that are free from mold. You’ll want enough for layering and for a gorgeous garnish on top. While you can use thawed frozen raspberries in a pinch, fresh ones truly offer the best texture and visual appeal.
- Raspberry Preserves/Jam (Optional but Recommended): A thin layer of good quality raspberry preserves, slightly warmed to make it spreadable, can really boost the raspberry flavor in between the creamy layers. It adds a lovely concentrated fruitiness.
- Vanilla Extract: A splash of good quality vanilla extract enhances the flavors in the cream cheese layer, adding a subtle warmth.
- Chocolate Shavings or Mini Chocolate Chips: For a final decorative flourish and an extra touch of chocolatey goodness on top.
Step-by-Step Instructions
Let’s get down to business and assemble this spectacular No Bake Raspberry Chocolate Lasagna! It’s all about building delicious layers, and I promise, it’s easier than it sounds.
- Prepare Your Pan: First things first, grab a 9×13 inch baking dish. If you want super clean slices, you can lightly spray it with cooking spray and then line it with parchment paper, leaving an overhang on the sides. This makes lifting the whole lasagna out incredibly easy later on.
- Make the Oreo Crust: Take your 36 Oreo cookies and crush them into fine crumbs. As I mentioned, a food processor makes this quick work! Transfer the crumbs to a medium bowl. Melt 6 tablespoons of unsalted butter and pour it over the crumbs. Stir until the crumbs are thoroughly moistened. Press this mixture firmly and evenly into the bottom of your prepared 9×13 inch dish. I like to use the bottom of a flat-bottomed glass or a measuring cup to get it really compact. Once pressed, pop the crust into the freezer for about 10-15 minutes, or the refrigerator for 30 minutes, to help it set.
- Create the Cream Cheese Layer: While your crust chills, in a large bowl, beat the softened cream cheese with the powdered sugar and vanilla extract using an electric mixer until it’s light, fluffy, and completely smooth. Make sure there are no lumps! Once smooth, gently fold in one 8-ounce tub of thawed whipped topping until just combined. Be careful not to overmix; we want to keep it light and airy. Spread this creamy mixture evenly over your chilled Oreo crust.
- Prepare the Chocolate Pudding Layer: In a separate medium bowl, whisk together the cold milk and the instant chocolate pudding mix for about 2-3 minutes, or until the mixture begins to thicken. It will look quite thick. Now, gently fold in about half of the remaining 8-ounce tub of thawed whipped topping into the pudding. This lightens the pudding and makes it more spreadable. Spread this chocolate layer carefully over the cream cheese layer.
- Add the Raspberry Layer: This is where our star fruit comes in! If using raspberry preserves, you can warm them slightly in the microwave for 10-15 seconds to make them easier to spread. Gently spread a thin layer of preserves over the chocolate pudding layer, if using. Then, arrange a generous layer of fresh raspberries over the chocolate pudding (or preserves). You can press them down ever so slightly to embed them into the pudding.
- The Final Whipped Topping & Garnish: Spread the remaining thawed whipped topping evenly over the raspberry layer. Now for the fun part: garnishing! Arrange additional fresh raspberries artfully on top, and sprinkle with chocolate shavings or mini chocolate chips.
- Chill, Chill, Chill!: This is the most crucial step for a perfect no-bake lasagna. Cover the dish tightly with plastic wrap and refrigerate for at least 4-6 hours, but ideally overnight. The longer it chills, the better the layers will set, making for cleaner slices and a more stable dessert.
- Serve and Enjoy: When you’re ready to serve, remove from the refrigerator. If you used parchment paper, you can carefully lift the entire lasagna out of the dish before slicing. For clean slices, run your knife under hot water and wipe it clean between each cut. Then, simply slice and bask in the glory of your delicious No Bake Raspberry Chocolate Lasagna!
Tips & Suggestions
Making my No Bake Raspberry Chocolate Lasagna is a delightful experience, and with a few of my favorite tips, you can ensure yours turns out perfectly every time. I want you to enjoy every single bite!
- For the Perfect Oreo Crust: Don’t skimp on crushing the Oreos finely. Large chunks can make the crust crumbly rather than firm. Also, really press that crust down firmly into the pan. This compaction is what gives you a solid base that won’t fall apart when you slice into your lasagna. Chilling it briefly in the freezer helps it set even faster.
- Room Temperature Cream Cheese is Non-Negotiable: I cannot stress this enough! If your cream cheese isn’t soft and at room temperature, you’ll end up with lumps in your cream cheese layer, no matter how much you beat it. Plan ahead and take it out of the fridge at least an hour before you start.
- Don’t Overmix the Whipped Topping: When folding the whipped topping into the cream cheese and pudding mixtures, be gentle. We want to keep that light, airy texture. Overmixing can deflate it and make your layers denser than desired.
- Choosing Your Raspberries: Fresh, ripe raspberries are definitely the star here. Look for ones that are vibrant in color and plump. If fresh aren’t available, you can use frozen raspberries, but make sure they are completely thawed and thoroughly drained to prevent excess moisture from making your lasagna watery. Pat them dry with a paper towel if necessary.
- Enhancing Raspberry Flavor: My secret for an extra burst of raspberry goodness is that optional layer of warmed raspberry preserves. It adds an intense, concentrated fruit flavor that really makes the raspberries pop against the chocolate. You could also very carefully infuse a non-alcoholic raspberry syrup into the whipped topping if you wanted an even more pronounced raspberry essence in the creamy layers.
- For Cleaner Slices: This is a classic trick for any layered dessert! Before each slice, dip your knife in hot water and wipe it clean. This helps the knife glide through the layers without dragging and gives you beautifully neat pieces of your lasagna.
- Make Ahead Marvel: This dessert truly shines when it’s made ahead of time. I always recommend chilling it overnight. The extended chill time allows all the layers to firm up perfectly and for the flavors to meld together beautifully. It’s a fantastic option for parties because you can do all the work the day before!
- Customize Your Topping: While fresh raspberries and chocolate shavings are my go-to, feel free to get creative with your garnish! A sprinkle of mini chocolate chips, a dusting of cocoa powder, or even a few fresh mint leaves can add a lovely touch.
Storage
Once you’ve gone to the effort of creating this magnificent No Bake Raspberry Chocolate Lasagna, you’ll want to make sure it stays fresh and delicious! Proper storage is key for enjoying every last slice.
- Refrigeration is Essential: Due to the dairy components like cream cheese, milk, and whipped topping, this lasagna absolutely needs to be stored in the refrigerator. It cannot be left at room temperature for extended periods.
- Airtight is Best: To keep your lasagna fresh and prevent it from absorbing any odors from your fridge, cover it tightly. If you used a 9×13 inch dish with a lid, that’s perfect! Otherwise, wrap the dish snugly with plastic wrap, ensuring it touches the surface of the whipped topping to prevent a skin from forming, and then cover with aluminum foil for an extra layer of protection.
- How Long Will It Last?: When stored properly in an airtight container in the refrigerator, my No Bake Raspberry Chocolate Lasagna will remain fresh and delicious for about 3-4 days. After that, the texture might start to change slightly, especially the creaminess of the layers.
- Can You Freeze It?: Yes, you can! This is a great option if you want to make it well in advance or have leftovers you want to save. To freeze, make sure the lasagna is fully set and chilled. Then, either wrap the entire pan tightly with multiple layers of plastic wrap and then foil, or slice the lasagna into individual portions and wrap each slice separately before placing them in an airtight freezer-safe container.
- Thawing from Frozen: To enjoy a frozen slice, simply transfer it from the freezer to the refrigerator and let it thaw for several hours, or overnight, until it’s completely soft. While the taste will still be fantastic, the texture of the whipped topping and cream cheese layers might be slightly softer than when freshly made. It’s still a wonderfully refreshing treat!
Final Thoughts
And there you have it! My complete guide to creating the most incredible No Bake Raspberry Chocolate Lasagna With Oreo Crust. I truly believe this dessert is an absolute must-try for anyone craving something utterly delicious, yet wonderfully simple to prepare.
What makes this particular recipe so special is the delightful symphony of textures and flavors. You have the unmistakable crunch of the rich Oreo crust, followed by a luscious, smooth chocolate layer, and then the vibrant, tangy sweetness of the raspberry cream cheese topping. It all culminates in a dessert that’s not only visually stunning but also incredibly satisfying. I promise you, with every forkful of this No Bake Raspberry Chocolate Lasagna With Oreo Crust, you’ll experience a little burst of joy.
It’s the perfect treat for any occasion, from a casual family dinner to a festive gathering, especially when you want to impress without the hassle of baking. Go ahead, give this recipe a try; I know you and your loved ones will absolutely adore it!

Leave a Comment