
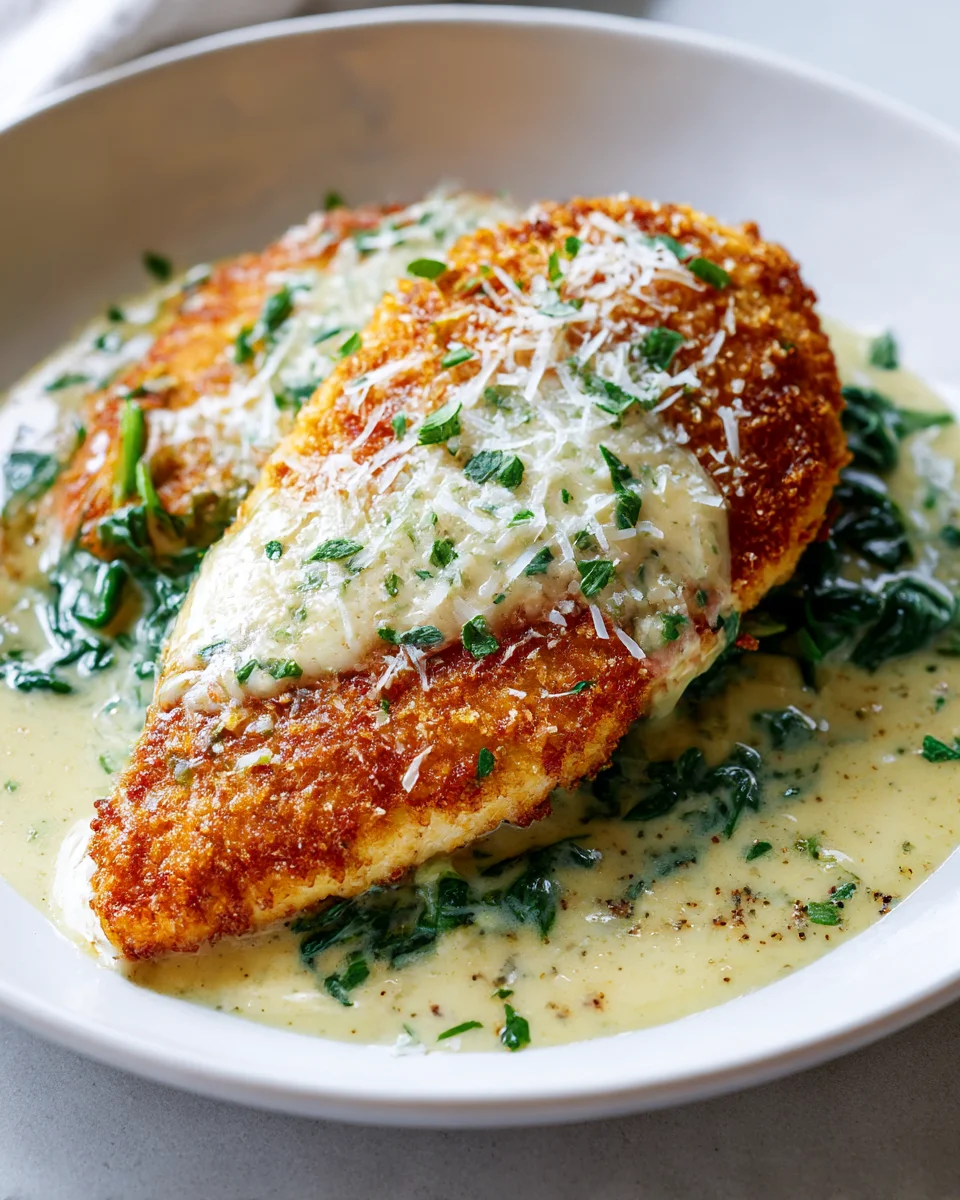
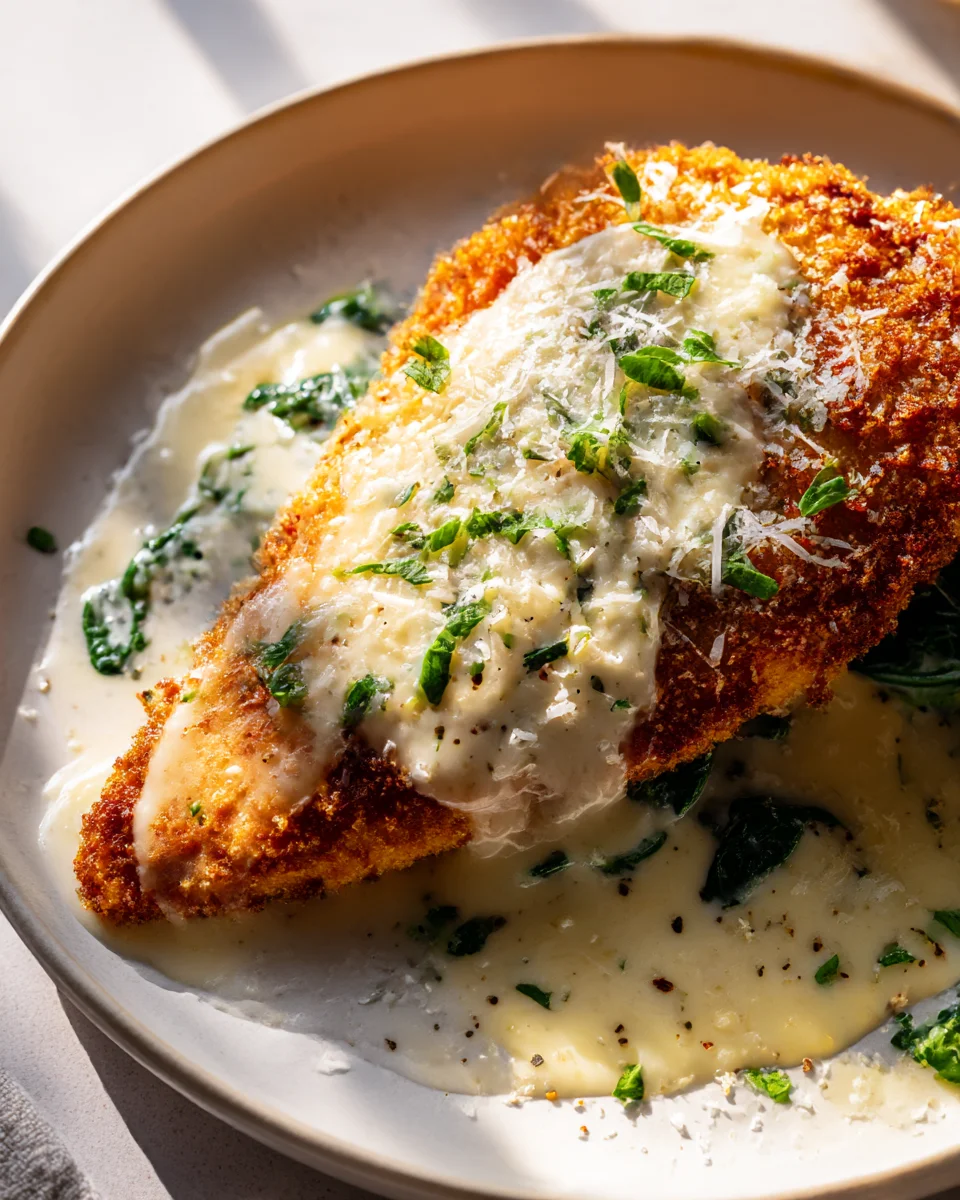
Crispy Parmesan Chicken With A Rich Garlic Sauce Easy Dinner Idea
Oh my goodness, I have found your next favorite weeknight meal, and I am so excited to share it with you! Imagine sinking your teeth into perfectly golden, crispy chicken, each bite bursting with savory Parmesan flavor. But wait, there’s more! This isn’t just any crispy chicken; it’s bathed in the most luscious, rich garlic sauce you can imagine. Seriously, this sauce is a game-changer – it’s creamy, garlicky, and utterly irresistible, taking simple chicken to a gourmet level without any fuss.
I absolutely adore this dish because it delivers incredible flavor and a satisfying texture contrast, making it feel fancy enough for guests but easy enough for a busy Tuesday night. You’ll love how quickly it comes together, transforming humble chicken breasts into a truly unforgettable meal that everyone at your table will rave about. It’s the perfect balance of crispy, creamy, and wonderfully garlicky – a true crowd-pleaser that I know you’ll be making again and again.
Ingredient Notes
Creating my Crispy Parmesan Chicken with a Rich Garlic Sauce is all about selecting the right components to achieve that perfect balance of crunch, tenderness, and decadent flavor. Here’s a breakdown of the key ingredients I swear by and some handy substitutions if you need them.
For the Crispy Parmesan Chicken:
- Chicken Breasts: I always go for boneless, skinless chicken breasts, usually about 6-8 ounces each. Pounding them to an even thickness (about ½ inch) is crucial for quick and even cooking, ensuring they stay juicy while the exterior gets perfectly crispy.
- All-Purpose Flour: This is the first step in our breading station, helping the egg wash adhere better. You can easily substitute this with a gluten-free all-purpose flour blend if you’re catering to dietary needs.
- Eggs: Two large eggs, lightly beaten, act as the “glue” for our breading.
- Panko Breadcrumbs: Ah, the secret to that ultimate crispiness! Panko breadcrumbs are coarser and lighter than regular breadcrumbs, absorbing less oil and delivering a superior crunch. If you can’t find panko, regular fine breadcrumbs will work, but the texture won’t be quite as airy. For a gluten-free option, look for gluten-free panko or crush some gluten-free crackers.
- Freshly Grated Parmesan Cheese: This is non-negotiable for flavor and that delightful golden crust. Pre-grated cheese in a can often contains anti-caking agents that can prevent it from melting and crisping up properly. Grate your own for the best results! Pecorino Romano can be used for a sharper, saltier kick.
- Seasonings: Salt, black pepper, and a touch of garlic powder and onion powder are my go-to for seasoning the flour and the chicken itself. Don’t be shy; proper seasoning at each stage builds incredible flavor.
- Olive Oil or Vegetable Oil: For pan-frying. I prefer a neutral oil with a higher smoke point, like vegetable or canola oil, but a good quality olive oil works wonderfully too. You’ll need enough to generously coat the bottom of your pan.
For the Rich Garlic Sauce:
- Unsalted Butter: This forms the base of our luxurious sauce, adding richness and a wonderful flavor. If you only have salted butter, just adjust the amount of added salt later.
- Fresh Garlic: And I mean a lot of it! Minced fresh garlic is the star here. I usually use 6-8 cloves, but honestly, if you’re a garlic lover like me, don’t hesitate to add more!
- Chicken Broth: This adds depth and liquid to our sauce. Low-sodium chicken broth gives you more control over the seasoning. Vegetable broth is a perfectly fine substitute.
- Heavy Cream: This is what truly makes the sauce “rich.” Heavy cream (or whipping cream) provides that velvety texture and decadent mouthfeel. For a lighter sauce, you could use half-and-half, but it won’t be quite as thick or luxurious. For a dairy-free alternative, full-fat coconut milk (canned, not from a carton) can be used, though it will impart a subtle coconut flavor.
- Dried Italian Seasoning: A blend of herbs like oregano, basil, and thyme that complements both the chicken and the garlic sauce beautifully.
- Fresh Parsley: Chopped fresh parsley for garnish adds a pop of color and freshness right at the end.
Step-by-Step Instructions
Get ready to create a truly delicious and impressive meal with these simple, step-by-step instructions for my Crispy Parmesan Chicken with a Rich Garlic Sauce. I promise, it’s easier than it sounds!
- Prepare the Chicken: Lay your chicken breasts one at a time between two pieces of plastic wrap. Using a meat mallet or a heavy rolling pin, pound them evenly to about ½-inch thickness. This ensures they cook quickly and uniformly, staying tender inside. Season both sides of the pounded chicken generously with salt, black pepper, garlic powder, and onion powder.
- Set Up the Breading Station: Grab three shallow dishes. In the first, add the all-purpose flour. In the second, whisk the eggs until smooth. In the third, combine the panko breadcrumbs and freshly grated Parmesan cheese, along with a pinch more salt and pepper.
- Bread the Chicken: Dredge each chicken breast first in the flour, shaking off any excess. Next, dip it into the beaten egg, ensuring it’s fully coated. Finally, press the chicken firmly into the panko-Parmesan mixture, making sure it’s completely covered. The more breading, the crispier it will be! Set the breaded chicken aside on a plate or wire rack.
- Pan-Fry the Chicken: Heat about ¼ to ½ inch of olive or vegetable oil in a large skillet over medium-high heat. Once the oil is shimmering and hot (you can test it by flicking a tiny bit of water in; it should sizzle), carefully add the breaded chicken breasts to the pan, being careful not to overcrowd it. You’ll likely need to cook them in batches.
- Cook Until Golden and Crispy: Cook the chicken for 4-6 minutes per side, or until it’s golden brown, crispy, and cooked through (internal temperature should reach 165°F or 74°C). Once cooked, transfer the crispy chicken to a plate lined with paper towels to drain any excess oil. Keep them warm while you make the sauce.
- Start the Garlic Sauce: Carefully drain most of the oil from the skillet, leaving about a tablespoon or two, along with any delicious browned bits. Reduce the heat to medium. Add the unsalted butter to the skillet and let it melt.
- Sauté the Garlic: Add the minced fresh garlic to the melted butter and sauté for about 1 minute, until fragrant. Be careful not to burn it!
- Build the Sauce: Pour in the chicken broth, scraping up any browned bits from the bottom of the pan – this adds so much flavor! Stir in the dried Italian seasoning. Let it simmer for 2-3 minutes to reduce slightly.
- Make it Rich: Reduce the heat to low and stir in the heavy cream. Let the sauce gently simmer for another 3-5 minutes, stirring occasionally, until it thickens to your desired consistency. Taste and adjust seasonings with salt and pepper as needed.
- Serve It Up: Spoon a generous amount of that rich garlic sauce over your crispy Parmesan chicken. Garnish with fresh chopped parsley. Serve immediately and enjoy!
Tips & Suggestions
Achieving that perfect “Crispy Parmesan Chicken with a Rich Garlic Sauce” isn’t just about following the steps; it’s about a few clever tricks that elevate the dish from good to absolutely amazing. Here are my favorite tips to ensure your meal is a resounding success!
- Pat the Chicken Dry: Before you even think about breading, make sure your chicken breasts are thoroughly patted dry with paper towels. Excess moisture is the enemy of crispiness! A dry surface allows the breading to adhere better and crisp up beautifully.
- Don’t Skimp on the Parmesan: I cannot stress this enough – use freshly grated Parmesan cheese. The pre-shredded stuff often has cellulose which can make it melt strangely and prevent that gorgeous, golden crust. Freshly grated Parmesan not only tastes better but also helps create that incredibly crispy, cheesy coating.
- Mind Your Oil Temperature: This is key for crispy chicken that’s not greasy. If your oil isn’t hot enough, the breading will absorb too much oil and become soggy. If it’s too hot, the breading will burn before the chicken is cooked through. Medium-high heat is usually perfect; look for shimmering oil, and test with a tiny pinch of breadcrumb – it should sizzle immediately.
- Don’t Crowd the Pan: Give your chicken breasts space to breathe! Overcrowding the skillet lowers the oil temperature and steams the chicken instead of frying it, resulting in a less crispy exterior. Work in batches if necessary.
- Build Flavor in Layers: Season at every stage! Season the chicken itself, then the flour, and finally the panko-Parmesan mixture. Don’t forget to season the sauce as well. This layered approach ensures every bite is packed with flavor.
- For Extra Crispy Chicken: After breading, you can let the chicken sit on a wire rack for about 10-15 minutes before frying. This allows the breading to “set” a bit, making it less likely to fall off and promoting even crispier results.
- Serve It Fresh: While the sauce is fantastic, the chicken is at its absolute best right off the pan. The crispiness is unmatched when fresh.
- Serving Suggestions: This dish pairs beautifully with so many sides! I love it with a simple pasta (like linguine or fettuccine) to soak up that luscious garlic sauce, creamy mashed potatoes, steamed green beans, roasted asparagus, or a fresh side salad to cut through the richness. Don’t forget some crusty bread for dipping!
- Spice it Up: If you like a little heat, add a pinch of red pepper flakes to the garlic sauce when you add the Italian seasoning.
Storage
While my Crispy Parmesan Chicken with a Rich Garlic Sauce is undeniably best enjoyed fresh, I totally understand the need for leftovers, especially when it’s so delicious! Here’s how I recommend storing and reheating your meal to maintain as much of its original glory as possible.
- Refrigeration:
- Chicken: Once cooled completely, store the cooked chicken in an airtight container in the refrigerator for up to 3-4 days. To best preserve its crispiness, I sometimes wrap individual pieces in paper towels before placing them in the container to absorb any excess moisture.
- Sauce: The rich garlic sauce can be stored separately in its own airtight container in the refrigerator for up to 3-4 days. Storing it separately helps prevent the chicken from becoming soggy.
- Reheating:
- Chicken (for Crispiness): To bring back some of that wonderful crispiness, reheating the chicken in the oven or an air fryer is your best bet. Preheat your oven to 375°F (190°C) or your air fryer to 350°F (175°C). Place the chicken on a wire rack set on a baking sheet and heat for 10-15 minutes, or until heated through and crisped to your liking. Flipping halfway through can help.
- Chicken (Quick Method): If you’re in a hurry and don’t mind a softer chicken, you can microwave it. However, be aware that it will lose its crisp texture. Heat in 30-second intervals until warmed through.
- Sauce: The garlic sauce reheats beautifully on the stovetop. Gently warm it over low-medium heat, stirring occasionally, until simmering. If it’s too thick, you can add a tablespoon or two of chicken broth or water to thin it out to your desired consistency. You can also microwave the sauce, stirring every minute or so.
- Freezing:
- Chicken: Cooked crispy Parmesan chicken can be frozen, but please be aware that the breading will likely lose a significant amount of its crispiness upon thawing and reheating. You can freeze individual pieces in an airtight freezer-safe container or freezer bag for up to 2-3 months. Thaw in the refrigerator overnight before reheating in the oven or air fryer.
- Sauce: The rich garlic sauce freezes very well! Pour it into a freezer-safe container, leaving a little headspace for expansion. Freeze for up to 3 months. Thaw in the refrigerator overnight, then reheat gently on the stovetop, adding a splash of broth or water if needed.
Final Thoughts
So there you have it! We’ve journeyed through creating a truly delightful dinner. I honestly believe that Crispy Parmesan Chicken With A Rich Garlic Sauce Easy Dinner Idea is more than just a meal; it’s a testament to how simple ingredients can come together to create something truly extraordinary. The satisfying crunch of the parmesan chicken, beautifully complemented by that luxurious, savory garlic sauce, is a combination made in culinary heaven. It’s perfectly quick for those busy weeknights but impressive enough to serve when you have company. I absolutely encourage you to give this recipe a try – I promise, this Crispy Parmesan Chicken With A Rich Garlic Sauce Easy Dinner Idea will quickly become a cherished favorite in your home. Enjoy every delicious bite!
Leave a Comment