
I’ll never forget the first time I tried stuffed cheddar soft pretzels at a cozy little café tucked away in the heart of the city. It was a rainy Saturday afternoon, and the rich, buttery aroma wafting through the air instantly drew me in. As I took my first bite, the warm, chewy exterior gave way to a gooey, melty cheddar filling that danced on my palate. In that moment, the world outside faded away, and all that mattered was the blissful combination of flavors and textures.
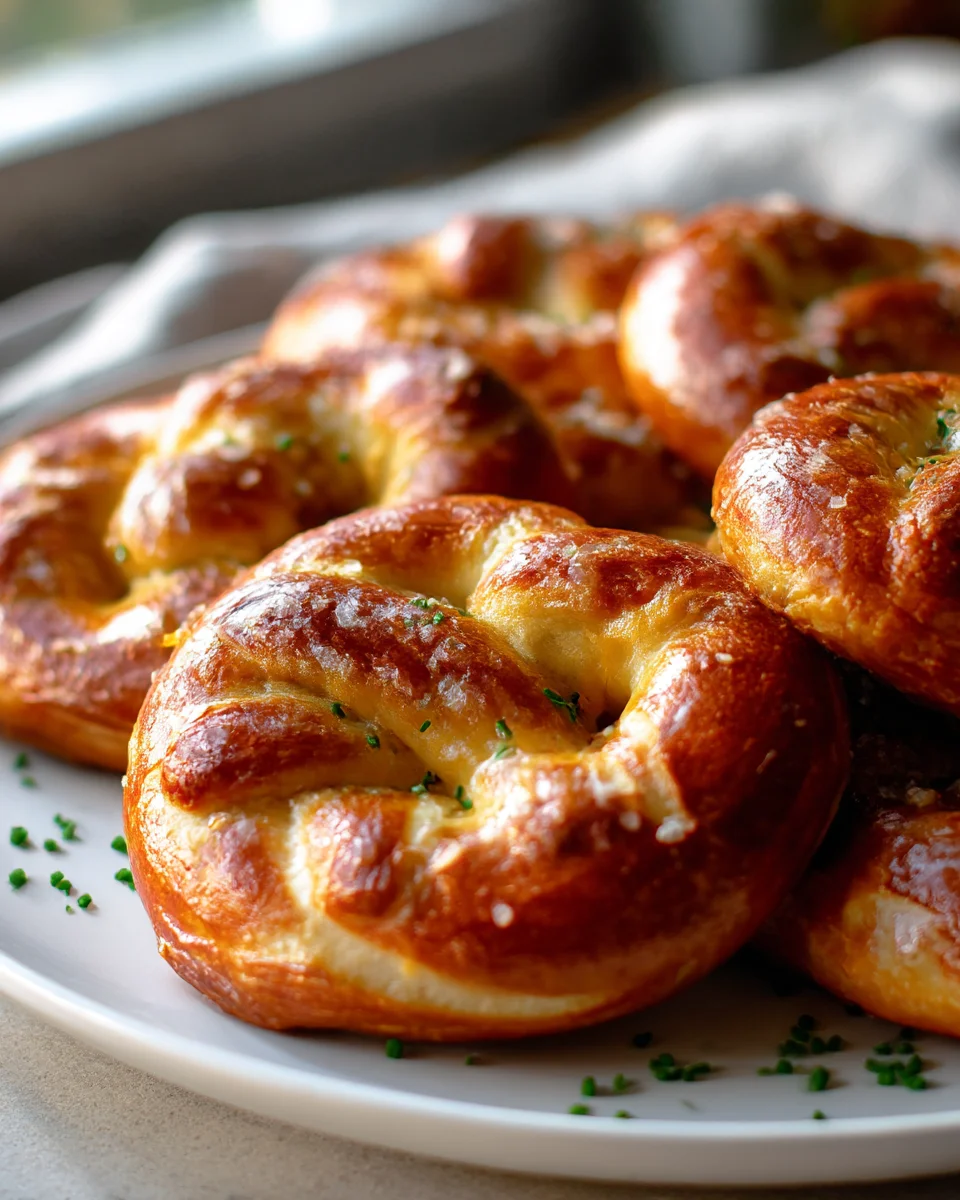
These stuffed cheddar soft pretzels have become a cherished recipe in my home, not just for their incredible taste, but for the joy they bring to gatherings with family and friends. Picture this: a golden-brown pretzel, its surface glistening with a sprinkle of coarse salt, and a soft, pillowy interior that hugs a generous pocket of melted cheddar. The first pull reveals strings of cheese that stretch and tease, inviting everyone to take a bite. The scent of freshly baked dough mingles with the rich aroma of cheese, creating an irresistible allure that’s hard to resist.
What makes my version special is the addition of a hint of garlic powder and a pinch of smoked paprika, elevating the classic taste to new heights. These flavors complement the cheddar beautifully, making each bite a delightful surprise. So, if you’re ready to embark on this delicious journey, let me show you exactly how to make these stuffed cheddar soft pretzels that are sure to steal the show!
Why You’ll Love This Recipe
- Soft, chewy pretzels with a golden-brown exterior and a warm, gooey cheddar filling that creates a heavenly combination of textures.
- Ready in under 1 hour, this recipe is perfect for a quick snack or appetizer that doesn’t compromise on flavor.
- Budget-friendly, with most ingredients being pantry staples, making it easy to whip up without breaking the bank.
- Customizable to your taste; you can experiment with different cheeses or add spices for a unique twist on the classic recipe.
- Easy to follow step-by-step instructions ensure that even novice bakers can create these pretzels without a hitch.
Ingredients
- For the Dough:
- 4 cups all-purpose flour
- 1 packet (2 1/4 tsp) active dry yeast
- 1 teaspoon salt
- 1 tablespoon granulated sugar
- 1 1/2 cups warm water (110°F to 115°F)
- 2 tablespoons unsalted butter, melted
- For the Cheese Filling:
- 2 cups sharp cheddar cheese, shredded
- 1/2 cup cream cheese, softened
- 1/4 teaspoon garlic powder
- 1/4 teaspoon onion powder
- 1/4 teaspoon black pepper
- For the Baking Soda Bath:
- 1/2 cup baking soda
- 10 cups water
- For Topping:
- Coarse sea salt, for sprinkling
- 1 egg, beaten (for egg wash)
Let’s dive into some key ingredients. First up is the active dry yeast, which is crucial for leavening. It helps the dough rise, providing that soft, airy texture we all love in pretzels. When choosing yeast, make sure it’s fresh—check the expiration date, and if you want to substitute, instant yeast can be used in the same amount without needing to activate it in warm water.
Next, let’s talk about the cheese filling. Sharp cheddar cheese brings a robust flavor that pairs beautifully with the pretzel dough. You can also try using pepper jack for a spicy kick or mozzarella for a milder taste. Cream cheese adds creaminess and helps bind the filling, ensuring it stays gooey once melted. If you’re looking for a lighter option, you could use a low-fat cream cheese, but keep in mind it may alter the texture slightly.
Step-by-Step Instructions
- In a large mixing bowl, combine the warm water (110°F to 115°F), sugar, and active dry yeast. Let it sit for 5-10 minutes until the mixture is frothy. This indicates the yeast is active; if it doesn’t foam, your yeast may be expired.
- Add the melted butter and salt to the yeast mixture, stirring until combined. Gradually add the flour, mixing until a dough forms. You want the dough to be slightly tacky but not sticky. If it’s too sticky, add a little more flour, one tablespoon at a time.
- Knead the dough on a floured surface for about 5-7 minutes until it becomes smooth and elastic. A good test is to poke it with your finger; it should spring back. Avoid over-kneading which can lead to tough pretzels.
- Place the kneaded dough in a lightly greased bowl, cover it with a damp cloth, and let it rise in a warm area for about 30-40 minutes or until it doubles in size.
- While the dough is rising, prepare the cheese filling by mixing together the shredded cheddar, cream cheese, garlic powder, onion powder, and black pepper in a bowl. Mix until smooth and creamy; set aside.
- Preheat your oven to 425°F (220°C) and line a baking sheet with parchment paper. In a large pot, bring 10 cups of water and 1/2 cup of baking soda to a gentle boil.
- Once the dough has risen, punch it down and divide it into 12 equal portions. Roll each portion into a long rope, about 12 inches long. Flatten each rope slightly and place about 2 tablespoons of the cheese filling in the center. Pinch the dough around the filling to seal completely.
- Gently twist each stuffed dough rope into a pretzel shape and carefully place it in the boiling baking soda bath for about 30 seconds. This step is crucial for achieving that classic pretzel flavor and color, so don’t skip it!
- Remove the pretzels from the bath and place them on the prepared baking sheet. Brush each pretzel with the beaten egg and sprinkle generously with coarse sea salt.
- Bake for 12-15 minutes or until golden brown. Keep an eye on them; they should be a deep golden color but not burnt. Let them cool slightly before serving.
Pro Tips for the Best Stuffed Cheddar Soft Pretzels
- Be cautious with the boiling process; don’t overcrowd the pot as it can cause the pretzels to stick together. Boil 2-3 pretzels at a time for best results.
- Use a kitchen scale to measure your flour for the most accurate results. This ensures your dough is not too dry or too wet, which is a common mistake that can affect the texture.
- For extra flavor, consider adding a pinch of smoked paprika or cayenne pepper to the cheese filling for a unique kick. You can also experiment with different cheese blends for varied flavors!
- Invest in a dough scraper; it makes kneading and cutting the dough much easier, and it also helps keep your work surface clean.
- Letting the pretzels sit for a few minutes after baking enhances their flavor as they cool, allowing the ingredients to meld together beautifully. Enjoy them warm for the best experience!
Variations & Serving Ideas
For a twist on the classic recipe, try these variations:
1. Herbed Cheese Filling: Add fresh herbs like chives or parsley to the cheese filling for a refreshing flavor.
2. Spicy Jalapeño Pretzels: Incorporate finely chopped jalapeños into the cheese filling for a spicy kick.
3. Sweet Cinnamon Sugar Pretzels: Omit the cheese and instead fill the pretzels with a mixture of cinnamon and sugar, then top with a cinnamon-sugar mixture after baking.
These stuffed cheddar soft pretzels pair wonderfully with sides like:
1. Mustard Dipping Sauce: The tanginess of mustard complements the richness of the cheese.
2. Spicy Salsa: A refreshing salsa can cut through the richness of the pretzels and add a nice contrast.
3. Creamy Ranch Dip: This classic dip enhances the flavors of the pretzels while adding creaminess.
Storage, Make-Ahead & Reheating
Stuffed cheddar soft pretzels can be stored in the refrigerator for up to 3 days in an airtight container. They freeze well too! To freeze, place them in a single layer on a baking sheet until solid, then transfer them to a freezer-safe bag or container for up to 2 months. For reheating, preheat your oven to 350°F (175°C) and bake for about 10-12 minutes until warmed through. Interestingly, these pretzels taste even better the next day as the flavors develop and meld together!
Frequently Asked Questions
Can I make Stuffed Cheddar Soft Pretzels ahead of time?
Yes — in fact, they can be prepared the day before! Just assemble the pretzels and store them in the fridge. Bake them fresh right before serving to enjoy their warm, gooey goodness.
What kind of cheese works best for the filling?
Sharp cheddar cheese is ideal for a rich flavor, but feel free to experiment with other cheeses like Gouda, Monterey Jack, or even a blend of different cheeses for a delicious twist!
Can I make these pretzels gluten-free?
Absolutely! Substitute the all-purpose flour with a gluten-free flour blend that contains xanthan gum. The texture and flavor may vary slightly, but they’ll still be delicious!
Why is the baking soda bath important?
The baking soda bath gives the pretzels their characteristic chewy texture and deep golden color. It helps develop that delicious pretzel flavor, making it a crucial step in the process!
How can I prevent the filling from leaking out?
Final Thoughts
Stuffed Cheddar Soft Pretzels are truly a treat that satisfies both the heart and the palate. The warm, chewy pretzel dough enveloping gooey, melted cheddar creates an irresistible combination that’s perfect for any gathering or a cozy night in.
This is the kind of recipe I come back to again and again, especially when I want to impress friends or indulge in a comforting snack while watching a movie. The aroma that fills your kitchen while these pretzels bake is simply divine!
I encourage you to give these pretzels a try. Experiment with different cheeses or add your favorite herbs and spices to personalize them. Don’t forget to share your results or any creative twists you come up with—I’d love to see how you make this recipe your own!


Leave a Comment