
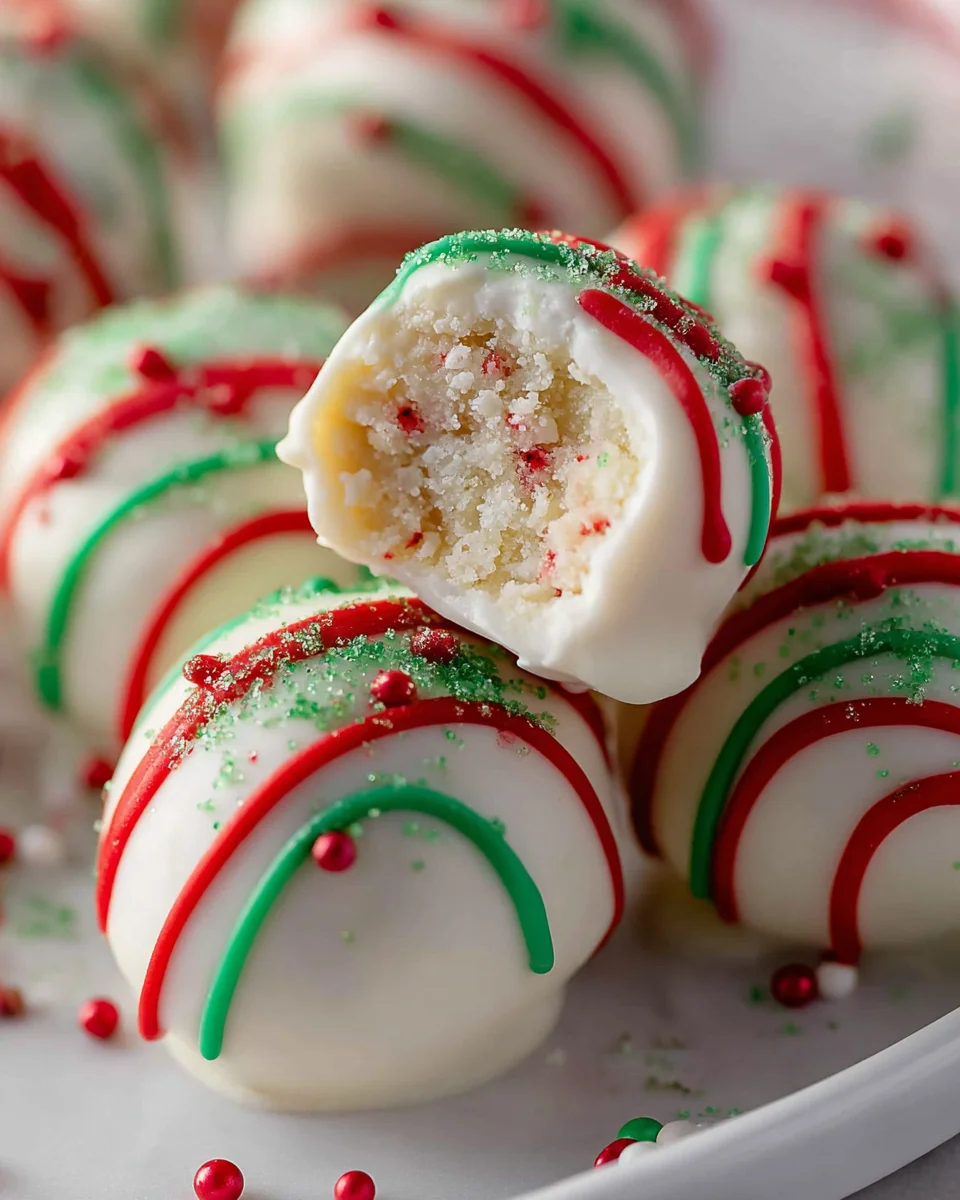
Little Debbie Christmas Tree Cakes Truffles are not just a dessert; they are an invitation to pure holiday joy! If you grew up eagerly anticipating the moment those iconic, frosted little trees appeared on store shelves each December, then prepare for a wave of delicious nostalgia to wash over you. We’re taking that beloved seasonal treat – a symbol of simple, festive pleasure for generations – and transforming it into something even more extraordinary: a bite-sized, decadent truffle that’s as easy to make as it is delightful to devour.
This recipe isn’t just about convenience; it’s about elevating a classic into a sophisticated yet playful confection perfect for sharing. People absolutely adore these truffles because they capture all the sweet, cakey goodness and festive spirit of the original Little Debbie Christmas Tree Cakes, but with an added layer of rich, fudgy texture and an undeniable elegance perfect for any holiday gathering. I promise, these Little Debbie Christmas Tree Cakes Truffles will become the star of your dessert table this year! They offer a perfect blend of cherished childhood memory and gourmet indulgence, making them irresistible to all ages.
Ingredients:
- 12 Little Debbie Christmas Tree Cakes (the classic vanilla cake with green frosting and creme filling – typically found seasonally)
- 8 ounces cream cheese, full-fat, softened completely to room temperature
- 16-24 ounces white candy melts or good quality white chocolate (you can also use milk or dark chocolate if you prefer, but white gives that iconic “snow” look)
- 2-3 tablespoons shortening or refined coconut oil (optional, for thinning chocolate if needed)
- Assorted festive sprinkles (Christmas-themed nonpareils, jimmies, edible glitter, or small shaped sprinkles)
- Parchment paper or silicone baking mats
- Small microwave-safe bowls or a double boiler setup for melting chocolate
- A 1-inch or 1.5-inch cookie scoop (for consistent truffle size)
- Dipping tools or forks (a small, narrow fork works wonderfully)
Preparation of the Truffle Base
-
Unwrap and Crumble the Cakes: First things first, carefully unwrap all 12 of your Little Debbie Christmas Tree Cakes. Place them into a large, sturdy mixing bowl. This is where the magic begins for our Little Debbie Christmas Tree Cakes Truffles! Now, using a strong fork, a potato masher, or even clean hands, begin to thoroughly mash and crumble the cakes. Your goal here is to break down every single cake, including the cake itself, the creme filling, and the iconic green frosting, until it forms a uniform, moist crumb. You really want to ensure there are no large chunks left behind, as this will affect the texture and rollability of your truffles. If you have a food processor, you can do this in batches for a super fine, consistent crumb, which makes for an incredibly smooth truffle base. Just pulse until no discernible large pieces remain.
-
Incorporate the Cream Cheese: Once your cakes are perfectly crumbled, add the softened cream cheese to the bowl. It’s really important that your cream cheese is at room temperature, as this ensures it will blend smoothly and effortlessly with the cake crumbs without leaving any lumps. A cold cream cheese will resist mixing and result in a clumpy, uneven truffle base. Now, it’s time to get your hands dirty! I find that using my hands is the absolute best way to mix this concoction. Knead and squish the cake and cream cheese together until a completely uniform, pliable “dough” forms. You want the mixture to be well-combined, sticky enough to hold together, but not overly wet. It should be firm enough that you can easily roll it into a ball without it crumbling apart. This wonderful blend is the very foundation of your delectable Little Debbie Christmas Tree Cakes Truffles, so make sure it’s perfect.
-
First Chill – The Essential Step: This step is non-negotiable for perfectly formed truffles. Once your mixture is thoroughly combined, cover the bowl tightly with plastic wrap. Place the bowl into the refrigerator and chill for a minimum of 1 to 2 hours. Seriously, do not skip or rush this chilling phase! The cold helps the fats in the cream cheese and cake frosting firm up, making the mixture much easier to handle and roll. If you try to roll the truffles before they are properly chilled, the mixture will be too soft and sticky, leading to a frustrating, messy experience and misshapen truffles. Adequate chilling ensures your Little Debbie Christmas Tree Cakes Truffles will hold their shape beautifully.
Shaping the Truffles
-
Prepare for Rolling: While your truffle base is chilling, prepare your workspace. Line a large baking sheet with parchment paper or a silicone baking mat. This provides a non-stick surface for your rolled truffles and makes for easy cleanup. Get your cookie scoop ready. I personally find that a 1-inch cookie scoop creates the perfect bite-sized Little Debbie Christmas Tree Cakes Truffles, making them ideal for holiday platters and gifting. If you prefer a slightly larger treat, a 1.5-inch scoop works wonderfully too.
-
Scoop and Roll: Remove the chilled truffle mixture from the refrigerator. Using your chosen cookie scoop, portion out even amounts of the mixture. Gently roll each portion between your clean palms to form smooth, round balls. Try to make them as consistent in size as possible. Uniformity not only looks more professional but also ensures even dipping and setting of the chocolate coating. As you roll, you’ll notice how much easier this process is thanks to the thorough chilling. If the mixture starts to get too soft or sticky, simply pop it back into the fridge for 15-20 minutes to firm up again.
-
Second Chill for Firmness: Arrange the rolled truffles on your prepared baking sheet, leaving a little space between each one. Once all the mixture has been rolled into perfect spheres, return the entire baking sheet to the refrigerator for another 30 to 60 minutes. This second chill is crucial for setting up your Little Debbie Christmas Tree Cakes Truffles to be absolutely firm before dipping. When the truffles are very cold, the warm melted chocolate will set much more quickly upon contact, reducing the chance of the truffles falling apart or getting too soft during the dipping process. This step truly makes a difference in achieving beautifully coated truffles.
Coating and Decorating
-
Melt the Chocolate Coating: While your truffles are getting their final chill, it’s time to prepare your dipping chocolate. If you’re using white candy melts, place about two-thirds of them into a microwave-safe bowl. Microwave in 30-second intervals, stirring thoroughly after each interval, until the candy melts are mostly melted and smooth. Be careful not to overheat, as this can cause the chocolate to seize or become grainy. If using a double boiler, place the candy melts in the top bowl over simmering water, stirring until smooth. Remove from heat immediately once melted. If your chocolate seems too thick for dipping, you can stir in 1/2 to 1 teaspoon of shortening or refined coconut oil at a time, until you reach a smooth, pourable consistency. This is especially helpful if you’re using good quality chocolate bars rather than candy melts. Keep the remaining un-melted candy melts aside, as you may need to add a few more if your melted chocolate cools down too much during dipping, helping to keep it fluid.
-
The Dipping Process: Remove your extra-chilled Little Debbie Christmas Tree Cakes Truffles from the refrigerator. Work with a few truffles at a time, keeping the rest cold. Using a dipping tool, a small narrow fork, or even a toothpick inserted slightly into the truffle, gently lower one truffle into the melted chocolate. Submerge it completely, then lift it out, allowing any excess chocolate to drip back into the bowl. You can lightly tap the dipping tool against the rim of the bowl to help remove excess. A thinner, even coating is generally more desirable than a thick, clumpy one. Quickly transfer the coated truffle to your prepared parchment-lined baking sheet. Work swiftly! The cold truffles will cause the chocolate to set very quickly.
-
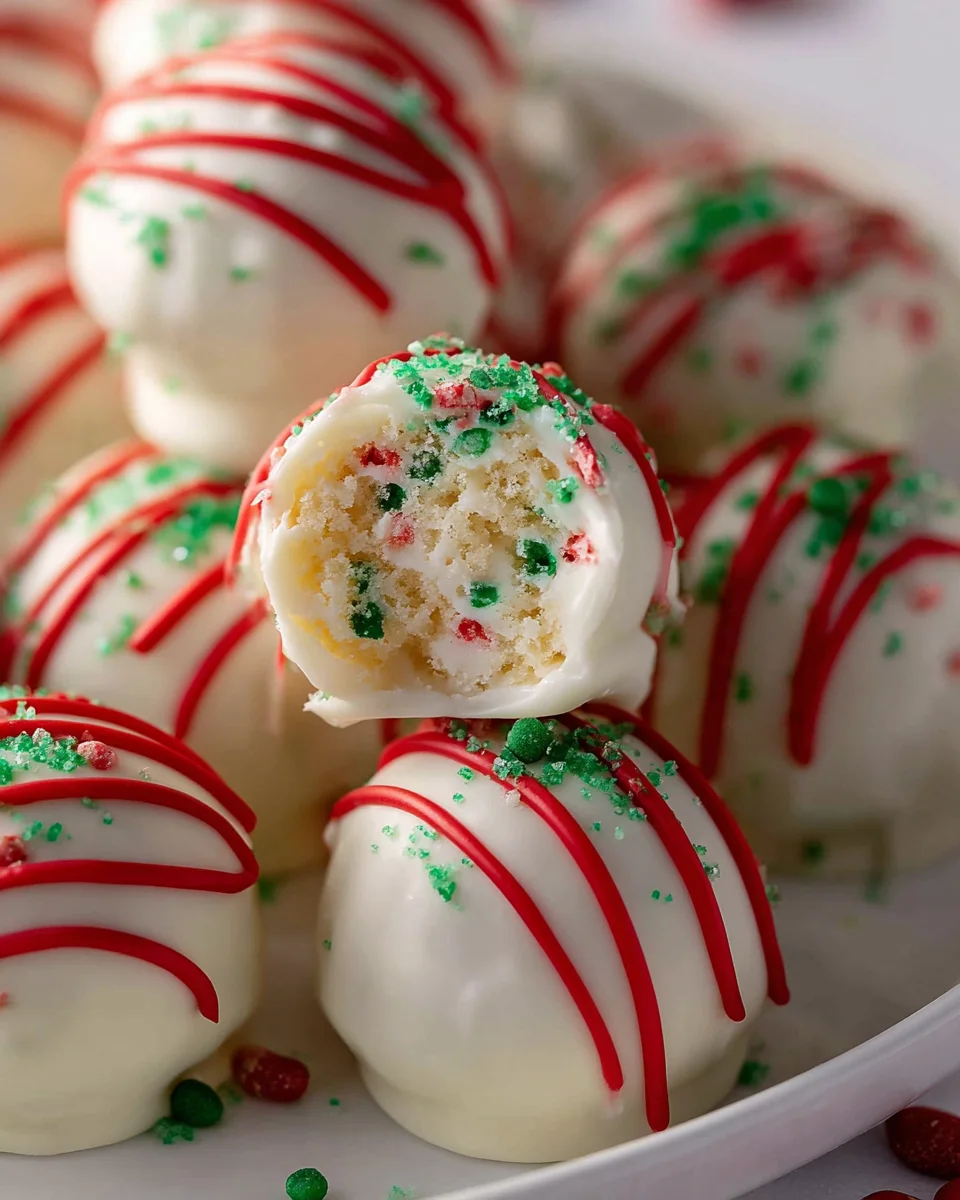
Time to Decorate! Immediately after placing each dipped truffle onto the parchment paper, while the chocolate is still wet and pliable, generously sprinkle it with your chosen festive sprinkles. This is where your Little Debbie Christmas Tree Cakes Truffles truly transform into holiday masterpieces! Don’t be shy with the sprinkles; they add so much visual appeal and a delightful crunch. If you wait too long, the chocolate will set, and the sprinkles won’t adhere properly. Continue this dipping and decorating process with the remaining truffles, melting more chocolate if necessary as you go.
-
Final Set and Storage: Once all your Little Debbie Christmas Tree Cakes Truffles have been dipped and beautifully adorned with sprinkles, allow them to set completely. You can leave them at room temperature if your home is cool (around 68-70°F or 20-21°C), but for quicker and more reliable setting, I highly recommend placing the entire baking sheet back into the refrigerator for at least 30 minutes, or until the chocolate coating is completely firm to the touch. Once fully set, gently remove the truffles from the parchment paper. Any small “feet” of chocolate that may have formed around the base can often be carefully trimmed away with a sharp paring knife for a cleaner look. Your finished Little Debbie Christmas Tree Cakes Truffles are now ready to be enjoyed! Store them in an airtight container in the refrigerator for up to 1 week. This keeps them fresh and maintains their firm, delightful texture. You can also freeze them for up to 1 month for longer storage; just thaw them in the refrigerator before serving. These festive treats are an absolute joy to make and even more joyful to share during the holiday season!
Conclusion:
And there you have it, my friends! We’ve reached the sweet finale of our journey, and I genuinely hope you’re feeling as excited and inspired as I am about this incredible creation. If there’s one recipe I could implore you to try this holiday season, it’s truly this one. These delightful truffles aren’t just another dessert; they are a beacon of festive cheer, a testament to culinary ingenuity, and an absolute joy to behold and devour. What makes them an absolute must-try, you ask? Well, for starters, it’s the sheer simplicity. You’re taking a beloved, nostalgic holiday snack and transforming it into something elevated, elegant, and utterly irresistible, all with minimal effort. No complicated baking, no obscure ingredients, just pure, unadulterated holiday magic in every bite. They capture the essence of childhood wonder with the sophisticated appeal of a gourmet treat, bridging that gap beautifully. The combination of the soft, cakey interior, the creamy frosting, and the decadent chocolate coating is simply divine, creating a texture and flavor profile that will have everyone reaching for another. It’s truly a shortcut to a dazzling dessert platter, making you look like a kitchen wizard without breaking a sweat.
But the fun doesn’t stop once you’ve made your batch of these sensational treats. Oh no, the possibilities for enjoying and sharing them are endless! Imagine them artfully arranged on a beautiful platter for your next holiday gathering, nestled amongst other festive goodies. They make an exceptional centerpiece for any dessert table, sparking conversation and delight with their charming appearance. For a truly heartwarming gesture, consider packaging a handful of these beauties in a cute box or cellophane bag, tied with a festive ribbon, to gift to friends, neighbors, or teachers. They make incredibly thoughtful, homemade presents that speak volumes. And for a truly indulgent experience on a chilly winter evening, pair these with a steaming mug of hot cocoa, a rich cup of coffee, or even a glass of chilled milk. The way the smooth chocolate melts ever so slightly when enjoyed with a warm beverage is pure bliss.
Now, let’s talk about making these already fantastic truffles even more your own with a few delightful variations. The base recipe for these Little Debbie Christmas Tree Cakes Truffles is incredibly forgiving and adaptable, inviting your creativity to shine. Instead of just classic milk or dark chocolate, why not experiment with a luxurious white chocolate coating, perhaps dyed with a drop of green or red food coloring for an extra festive touch? You could sprinkle them with crushed candy canes for a refreshing peppermint crunch, or finely chopped pistachios for a lovely color and nutty texture. A drizzle of contrasting chocolate (dark over white, or vice-versa) adds a professional, artistic flourish. For those who love an extra layer of flavor, a tiny drop of peppermint extract or almond extract can be added to the melted coating chocolate or even mixed into the cake batter itself (before chilling, of course!) for an unexpected, delightful twist. Don’t be afraid to play with different types of sprinkles—from classic nonpareils to elegant edible glitter, each choice can transform their look for various occasions beyond just Christmas. Think pastel sprinkles for an Easter treat, or orange and black for Halloween using a different Little Debbie cake base!
So, what are you waiting for? This is your invitation, your friendly nudge, to dive into the joyous simplicity of making these incredible truffles. I promise you, the reward far outweighs the minimal effort. You’ll be amazed at how quickly they come together and even more impressed by the rave reviews you’re sure to receive. They are truly a showstopper that requires no actual baking talent, just a willingness to have fun in the kitchen. Don’t just read about the magic; create it! I wholeheartedly encourage you to give this recipe a try this holiday season. And when you do, please, please, share your experience! I absolutely adore hearing about your kitchen adventures. Tag me in your photos, tell me about your favorite variations, or just drop a comment to let me know how much you and your loved ones enjoyed these fabulous treats. Happy baking, happy sharing, and happy holidays!
Little Debbie Christmas Tree Cakes Truffles
Transform beloved Little Debbie Christmas Tree Cakes into decadent, bite-sized truffles perfect for holiday gatherings. Easy to make and irresistibly festive, these truffles capture all the sweet, cakey goodness with an added layer of rich, fudgy texture and elegance.
Ingredients
Instructions
Important Information
Nutrition Facts (Per Serving)
It is important to consider this information as approximate and not to use it as definitive health advice.
Allergy Information
Please check ingredients for potential allergens and consult a health professional if in doubt.
Leave a Comment