
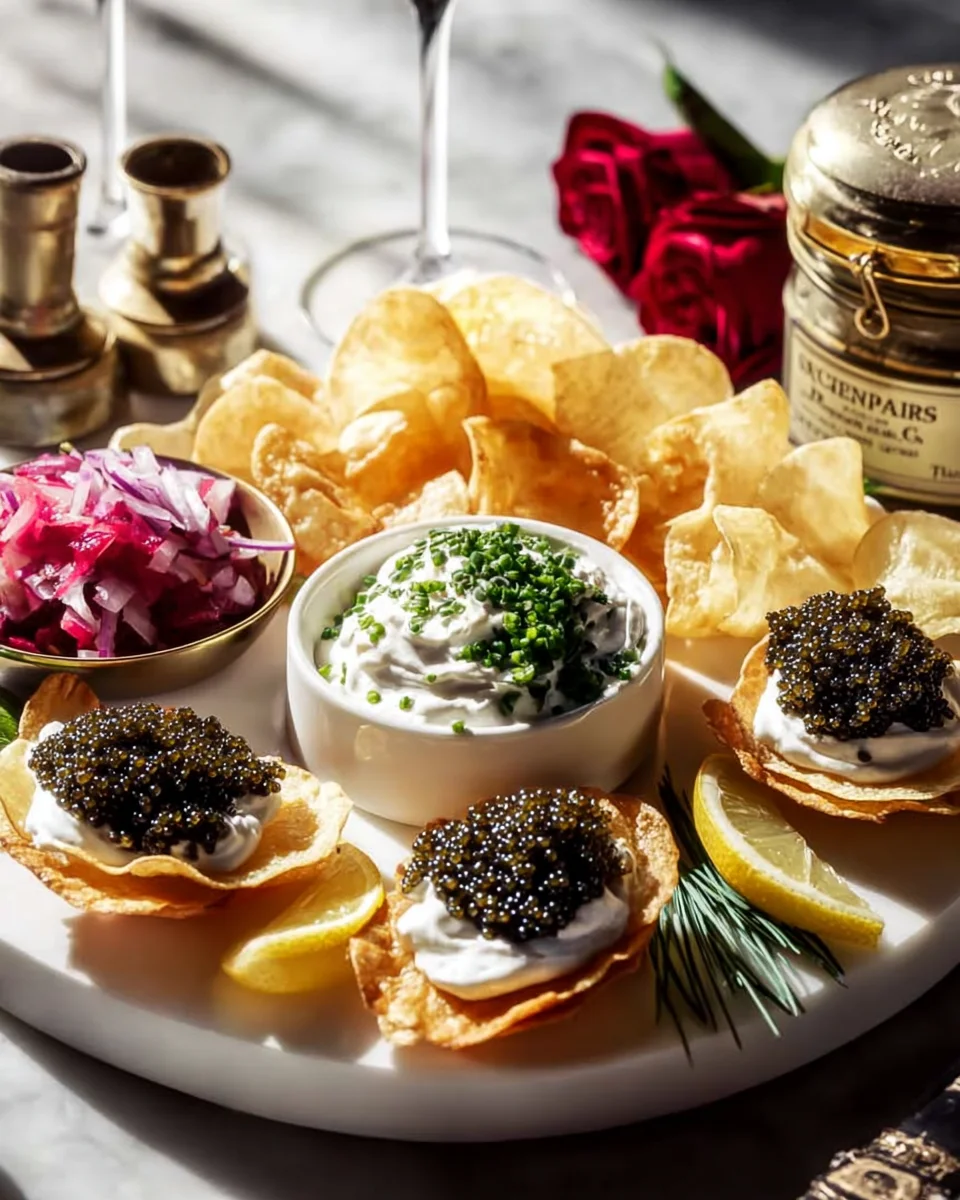
Caviar Appetizer – just the mention of it conjures images of sophistication, luxury, and unforgettable gatherings. Have you ever wanted to serve something truly exquisite that makes a lasting impression without spending hours slaving away in the kitchen? I am absolutely thrilled to guide you through creating an elegant dish that will do just that, surprising your guests with minimal effort.
For centuries, caviar has been celebrated across cultures, particularly revered in Russian and Persian traditions, where it symbolized wealth and festivity. It’s more than just a delicacy; it’s a timeless emblem of refined taste and culinary excellence. Today, while still holding its prestigious status, a Caviar Appetizer is surprisingly accessible to prepare, allowing anyone to bring a touch of grandeur to their table, transforming an ordinary evening into something extraordinary.
Why Everyone Loves This Elevated Bite
People adore a well-crafted caviar dish for its incredible sensory experience. The delightful burst of briny flavor, the subtle nutty undertones, and the unique, delicate texture create a symphony on the palate that is simply unparalleled. It’s the ultimate way to start a meal, offering a refreshing and luxurious introduction that excites the taste buds and sets a sophisticated tone for the entire event. It’s impressive, yet remarkably simple to assemble, proving that true elegance doesn’t always demand complex techniques.
Ingredients:
Friends, get ready to dive into the world of exquisite flavors! Crafting the perfect caviar appetizer is all about quality ingredients and a touch of patience. Here’s what you’ll need to create a truly memorable experience, including making our own delightful blini from scratch. Trust me, it’s worth it!
- For the Blini:
- 1 cup (240ml) warm milk (around 105-115°F / 40-46°C)
- 2 ¼ teaspoons active dry yeast (one standard packet)
- 1 teaspoon granulated sugar (for activating yeast)
- ¾ cup (90g) all-purpose flour
- ¼ cup (30g) buckwheat flour (optional, but adds a lovely authentic flavor and texture)
- ½ teaspoon fine sea salt
- 2 large eggs, separated (whites and yolks)
- 2 tablespoons unsalted butter, melted and cooled slightly, plus more for cooking
- For the Caviar and Accompaniments:
- 1.75 oz to 2 oz (50g to 56g) high-quality caviar (e.g., Osetra, Kaluga, Sevruga, or a sustainable American White Sturgeon). The type of caviar truly defines the luxuriousness of your caviar appetizer, so choose wisely within your budget.
- ½ cup (120g) crème fraîche, chilled
- 2 tablespoons fresh chives, finely minced
- ¼ small red onion, very finely minced (optional, for a sharp contrast)
- 2 large hard-boiled eggs, finely sieved or chopped (optional, for a classic touch)
- Lemon wedges (optional, for a hint of acidity)
Phase 1: Preparing the Blini Batter – The Foundation of Your Caviar Appetizer
Making blini from scratch might seem like an extra step, but I promise you, the warm, fluffy, slightly yeasty pancakes are the absolute best canvas for a luxurious caviar appetizer. This process ensures freshness and allows you to control the quality and texture of your foundation. Let’s get started!
- Activate the Yeast: In a medium bowl, pour in your warm milk. It’s crucial that the milk is warm, not hot, as too much heat will kill the yeast, and too cold won’t activate it. Aim for a temperature that feels like a warm bath. Sprinkle the active dry yeast and the teaspoon of granulated sugar over the milk. Give it a gentle stir to combine, then let it sit undisturbed for about 5 to 10 minutes. You’re looking for a foamy, bubbly layer to form on the surface – this is your visual cue that the yeast is alive and ready to work its magic. If you don’t see this activity, your yeast might be old or the milk temperature was off, and it’s best to start again to ensure your blini rise beautifully. This initial step is paramount for light and airy blini, which are essential for a delightful caviar appetizer.
- Combine Dry Ingredients: In a separate large mixing bowl, whisk together the all-purpose flour, buckwheat flour (if using), and salt. The buckwheat flour adds a wonderful earthy, nutty depth that complements the caviar beautifully, giving your blini an authentic Russian flair. If you don’t have buckwheat flour, simply use a full cup of all-purpose flour; your blini will still be delicious. Whisking ensures that all ingredients are evenly distributed, preventing lumps later on and making for a smoother batter.
- Mix Wet Ingredients (Except Egg Whites): Once your yeast is active and foamy, add the two egg yolks to the yeast mixture. Whisk them in until fully incorporated. Then, gently pour in the slightly cooled melted butter. Whisk again until everything is well combined. It’s important for the butter to be only slightly cooled, not hot, as hot butter can “cook” the egg yolks and affect the yeast. This mixture will be the liquid base for our blini, contributing richness and flavor.
- Combine Wet and Dry & Rest the Batter: Now, create a well in the center of your dry ingredients. Gradually pour the wet yeast-egg-butter mixture into the well while continuously whisking from the center outwards. Continue whisking until you have a smooth batter, free of lumps. Don’t overmix, though; just mix until combined. Overmixing can develop the gluten too much, leading to tough blini instead of tender ones. Once combined, cover the bowl tightly with plastic wrap or a clean kitchen towel and place it in a warm, draft-free spot for 1 to 1.5 hours. During this resting period, the yeast will ferment, causing the batter to rise and develop flavor. This crucial step is what gives blini their signature airy texture and slightly tangy taste, making them perfect for your elegant caviar appetizer.
- Prepare Egg Whites and Finish Batter: About 15 minutes before the end of the batter’s resting time, take your two egg whites (which you separated earlier) and place them in a clean, grease-free bowl. Using an electric mixer (or a whisk and some serious arm strength!), beat the egg whites until stiff peaks form. This means that when you lift the whisk, the peaks of the egg white stand upright without flopping over. These stiff egg whites are the secret to incredibly light and fluffy blini. Gently fold the beaten egg whites into your risen blini batter. Do this in two additions, being careful not to deflate the air you’ve incorporated. Use a spatula and a gentle, ‘cut and fold’ motion. This final addition will lighten the batter considerably, ensuring your blini are wonderfully tender and ready to be topped with the finest caviar.
Phase 2: Cooking the Blini – Crafting the Perfect Base
With your magnificent batter ready, it’s time to transform it into golden, fluffy blini. This stage is relatively quick, but precision helps ensure each blini is a perfect miniature pancake, ideal for holding its luxurious topping as part of your caviar appetizer.
- Preheat Your Pan: Place a non-stick frying pan, a well-seasoned cast iron pan, or a blini pan over medium-low heat. It’s important to keep the heat moderate to low; blini cook quickly and you want them to cook through without burning. Let the pan heat up for a few minutes until it’s consistently warm.
- Lightly Grease the Pan: Melt a small knob of unsalted butter in the pan, swirling to coat the bottom lightly. Alternatively, you can use a neutral oil like grapeseed or vegetable oil. Wipe away any excess with a paper towel. You want just enough fat to prevent sticking and give a golden crust, but not so much that the blini become greasy.
- Portion and Cook the Blini: Using a small ladle or a tablespoon, spoon about 1 to 1.5 tablespoons of batter for each blini onto the hot pan. Leave some space between each blini, as they will spread slightly. I usually aim for blini that are about 2-3 inches (5-7.5 cm) in diameter – the perfect bite-sized vessel for your caviar appetizer. Cook for about 2 to 3 minutes on the first side, or until you see small bubbles appearing on the surface and the edges look set and slightly golden.
- Flip and Finish: Carefully flip each blini using a thin spatula. Cook for another 1 to 2 minutes on the second side, until golden brown and cooked through. The blini should feel springy to the touch. Remove the cooked blini from the pan and transfer them to a plate.
- Keep Warm and Repeat: If you’re serving them immediately, you can keep the cooked blini warm by placing them on an oven-safe plate and covering them loosely with foil in a very low oven (around 200°F / 95°C). Continue cooking the remaining batter, adding a tiny bit more butter to the pan between batches if necessary. You should yield approximately 25-30 blini, depending on their size. These fresh, warm blini are undoubtedly the best foundation for any serious caviar appetizer.
Phase 3: Preparing the Garnishes – Enhancing Your Caviar Appetizer
While the blini are resting or staying warm, let’s turn our attention to the essential supporting actors for our caviar appetizer. These garnishes not only add visual appeal but also provide crucial textural and flavor contrasts that elevate the entire experience.
- Prepare the Crème Fraîche: Ensure your crème fraîche is thoroughly chilled. Give it a gentle stir if it seems too thick, just to make it smooth and easily spoonable. Crème fraîche offers a lovely, tangy creaminess that acts as a perfect buffer between the blini and the delicate caviar, mellowing its intensity and providing a beautiful textural counterpoint. Some people prefer unsalted butter, but I find crème fraîche superior for its subtle tang.
- Mince the Chives: Wash and thoroughly dry your fresh chives. Gather them into a tight bunch and use a very sharp knife to finely mince them. You want tiny, bright green flecks that will offer a delicate oniony freshness and a pop of color without overpowering the caviar. Place them in a small serving bowl.
- Mince the Red Onion (Optional but Recommended): If using, peel and very finely mince the red onion. The key here is “very finely” – you want almost translucent, tiny pieces that provide a sharp, piquant crunch without overwhelming the delicate flavor of the caviar. Red onion can be strong, so use it judiciously. Place in a separate small serving bowl.
- Prepare Hard-Boiled Eggs (Optional Classic): For a truly traditional caviar appetizer, hard-boiled eggs are a wonderful addition. Boil your eggs until firm (about 9-10 minutes), then cool them quickly in an ice bath. Peel them, then use a fine sieve or grater to create a delicate “snow” of egg white and yolk, or simply chop them very finely. The subtle, rich flavor and soft texture of the egg provide another layer of complexity. Keep the whites and yolks separated if you want to offer them individually, or mix gently. Place in a small serving bowl.
Phase 4: Assembling and Serving Your Exquisite Caviar Appetizer
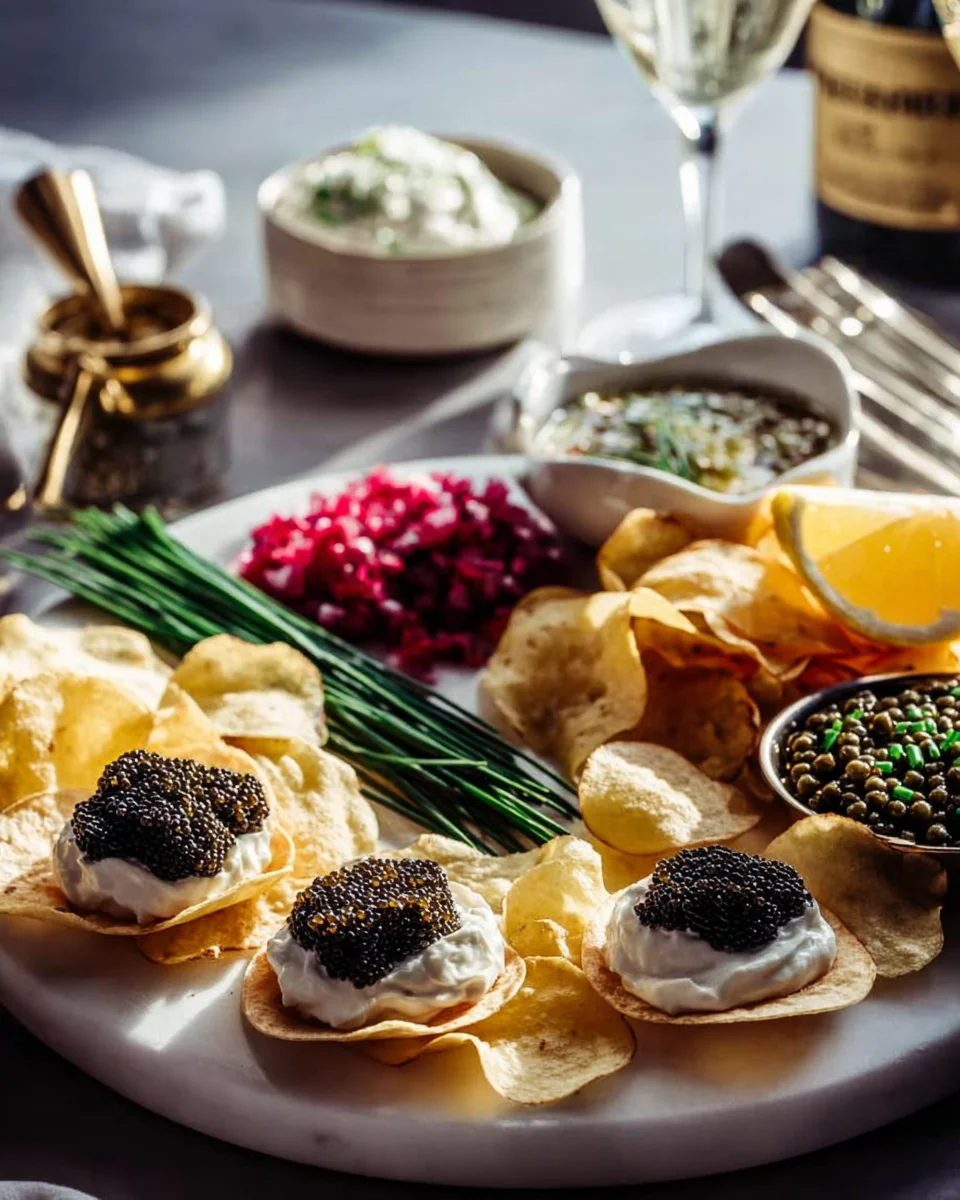
This is the moment we’ve been building towards – the grand finale! Assembling your caviar appetizer is an art form, focusing on presentation and respecting the star ingredient: the caviar. Remember, caviar is best served very cold.
- Arrange Your Blini: If serving buffet style, arrange your warm blini attractively on a platter. If serving individually, place a few blini on each guest’s plate. The warmth of the blini contrasts beautifully with the cold accompaniments.
- Prepare the Caviar: The most crucial step! Before serving, ensure your caviar is thoroughly chilled. Place the jar or tin of caviar directly onto a bed of crushed ice. This keeps it at the optimal temperature and enhances its flavor and texture. Provide a mother-of-pearl spoon, a bone spoon, or a plastic spoon for serving the caviar. Avoid metal spoons, as they can impart a metallic taste that detracts from the delicate flavor of the caviar. This tip is paramount for any authentic caviar appetizer experience.
-
The Assembly: Invite your guests to assemble their own, or you can prepare a few in advance for a stunning presentation.
- First, take a blini.
- Next, add a small dollop of chilled crème fraîche onto the center of the blini. You don’t want too much, just enough to cover the blini’s surface and act as a creamy base.
- Now, for the star: carefully spoon a generous helping of caviar (about ½ to 1 teaspoon per blini) directly onto the crème fraîche. Do not spread or mash the caviar; let the delicate eggs remain intact. The goal is to taste the individual pearls burst in your mouth.
- Finally, add your chosen garnishes. A sprinkle of minced chives is almost mandatory for its freshness and color. A tiny pinch of minced red onion or sieved egg can be added if desired, but remember, less is often more when it comes to caviar. The goal is to enhance, not overshadow, the luxurious taste of the caviar.
- Serve Immediately and Enjoy: Serve your beautiful caviar appetizer immediately while the blini are still warm and the caviar is perfectly chilled. Encourage guests to savor each bite, appreciating the complex interplay of textures and flavors – the soft blini, the creamy crème fraîche, the briny pop of the caviar, and the fresh bite of the chives. This truly is an experience, not just a dish. For an extra touch of elegance, offer small wedges of lemon on the side, although I often find a well-balanced caviar appetizer doesn’t need it. The quality of your ingredients, especially the caviar, will shine through. Enjoy this sophisticated and delightful treat!
Conclusion:
Well, friends, we’ve reached the exciting culmination of our culinary journey! I genuinely hope you’re as excited as I am about the prospect of bringing this incredible dish to life in your own kitchen. If there’s one thing I want you to take away from this recipe, it’s that elegance doesn’t have to mean complexity. This particular creation is a shining example of how simple, high-quality ingredients can combine to form something truly spectacular. It’s a dish that effortlessly elevates any gathering, transforming an ordinary evening into an unforgettable celebration. Think about the compliments you’ll receive, the delighted expressions on your guests’ faces as they savor each perfect bite.
This isn’t just another appetizer; it’s an experience. This specific Caviar Appetizer is the kind of dish that whispers luxury and sophistication without requiring hours of painstaking effort. I specifically designed this recipe to be approachable, ensuring that even novice cooks can achieve show-stopping results. The balance of textures – the delicate crunch, the creamy smoothness, the surprising burst of flavor – is meticulously crafted to tantalize the palate. It’s robust enough to make an impact, yet refined enough to maintain a certain grace. Trust me when I say, once you taste the harmonious blend of flavors we’ve explored, you’ll understand exactly why this recipe deserves a permanent spot in your entertaining repertoire. It’s a testament to the power of thoughtful cooking, proving that culinary magic is absolutely within your reach.
Now, let’s talk about how to truly make this recipe your own, or simply enhance the experience even further. While the recipe as written is absolutely perfect, a true culinary adventurer knows the joy of customization. For a classic presentation, I highly recommend serving these alongside crisp, thin blinis or perfectly toasted brioche points. The slightly sweet, buttery notes of these bases provide an ideal canvas for the delicate flavors. If you’re looking for a refreshing twist, consider a dollop of crème fraîche infused with a hint of lemon zest or finely chopped chives – it adds a bright, tangy counterpoint that is simply divine.
For beverage pairings, nothing quite matches the timeless elegance of a crisp, dry Champagne or a sparkling wine. The bubbles cleanse the palate beautifully, preparing you for the next exquisite bite. If you prefer spirits, a chilled, high-quality vodka, served neat, is a traditional and highly recommended accompaniment. On the non-alcoholic front, a sparkling water with a squeeze of fresh lime or a sophisticated non-alcoholic sparkling cider can be equally delightful.
Don’t be afraid to experiment with your garnishes too! Beyond the traditional chives, a tiny sprig of fresh dill can add a lovely herbaceous note, or even a microscopic shaving of red onion for a very subtle, piquant kick. For those who enjoy a bit of heat, a tiny whisper of freshly cracked white pepper can elevate the flavors without overpowering them. And remember, presentation is key. Arrange your appetizers artfully on a beautiful platter, perhaps nestled among some crushed ice to keep them perfectly chilled and visually stunning. Each small detail contributes to the overall luxurious experience you’re creating for yourself and your guests.
So, what are you waiting for? I implore you to set aside some time this week, gather your ingredients, and embark on this delightful culinary adventure. Don’t be intimidated by the perceived grandeur; this recipe is designed for success and pure enjoyment. Imagine the satisfaction of presenting this exquisite dish, knowing you’ve created something truly special with your own hands. This is your invitation to impress, to celebrate, and to savor.
Once you’ve experienced the magic of this recipe, I would absolutely love to hear about it! Please, share your triumphs, your clever adaptations, and even your “aha!” moments. Tag me on social media or drop a comment below; your experiences inspire me and the entire community. Let’s create a beautiful tapestry of shared culinary joy. Happy cooking, my friends, and prepare to be utterly charmed!
Caviar Appetizer Recipe: Quick, Elegant & Delicious!
Serve something truly exquisite that makes a lasting impression without spending hours slaving away in the kitchen. This elegant dish will surprise your guests with minimal effort.
Ingredients
Instructions
Important Information
Nutrition Facts (Per Serving)
It is important to consider this information as approximate and not to use it as definitive health advice.
Allergy Information
Please check ingredients for potential allergens and consult a health professional if in doubt.
Leave a Comment