
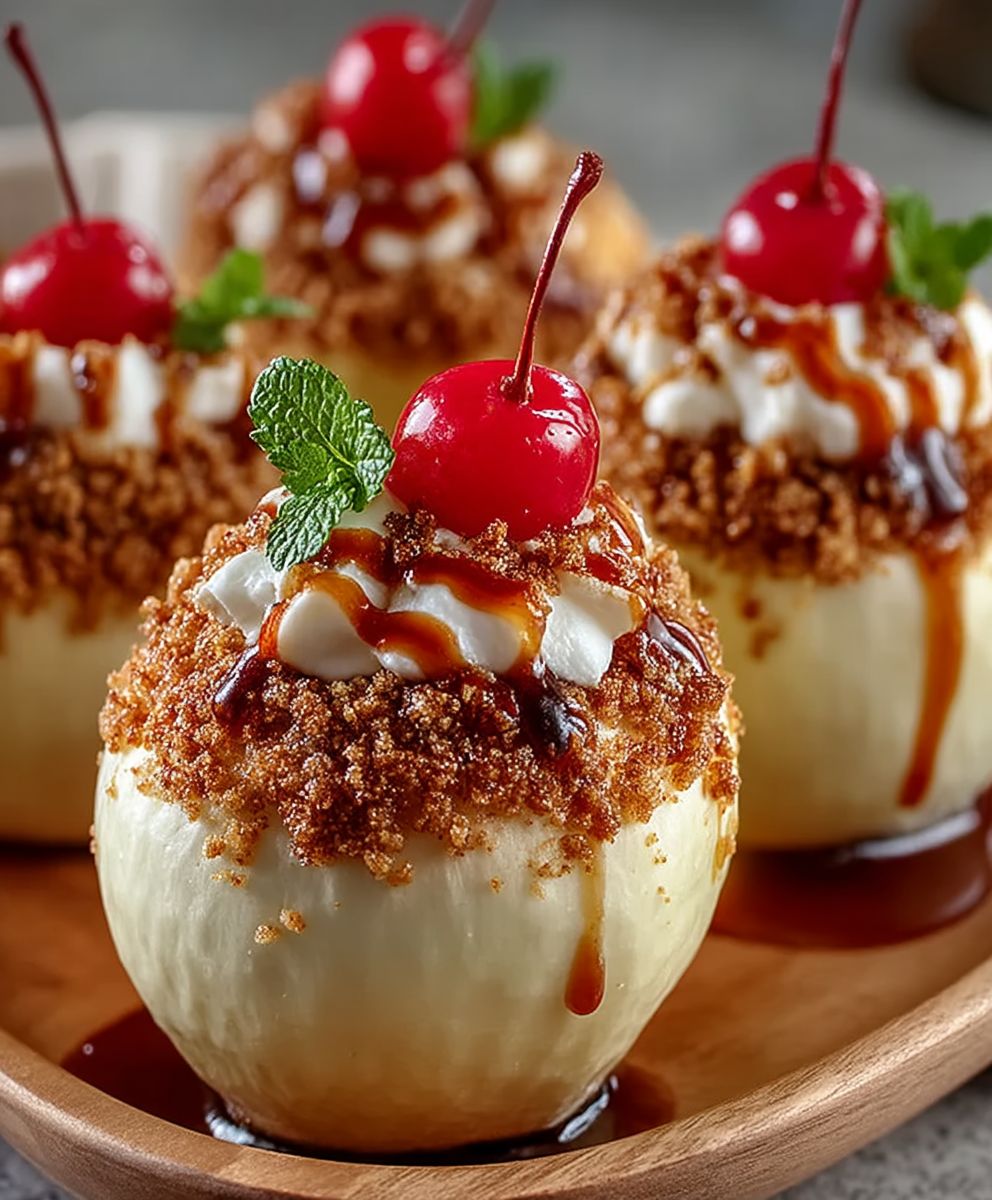
Cheesecake Stuffed Apples: Prepare to experience a dessert revelation! Imagine biting into a perfectly baked apple, its tender flesh giving way to a creamy, decadent cheesecake filling. It’s a symphony of textures and flavors that will leave you craving more. Forget choosing between apple pie and cheesecake; with this recipe, you get the best of both worlds in one delightful bite!
While the exact origins of stuffing apples with sweet fillings are somewhat obscure, the concept of combining fruit and creamy desserts has been around for centuries. Think of classic baked apples with custard or fruit tarts with cream cheese fillings. This recipe for Cheesecake Stuffed Apples takes that time-honored tradition and elevates it to a new level of deliciousness.
What makes these apples so irresistible? It’s the perfect balance of sweet and tart, the comforting warmth of baked apples, and the luxurious richness of cheesecake. Plus, they’re surprisingly easy to make, making them ideal for a weeknight treat or a show-stopping dessert for your next gathering. The creamy cheesecake filling complements the slightly tart apple beautifully, creating a flavor profile that’s both sophisticated and comforting. Get ready to impress your friends and family with this unique and unforgettable dessert!
Ingredients:
- For the Cheesecake Filling:
- 8 ounces cream cheese, softened
- 1/4 cup granulated sugar
- 1 large egg
- 1/2 teaspoon vanilla extract
- Pinch of salt
- For the Apples:
- 4 medium apples (Honeycrisp, Gala, or Fuji work well)
- 2 tablespoons butter, melted
- 1/4 cup brown sugar, packed
- 1/2 teaspoon ground cinnamon
- 1/4 teaspoon ground nutmeg
- 1/4 cup chopped pecans or walnuts (optional)
- 2 tablespoons all-purpose flour (optional, for thickening juices)
- Optional Toppings:
- Caramel sauce
- Whipped cream
- Chopped nuts
- Cinnamon sugar
Preparing the Cheesecake Filling:
- In a medium bowl, beat the softened cream cheese with an electric mixer until smooth and creamy. This is a crucial step – you don’t want any lumps in your filling! Make sure your cream cheese is truly softened to room temperature for the best results.
- Add the granulated sugar to the cream cheese and continue to beat until well combined. Scrape down the sides of the bowl to ensure everything is evenly mixed.
- Beat in the egg until just combined. Be careful not to overmix at this stage, as overmixing can incorporate too much air and cause the filling to crack during baking.
- Stir in the vanilla extract and salt. Mix until everything is well incorporated. Set the cheesecake filling aside while you prepare the apples. You can even refrigerate it for a bit if your kitchen is warm.
Preparing the Apples:
- Preheat your oven to 375°F (190°C). Line a baking sheet with parchment paper for easy cleanup. This will also prevent the apples from sticking to the pan.
- Wash and dry the apples thoroughly. Use an apple corer to remove the core from each apple, leaving the bottom intact. You want to create a well in the center of each apple to hold the cheesecake filling. If you don’t have an apple corer, you can use a sharp knife to carefully cut around the core and remove it.
- Using a small spoon or knife, carefully scoop out a little bit more of the apple flesh from the center of each apple, creating a larger cavity for the filling. Be careful not to pierce the bottom of the apple. This step is important because the apples will shrink slightly during baking, and you want to ensure there’s enough room for the cheesecake filling to expand.
- In a small bowl, melt the butter. You can do this in the microwave or in a small saucepan on the stovetop.
- In another small bowl, combine the brown sugar, cinnamon, nutmeg, and chopped pecans or walnuts (if using). This mixture will add a delicious flavor and texture to the apples.
- Brush the outside of each apple with the melted butter. This will help the apples to soften and caramelize during baking.
- Sprinkle the brown sugar mixture evenly over the outside of each apple. Make sure to get into all the nooks and crannies.
- If you want to thicken the juices that will release from the apples during baking, sprinkle a little all-purpose flour into the bottom of each apple cavity. This is optional, but it will help to create a thicker, more sauce-like consistency.
Stuffing and Baking the Apples:
- Spoon the cheesecake filling into the cavity of each apple, filling it to the top. Don’t worry if it mounds up a little – it will settle during baking.
- Place the stuffed apples on the prepared baking sheet. Make sure they are spaced evenly apart.
- Bake for 30-40 minutes, or until the apples are tender and the cheesecake filling is set. The baking time will depend on the size and type of apples you use. You can test the apples for doneness by inserting a fork into the flesh – it should be easily pierced. The cheesecake filling should be lightly golden brown and set around the edges. If the apples start to brown too quickly, you can tent them with foil.
- Remove the baked apples from the oven and let them cool slightly on the baking sheet before transferring them to a serving plate. This will prevent them from falling apart.
Serving and Enjoying:
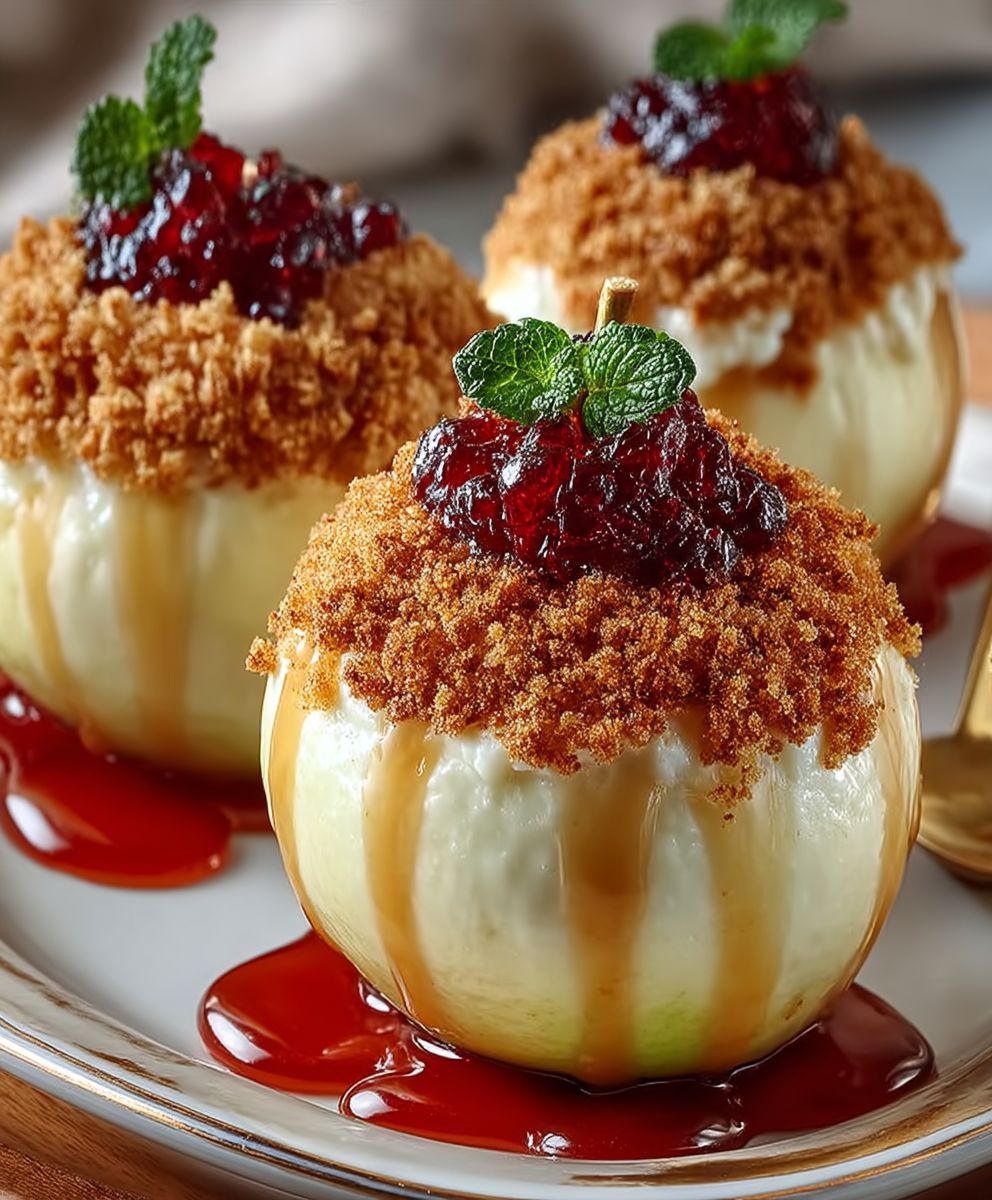
- Serve the cheesecake stuffed apples warm or at room temperature. They are delicious on their own, but you can also add a dollop of whipped cream, a drizzle of caramel sauce, or a sprinkle of chopped nuts for extra flavor and texture.
- Store any leftover apples in the refrigerator in an airtight container. They can be reheated in the microwave or oven.
Tips and Variations:
- Apple Variety: As mentioned earlier, Honeycrisp, Gala, and Fuji apples work well for this recipe. However, you can experiment with other varieties to find your favorite. Granny Smith apples will provide a tart contrast to the sweet cheesecake filling.
- Spice It Up: Add a pinch of ground ginger or cardamom to the brown sugar mixture for a warm and spicy flavor.
- Add Some Crunch: Instead of pecans or walnuts, try using chopped almonds, macadamia nuts, or even granola for a different texture.
- Chocolate Chips: Stir a handful of mini chocolate chips into the cheesecake filling for a chocolatey twist.
- Caramel Apple: Drizzle the baked apples with caramel sauce and sprinkle with sea salt for a caramel apple-inspired treat.
- Make it Vegan: Use vegan cream cheese and a flax egg (1 tablespoon ground flaxseed mixed with 3 tablespoons water) in the cheesecake filling to make this recipe vegan-friendly.
- Gluten-Free Option: Ensure all ingredients are gluten-free. The recipe is naturally gluten-free except for the optional flour for thickening the juices. Use a gluten-free flour blend instead.
- Individual Serving: This recipe is perfect for individual servings, making it a great option for dinner parties or special occasions.
- Make Ahead: You can prepare the cheesecake filling and stuff the apples ahead of time. Store them in the refrigerator until you are ready to bake. This is a great way to save time when entertaining.
- Don’t Overbake: Be careful not to overbake the apples, as they can become mushy. The apples should be tender but still hold their shape.
Troubleshooting:
- Cheesecake Filling Cracking: To prevent the cheesecake filling from cracking, avoid overmixing the batter and bake the apples at a lower temperature for a longer period of time.
- Apples Too Soft: If the apples are becoming too soft during baking, tent them with foil to prevent them from browning too quickly.
- Filling Too Runny: If the cheesecake filling is too runny, add a tablespoon of cornstarch to the batter to help thicken it.
- Apples Not Cooking Evenly: To ensure the apples cook evenly, rotate the baking sheet halfway through baking.
Nutritional Information (approximate, per apple):
Calories: 300-400
Fat: 15-25g
Saturated Fat: 8-12g
Cholesterol: 50-75mg
Sodium: 100-150mg
Carbohydrates: 30-40g
Sugar: 20-30g
Protein: 5-7g
Note: Nutritional information is an estimate and may vary depending on the specific ingredients used.
Conclusion:
So there you have it! These Cheesecake Stuffed Apples are more than just a dessert; they’re an experience. The warm, tender apple, the creamy, tangy cheesecake filling, and that delightful crunch from the topping – it’s a symphony of textures and flavors that will leave you wanting more. I truly believe this recipe is a must-try, especially if you’re looking for something a little different, a little healthier, and a whole lot more delicious than your average sweet treat.
Why is it a must-try? Well, beyond the incredible taste, it’s surprisingly easy to make. You don’t need to be a master baker to whip these up. The ingredients are simple, the instructions are straightforward, and the results are absolutely stunning. Plus, it’s a fantastic way to use up those extra apples you might have lying around, especially during apple season. It’s a crowd-pleaser, a conversation starter, and a guaranteed way to impress your friends and family.
Serving Suggestions and Variations:
Now, let’s talk about how to serve these beauties and some fun variations you can try. For a simple yet elegant presentation, serve them warm with a scoop of vanilla ice cream or a dollop of whipped cream. A sprinkle of cinnamon or a drizzle of caramel sauce would also be divine. If you’re feeling fancy, you could even add a few chopped pecans or walnuts for extra crunch.
But the fun doesn’t stop there! Feel free to experiment with different apple varieties. Granny Smith apples will give you a tart contrast to the sweet filling, while Honeycrisp apples will offer a more balanced flavor. You can also play around with the cheesecake filling. Add a swirl of raspberry jam for a fruity twist, or mix in some chocolate chips for a decadent treat. For a healthier option, use Greek yogurt instead of cream cheese in the filling and sweeten it with honey or maple syrup. You can even try using different types of nuts in the topping, like almonds or hazelnuts.
Another variation I love is to add a touch of spice to the apples before baking. A pinch of nutmeg, allspice, or even a little bit of ginger can really enhance the warm, comforting flavors of this dessert. And if you’re feeling adventurous, you could even try grilling the apples instead of baking them. The smoky flavor from the grill will add a whole new dimension to the dish.
Ultimately, the possibilities are endless! Don’t be afraid to get creative and put your own spin on this recipe. That’s what cooking is all about, after all – experimenting, having fun, and creating something that you truly love.
Time to Get Baking!
I’m so excited for you to try this recipe for Cheesecake Stuffed Apples! I know you’re going to love it. It’s the perfect dessert for any occasion, whether it’s a cozy night in or a festive gathering with friends and family. So, gather your ingredients, preheat your oven, and get ready to create something truly special.
And most importantly, don’t forget to share your experience with me! I’d love to hear how your Cheesecake Stuffed Apples turned out, what variations you tried, and what your friends and family thought. You can leave a comment below, tag me on social media, or even send me an email. I can’t wait to see your creations and hear your stories. Happy baking!
Cheesecake Stuffed Apples: A Delicious & Easy Fall Dessert
These Cheesecake Stuffed Apples are a delightful fall treat! Cored apples are filled with a creamy cheesecake mixture, topped with a brown sugar spice blend, and baked until tender. Enjoy warm with optional toppings like caramel sauce or whipped cream. Perfect for individual servings and easily customizable with different apple varieties, nuts, or spices.
Ingredients
* **Convert it to a different format:** I can convert this into JSON, YAML, Markdown, or another structured format.
* **Answer questions about the recipe:** Ask me questions like “How long do I bake the apples?” or “What kind of apples are recommended?”
* **Summarize the recipe:** I can provide a shorter version of the recipe, focusing on the key steps.
* **Suggest substitutions:** If you have dietary restrictions or ingredient preferences, I can suggest substitutions.
* **Scale the recipe:** I can adjust the ingredient quantities to make more or fewer servings.
* **Compare it to other recipes:** If you provide another recipe, I can compare the ingredients, instructions, or nutritional information.
* **Generate variations:** Based on the tips and variations section, I can generate a new recipe variation.
* **Identify potential issues:** I can analyze the recipe for potential issues or areas where clarity could be improved.
* **Create a shopping list:** I can generate a shopping list based on the ingredients.
**Please tell me what you’d like me to do with this recipe information.**
Instructions
- In a medium bowl, beat the softened cream cheese with an electric mixer until smooth and creamy.
- Add the granulated sugar to the cream cheese and continue to beat until well combined.
- Beat in the egg until just combined.
- Stir in the vanilla extract and salt. Mix until everything is well incorporated. Set aside.
- Preheat oven to 375°F (190°C). Line a baking sheet with parchment paper.
- Wash and dry the apples. Use an apple corer to remove the core from each apple, leaving the bottom intact.
- Scoop out a little bit more of the apple flesh from the center of each apple, creating a larger cavity for the filling.
- In a small bowl, melt the butter.
- In another small bowl, combine the brown sugar, cinnamon, nutmeg, and chopped pecans or walnuts (if using).
- Brush the outside of each apple with the melted butter.
- Sprinkle the brown sugar mixture evenly over the outside of each apple.
- If you want to thicken the juices that will release from the apples during baking, sprinkle a little all-purpose flour into the bottom of each apple cavity.
- Spoon the cheesecake filling into the cavity of each apple, filling it to the top.
- Place the stuffed apples on the prepared baking sheet, spaced evenly apart.
- Bake for 30-40 minutes, or until the apples are tender and the cheesecake filling is set.
- Remove from the oven and let them cool slightly on the baking sheet before transferring them to a serving plate.
- Serve warm or at room temperature. Add optional toppings if desired.
- Store any leftover apples in the refrigerator in an airtight container.
Notes
* **Convert it to a different format:** (e.g., JSON, YAML, Markdown)
* **Summarize the recipe:** (e.g., a short description, a list of key ingredients and steps)
* **Answer questions about the recipe:** (e.g., “Can I use a different type of apple?”, “How long does it take to bake?”)
* **Suggest variations or substitutions:** (e.g., “What can I use instead of pecans?”, “How can I make this healthier?”)
* **Compare it to other recipes:** (If you provide another recipe, I can compare ingredients, steps, or nutritional information)
* **Generate a shopping list:**
* **Calculate the total cooking time:**
* **Identify potential allergens:**
* **Scale the recipe:** (e.g., for 2 apples instead of 4)
Let me know what you’d like me to do! For example, you could say:
“Convert the recipe to JSON format.”
or
“Summarize the recipe in a short paragraph.”
or
“What are some substitutions for pecans?”
Printable Recipe Card
Want just the essential recipe details without scrolling through the article? Get our printable recipe card with just the ingredients and instructions.

Leave a Comment