
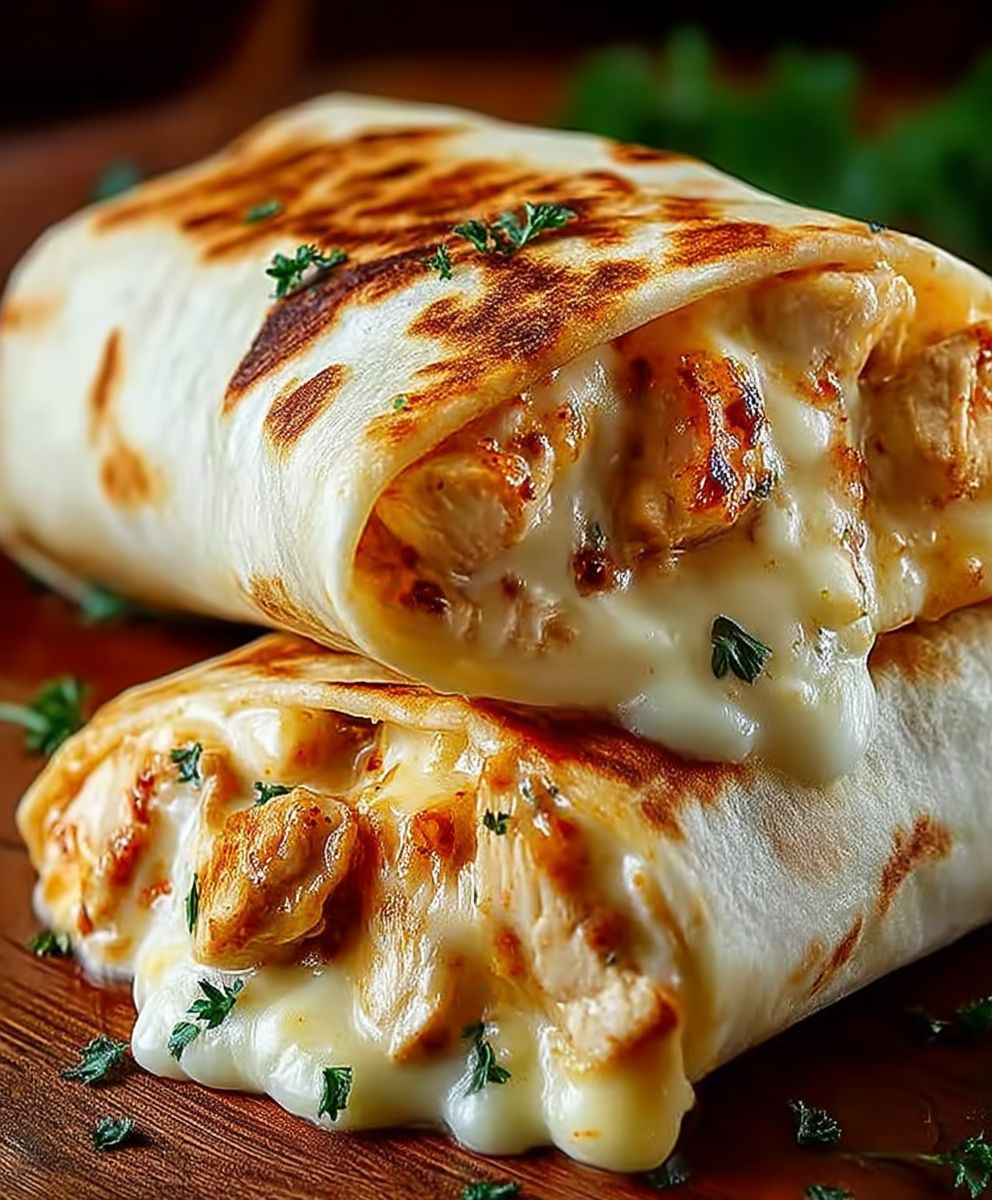
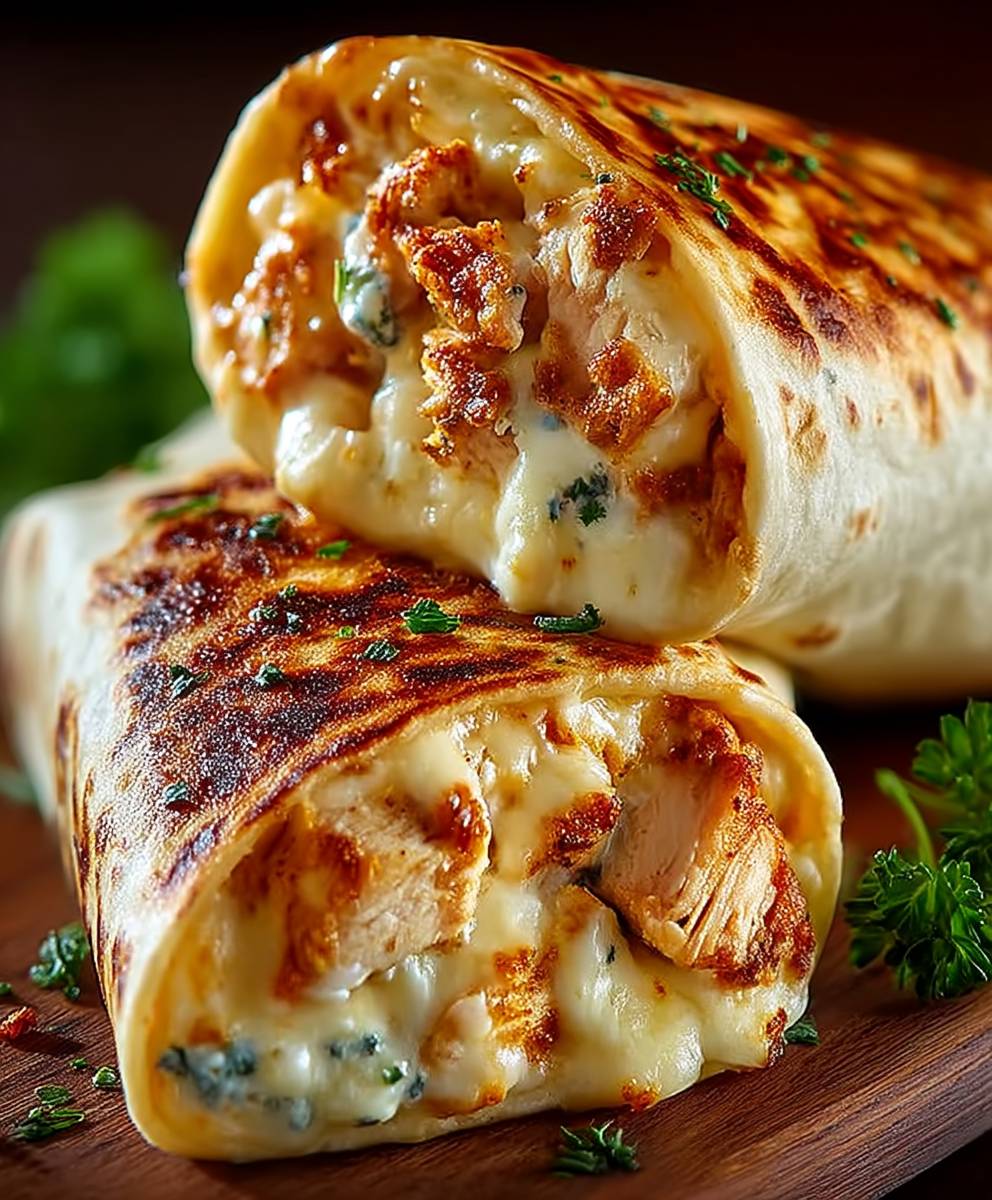
Cheesy Garlic Chicken Wraps: Prepare to be amazed! Imagine sinking your teeth into a warm, toasted wrap bursting with juicy, garlic-infused chicken, smothered in melted, gooey cheese. This isn’t just lunch; it’s an experience! I’m so excited to share this recipe with you because it’s a guaranteed crowd-pleaser, perfect for busy weeknights or a fun weekend gathering.
While the exact origins of the chicken wrap are debated, the concept of wrapping savory fillings in flatbreads has ancient roots across various cultures. From Middle Eastern shawarma to Mexican burritos, the idea of portable, flavorful meals is timeless. This particular iteration, the Cheesy Garlic Chicken Wrap, takes inspiration from classic Italian-American flavors, combining the comforting taste of garlic bread with the satisfying protein of chicken.
What makes these wraps so irresistible? It’s the perfect combination of textures and tastes. The tender, flavorful chicken, the creamy, melted cheese, and the slight crunch of the toasted wrap create a symphony of sensations in every bite. Plus, they’re incredibly convenient! You can prep the chicken ahead of time, making assembly a breeze when hunger strikes. Whether you’re looking for a quick and easy lunch, a satisfying dinner, or a fun appetizer to share, these wraps are sure to become a new favorite. Get ready to experience the ultimate comfort food in a convenient, delicious package!
Ingredients:
- 1.5 lbs boneless, skinless chicken breasts, cut into 1-inch cubes
- 1 tablespoon olive oil
- 2 cloves garlic, minced
- 1 teaspoon Italian seasoning
- 1/2 teaspoon paprika
- 1/4 teaspoon red pepper flakes (optional, for a little heat)
- Salt and freshly ground black pepper to taste
- 8 large flour tortillas (10-12 inch)
- 1 cup shredded mozzarella cheese
- 1/2 cup shredded cheddar cheese
- 1/4 cup grated Parmesan cheese
- 1/4 cup butter, melted
- 1 clove garlic, minced (for garlic butter)
- 2 tablespoons chopped fresh parsley (for garnish)
- Optional toppings: diced tomatoes, shredded lettuce, sour cream, salsa
Preparing the Chicken:
Okay, let’s get started with the heart of our wraps – the cheesy garlic chicken! This part is super important because we want the chicken to be flavorful and juicy. Trust me, it makes all the difference.
- Prepare the Chicken: First things first, grab your chicken breasts and cut them into bite-sized cubes, about 1-inch each. This ensures they cook evenly and fit perfectly into our wraps.
- Season the Chicken: Now, in a medium bowl, toss the cubed chicken with olive oil, minced garlic, Italian seasoning, paprika, red pepper flakes (if you’re feeling spicy!), salt, and pepper. Make sure every piece of chicken is nicely coated with all those delicious spices. Don’t be shy with the seasoning – it’s what gives the chicken its amazing flavor!
- Cook the Chicken: Heat a large skillet over medium-high heat. Once the skillet is hot, add the seasoned chicken in a single layer. Avoid overcrowding the pan, as this can cause the chicken to steam instead of sear. If necessary, cook the chicken in batches. Cook for about 5-7 minutes, or until the chicken is cooked through and no longer pink inside. The internal temperature should reach 165°F (74°C).
- Rest the Chicken: Once cooked, remove the chicken from the skillet and set aside. Let it rest for a few minutes while you prepare the other components. This helps the juices redistribute, resulting in more tender and flavorful chicken.
Preparing the Garlic Butter:
Next up, we’re making the garlic butter that will take these wraps to the next level. This is where the magic happens, folks! The garlic butter adds a rich, savory flavor that complements the cheesy chicken perfectly.
- Melt the Butter: In a small bowl, melt the butter. You can do this in the microwave (in short intervals, stirring in between) or in a small saucepan over low heat. Just be careful not to burn it!
- Add Garlic: Once the butter is melted, add the minced garlic. Stir well to combine. The heat from the melted butter will gently infuse the garlic flavor.
- Set Aside: Set the garlic butter aside for later. We’ll be using it to brush the tortillas before adding the filling.
Assembling the Cheesy Garlic Chicken Wraps:
Alright, now for the fun part – assembling our cheesy garlic chicken wraps! This is where all our hard work comes together to create a delicious and satisfying meal.
- Warm the Tortillas: Lightly warm the tortillas in a dry skillet or microwave for a few seconds. This makes them more pliable and easier to roll without tearing.
- Brush with Garlic Butter: Lay a tortilla flat on a clean surface. Brush it generously with the prepared garlic butter. This adds a fantastic flavor and helps the tortilla crisp up nicely when we cook it.
- Add Cheese: Sprinkle a layer of mozzarella cheese, cheddar cheese, and Parmesan cheese over the garlic buttered tortilla. Don’t be shy with the cheese – we want these wraps to be extra cheesy!
- Add Chicken: Top the cheese with a generous portion of the cooked chicken. Spread the chicken evenly over the cheese.
- More Cheese: Add another layer of mozzarella, cheddar, and Parmesan cheese on top of the chicken. Because, why not?
- Fold the Sides: Fold in the sides of the tortilla towards the center, about 1-2 inches. This helps keep the filling from spilling out.
- Roll the Wrap: Tightly roll the tortilla from the bottom up, like a burrito. Make sure to tuck in the filling as you roll to create a secure wrap.
- Repeat: Repeat steps 2-7 with the remaining tortillas and filling.
Cooking the Wraps:
Almost there! Now we’re going to cook the wraps until they’re golden brown and the cheese is melted and gooey. This is the final step that transforms our assembled wraps into a culinary masterpiece.
- Heat the Skillet: Heat a large skillet over medium heat. You can use the same skillet you used to cook the chicken.
- Cook the Wraps: Place the wraps in the skillet, seam-side down. Cook for about 3-4 minutes per side, or until golden brown and crispy. Gently press down on the wraps with a spatula to ensure even browning.
- Check for Doneness: The wraps are done when the tortillas are golden brown and crispy, and the cheese is melted and gooey inside. You can carefully cut one open to check if the cheese is fully melted.
- Remove and Slice: Remove the cooked wraps from the skillet and let them cool slightly before slicing in half or into smaller pieces. This makes them easier to handle and eat.
Serving and Garnishing:
Finally, it’s time to serve and enjoy our cheesy garlic chicken wraps! But before we dig in, let’s add a few finishing touches to make them even more appealing.
- Garnish: Sprinkle the sliced wraps with chopped fresh parsley for a pop of color and freshness.
- Serve with Toppings: Serve the wraps with your favorite toppings, such as diced tomatoes, shredded lettuce, sour cream, or salsa. These toppings add extra flavor and texture to the wraps.
- Enjoy: Serve immediately and enjoy the cheesy, garlicky goodness! These wraps are perfect for lunch, dinner, or a quick and easy snack.
Tips and Variations:
Want to customize these wraps to your liking? Here are a few tips and variations to try:
- Add Vegetables: Add some chopped vegetables to the filling, such as bell peppers, onions, or mushrooms. This adds extra nutrients and flavor to the wraps.
- Use Different Cheese: Experiment with different types of cheese, such as pepper jack, provolone, or Monterey Jack.
- Make it Spicy: Add more red pepper flakes or a dash of hot sauce to the chicken for a spicier kick.
- Use Different Protein: Substitute the chicken with ground beef, shredded pork, or even tofu for a vegetarian option.
- Make it Gluten-Free: Use gluten-free tortillas to make these wraps gluten-free.
- Bake the Wraps: Instead of cooking the wraps in a skillet, you can bake them in the oven at 375°F (190°C) for about 10-15 minutes, or until golden brown and the cheese is melted.
Storage Instructions:
If you have any leftover wraps, you can store them in the refrigerator for up to 3 days. To reheat, wrap them in foil and bake in the oven at 350°F (175°C) for about 10-15 minutes, or until heated through. You can also reheat them in a skillet over medium heat, flipping occasionally, until heated through.
Nutritional Information (Approximate):
Please note that the nutritional information is an estimate and may vary depending on the specific ingredients used.
- Calories: Approximately 500-600 per wrap
- Protein: 30-40 grams
- Fat: 25-35 grams
- Carbohydrates: 40-50 grams
Conclusion:
This isn’t just another recipe; it’s a flavor explosion waiting to happen! These Cheesy Garlic Chicken Wraps are truly a must-try because they deliver on all fronts: they’re quick, easy, incredibly delicious, and endlessly customizable. The combination of juicy, garlicky chicken, melted cheese, and your favorite toppings all nestled in a warm tortilla is simply irresistible. Trust me, once you take that first bite, you’ll understand why I’m so excited about this recipe.
But what truly sets these wraps apart is their versatility. Looking for serving suggestions? Serve them with a side of creamy coleslaw for a classic pairing, or add a vibrant salsa for a zesty kick. A simple green salad also complements the richness of the wraps beautifully. For a heartier meal, consider serving them alongside some roasted sweet potatoes or a bowl of your favorite soup.
And the variations? The possibilities are endless! If you’re a fan of spice, add a pinch of red pepper flakes to the chicken marinade or drizzle some hot sauce over the finished wraps. For a vegetarian option, substitute the chicken with grilled halloumi cheese or seasoned black beans. You could even add some sautéed vegetables like bell peppers, onions, and mushrooms for extra flavor and nutrients. Think about adding some crispy bacon bits for a smoky flavor.
Want to make it even cheesier? Try using a blend of different cheeses, such as mozzarella, cheddar, and Monterey Jack. Or, for a gourmet touch, add some crumbled feta or goat cheese. Don’t be afraid to experiment with different herbs and spices too. A sprinkle of dried oregano, basil, or thyme can add a wonderful depth of flavor.
These Cheesy Garlic Chicken Wraps are also perfect for meal prepping. Simply cook the chicken and prepare the other ingredients ahead of time, then assemble the wraps when you’re ready to eat. They’re also great for lunchboxes or picnics. Just wrap them tightly in foil or plastic wrap to keep them fresh.
I’ve poured my heart into perfecting this recipe, and I’m confident that you’ll love it as much as I do. It’s the perfect weeknight meal, a crowd-pleasing appetizer, or a satisfying snack. It’s a recipe that you’ll turn to again and again, and one that you can easily adapt to suit your own tastes and preferences.
So, what are you waiting for? Grab your ingredients and get cooking! I’m so excited for you to try these Cheesy Garlic Chicken Wraps. I know you’ll be impressed by how easy they are to make and how incredibly delicious they taste.
Once you’ve made them, I’d absolutely love to hear about your experience. Did you make any variations? What were your favorite toppings? Share your photos and comments with me – I can’t wait to see what you create! Happy cooking, and enjoy every delicious bite of these fantastic wraps! Let me know what you think of this recipe and if you have any questions. I am always happy to help.
Cheesy Garlic Chicken Wraps: The Ultimate Recipe for a Quick & Delicious Meal
Flavorful chicken, melted cheese, and garlic butter combine in a warm, satisfying wrap. Perfect for a quick and easy meal!
Ingredients
- 1.5 lbs boneless, skinless chicken breasts, cut into 1-inch cubes
- 1 tablespoon olive oil
- 2 cloves garlic, minced
- 1 teaspoon Italian seasoning
- 1/2 teaspoon paprika
- 1/4 teaspoon red pepper flakes (optional, for a little heat)
- Salt and freshly ground black pepper to taste
- 8 large flour tortillas (10-12 inch)
- 1 cup shredded mozzarella cheese
- 1/2 cup shredded cheddar cheese
- 1/4 cup grated Parmesan cheese
- 1/4 cup butter, melted
- 1 clove garlic, minced (for garlic butter)
- 2 tablespoons chopped fresh parsley (for garnish)
- Optional toppings: diced tomatoes, shredded lettuce, sour cream, salsa
Instructions
- Cut chicken into 1-inch cubes. In a bowl, toss with olive oil, minced garlic, Italian seasoning, paprika, red pepper flakes (if using), salt, and pepper.
- Heat a large skillet over medium-high heat. Add chicken in a single layer (cook in batches if needed). Cook for 5-7 minutes, or until cooked through (internal temperature 165°F/74°C). Remove from skillet and let rest.
- In a small bowl, melt butter. Add minced garlic and stir well. Set aside.
- Lightly warm tortillas in a dry skillet or microwave for a few seconds to make them pliable.
- Lay a tortilla flat. Brush generously with garlic butter. Sprinkle with mozzarella, cheddar, and Parmesan cheese. Top with cooked chicken. Add another layer of mozzarella, cheddar, and Parmesan cheese.
- Fold in the sides of the tortilla (1-2 inches). Tightly roll from the bottom up, tucking in the filling.
- Repeat steps 5-6 with remaining tortillas and filling.
- Heat a large skillet over medium heat. Place wraps in the skillet, seam-side down. Cook for 3-4 minutes per side, or until golden brown and crispy, pressing down gently with a spatula.
- Ensure tortillas are golden brown and cheese is melted.
- Remove from skillet and let cool slightly before slicing in half or into smaller pieces.
- Sprinkle with chopped fresh parsley. Serve with optional toppings like diced tomatoes, shredded lettuce, sour cream, or salsa. Enjoy!
Notes
- Spice Level: Adjust the amount of red pepper flakes to your preference.
- Cheese Variations: Feel free to use other cheese blends like pepper jack, provolone, or Monterey Jack.
- Vegetable Additions: Add chopped bell peppers, onions, or mushrooms to the filling for extra flavor and nutrients.
- Protein Substitutions: Try ground beef, shredded pork, or tofu instead of chicken.
- Gluten-Free Option: Use gluten-free tortillas.
- Baking Option: Bake wraps at 375°F (190°C) for 10-15 minutes, or until golden brown and cheese is melted.
- Storage: Store leftover wraps in the refrigerator for up to 3 days. Reheat in foil in the oven at 350°F (175°C) for 10-15 minutes, or in a skillet over medium heat.
Printable Recipe Card
Want just the essential recipe details without scrolling through the article? Get our printable recipe card with just the ingredients and instructions.
Leave a Comment