
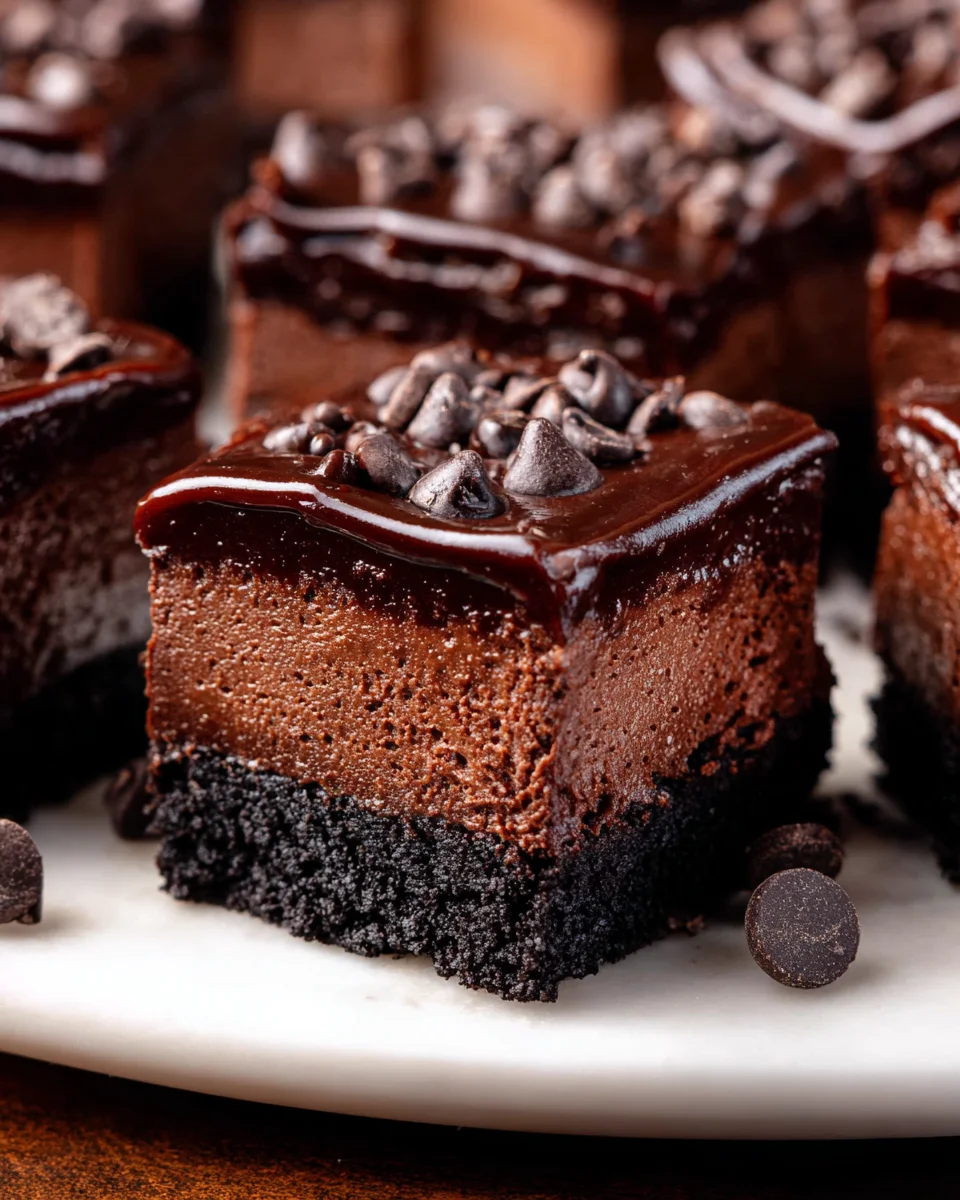
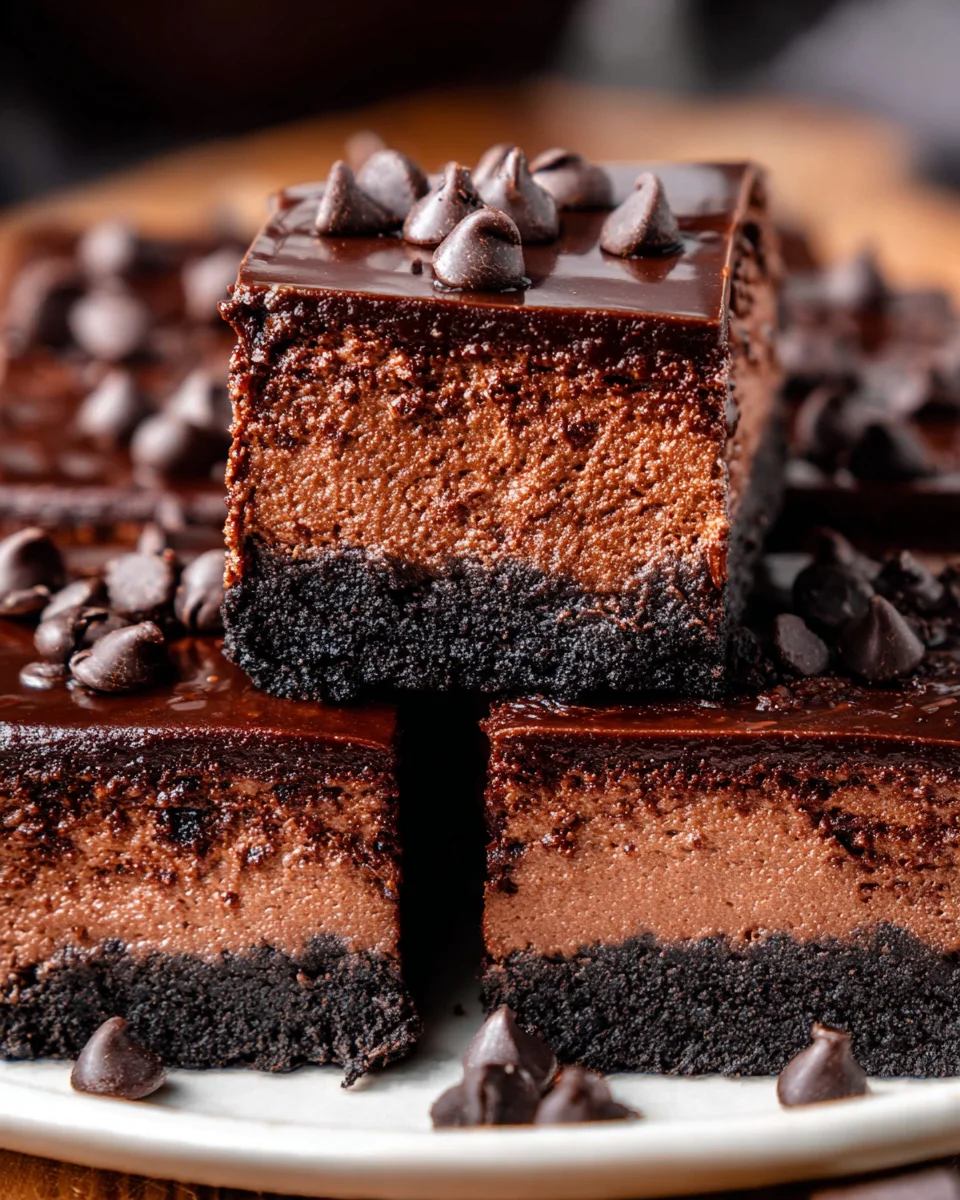
Chocolate Cheesecake Brownie Bars are more than just a dessert; they are a decadent celebration, a harmonious fusion of two beloved classics that promise to tantalize your taste buds with every single bite. I’m incredibly excited to share a recipe that perfectly encapsulates everything wonderful about rich, fudgy brownies and creamy, tangy cheesecake, all conveniently baked into one irresistible bar.
While the brownie itself boasts a fascinating American heritage, evolving from a simple cake-like treat in the late 19th century, and cheesecake traces its roots back to ancient Greece, the concept of combining these two powerhouses is a brilliant, modern innovation. It’s a testament to our ongoing quest for culinary perfection, marrying the deep cocoa notes of a classic brownie with the smooth, luxurious texture of a cheesecake swirl.
People absolutely adore these bars for so many reasons. The initial bite delivers that familiar, comforting chewiness and intense chocolate flavor from the brownie base, immediately followed by the refreshing, creamy counterpoint of the cheesecake layer. It’s a symphony of textures and tastes – the rich sweetness balanced by a delicate tang, the fudgy base complementing the silky topping. They’re also incredibly convenient for gatherings, easy to transport, and utterly satisfying, making these Chocolate Cheesecake Brownie Bars an undeniable crowd-pleaser for any occasion. Prepare to impress everyone with this show-stopping dessert that truly offers the best of both worlds!
Ingredients:
- For the Rich Brownie Layer:
- 1 cup (2 sticks or 226g) unsalted butter, cut into cubes
- 4 ounces (113g) unsweetened chocolate, roughly chopped
- 1 ¾ cups (350g) granulated sugar
- 4 large eggs, at room temperature
- 2 teaspoons pure vanilla extract
- 1 cup (125g) all-purpose flour
- ½ cup (45g) unsweetened cocoa powder (Dutch-processed or natural, your preference!)
- ½ teaspoon salt
- ½ cup (85g) semi-sweet chocolate chips (optional, but I love the extra chocolatey pockets!)
- For the Creamy Cheesecake Swirl:
- 2 (8-ounce) packages full-fat cream cheese, softened at room temperature
- ½ cup (100g) granulated sugar
- 1 large egg, at room temperature
- 1 teaspoon pure vanilla extract
- ¼ cup (60g) sour cream, at room temperature (this adds a beautiful tang and creaminess!)
Preparing the Decadent Brownie Layer
- Preheat and Prepare: My first step, and one I always insist on, is to preheat your oven to 350°F (175°C). Then, grab a 9×13 inch baking pan. I like to line mine with parchment paper, leaving an overhang on the sides. This creates convenient “handles” that make lifting the finished Chocolate Cheesecake Brownie Bars out of the pan an absolute breeze, ensuring perfect slices every time. Give the parchment paper a light spray with non-stick cooking spray for extra insurance.
- Melt Chocolate and Butter: In a large, heatproof bowl, combine your cubed unsalted butter and the chopped unsweetened chocolate. Set this bowl over a saucepan of simmering water, creating a double boiler. Make sure the bottom of the bowl does not touch the water – we’re going for gentle melting here, not direct heat. Stir occasionally until both the chocolate and butter are completely melted and beautifully smooth. This slow and steady method is key to a glossy, un-seized chocolate base. Once melted, remove the bowl from the heat and let it cool slightly for about 5-10 minutes. You want it warm, but not scorching hot when you add the other ingredients.
- Whisk Wet Ingredients: While the chocolate mixture is cooling, in a separate medium bowl, whisk together the 1 ¾ cups of granulated sugar, the 4 large eggs, and 2 teaspoons of pure vanilla extract. Whisk vigorously for about 2-3 minutes until the mixture is light in color, slightly thickened, and frothy. This aeration is important for the brownie’s texture!
- Combine Chocolate and Egg Mixtures: Pour the slightly cooled melted chocolate and butter mixture into the egg and sugar mixture. Whisk them together until they are thoroughly combined and the batter is smooth and uniformly dark. I love watching it come together – it already smells incredible!
- Sift Dry Ingredients: In a third bowl (yes, a few bowls are involved, but it’s worth it!), whisk together the 1 cup of all-purpose flour, ½ cup of unsweetened cocoa powder, and ½ teaspoon of salt. Sifting isn’t strictly necessary if you whisk well, but it helps prevent any lumps and ensures a lighter brownie.
- Gently Fold Dry into Wet: Now, add the dry ingredient mixture to the wet chocolate mixture. Using a spatula, fold them together until just combined. The golden rule for brownies: do not overmix! Overmixing develops gluten, leading to tough brownies. Stop folding as soon as you no longer see streaks of flour. If you’re using them, gently fold in the ½ cup of semi-sweet chocolate chips at this stage.
- Spread the Brownie Base: Pour the rich brownie batter into your prepared 9×13 inch baking pan. Use your spatula to spread it evenly into a flat layer. Set this aside while we prepare our dreamy cheesecake topping.
Crafting the Creamy Cheesecake Swirl
- Soften Cream Cheese: This is a non-negotiable step for a smooth, lump-free cheesecake layer! Ensure your two 8-ounce packages of full-fat cream cheese are at absolute room temperature. I usually take mine out of the fridge at least an hour or two before I plan to bake. Place the softened cream cheese in a large mixing bowl.
- Cream Cheese and Sugar: Using an electric mixer (either a stand mixer with the paddle attachment or a hand mixer), beat the softened cream cheese on medium speed until it’s perfectly smooth and creamy, about 1-2 minutes. Scrape down the sides of the bowl. Then, add the ½ cup of granulated sugar and beat again on medium speed until well combined and fluffy, about another 1-2 minutes.
- Incorporate Egg and Vanilla: Add the single large egg and 1 teaspoon of pure vanilla extract to the cream cheese mixture. Beat on low speed until just combined. Be careful not to overmix here; we want to incorporate them gently without adding too much air, which can cause cracking later. Scrape down the bowl once more to ensure everything is fully incorporated.
- Add Sour Cream for Extra Oomph: Finally, add the ¼ cup of room temperature sour cream. Beat on low speed until just blended. The sour cream is my secret weapon for an extra luscious, slightly tangy cheesecake that perfectly balances the sweetness of the brownie. Your cheesecake mixture should now be beautifully smooth and pourable.
Assembling and Baking Your Chocolate Cheesecake Brownie Bars
- Dollop the Cheesecake Layer: Spoon dollops of the creamy cheesecake mixture over the top of the brownie batter, distributing it as evenly as possible. You don’t need to be precise, as we’re going to swirl it!
- Create the Iconic Swirl: Now for the fun part! Grab a butter knife or a skewer. Gently drag the knife through the cheesecake and brownie layers, creating beautiful swirls. Don’t overdo it – a few deliberate passes are all you need to create those stunning marbled patterns. You’re aiming for distinct swirls, not completely mixing the layers together. I usually go for an S-shape or zigzag pattern across the pan.
-
Bake to Perfection: Carefully place your pan of Chocolate Cheesecake Brownie Bars into the preheated 350°F (175°C) oven. Bake for approximately 35-45 minutes. The baking time can vary depending on your oven, so keep an eye on it.
How to Tell When They’re Done:
You’ll know they’re ready when the edges of the brownie layer are set and look baked, and the cheesecake layer is mostly set but still has a slight jiggle in the very center when you gently shake the pan. A toothpick inserted into the brownie portion (avoiding the cheesecake swirl) should come out with moist crumbs, not wet batter. Avoid overbaking, as this can dry out the brownies and cause the cheesecake to crack.
Cooling, Slicing, and Enjoying Your Masterpiece
- Initial Cooling: Once baked, remove the pan from the oven and place it on a wire rack to cool completely at room temperature. This will take at least 1-2 hours. Resist the urge to cut into them immediately! The cheesecake needs to set properly.
- Chill Out: After the bars have cooled to room temperature, cover the pan loosely with plastic wrap. Transfer it to the refrigerator and chill for a minimum of 3-4 hours, or ideally, overnight. This chilling step is absolutely crucial for perfectly set, clean-cut Chocolate Cheesecake Brownie Bars. If you try to cut them warm, they will be a crumbly, gooey mess, albeit a delicious one!
- Slice and Serve: Once thoroughly chilled, use the parchment paper overhangs to carefully lift the entire slab of Chocolate Cheesecake Brownie Bars out of the pan and onto a cutting board. For the cleanest cuts, I recommend using a large, sharp knife. For each cut, wipe the knife clean with a damp cloth between slices. This prevents dragging cheesecake residue onto the brownie and keeps your bars looking professional. I typically cut them into 16 or 24 bars, depending on how generous I’m feeling!
- Storing Your Delights: These amazing Chocolate Cheesecake Brownie Bars are best stored in an airtight container in the refrigerator for up to 4-5 days. If they last that long, that is! I find they rarely do in my house. These bars also freeze beautifully for up to 2-3 months. Just wrap individual bars tightly in plastic wrap and then foil. Thaw in the refrigerator before serving.
- Serving Suggestion: While they are utterly perfect on their own, a light dusting of cocoa powder or a drizzle of chocolate ganache can elevate their presentation if you’re feeling fancy. But honestly, their rich, fudgy brownie base and creamy, tangy cheesecake swirl speak for themselves. Enjoy every single bite of these homemade treats!
Conclusion:
Well, my fellow dessert enthusiasts, we’ve reached the sweet finale, and I truly hope you’re as excited as I am about what you’ve just learned to create! These Chocolate Cheesecake Brownie Bars are, without a doubt, a recipe that will not only impress but also utterly delight anyone lucky enough to take a bite. I’ve poured my heart into perfecting this creation, ensuring it hits every single note: the rich, fudgy chewiness of the perfect brownie base, the luxurious, tangy creaminess of the cheesecake layer, and of course, that irresistible chocolatey finish that ties it all together. It’s more than just a dessert; it’s an experience, a symphony of textures and flavors that proves you don’t have to choose between a brownie and a cheesecake when you can have the best of both worlds in one incredible bite.
I genuinely believe this recipe is a must-try for so many reasons. For one, it’s remarkably straightforward to execute, despite its sophisticated appearance. You don’t need to be a pastry chef to achieve a show-stopping result. It’s also incredibly versatile, equally at home at a casual family gathering, a fancy dinner party, or simply enjoyed as a well-deserved treat after a long day. The joy of seeing the layers beautifully distinct, the perfect marbling, and the sheer delight on people’s faces when they taste it – that’s truly priceless. This isn’t just baking; it’s creating edible happiness. You’ll find yourself reaching for this recipe again and again, whether you’re trying to impress guests or simply indulging your own sweet tooth with something truly extraordinary.
Now, let’s talk about serving and making these beauties truly your own! While these bars are absolutely divine served at room temperature, straight from the pan (once cooled, of course!), I have a few suggestions to elevate the experience even further. For a truly decadent treat, try warming a square ever so slightly in the microwave for 10-15 seconds, then serving it alongside a generous scoop of good quality vanilla bean ice cream. The contrast of warm, gooey brownie and cool, creamy ice cream is simply out of this world. A dusting of cocoa powder or a sprinkle of flaky sea salt can add a touch of elegance and enhance the chocolate’s depth. If you’re feeling particularly fancy, a drizzle of homemade raspberry coulis or a store-bought salted caramel sauce can add another layer of flavor and visual appeal. Don’t forget a perfectly brewed cup of coffee or a cold glass of milk to complete the ultimate dessert moment.
But why stop there? Feel free to experiment with variations to suit your taste or the occasion! Consider adding a handful of chopped walnuts or pecans to your brownie batter for an extra textural crunch. For a subtle twist, infuse your cheesecake layer with a touch of orange zest or a hint of espresso powder to deepen the chocolate flavor. If you’re a fan of different chocolates, swirl some white chocolate into the cheesecake layer before baking for a striking visual and flavor contrast. During the holidays, a sprinkle of crushed peppermint candy on top after they’ve cooled can transform these into a festive delight. The possibilities for customization are endless, and that’s part of the fun! This recipe provides a fantastic foundation for your culinary creativity.
So, what are you waiting for? I wholeheartedly encourage you to roll up your sleeves, gather your ingredients, and give these incredible bars a try. Trust me, the aroma filling your kitchen alone is worth the effort! When you pull that perfectly baked pan from the oven, you’ll feel an immense sense of accomplishment, and the first bite will confirm that every moment was worth it. Please, when you make them, come back and share your experience with me! I love hearing about your baking adventures and seeing your delicious creations. Whether it’s a photo of your perfectly marbled bars or a story about how quickly they disappeared at your family dinner, your feedback truly inspires me. Go forth and bake something amazing!
Chocolate Cheesecake Brownie Bars
A decadent fusion creating irresistible bars, combining an Oreo crust with a rich, fudgy chocolate cheesecake filling. These bars are a perfect blend of creamy texture and intense chocolate flavor, making them a crowd-pleaser for any occasion.
Ingredients
Instructions
Important Information
Nutrition Facts (Per Serving)
It is important to consider this information as approximate and not to use it as definitive health advice.
Allergy Information
Please check ingredients for potential allergens and consult a health professional if in doubt.


Leave a Comment