
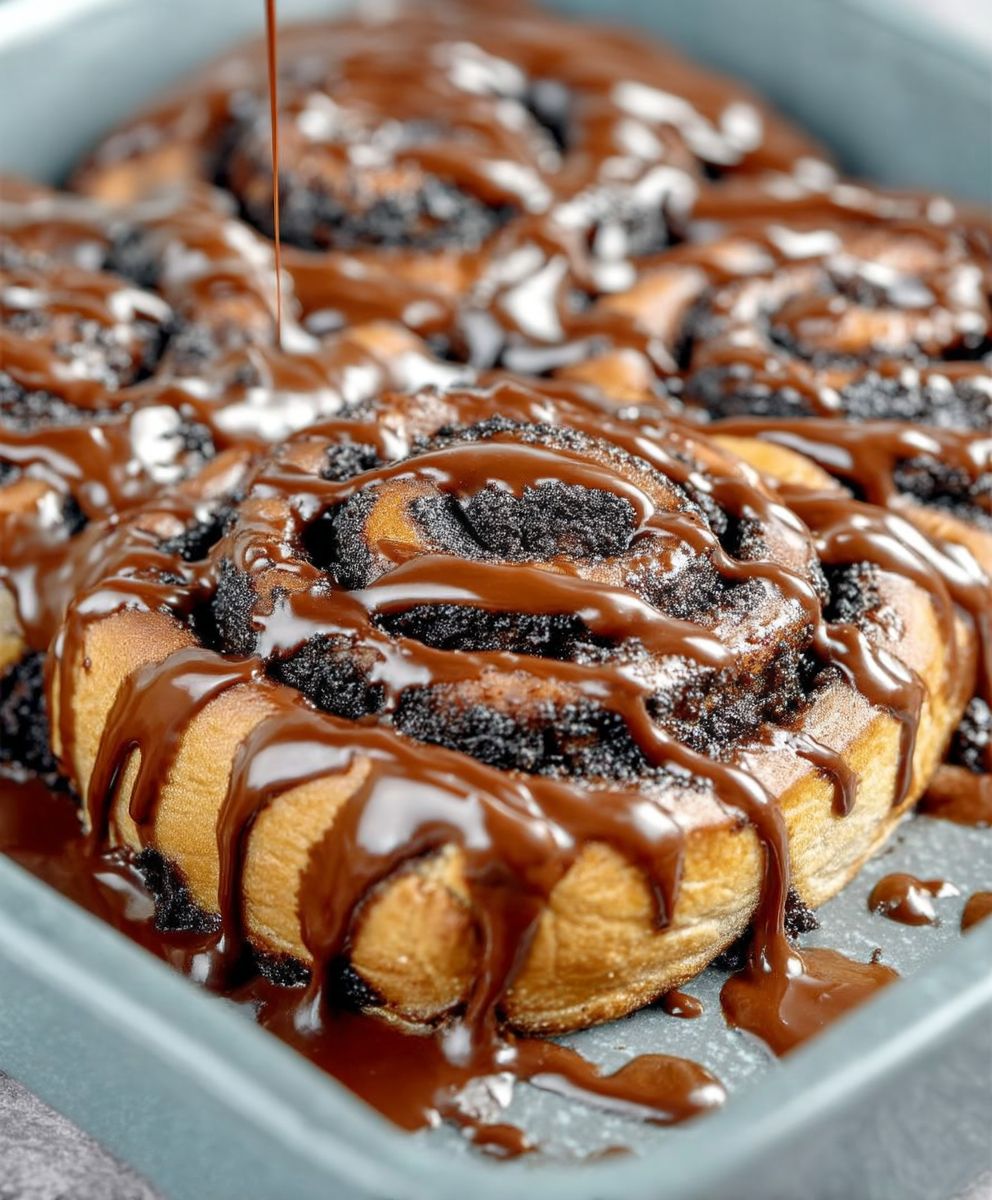
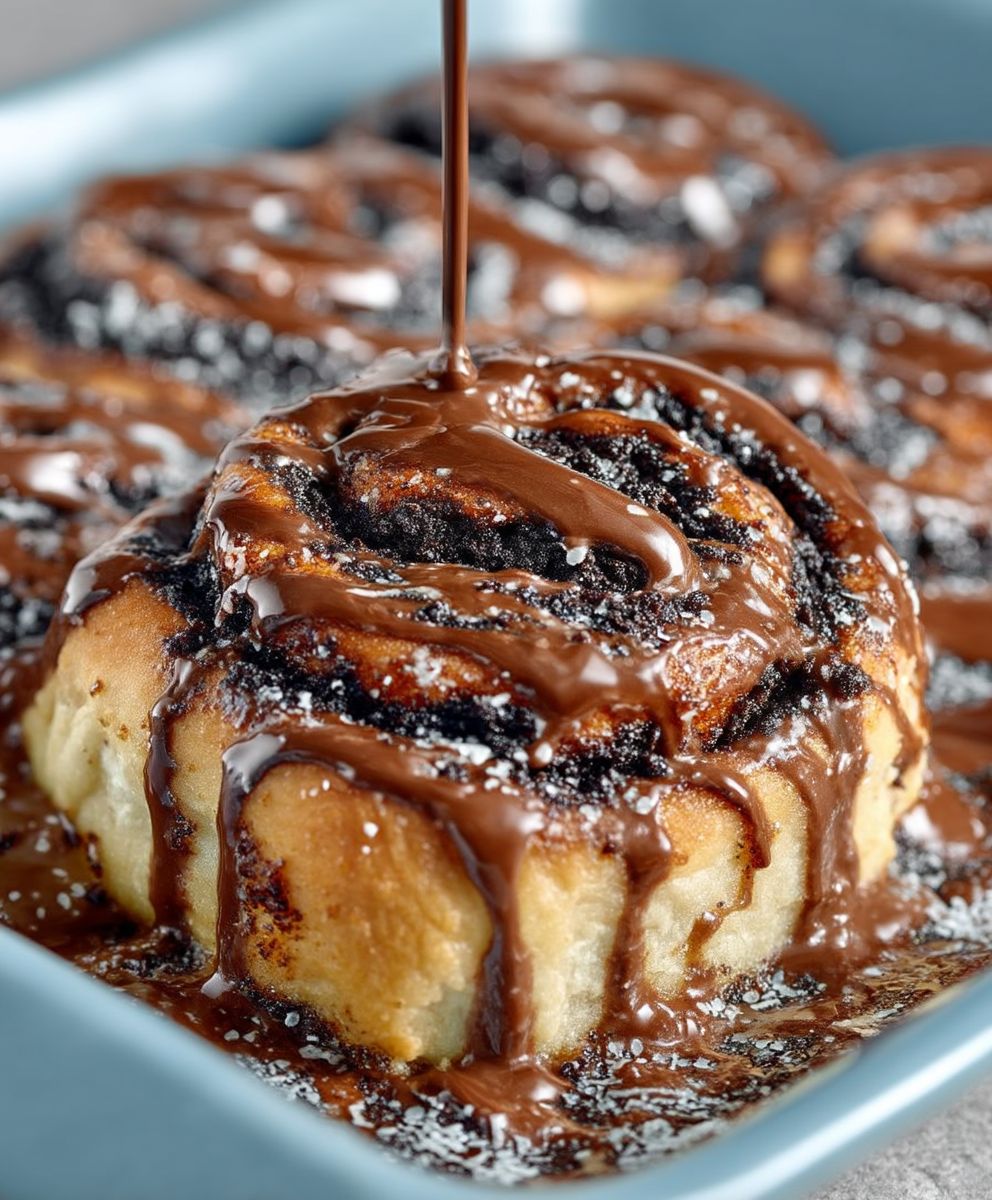
Chocolate Cinnamon Rolls: Prepare to be transported to a realm of pure indulgence! Imagine biting into a warm, gooey cinnamon roll, but with a decadent twist – rich, dark chocolate swirled into every layer. This isn’t just breakfast; it’s an experience, a comforting hug in pastry form that will elevate your weekend mornings or satisfy your sweet cravings any time of day.
The classic cinnamon roll has a long and storied history, with roots tracing back to Scandinavia and Northern Europe. Over time, variations have emerged, each reflecting the unique culinary traditions of different regions. While the origins of adding chocolate to cinnamon rolls are less clear, it’s a relatively modern innovation that has quickly gained popularity, and for good reason! It’s a delightful marriage of two beloved flavors.
What makes chocolate cinnamon rolls so irresistible? It’s the perfect combination of textures – the soft, pillowy dough, the melty chocolate, and the sweet, spiced cinnamon filling. The aroma alone is enough to make your mouth water! Plus, they are surprisingly easy to make at home, allowing you to customize the level of chocolate intensity and spice to your liking. Whether you’re a seasoned baker or a novice in the kitchen, this recipe is sure to impress. Get ready to create a batch of these heavenly treats and experience the ultimate comfort food!
Ingredients:
- For the Dough:
- 3 ½ cups (420g) all-purpose flour, plus more for dusting
- ¼ cup (50g) granulated sugar
- 2 ¼ teaspoons (7g) active dry yeast (1 packet)
- 1 teaspoon salt
- 1 cup (240ml) milk, warmed to 110-115°F (43-46°C)
- ¼ cup (57g) unsalted butter, melted
- 2 large eggs, lightly beaten
- For the Chocolate Cinnamon Filling:
- ½ cup (113g) unsalted butter, softened
- ¾ cup (150g) granulated sugar
- ½ cup (45g) unsweetened cocoa powder
- 2 tablespoons ground cinnamon
- ¼ teaspoon salt
- ½ cup (60g) chocolate chips, semi-sweet or dark (optional)
- For the Cream Cheese Frosting:
- 4 ounces (113g) cream cheese, softened
- ¼ cup (57g) unsalted butter, softened
- 2 cups (240g) powdered sugar
- 1 teaspoon vanilla extract
- 2-4 tablespoons milk, or more to reach desired consistency
Making the Dough:
- Activate the Yeast: In a large bowl, or the bowl of your stand mixer, combine the warm milk, sugar, and yeast. Let it sit for 5-10 minutes, or until the yeast is foamy. This step is crucial to ensure your yeast is alive and active. If it doesn’t foam, your yeast might be old, and you’ll need to start over with fresh yeast.
- Combine Wet Ingredients: Add the melted butter and lightly beaten eggs to the yeast mixture. Whisk to combine everything well.
- Add Dry Ingredients: In a separate bowl, whisk together the flour and salt. Gradually add the dry ingredients to the wet ingredients, mixing on low speed with the dough hook attachment (or by hand) until a shaggy dough forms.
- Knead the Dough: If using a stand mixer, knead the dough on medium speed for 6-8 minutes, or until it becomes smooth and elastic. If kneading by hand, turn the dough out onto a lightly floured surface and knead for 8-10 minutes, or until it’s smooth and elastic. The dough should be slightly tacky but not sticky. If it’s too sticky, add a tablespoon of flour at a time until it reaches the right consistency.
- First Rise: Place the dough in a lightly oiled bowl, turning to coat. Cover the bowl with plastic wrap or a clean kitchen towel and let it rise in a warm place for 1-1.5 hours, or until doubled in size. This rise is essential for developing the flavor and texture of the cinnamon rolls. I usually place mine in a slightly warmed oven (turned off!) to create a cozy environment.
Preparing the Chocolate Cinnamon Filling:
- Combine Filling Ingredients: While the dough is rising, prepare the filling. In a medium bowl, cream together the softened butter, sugar, cocoa powder, cinnamon, and salt until smooth and well combined. Make sure your butter is truly softened, or you’ll end up with a lumpy filling.
Assembling and Baking the Cinnamon Rolls:
- Roll Out the Dough: Once the dough has doubled in size, gently punch it down to release the air. Turn it out onto a lightly floured surface and roll it into a large rectangle, about 12×18 inches. Try to keep the rectangle as even as possible for uniform rolls.
- Spread the Filling: Spread the chocolate cinnamon filling evenly over the entire surface of the dough, leaving a small border along one of the long edges. This border will help seal the rolls. Sprinkle the chocolate chips (if using) evenly over the filling.
- Roll Up the Dough: Starting from the long edge opposite the border, tightly roll the dough into a log. Pinch the seam to seal it tightly. A tight roll is key to preventing the rolls from unraveling during baking.
- Cut the Rolls: Using a sharp serrated knife or unflavored dental floss, cut the log into 12 equal slices. I find that using dental floss creates cleaner cuts and prevents the rolls from getting squished. To use floss, slide a piece of floss under the log, cross the ends over the top, and pull to slice.
- Second Rise: Arrange the rolls in a lightly greased 9×13 inch baking dish. Cover loosely with plastic wrap or a clean kitchen towel and let them rise for another 30-45 minutes, or until they are puffy and almost doubled in size. This second rise is crucial for achieving a light and airy texture.
- Preheat the Oven: While the rolls are rising, preheat your oven to 350°F (175°C).
- Bake the Rolls: Bake the cinnamon rolls for 25-30 minutes, or until they are golden brown and cooked through. The internal temperature should reach around 200°F (93°C). If the tops are browning too quickly, you can tent them with foil during the last 10 minutes of baking.
- Cool Slightly: Let the cinnamon rolls cool in the baking dish for about 10-15 minutes before frosting. This allows them to set slightly and prevents the frosting from melting completely.
Making the Cream Cheese Frosting:
- Cream Butter and Cream Cheese: While the rolls are baking, prepare the frosting. In a medium bowl, beat together the softened cream cheese and butter until smooth and creamy. It’s important that both the cream cheese and butter are at room temperature to prevent lumps.
- Add Powdered Sugar and Vanilla: Gradually add the powdered sugar, beating on low speed until combined. Stir in the vanilla extract.
- Adjust Consistency: Add milk, one tablespoon at a time, until the frosting reaches your desired consistency. I prefer a slightly thinner frosting that drizzles nicely over the rolls.
Frosting and Serving:
- Frost the Rolls: Generously spread the cream cheese frosting over the warm cinnamon rolls.
- Serve Immediately: Serve the chocolate cinnamon rolls warm and enjoy! They are best enjoyed fresh, but can be stored in an airtight container at room temperature for up to 2 days, or in the refrigerator for up to 4 days. Reheat gently before serving.
Conclusion:
And there you have it! These Chocolate Cinnamon Rolls are more than just a dessert; they’re an experience. From the rich, decadent chocolate swirled with the warm spice of cinnamon, to the soft, pillowy dough that melts in your mouth, every bite is pure bliss. I truly believe this recipe is a must-try for anyone who loves baking, chocolate, or simply wants to impress their friends and family with a truly unforgettable treat.
Why is this recipe a must-try? Because it elevates the classic cinnamon roll to a whole new level of indulgence. The addition of cocoa powder to both the dough and the filling creates a depth of flavor that is simply irresistible. It’s the perfect balance of sweet and spice, rich and comforting. Plus, let’s be honest, who can resist the allure of warm, gooey chocolate? These rolls are guaranteed to be a crowd-pleaser, whether you’re serving them for breakfast, brunch, or dessert.
But the best part? This recipe is surprisingly easy to follow. I’ve broken down each step to ensure that even beginner bakers can achieve perfect results. And while the process does require some time and patience, the end result is well worth the effort. Trust me, the aroma that will fill your kitchen as these rolls bake is enough to make anyone’s day brighter.
Now, let’s talk serving suggestions and variations. While these Chocolate Cinnamon Rolls are delicious on their own, there are plenty of ways to customize them to your liking. For a truly decadent experience, try topping them with a scoop of vanilla ice cream or a dollop of whipped cream. A drizzle of chocolate sauce or a sprinkle of chopped nuts would also be a fantastic addition.
If you’re looking for a slightly lighter option, you can reduce the amount of sugar in the filling or use a lighter cream cheese frosting. You could also add a touch of espresso powder to the dough for an extra boost of flavor. And for a truly unique twist, try adding some chopped pecans or walnuts to the filling for a bit of crunch.
Here are a few more ideas to get your creative juices flowing:
Serving Suggestions:
- Serve warm with a glass of cold milk or a cup of hot coffee.
- Top with a cream cheese frosting, a chocolate glaze, or a simple dusting of powdered sugar.
- Add a scoop of vanilla ice cream or a dollop of whipped cream for an extra-indulgent treat.
- Serve as part of a brunch spread or as a dessert after dinner.
Variations:
- Add chopped nuts (pecans, walnuts, or almonds) to the filling.
- Substitute dark chocolate for milk chocolate for a richer flavor.
- Add a touch of espresso powder to the dough for a mocha flavor.
- Use a different type of frosting, such as a maple cream cheese frosting or a chocolate ganache.
- Add a layer of Nutella to the dough before rolling it up.
I’m so excited for you to try this recipe! I know you’re going to love these Chocolate Cinnamon Rolls as much as I do. So, gather your ingredients, preheat your oven, and get ready to bake up a batch of pure deliciousness.
And finally, I would absolutely love to hear about your experience making these rolls. Did you try any of the variations I suggested? Did you make any changes to the recipe? What did your friends and family think? Please share your photos and stories in the comments below. I can’t wait to see what you create! Happy baking!
Chocolate Cinnamon Rolls: The Ultimate Guide to Baking Perfection
Decadent chocolate cinnamon rolls with a rich chocolate-cinnamon filling swirled into soft, homemade dough and topped with tangy cream cheese frosting. Perfect for brunch or a special treat!
Ingredients
- 3 ½ cups (420g) all-purpose flour, plus more for dusting
- ¼ cup (50g) granulated sugar
- 2 ¼ teaspoons (7g) active dry yeast (1 packet)
- 1 teaspoon salt
- 1 cup (240ml) milk, warmed to 110-115°F (43-46°C)
- ¼ cup (57g) unsalted butter, melted
- 2 large eggs, lightly beaten
- ½ cup (113g) unsalted butter, softened
- ¾ cup (150g) granulated sugar
- ½ cup (45g) unsweetened cocoa powder
- 2 tablespoons ground cinnamon
- ¼ teaspoon salt
- ½ cup (60g) chocolate chips, semi-sweet or dark (optional)
- 4 ounces (113g) cream cheese, softened
- ¼ cup (57g) unsalted butter, softened
- 2 cups (240g) powdered sugar
- 1 teaspoon vanilla extract
- 2-4 tablespoons milk, or more to reach desired consistency
Instructions
- Activate the Yeast: In a large bowl, or the bowl of your stand mixer, combine the warm milk, sugar, and yeast. Let it sit for 5-10 minutes, or until the yeast is foamy.
- Combine Wet Ingredients: Add the melted butter and lightly beaten eggs to the yeast mixture. Whisk to combine everything well.
- Add Dry Ingredients: In a separate bowl, whisk together the flour and salt. Gradually add the dry ingredients to the wet ingredients, mixing on low speed with the dough hook attachment (or by hand) until a shaggy dough forms.
- Knead the Dough: If using a stand mixer, knead the dough on medium speed for 6-8 minutes, or until it becomes smooth and elastic. If kneading by hand, turn the dough out onto a lightly floured surface and knead for 8-10 minutes, or until it’s smooth and elastic. The dough should be slightly tacky but not sticky. If it’s too sticky, add a tablespoon of flour at a time until it reaches the right consistency.
- First Rise: Place the dough in a lightly oiled bowl, turning to coat. Cover the bowl with plastic wrap or a clean kitchen towel and let it rise in a warm place for 1-1.5 hours, or until doubled in size.
- Combine Filling Ingredients: While the dough is rising, prepare the filling. In a medium bowl, cream together the softened butter, sugar, cocoa powder, cinnamon, and salt until smooth and well combined.
- Roll Out the Dough: Once the dough has doubled in size, gently punch it down to release the air. Turn it out onto a lightly floured surface and roll it into a large rectangle, about 12×18 inches.
- Spread the Filling: Spread the chocolate cinnamon filling evenly over the entire surface of the dough, leaving a small border along one of the long edges. Sprinkle the chocolate chips (if using) evenly over the filling.
- Roll Up the Dough: Starting from the long edge opposite the border, tightly roll the dough into a log. Pinch the seam to seal it tightly.
- Cut the Rolls: Using a sharp serrated knife or unflavored dental floss, cut the log into 12 equal slices.
- Second Rise: Arrange the rolls in a lightly greased 9×13 inch baking dish. Cover loosely with plastic wrap or a clean kitchen towel and let them rise for another 30-45 minutes, or until they are puffy and almost doubled in size.
- Preheat the Oven: While the rolls are rising, preheat your oven to 350°F (175°C).
- Bake the Rolls: Bake the cinnamon rolls for 25-30 minutes, or until they are golden brown and cooked through. The internal temperature should reach around 200°F (93°C). If the tops are browning too quickly, you can tent them with foil during the last 10 minutes of baking.
- Cool Slightly: Let the cinnamon rolls cool in the baking dish for about 10-15 minutes before frosting.
- Cream Butter and Cream Cheese: While the rolls are baking, prepare the frosting. In a medium bowl, beat together the softened cream cheese and butter until smooth and creamy.
- Add Powdered Sugar and Vanilla: Gradually add the powdered sugar, beating on low speed until combined. Stir in the vanilla extract.
- Adjust Consistency: Add milk, one tablespoon at a time, until the frosting reaches your desired consistency.
- Frost the Rolls: Generously spread the cream cheese frosting over the warm cinnamon rolls.
- Serve Immediately: Serve the chocolate cinnamon rolls warm and enjoy!
Notes
- Make sure your milk is warmed to the correct temperature (110-115°F) to activate the yeast. If it’s too hot, it can kill the yeast.
- If your yeast doesn’t foam after 5-10 minutes, it might be old, and you’ll need to start over with fresh yeast.
- Knead the dough until it’s smooth and elastic. This is important for the texture of the cinnamon rolls.
- Let the dough rise in a warm place for the best results.
- Make sure your butter is softened for the filling and frosting to prevent lumps.
- Use dental floss to cut the rolls for cleaner cuts.
- Don’t overbake the cinnamon rolls, or they will be dry.
- Store leftover cinnamon rolls in an airtight container at room temperature for up to 2 days, or in the refrigerator for up to 4 days. Reheat gently before serving.
Printable Recipe Card
Want just the essential recipe details without scrolling through the article? Get our printable recipe card with just the ingredients and instructions.

Leave a Comment