
Christmas Red Velvet Cheesecake Recipe Festive Delicious is here to transform your holiday dessert table! Imagine the delight on your guests’ faces as you present a dessert that perfectly marries two iconic treats into one spectacular creation. This isn’t just any cheesecake; it’s a show-stopping marvel, boasting layers of vibrant red velvet cake and a silky-smooth, tangy cheesecake filling, all crowned with a luscious cream cheese frosting. The rich history of red velvet cake, with its origins often tied to the elegant Waldorf-Astoria Hotel and its vibrant color making it a symbol of joy and celebration, combined with the timeless appeal of a classic cheesecake, makes this dish truly special. While cheesecake’s roots stretch back to ancient Greece, its modern iterations have captivated palates worldwide, and this festive version is no exception.
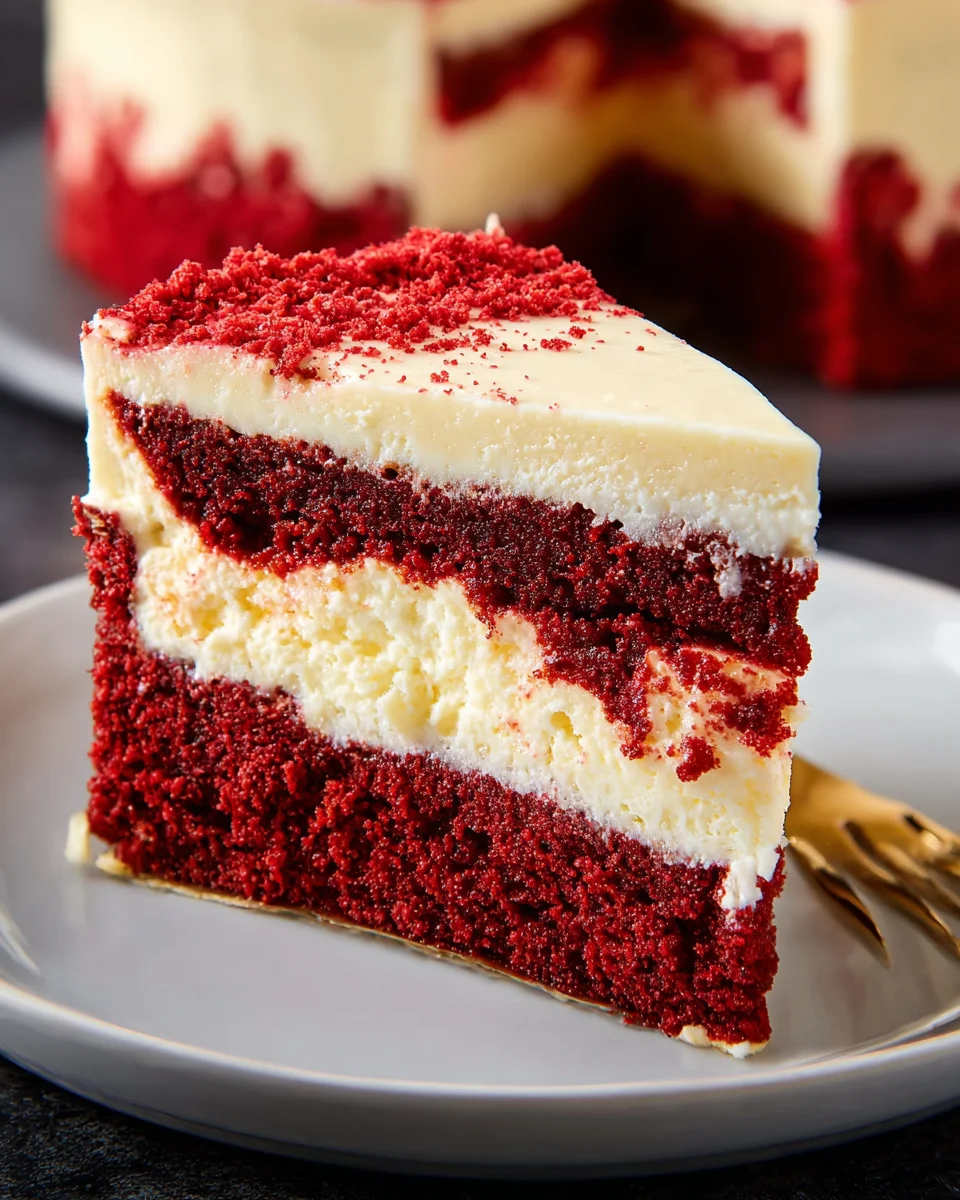
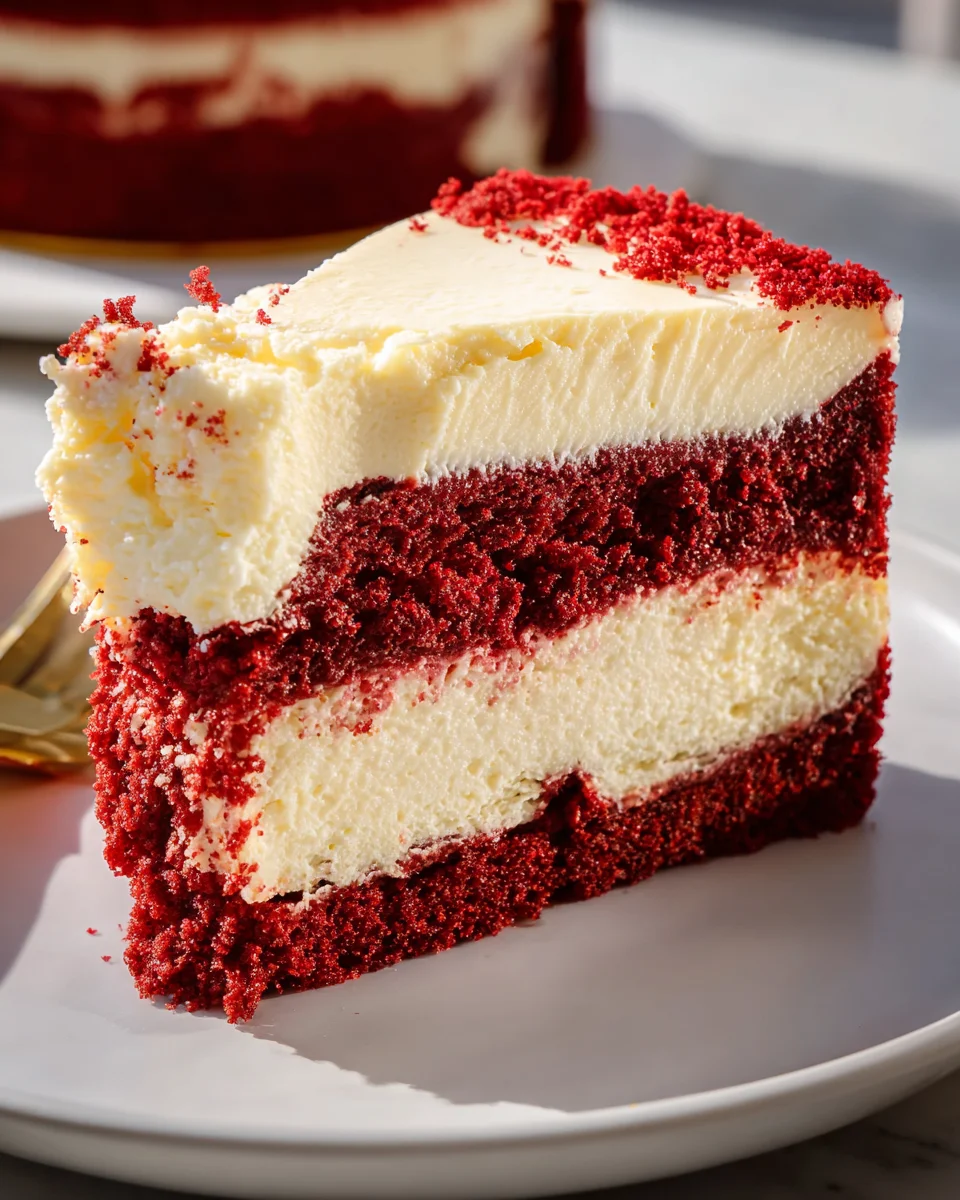
People absolutely adore this combination because it offers the best of both worlds: the tender, cocoa-kissed crumb of red velvet cake provides a delightful counterpoint to the dense, creamy texture of the cheesecake. It’s a symphony of flavors and textures in every single bite – sweet, tangy, rich, and incredibly satisfying. Beyond the exquisite taste, the visual appeal of this dessert, particularly its striking red hue against the pristine white frosting, makes it an ideal centerpiece for any holiday gathering. This particular Christmas Red Velvet Cheesecake Recipe Festive Delicious promises to be not only a crowd-pleaser but also a memorable addition to your annual traditions, guaranteeing rave reviews and requests for seconds. It truly embodies the spirit of holiday indulgence and effortless elegance.
Ingredients:
-
For the Red Velvet Cake Layers:
- 2 ½ cups (300g) all-purpose flour, sifted
- 1 ½ cups (300g) granulated sugar
- 1 tablespoon unsweetened cocoa powder
- 1 teaspoon baking soda
- ½ teaspoon salt
- 1 cup (240ml) buttermilk, at room temperature
- ½ cup (120ml) vegetable oil (or other neutral oil like canola)
- 2 large eggs, at room temperature
- 2 tablespoons (30ml) red food coloring (liquid or gel, adjust for desired depth of color; I often use a good quality gel for intense color)
- 1 teaspoon white vinegar
- 1 teaspoon vanilla extract
-
For the Festive No-Bake Cheesecake Layer:
- 16 ounces (450g) cream cheese, full-fat, softened at room temperature
- ½ cup (100g) granulated sugar
- 1 teaspoon vanilla extract
- 1 tablespoon fresh lemon juice (optional, but I love how it brightens the flavor!)
- 1 ½ cups (360ml) heavy cream (cold)
- ½ cup (60g) powdered sugar, sifted
- 1 packet (7g or about 2 ½ teaspoons) unflavored gelatin powder
- ¼ cup (60ml) cold water (for blooming the gelatin)
-
For the Dreamy Cream Cheese Frosting:
- 16 ounces (450g) cream cheese, full-fat, softened at room temperature
- 1 cup (226g) unsalted butter, softened at room temperature
- 4 cups (480g) powdered sugar, sifted (you can add a little more or less to taste and desired consistency)
- 2 teaspoons vanilla extract
- Pinch of salt (it really helps to balance the sweetness!)
-
For Decoration (Optional, but highly recommended for a truly Christmas Red Velvet Cheesecake Festive Delicious presentation!):
- Fresh cranberries
- Small sprigs of fresh rosemary
- White chocolate shavings or curls
- Edible glitter or festive sprinkles
Phase 1: Preparing the Red Velvet Cake Layers for Your Festive Christmas Red Velvet Cheesecake
- Preheat and Prepare Your Pans: First things first, preheat your oven to a cozy 350°F (175°C). An accurately preheated oven is your best friend for evenly baked cakes! Now, let’s get those cake pans ready. Grease and flour two 8-inch round cake pans thoroughly. For an extra layer of non-stick security, which I always recommend, line the bottoms with parchment paper circles. This simple step can save you a lot of heartache when it comes to releasing your beautifully baked layers.
- Sift Your Dry Ingredients: In a large mixing bowl, take a moment to whisk together your sifted all-purpose flour, granulated sugar, unsweetened cocoa powder, baking soda, and salt. Sifting isn’t just for fancy bakers; it breaks up any pesky lumps and, more importantly, incorporates air, which contributes to a delightfully light and tender cake crumb. The cocoa powder here is subtle, just enough to add a hint of chocolatey depth without overpowering that iconic red color. Set this perfectly combined mixture aside.
- Whip Up the Wet Ingredients: In a separate, medium-sized bowl or a large liquid measuring cup, combine your buttermilk, vegetable oil, large eggs, red food coloring, white vinegar, and vanilla extract. Whisk them vigorously until everything is beautifully combined and the red color is rich and even. Don’t hold back on the food coloring; we want that vibrant, show-stopping red that makes a red velvet cake so special, especially for a Christmas Red Velvet Cheesecake Festive Delicious dessert! The magical duo of vinegar and buttermilk is key here – they react with the baking soda to create that characteristic tender crumb and a delicate tang that truly defines red velvet.
- Gently Combine Wet and Dry: Now, it’s time to bring these two wonderful mixtures together. Gradually add the wet ingredients into the dry ingredients. Using an electric mixer on low speed, or even a sturdy whisk by hand, mix until they are just combined. The golden rule here is to avoid overmixing! Overmixing develops gluten, which can result in a tough, chewy cake – and we’re aiming for tender perfection. A few small streaks of flour are absolutely fine; they’ll disappear during baking, I promise. Your batter should be smooth, thick, and boasting that gorgeous, vibrant red hue.
- Divide and Bake to Perfection: Divide your magnificent red batter evenly between the two prepared 8-inch cake pans. If you’re a stickler for precision, a kitchen scale can help ensure perfectly uniform layers, but honestly, eyeballing it usually works out just fine. Carefully place the pans into your preheated oven and bake for 25-30 minutes. You’ll know they’re done when a wooden skewer or toothpick inserted into the very center of the cakes comes out clean, maybe with a few moist crumbs clinging to it, but no wet batter. Remember, every oven is a little different, so start checking around the 25-minute mark. The aroma that fills your kitchen at this stage is absolutely heavenly!
- Cool, Cool, Cool (Crucial Step!): Once your cakes are baked to perfection, remove them from the oven and let them cool in their pans on a wire rack for about 10-15 minutes. This cooling period allows the cakes to firm up slightly and makes them less prone to breaking. After this initial rest, carefully invert them onto the wire rack, gently peel off any parchment paper you used, and let them cool completely. This step is non-negotiable. Seriously, resist the urge to rush! Attempting to frost or stack warm cakes will lead to a melty, crumbly mess, and nobody wants that. Patience is indeed a virtue, especially when you’re crafting such a magnificent and delightful treat!
Phase 2: Crafting the Festive No-Bake Cheesecake Layer
- Prepare Your Gelatin: This is the secret to a stable no-bake cheesecake layer that holds its shape beautifully in a layered cake! In a small, heatproof bowl, sprinkle the unflavored gelatin powder evenly over the ¼ cup of cold water. Let it sit undisturbed for 5-10 minutes; this process is called “blooming,” and you’ll see it transform into a thick, lumpy paste. Once bloomed, you need to melt it. You can do this by placing the bowl over a pot of simmering water (a bain-marie) and stirring gently, or by microwaving it in very short 10-second bursts, stirring well after each, until it’s completely dissolved and clear, with no granules remaining. Set it aside to cool slightly, making sure it doesn’t solidify.
- Whip the Cream Cheese Mixture: In a large mixing bowl, using an electric mixer, beat your softened full-fat cream cheese with the ½ cup of granulated sugar, vanilla extract, and your optional lemon juice until the mixture is incredibly smooth, creamy, and completely free of lumps. This usually takes about 2-3 minutes on medium speed. Remember to scrape down the sides of the bowl frequently to ensure everything gets perfectly incorporated. You want this mixture to be light and airy.
- Whip the Heavy Cream: In a separate, preferably chilled, large bowl (a cold bowl and cold cream really help achieve stiff peaks faster!), beat the cold heavy cream along with the ½ cup of sifted powdered sugar until beautiful, stiff peaks form. Be vigilant here – it’s easy to overbeat heavy cream, which can quickly turn into butter! You want it to hold its shape firmly when you lift the beaters.
- Combine and Stabilize with Gelatin: First, gently fold about a third of your whipped cream into the cream cheese mixture. This “lightens” the cream cheese base, making it easier to incorporate the rest. Next, while continuing to gently fold, slowly drizzle the slightly cooled, dissolved gelatin into the cream cheese mixture. It’s important to do this somewhat quickly and evenly to prevent the gelatin from seizing up and forming lumps. Once the gelatin is fully incorporated, gently fold in the remaining whipped cream until no streaks remain and the mixture is uniformly smooth and wonderfully fluffy. Be careful not to deflate all that lovely air you just whipped in!
- Prepare for Chilling: Line an 8-inch round cake pan (the same size as your cake layers) with plastic wrap, leaving a generous overhang on all sides. This plastic wrap will be your savior when it comes to easily removing the chilled cheesecake layer. Pour the cheesecake mixture into the prepared pan and smooth the top with an offset spatula. Then, cover it tightly with more plastic wrap.
- Chill Thoroughly (Patience is Key!): Now comes the hardest part – waiting! Refrigerate your cheesecake layer for a minimum of 4-6 hours, or even better, overnight, until it is completely firm and fully set. This extended chilling time is absolutely critical and non-negotiable for a stable layer that you can confidently transfer and that will hold its shape beautifully within your magnificent layered cake. You’re building a structural marvel here, so give it ample time to solidify! This luscious cheesecake layer will be the incredibly creamy and tangy heart of your Christmas Red Velvet Cheesecake Festive Delicious creation.
Phase 3: Whipping Up the Dreamy Cream Cheese Frosting
- Beat Butter and Cream Cheese: In a large mixing bowl, using an electric mixer on medium speed, beat the softened unsalted butter and softened full-fat cream cheese together until the mixture is wonderfully light, fluffy, and perfectly smooth. This usually takes a good 3-5 minutes. It is absolutely paramount that both your butter and cream cheese are at true room temperature; otherwise, you’ll end up with a lumpy, uncooperative frosting. Make sure to scrape down the sides of the bowl frequently to ensure every bit is evenly incorporated.
- Gradually Add Powdered Sugar: With your mixer on low speed, gradually add the sifted powdered sugar, one cup at a time, allowing each addition to be fully incorporated before adding more. Once all the sugar has been added, increase the mixer speed to medium-high and beat for another 2-3 minutes. This step is key – it aerates the frosting, making it incredibly fluffy, smooth, and spreadable.
- Add Vanilla and Salt: Finally, beat in the vanilla extract and that small but mighty pinch of salt. The salt isn’t just a placeholder; it genuinely helps to cut through the sweetness and enhances all the other lovely flavors in your frosting. Mix until just combined. Now’s your chance to taste and adjust! If you prefer it sweeter, add a little more sifted powdered sugar. If you want more vanilla punch, add another dash. This frosting should be utterly divine – creamy, perfectly tangy, and sweet, creating the ideal complement to your rich red velvet cake and the delightful cheesecake layer.
Phase 4: Assembling Your Christmas Red Velvet Cheesecake Masterpiece
- Level Your Cake Layers: Once your red velvet cake layers are completely cool (I mean it, completely!), take a moment to level them. Use a long serrated knife or a specialized cake leveler to carefully trim off any domes or uneven tops, creating a perfectly flat surface. This step is really important for achieving that professional, neatly stacked look for your finished cake.
- Prepare the Cheesecake Layer for Assembly: Carefully unwrap your thoroughly chilled cheesecake layer. Gently invert it onto a plate, then carefully peel off all the plastic wrap. Now, with the utmost care, using a large, thin offset spatula or a cake lifter, transfer that firm cheesecake disk to your desired serving plate or cake stand. If, for any reason, it feels a little too soft to handle (perhaps your fridge isn’t super cold), pop it back into the freezer for 15-20 minutes to firm up even more before attempting to move it. You want it cold and solid.
- Lay the First Cake Layer: Place one of your leveled red velvet cake layers onto your chosen serving platter or cake stand. Spread about a third of your luscious cream cheese frosting evenly over the top of this cake layer. Extend the frosting almost to the very edges, creating a lovely, consistent base for the next layer.
- Introduce the Cheesecake Heart: With gentle hands, carefully place your perfectly chilled, firm cheesecake layer directly on top of the first frosted red velvet cake layer. Try to center it as best as possible. The visual contrast of the vibrant red cake against the creamy white cheesecake at this stage is already looking absolutely spectacular and so festive!
- Add the Second Cake Layer: Spread another thin layer of cream cheese frosting (about ¼ cup should do it) on the underside of your second red velvet cake layer. This thin layer acts like a delicious “glue” to help it adhere better to the cheesecake. Then, carefully place this second cake layer on top of the cheesecake layer, pressing down very gently to ensure it’s level and securely seated.
- The Essential Crumb Coat: Now, apply a thin, even layer of cream cheese frosting all over the top and sides of your entire cake. This is what we call a “crumb coat,” and it’s a vital step! Its purpose is to trap any loose crumbs from your cake layers, preventing them from showing up in your beautiful final frosting layer. It doesn’t need to be perfectly smooth or thick, just a consistent, thin covering.
- Chill the Crumb Coat: Transfer your crumb-coated cake to the refrigerator for at least 30 minutes. This chilling time allows that thin crumb coat to firm up beautifully, which will make the application of your final frosting layer much, much smoother and cleaner. Trust me, this is a secret weapon for achieving that polished, bakery-worthy finish!
- Apply the Final Frosting: Once your crumb coat is chilled and firm to the touch, it’s time for the grand finale! Apply the remaining cream cheese frosting generously to the top and sides of your cake. Use an offset spatula or a cake scraper to achieve a smooth, elegant finish. If you prefer a more rustic and charming look, you can create delightful swirls or peaks with the back of a spoon or your spatula. Let your inner artist truly shine here! This final, glorious layer transforms your creation into an undeniable Christmas Red Velvet Cheesecake Festive Delicious dessert.
Phase 5: Decorating and Serving Your Christmas Red Velvet Cheesecake
- Decorate with Festive Flair (Optional but Highly Recommended!): This is truly where your cake embraces its magnificent Christmas spirit! Artfully arrange fresh cranberries and small, delicate sprigs of rosemary around the base or on top of the cake for a stunning, natural, and incredibly festive garnish. The vibrant red of the cranberries paired with the deep green of the rosemary creates a classic holiday contrast that is absolutely perfect for the season. You could also gently sprinkle white chocolate shavings or curls on top to beautifully mimic freshly fallen snow, or add a dusting of edible glitter for that extra magical sparkle. If you have a piping bag and some various tips, you can use any leftover frosting to create elegant borders or rosettes around the top edge of the cake for an even more elaborate touch.
- Final Chill for Perfection: For the cleanest, most precise slices and the absolute best overall presentation, I highly recommend refrigerating your fully decorated Christmas Red Velvet Cheesecake Festive Delicious cake for at least another 1-2 hours after frosting. This crucial chilling period gives the frosting and the entire cake structure ample time to firm up completely, ensuring a beautiful slice every time.
- Slice and Serve with Pride: When you’re ready to unveil and serve your stunning creation, remove the cake from the refrigerator and let it sit at room temperature for about 15-20 minutes. This brief pause allows the frosting and cake layers to soften just slightly, making for much easier and cleaner slicing. Use a sharp, thin knife, and here’s a professional tip: wipe the blade clean with a warm, damp cloth between each slice for absolutely pristine cuts. Each slice will reveal the breathtaking layers of vibrant red cake, the creamy, tangy white cheesecake, and the luscious cream cheese frosting – a true showstopper that will undoubtedly be the centerpiece of any holiday gathering.
- Storage: Should you (miraculously!) have any leftover Christmas Red Velvet Cheesecake, store it in an airtight container in the refrigerator for up to 3-4 days. This cake is so incredibly delicious and festive, though, that I genuinely doubt you’ll have much left to store! It’s truly a delightful dessert that perfectly captures the joy, beauty, and wonderful flavors of the holiday season. Enjoy every single festive, delicious bite!
Conclusion:
And there you have it, my friends! We’ve reached the sweet finale of our culinary journey together. I genuinely hope you’re feeling as excited as I am about this incredible dessert. This isn’t just any cheesecake; it’s a show-stopping masterpiece, perfectly blending the rich, cocoa-infused tang of classic red velvet with the smooth, luxurious creaminess of a perfectly baked cheesecake. It truly is the epitome of celebratory baking, designed to impress and delight everyone at your table.
From its striking crimson layers to its velvety texture and its harmonious balance of sweet and tangy flavors, every element of this dessert has been crafted to create an unforgettable experience. I’ve found that few desserts command attention quite like this one, and the best part is that despite its impressive appearance, it’s surprisingly accessible to create in your own kitchen. It brings that quintessential holiday warmth and cheer, making it more than just a treat – it’s a focal point for festive gatherings. The effort, which I promise is entirely manageable, pays off tenfold in the gasps of admiration and the pure joy it brings.
Serving Suggestions and Delightful Variations
Now, once you’ve pulled this magnificent creation from your oven and allowed it to chill to perfection, the fun of serving begins! I always adore presenting it simply, perhaps with a generous dollop of freshly whipped cream, lightly sweetened with a hint of vanilla bean paste. For a truly festive flourish, consider scattering a handful of glistening fresh cranberries or bright red raspberries over the top – their tartness provides a wonderful counterpoint to the richness, and their vibrant color makes the cheesecake pop even more. A delicate dusting of confectioners’ sugar or a subtle drizzle of melted white chocolate can also elevate its visual appeal, making each slice look like a work of art. Remember to always serve it well-chilled; this ensures the perfect firm yet creamy consistency that defines a superb cheesecake.
But why stop there? While the core recipe is a triumph on its own, don’t hesitate to personalize it! For those who love an even deeper chocolate experience, swapping out the traditional graham cracker crust for one made with crushed chocolate cookies (like Oreos!) is a game-changer. Alternatively, for an added layer of seasonal spice, a gingersnap crust can introduce a beautiful warmth that complements the red velvet perfectly. If you’re feeling adventurous with flavors, a very subtle hint of orange zest in the cheesecake filling can brighten the entire profile, adding an unexpected but delightful citrus note. And while it shines brightest during the holidays, this base recipe is so versatile that by simply adjusting your garnishes – perhaps fresh strawberries and a chocolate drizzle – you can enjoy a stunning red velvet cheesecake any time of year.
A Must-Try: The Christmas Red Velvet Cheesecake Recipe Festive Delicious Experience
I truly believe that making this dessert is about more than just following steps; it’s about creating moments, sharing joy, and indulging in something truly special. This particular Christmas Red Velvet Cheesecake Recipe Festive Delicious creation embodies everything wonderful about holiday baking: it’s visually stunning, incredibly flavorful, and brings smiles to every face around the table. It’s the kind of recipe that will earn you endless compliments and might just become a new cherished tradition in your home. The satisfaction you’ll feel from baking something so beautiful and so incredibly tasty is immeasurable.
So, my dear bakers, I wholeheartedly encourage you to roll up your sleeves and give this extraordinary recipe a try. Don’t be intimidated by its grandeur; I’ve meticulously outlined each step to ensure your success. Imagine the delight on your loved ones’ faces as you present this stunning dessert. It’s a wonderful way to express your creativity and share your love through food.
And once you’ve experienced the magic of this cheesecake for yourselves, I would absolutely love to hear about it! Please, share your baking adventures, your delicious results, and any personal twists you added. Snap a photo, tell us about your serving suggestions, or simply recount the joy it brought to your table. Your feedback and beautiful creations truly inspire me and our entire community of food lovers. Happy baking, and may your holiday season (or any season!) be filled with delicious moments!
Christmas Red Velvet Cheesecake Recipe – Festive & Delicious
This spectacular Christmas Red Velvet Cheesecake marries vibrant red velvet cake layers with a silky-smooth, tangy cheesecake filling, all crowned with luscious cream cheese frosting. It’s a show-stopping dessert perfect for holiday gatherings, offering a symphony of sweet, tangy, and rich flavors and textures.
Ingredients
Instructions
Important Information
Nutrition Facts (Per Serving)
It is important to consider this information as approximate and not to use it as definitive health advice.
Allergy Information
Please check ingredients for potential allergens and consult a health professional if in doubt.

Leave a Comment