
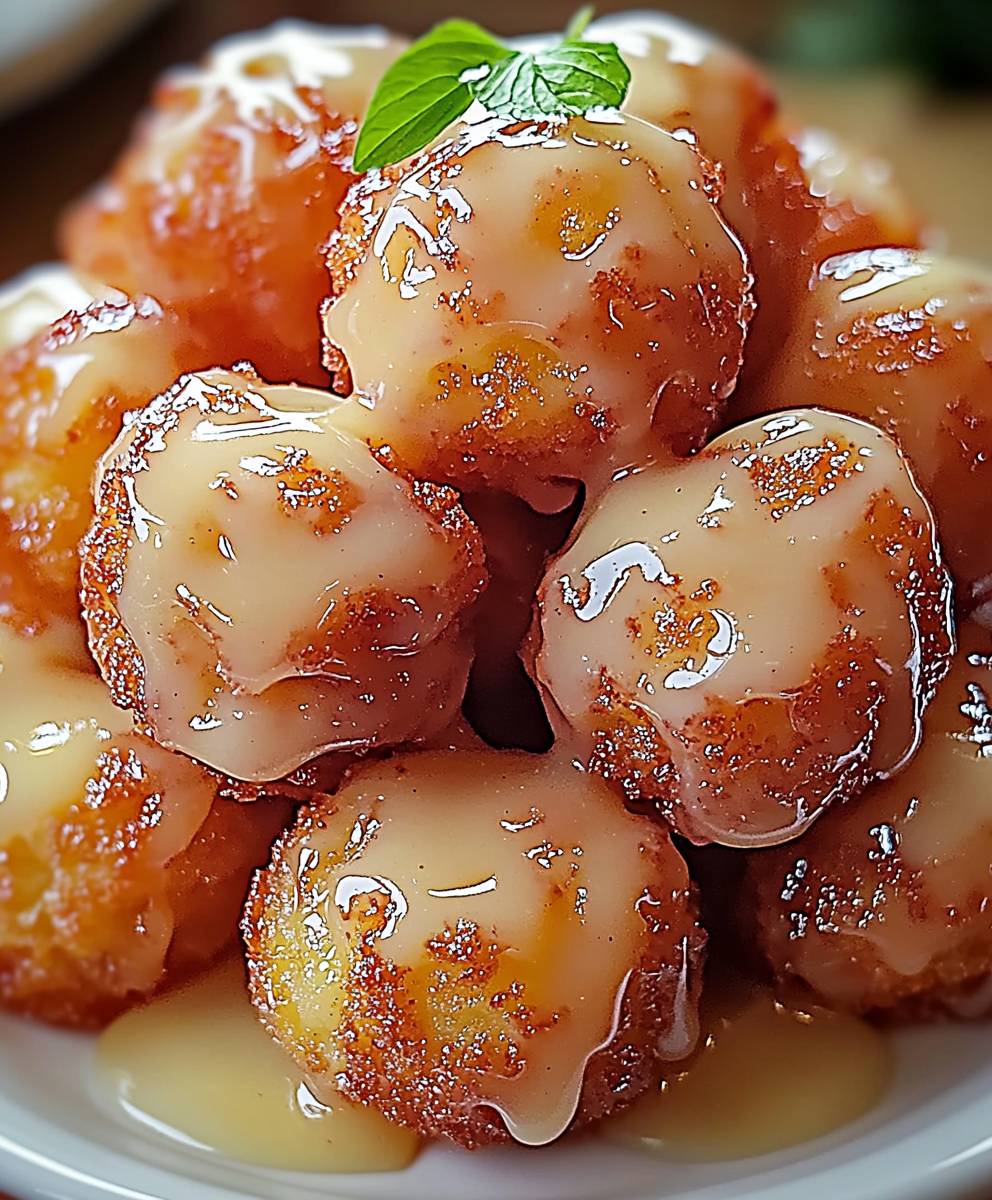
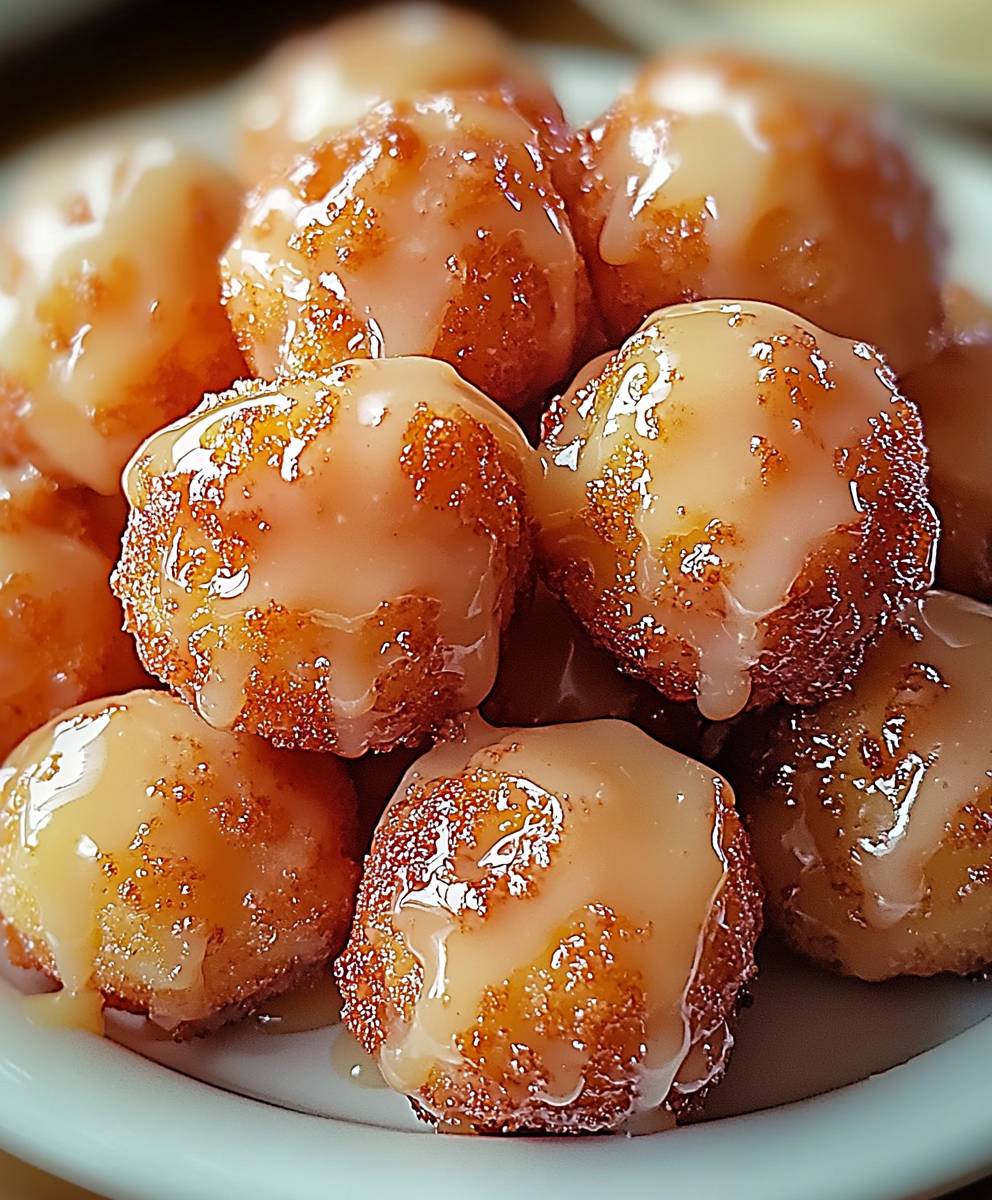
Cinnamon Glazed Apple Fritter: Prepare to be transported to a world of warm spices, crisp apples, and sugary bliss! Imagine biting into a cloud of fried dough, studded with tender apple pieces, and then drizzled generously with a luscious cinnamon glaze. This isn’t just a dessert; it’s an experience, a comforting hug in pastry form.
Apple fritters, in their various forms, have a long and delicious history, with roots tracing back to ancient Roman and medieval European kitchens. These early versions were often simple affairs, utilizing whatever fruits were in season and frying them in a basic batter. Over time, regional variations emerged, each adding its unique twist to this beloved treat. The addition of cinnamon, a spice prized for its warmth and aromatic qualities, elevates the apple fritter to a whole new level of indulgence.
What makes the cinnamon glazed apple fritter so irresistible? It’s the perfect combination of textures and flavors. The crispy exterior gives way to a soft, almost pillowy interior, while the tartness of the apples is beautifully balanced by the sweetness of the glaze. And let’s not forget the convenience! While they might seem like a special occasion treat, these fritters are surprisingly easy to make at home, allowing you to enjoy a taste of autumn any time of year. So, are you ready to embark on a culinary adventure and create your own batch of these delectable delights? Let’s get started!
Ingredients:
- For the Fritters:
- 2 1/2 cups all-purpose flour, plus more for dusting
- 1/4 cup granulated sugar
- 2 1/4 teaspoons (1 packet) active dry yeast
- 1 teaspoon ground cinnamon
- 1/2 teaspoon ground nutmeg
- 1/4 teaspoon salt
- 1 cup milk, warmed to 110-115°F (43-46°C)
- 1 large egg, lightly beaten
- 2 tablespoons unsalted butter, melted
- 2 teaspoons vanilla extract
- 2 medium apples (such as Honeycrisp or Granny Smith), peeled, cored, and diced into 1/4-inch pieces
- Vegetable oil, for frying
- For the Cinnamon Glaze:
- 2 cups powdered sugar
- 1/4 cup milk
- 2 tablespoons unsalted butter, melted
- 1 teaspoon ground cinnamon
- 1/2 teaspoon vanilla extract
- Pinch of salt
Preparing the Dough:
- Activate the Yeast: In a large bowl, combine the warm milk, sugar, and yeast. Gently stir and let it sit for 5-10 minutes, or until the mixture becomes foamy. This indicates that the yeast is active and ready to use. If it doesn’t foam, your yeast might be old, and you’ll need to start with fresh yeast.
- Combine Dry Ingredients: In a separate bowl, whisk together the flour, cinnamon, nutmeg, and salt. This ensures that the spices are evenly distributed throughout the dough.
- Mix Wet and Dry Ingredients: Add the beaten egg, melted butter, and vanilla extract to the yeast mixture. Stir well to combine. Gradually add the dry ingredients to the wet ingredients, mixing until a shaggy dough forms.
- Knead the Dough: Turn the dough out onto a lightly floured surface. Knead for 5-7 minutes, or until the dough becomes smooth and elastic. If the dough is too sticky, add a little more flour, one tablespoon at a time. Be careful not to add too much flour, as this can make the fritters tough.
- Incorporate the Apples: Gently fold in the diced apples until they are evenly distributed throughout the dough. Be careful not to overmix, as this can develop the gluten too much and make the fritters tough.
- First Rise: Place the dough in a lightly oiled bowl, turning to coat. Cover with plastic wrap or a clean kitchen towel and let it rise in a warm place for 1-1.5 hours, or until doubled in size. This allows the yeast to work its magic and create a light and airy fritter.
Shaping and Frying the Fritters:
- Punch Down the Dough: Gently punch down the dough to release the air. This helps to create a more even texture in the fritters.
- Divide and Shape: Turn the dough out onto a lightly floured surface. You have a couple of options here. You can either roll the dough out to about 1/2-inch thickness and use a cookie cutter or knife to cut out shapes (circles, squares, or even donuts!), or you can simply pinch off pieces of dough and shape them into rough, irregular fritters. I personally prefer the irregular shape for a more rustic look. Aim for fritters that are about 2-3 inches in diameter.
- Second Rise: Place the shaped fritters on a baking sheet lined with parchment paper. Cover with plastic wrap or a clean kitchen towel and let them rise for another 30-45 minutes. This second rise is crucial for creating light and fluffy fritters.
- Heat the Oil: While the fritters are rising, heat about 3 inches of vegetable oil in a large, heavy-bottomed pot or Dutch oven to 350-375°F (175-190°C). Use a deep-fry thermometer to monitor the temperature of the oil. Maintaining the correct temperature is essential for even cooking and preventing the fritters from becoming greasy.
- Fry the Fritters: Carefully place a few fritters at a time into the hot oil, being careful not to overcrowd the pot. Fry for 2-3 minutes per side, or until golden brown and cooked through. The fritters should puff up and float to the surface.
- Drain the Fritters: Remove the fried fritters with a slotted spoon and place them on a wire rack lined with paper towels to drain excess oil. This helps to keep the fritters crispy.
Preparing the Cinnamon Glaze:
- Combine Ingredients: In a medium bowl, whisk together the powdered sugar, milk, melted butter, cinnamon, vanilla extract, and salt until smooth. Add more milk, one tablespoon at a time, if needed to reach your desired consistency. The glaze should be thick enough to coat the fritters but thin enough to drizzle easily.
Glazing and Serving:
- Glaze the Fritters: While the fritters are still warm, dip them into the cinnamon glaze, coating them evenly. Alternatively, you can drizzle the glaze over the fritters using a spoon or fork.
- Let the Glaze Set: Place the glazed fritters back on the wire rack and let the glaze set for about 10-15 minutes before serving. This allows the glaze to harden slightly and prevents it from being too sticky.
- Serve and Enjoy: Serve the cinnamon glazed apple fritters warm and enjoy! They are best enjoyed fresh, but can be stored in an airtight container at room temperature for up to 2 days. However, they are definitely at their peak when freshly made.
Tips for Perfect Fritters:
- Don’t Overcrowd the Pot: Frying too many fritters at once will lower the oil temperature and result in greasy fritters. Fry in batches to maintain the correct temperature.
- Maintain Oil Temperature: Use a deep-fry thermometer to ensure the oil stays within the optimal temperature range of 350-375°F (175-190°C). Adjust the heat as needed to maintain the temperature.
- Use Fresh Oil: Using fresh, clean oil will result in better-tasting fritters. Avoid using oil that has been used for frying other foods, as it may impart unwanted flavors.
- Don’t Overmix the Dough: Overmixing the dough will develop the gluten too much and result in tough fritters. Mix until just combined.
- Let the Dough Rise Properly: Allowing the dough to rise properly is crucial for creating light and airy fritters. Be patient and let the dough double in size during the first rise and rise again during the second rise.
- Adjust Sweetness: If you prefer a sweeter glaze, add more powdered sugar. If you prefer a less sweet glaze, reduce the amount of powdered sugar.
- Add a Touch of Spice: Feel free to experiment with other spices in the dough or glaze, such as cardamom, ginger, or allspice.
- Apple Variety: While Honeycrisp and Granny Smith apples are recommended, you can use other apple varieties that hold their shape well during cooking.
Troubleshooting:
- Fritters are greasy: The oil temperature was likely too low. Make sure to maintain the correct temperature. Also, ensure you are draining the fritters properly on a wire rack lined with paper towels.
- Fritters are tough: The dough was likely overmixed. Be careful not to overmix the dough. Also, ensure you are not adding too much flour during kneading.
- Fritters are not rising: The yeast may be old or the milk may not have been warm enough. Make sure to use fresh yeast and warm the milk to the correct temperature. Also, ensure you are letting the dough rise in a warm place.
- Glaze is too thick: Add more milk, one tablespoon at a time, until you reach your desired consistency.
- Glaze is too thin: Add more powdered sugar, one tablespoon at a time, until you reach your desired consistency.
Conclusion:
So, there you have it! This Cinnamon Glazed Apple Fritter recipe is more than just a sweet treat; it’s a warm hug on a plate, a nostalgic trip to autumn orchards, and a guaranteed crowd-pleaser all rolled into one delicious bite. I truly believe this is a must-try recipe for anyone who loves the comforting flavors of cinnamon and apple, and who doesn’t? The crispy, golden exterior gives way to a soft, apple-studded interior, all perfectly complemented by that sweet and spicy cinnamon glaze. What’s not to love?
I know, I know, baking can sometimes seem intimidating, but trust me, this recipe is surprisingly straightforward. I’ve broken it down into easy-to-follow steps, and even if you’re a beginner baker, I’m confident you can achieve fritter perfection. The key is to not overmix the batter and to keep the oil at the right temperature. A little patience goes a long way! And the reward? Oh, the reward is so worth it.
But the best part about this recipe is its versatility! While the classic cinnamon glaze is my personal favorite, feel free to get creative. A simple dusting of powdered sugar is always a lovely option, or you could try a maple glaze for an extra touch of autumnal sweetness. For a richer flavor, consider adding a splash of bourbon or rum to the glaze. And if you’re feeling adventurous, why not experiment with different spices? A pinch of nutmeg or cardamom would add a unique and delightful twist.
Serving suggestions? Oh, the possibilities are endless! These fritters are absolutely divine served warm with a scoop of vanilla ice cream. They’re also perfect with a cup of hot coffee or tea for a cozy afternoon treat. For a truly decadent experience, try crumbling them over yogurt or oatmeal for a breakfast that feels like dessert. And of course, they’re always a hit at potlucks, brunches, and holiday gatherings. Imagine the smiles on your friends’ and family’s faces when you present them with a platter of these golden beauties!
Don’t be afraid to experiment and make this recipe your own. Maybe you prefer Granny Smith apples for a tarter flavor, or perhaps you like to add a handful of chopped walnuts to the batter for extra crunch. The beauty of baking is that it’s all about personal preference. So, go ahead, unleash your inner baker and create a Cinnamon Glazed Apple Fritter masterpiece that reflects your unique taste.
I’m so excited for you to try this recipe! I truly believe it will become a new favorite in your household. And please, don’t be shy about sharing your experience. I would absolutely love to hear how your fritters turned out, what variations you tried, and what your family and friends thought. Leave a comment below, tag me in your photos on social media, or send me an email. I’m always eager to connect with fellow food lovers and hear about their culinary adventures. Happy baking! I can’t wait to see your delicious creations!
Cinnamon Glazed Apple Fritter: The Ultimate Guide to Baking Perfection
Warm, fluffy apple fritters with a spiced cinnamon glaze. A perfect fall treat!
Ingredients
- 2 1/2 cups all-purpose flour, plus more for dusting
- 1/4 cup granulated sugar
- 2 1/4 teaspoons (1 packet) active dry yeast
- 1 teaspoon ground cinnamon
- 1/2 teaspoon ground nutmeg
- 1/4 teaspoon salt
- 1 cup milk, warmed to 110-115°F (43-46°C)
- 1 large egg, lightly beaten
- 2 tablespoons unsalted butter, melted
- 2 teaspoons vanilla extract
- 2 medium apples (such as Honeycrisp or Granny Smith), peeled, cored, and diced into 1/4-inch pieces
- Vegetable oil, for frying
- 2 cups powdered sugar
- 1/4 cup milk
- 2 tablespoons unsalted butter, melted
- 1 teaspoon ground cinnamon
- 1/2 teaspoon vanilla extract
- Pinch of salt
Instructions
- Activate the Yeast: In a large bowl, combine the warm milk, sugar, and yeast. Gently stir and let it sit for 5-10 minutes, or until the mixture becomes foamy.
- Combine Dry Ingredients: In a separate bowl, whisk together the flour, cinnamon, nutmeg, and salt.
- Mix Wet and Dry Ingredients: Add the beaten egg, melted butter, and vanilla extract to the yeast mixture. Stir well to combine. Gradually add the dry ingredients to the wet ingredients, mixing until a shaggy dough forms.
- Knead the Dough: Turn the dough out onto a lightly floured surface. Knead for 5-7 minutes, or until the dough becomes smooth and elastic. If the dough is too sticky, add a little more flour, one tablespoon at a time.
- Incorporate the Apples: Gently fold in the diced apples until they are evenly distributed throughout the dough.
- First Rise: Place the dough in a lightly oiled bowl, turning to coat. Cover with plastic wrap or a clean kitchen towel and let it rise in a warm place for 1-1.5 hours, or until doubled in size.
- Punch Down the Dough: Gently punch down the dough to release the air.
- Divide and Shape: Turn the dough out onto a lightly floured surface. Roll the dough out to about 1/2-inch thickness and use a cookie cutter or knife to cut out shapes (circles, squares, or even donuts!), or pinch off pieces of dough and shape them into rough, irregular fritters. Aim for fritters that are about 2-3 inches in diameter.
- Second Rise: Place the shaped fritters on a baking sheet lined with parchment paper. Cover with plastic wrap or a clean kitchen towel and let them rise for another 30-45 minutes.
- Heat the Oil: Heat about 3 inches of vegetable oil in a large, heavy-bottomed pot or Dutch oven to 350-375°F (175-190°C). Use a deep-fry thermometer to monitor the temperature of the oil.
- Fry the Fritters: Carefully place a few fritters at a time into the hot oil, being careful not to overcrowd the pot. Fry for 2-3 minutes per side, or until golden brown and cooked through.
- Drain the Fritters: Remove the fried fritters with a slotted spoon and place them on a wire rack lined with paper towels to drain excess oil.
- Combine Glaze Ingredients: In a medium bowl, whisk together the powdered sugar, milk, melted butter, cinnamon, vanilla extract, and salt until smooth. Add more milk, one tablespoon at a time, if needed to reach your desired consistency.
- Glaze the Fritters: While the fritters are still warm, dip them into the cinnamon glaze, coating them evenly. Alternatively, you can drizzle the glaze over the fritters using a spoon or fork.
- Let the Glaze Set: Place the glazed fritters back on the wire rack and let the glaze set for about 10-15 minutes before serving.
- Serve and Enjoy: Serve the cinnamon glazed apple fritters warm and enjoy! They are best enjoyed fresh, but can be stored in an airtight container at room temperature for up to 2 days.
Notes
- Don’t Overcrowd the Pot: Frying too many fritters at once will lower the oil temperature and result in greasy fritters. Fry in batches to maintain the correct temperature.
- Maintain Oil Temperature: Use a deep-fry thermometer to ensure the oil stays within the optimal temperature range of 350-375°F (175-190°C). Adjust the heat as needed to maintain the temperature.
- Use Fresh Oil: Using fresh, clean oil will result in better-tasting fritters. Avoid using oil that has been used for frying other foods, as it may impart unwanted flavors.
- Don’t Overmix the Dough: Overmixing the dough will develop the gluten too much and result in tough fritters. Mix until just combined.
- Let the Dough Rise Properly: Allowing the dough to rise properly is crucial for creating light and airy fritters. Be patient and let the dough double in size during the first rise and rise again during the second rise.
- Adjust Sweetness: If you prefer a sweeter glaze, add more powdered sugar. If you prefer a less sweet glaze, reduce the amount of powdered sugar.
- Add a Touch of Spice: Feel free to experiment with other spices in the dough or glaze, such as cardamom, ginger, or allspice.
- Apple Variety: While Honeycrisp and Granny Smith apples are recommended, you can use other apple varieties that hold their shape well during cooking.
Printable Recipe Card
Want just the essential recipe details without scrolling through the article? Get our printable recipe card with just the ingredients and instructions.
Leave a Comment