
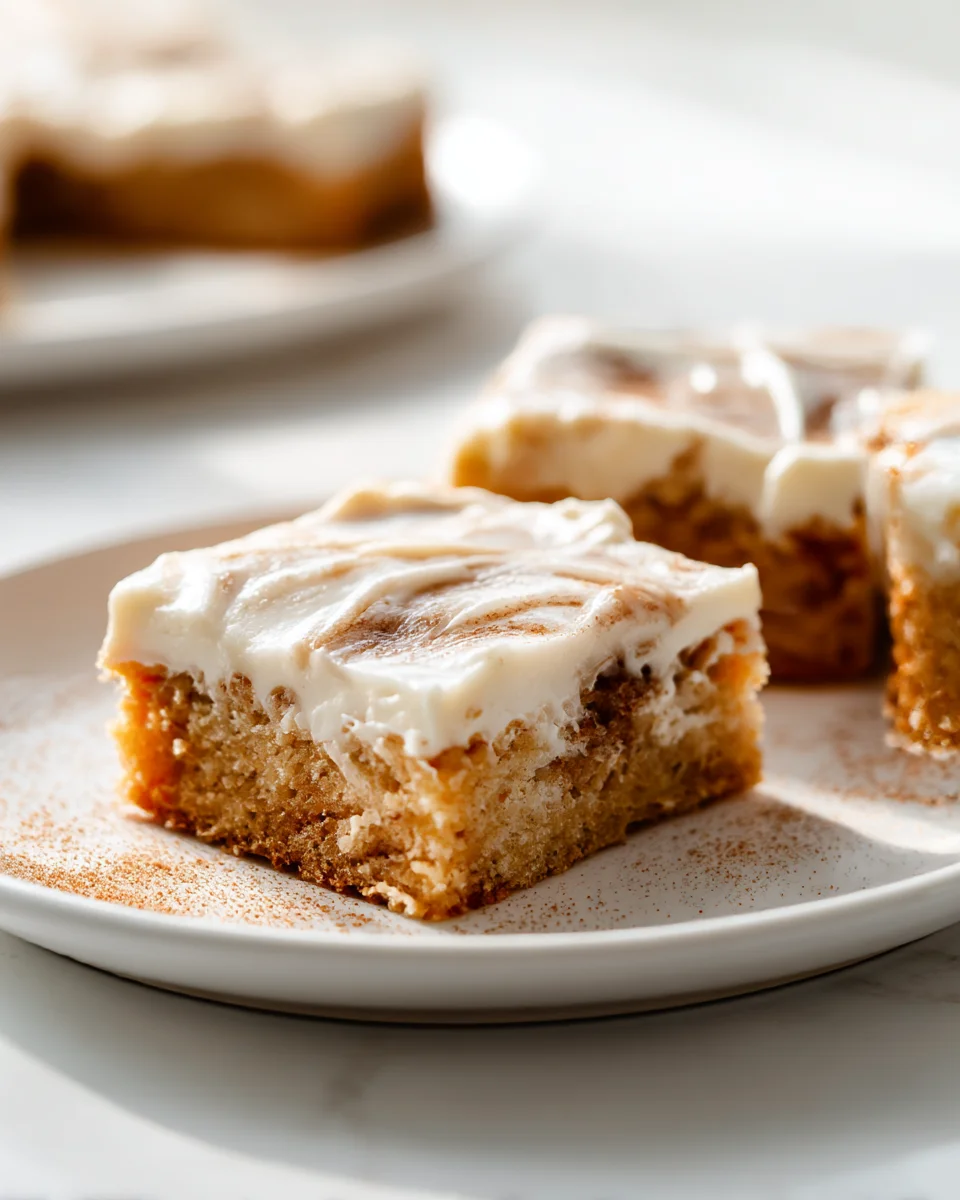
Cinnamon Roll Bliss Bars
Cinnamon Roll Bliss Bars – this name just screams cozy comfort, doesn’t it? If you, like me, adore the warm, inviting aroma and gooey deliciousness of a classic cinnamon roll but sometimes wish for a quicker, less fussy way to enjoy them, then you’ve absolutely found your new favorite treat! I’ve poured all the heartwarming flavors of those beloved swirled pastries into a convenient, crowd-pleasing bar form that I know you’re going to fall head over heels for.
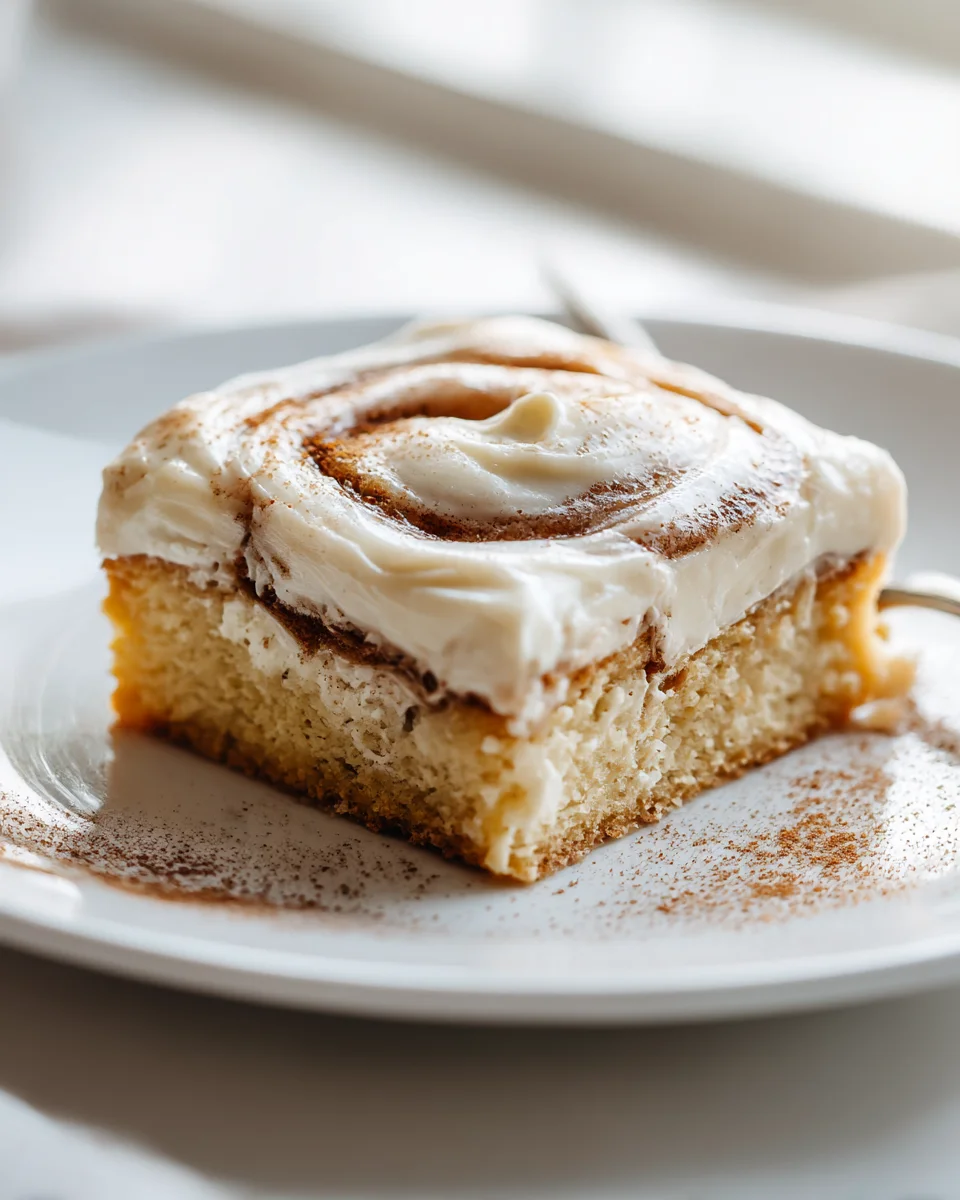
What makes these particular bars so special is their effortless charm. Imagine sinking your teeth into a soft, buttery base swirled with plenty of fragrant cinnamon sugar, all baked to golden perfection. Then, just when you think it can’t get any better, we crown it with a generous layer of tangy, sweet cream cheese frosting that truly elevates every single bite. It’s all the joy of a homemade cinnamon roll, but without the rolling, the individual proofing, or the sticky mess.
You’ll love how incredibly easy these are to whip up for breakfast, brunch, or a delightful dessert, and they’re always a huge hit at gatherings because they’re so simple to serve. Each square delivers that perfect balance of warmth, spice, and sweetness that makes you want to close your eyes and savor the moment. Get ready to experience true bliss in every bite!
Ingredient Notes
Crafting the perfect Cinnamon Roll Bliss Bars starts with understanding the role each ingredient plays. While the process is straightforward, using quality ingredients and paying attention to their state can make all the difference in achieving that irresistible gooey texture and rich flavor.
For the Bars:
- All-Purpose Flour: This forms the foundational structure of our bars. I recommend using unbleached all-purpose flour for a slightly softer crumb. If you’re looking for a gluten-free option, a good quality 1:1 gluten-free baking blend that includes xanthan gum will work beautifully. Just be mindful not to overmix the dough.
- Granulated Sugar & Light Brown Sugar: The combination of these two sugars provides the perfect balance of sweetness and moisture. Granulated sugar offers sweetness without adding much moisture, while brown sugar, with its molasses content, contributes to the bars’ tender, chewy texture and a subtle caramel note. If you’re out of light brown sugar, you can make your own by combining white granulated sugar with a small amount of molasses (about 1 tablespoon per cup of white sugar).
- Baking Powder: This is our primary leavening agent, giving the bars their lift and creating that soft, cake-like texture. Ensure your baking powder is fresh for optimal results; old baking powder can lead to dense bars.
- Salt: A crucial flavor enhancer, salt balances the sweetness and brings out the full depth of the cinnamon and vanilla. Don’
- Unsalted Butter: We use unsalted butter for both the bars and the cinnamon swirl. Using unsalted butter allows you to control the total amount of salt in the recipe. Make sure it’s melted for the bar batter and softened for the swirl to ensure proper incorporation. For a dairy-free alternative, good quality vegan butter sticks work exceptionally well here.
- Large Eggs: Eggs act as a binder, adding richness, moisture, and helping with the structure of the bars. Ensure your eggs are at room temperature, as they emulsify better with other ingredients, leading to a smoother batter.
- Milk: Any milk will work! I usually opt for whole milk for added richness, but 2% or even non-dairy alternatives like almond, oat, or soy milk are perfectly fine. Room temperature milk is preferred for easier mixing.
- Vanilla Extract: A good quality vanilla extract is essential for adding warmth and depth to the flavor profile. Don’t skimp here; it really makes a difference! Vanilla bean paste is an excellent substitute for an even more intense vanilla flavor.
For the Cinnamon Swirl:
- Light Brown Sugar: Again, the brown sugar provides that classic gooey cinnamon roll filling texture and flavor.
- Ground Cinnamon: This is the star of the show! Use fresh, good quality ground cinnamon for the best flavor. Older cinnamon can lose its potency, so check your spice rack.
- Melted Unsalted Butter: This helps bind the cinnamon sugar mixture and makes it spreadable, creating that luscious swirl.
For the Cream Cheese Frosting:
- Cream Cheese: Full-fat cream cheese is my recommendation for the creamiest, most decadent frosting. Ensure it’s softened to room temperature to prevent lumps. For a dairy-free option, there are several excellent plant-based cream cheese alternatives available that work great.
- Unsalted Butter: Just like the cream cheese, the butter for the frosting should be softened to room temperature for a smooth, airy consistency.
- Powdered Sugar (Confectioners’ Sugar): This provides sweetness and structure to the frosting. Sifting it isn’t strictly necessary but can help prevent lumps, especially if it’s been sitting in the pantry for a while.
- Vanilla Extract: Essential for that classic cream cheese frosting flavor.
- Milk/Cream (optional): A splash of milk or heavy cream can be added to thin the frosting to your desired consistency, if needed.
Step-by-Step Instructions
Making these Cinnamon Roll Bliss Bars is a truly delightful experience. Follow these steps, and you’ll be enjoying a batch of gooey, frosted perfection in no time!
-
Prepare for Bliss:
Preheat your oven to 350°F (175°C). Lightly grease a 9×13-inch baking pan, then line it with parchment paper, leaving an overhang on the longer sides. This parchment “sling” will make lifting the cooled bars out incredibly easy. Grease the parchment paper lightly as well.
-
Whisk the Dry Ingredients:
In a large bowl, whisk together the all-purpose flour, granulated sugar, light brown sugar, baking powder, and salt. Make sure there are no clumps of brown sugar.
-
Combine the Wet Ingredients:
In a separate medium bowl, whisk together the melted unsalted butter, large eggs, milk, and vanilla extract until well combined.
-
Form the Bar Batter:
Pour the wet ingredients into the dry ingredients. Mix with a spoon or rubber spatula just until no dry streaks of flour remain. Be careful not to overmix; a few lumps are okay. Overmixing can lead to tough bars.
-
Lay the First Layer:
Spread about half of the batter evenly into the prepared baking pan. It might be a bit sticky, so you can lightly wet your hands or use an offset spatula to help spread it.
-
Create the Cinnamon Swirl:
In a small bowl, combine the light brown sugar and ground cinnamon. Drizzle in the melted unsalted butter and mix well until it forms a thick, crumbly paste. Sprinkle this cinnamon sugar mixture evenly over the first layer of batter in the pan.
-
Add the Top Layer:
Carefully dollop the remaining batter over the cinnamon sugar layer. Use the back of a spoon or an offset spatula to gently spread the batter to cover the cinnamon mixture as best you can. It doesn’t have to be perfect; slight gaps are fine and will create lovely swirls.
-
Swirl to Perfection (Optional):
For a more pronounced swirl, take a butter knife or a skewer and gently run it through the batter a few times, creating swirls. Don’t overdo it, or the layers will mix too much.
-
Bake the Bars:
Bake for 28-35 minutes, or until the top is lightly golden brown and a wooden skewer or toothpick inserted into the center comes out clean or with moist crumbs attached (no wet batter). Keep an eye on them, as oven temperatures can vary.
-
Cool Completely:
Remove the pan from the oven and place it on a wire rack to cool completely. This is a critical step! Attempting to frost warm bars will result in a melty, messy frosting. Patience, my friend, is key here.
-
Prepare the Cream Cheese Frosting:
While the bars are cooling, make the frosting. In a medium bowl, using an electric mixer, beat the softened cream cheese and softened unsalted butter together until smooth and creamy, about 2-3 minutes. Scrape down the sides of the bowl as needed.
-
Finish the Frosting:
Gradually add the powdered sugar, one cup at a time, beating on low speed until combined, then increase to medium-high and beat until smooth. Beat in the vanilla extract. If the frosting is too thick, add milk or cream one teaspoon at a time until you reach your desired consistency.
-
Frost and Serve:
Once the bars are completely cool, lift them out of the pan using the parchment paper overhangs. Spread the cream cheese frosting evenly over the top. Cut into squares and enjoy your glorious Cinnamon Roll Bliss Bars!
Tips & Suggestions
Making these Cinnamon Roll Bliss Bars is quite straightforward, but a few insider tips can elevate your baking game and ensure every batch is pure bliss!
- Room Temperature Ingredients Are Your Friend: This applies particularly to the eggs, milk, cream cheese, and butter (for frosting). Room temperature ingredients combine more easily and create a smoother, more emulsified batter and frosting. This prevents lumps in your frosting and ensures a tender, even crumb for your bars. Plan ahead and take them out of the fridge at least 30-60 minutes before you start baking.
- Don’t Overmix the Batter: Once you combine the wet and dry ingredients for the bars, mix just until the flour streaks disappear. Overmixing develops the gluten in the flour, which can lead to tough, dry bars instead of the soft, tender texture we’re aiming for. A few small lumps are perfectly fine!
- The Art of the Swirl: When adding the top layer of batter, try to dollop it evenly over the cinnamon filling, then gently spread it. For the actual swirl, use a butter knife or skewer and make broad, gentle “S” shapes or figure eights. You want to marble the layers, not completely mix them together. Less is often more for a beautiful swirl.
- Cool Completely – Seriously: I cannot stress this enough! Frosting warm bars is a one-way ticket to a melted, runny mess. Your bars must be absolutely, completely cool before you even think about applying that delicious cream cheese frosting. If you’re in a hurry, you can place the cooled pan (after 20-30 minutes on the counter) into the refrigerator for a quicker chill.
- Adjust Frosting Consistency: If your cream cheese frosting feels too thick, add milk or cream (dairy or non-dairy) a teaspoon at a time until it reaches a spreadable, smooth consistency. If it’s too thin, you can add a little more powdered sugar, a tablespoon at a time, until it thickens up.
- Customize Your Bliss: Feel free to get creative! A sprinkle of chopped pecans or walnuts on top of the cinnamon swirl before the second layer of dough would be fantastic. You could also add a pinch of nutmeg to the cinnamon swirl for an extra layer of spice.
- Serving Warm: While they are delicious at room temperature, a quick 10-15 second pop in the microwave for an individual bar can warm it just enough to make the frosting slightly gooey and the bar wonderfully soft – reminiscent of a fresh cinnamon roll!
Storage
Proper storage is key to keeping your Cinnamon Roll Bliss Bars fresh, soft, and delicious, especially with that luscious cream cheese frosting.
-
At Room Temperature:
If your kitchen isn’t excessively warm, you can store frosted Cinnamon Roll Bliss Bars in an airtight container at room temperature for up to 1-2 days. However, due to the cream cheese in the frosting, refrigeration is generally recommended for longer freshness and food safety.
-
In the Refrigerator:
This is my preferred method for storing these bars. Place the cooled and frosted bars in an airtight container. They will stay fresh and moist in the refrigerator for up to 5-7 days. The frosting will firm up when chilled, so I recommend letting the bars sit out at room temperature for about 15-30 minutes before serving, which allows the frosting to soften slightly and the flavors to fully develop.
-
Freezing Unfrosted Bars:
If you want to bake ahead or have extra, unfrosted bars freeze beautifully. Once the baked bars are completely cool, wrap the entire slab (or individual cut bars) tightly in plastic wrap, then again in aluminum foil. Place them in a freezer-safe bag or container. They will keep well for up to 3 months. To serve, thaw them in the refrigerator overnight or at room temperature for a few hours, then prepare and spread the fresh cream cheese frosting.
-
Freezing Frosted Bars:
Yes, you can freeze frosted bars too! For best results, I recommend freezing them uncovered on a baking sheet until the frosting is firm (about 1-2 hours). Once firm, transfer the individual bars to an airtight, freezer-safe container, separating layers with parchment paper to prevent sticking. They’ll be good for about 1-2 months. Thaw individual bars in the refrigerator overnight or on the counter for a couple of hours before enjoying.
-
Preventing Dryness:
Always ensure your bars are stored in an airtight container. Exposure to air is the quickest way for them to dry out and lose their wonderful texture.
Final Thoughts
And there you have it – the secret to unlocking a truly delightful dessert experience! I genuinely hope you’ll give these Cinnamon Roll Bliss Bars a try. What makes them an absolute must-bake, in my opinion, is how they capture all the cozy, comforting flavors of a classic cinnamon roll, but in such an incredibly convenient and shareable bar form. Forget the fuss of individual rolling; these bars deliver that same irresistible gooey center and sweet cream cheese frosting with so much less effort. They’re perfect for brunch, an afternoon treat, or even just a sweet pick-me-up. I promise, one bite of these Cinnamon Roll Bliss Bars, and you’ll understand exactly why they’re called “bliss.” Get ready to spread some serious joy with this recipe!

Leave a Comment