
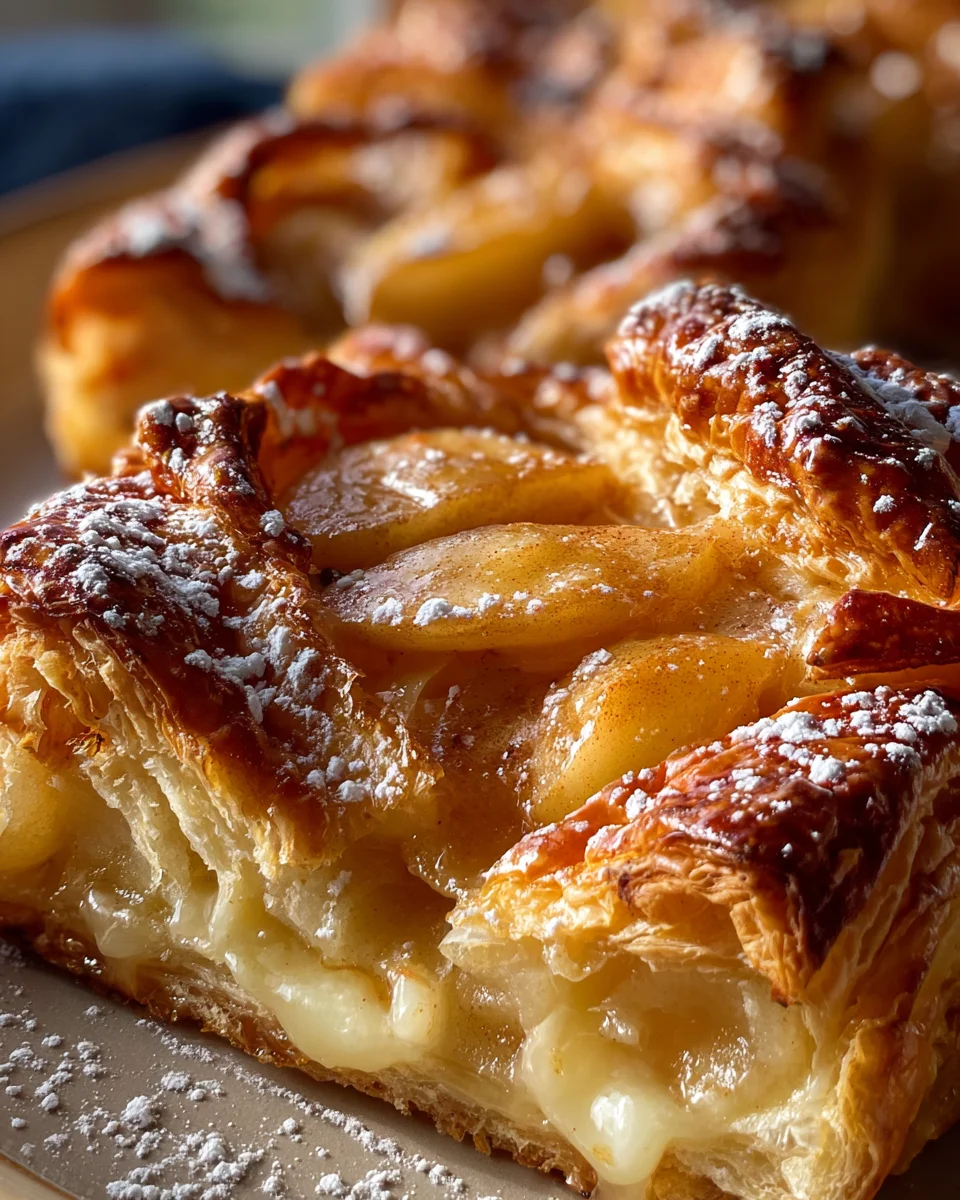
Classic Apple Puff Pastry. Just the name itself conjures up images of golden, flaky layers, bursting with sweet-tart apple filling and the warm embrace of cinnamon. There’s something undeniably magical about a dessert that manages to be both elegant and incredibly comforting at the same time. I find that the mere aroma of apples baking within a buttery crust is enough to transport anyone to a cozy kitchen, eagerly anticipating that first glorious bite. This isn’t merely a recipe; it’s an invitation to create a moment of pure bliss.
This beloved treat, while seemingly simple, holds a rich place in the pantheon of baked goods, evolving from humble fruit tarts enjoyed centuries ago into the sophisticated, multi-layered delight we cherish today. The genius of puff pastry, with its myriad of paper-thin layers, truly elevates a straightforward apple filling into an extraordinary culinary experience. People adore this dish not only for its irresistible combination of crisp exterior and tender, spiced apple interior, but also for its incredible versatility – perfect as a refined dessert, a delightful breakfast pastry, or a comforting afternoon snack. Mastering Classic Apple Puff Pastry is a rewarding journey, promising a symphony of textures and flavors that truly captivates the senses and brings warmth to any gathering.
Ingredients:
- For the Apple Filling:
- 4-5 medium baking apples (about 4 cups diced), such as Granny Smith, Honeycrisp, Fuji, or Braeburn. I personally love a mix of Granny Smith for tartness and Honeycrisp for sweetness and texture.
- 2 tablespoons unsalted butter
- 1/4 cup granulated sugar (adjust to taste depending on apple sweetness)
- 2 tablespoons light brown sugar, packed (adds a lovely caramel note)
- 1 teaspoon ground cinnamon
- 1/4 teaspoon ground nutmeg
- Pinch of ground cloves (optional, but adds depth)
- 1 tablespoon fresh lemon juice (prevents browning and brightens flavor)
- 1 tablespoon cornstarch or all-purpose flour (for thickening)
- 1 tablespoon cold water (to create a slurry with cornstarch)
- 1/2 teaspoon vanilla extract (optional, but highly recommended for aroma)
- For the Puff Pastry:
- 2 sheets (approximately 17.3 ounces total) frozen puff pastry, thawed according to package directions. I typically use Pepperidge Farm brand, which comes with two folded sheets.
- For the Egg Wash and Finishing:
- 1 large egg
- 1 tablespoon milk or water
- 1-2 tablespoons turbinado sugar (for sprinkling, optional, adds a nice crunch and sparkle)
- Optional Glaze (for after baking):
- 1/2 cup powdered sugar
- 1-2 tablespoons milk or cream
- 1/4 teaspoon vanilla extract
Preparing the Delicious Apple Filling:
- Choose and Prepare Your Apples with Care: Begin by selecting your apples. For the best “Classic Apple Puff Pastry” experience, I always recommend a blend of apples. Granny Smiths offer that essential tartness that cuts through the sweetness, while Honeycrisp or Fuji apples provide a firmer texture and a lovely natural sweetness. Once you’ve made your selection, carefully peel all the apples. I find a good quality vegetable peeler makes this task quick and enjoyable. After peeling, use an apple corer or a sharp paring knife to remove the core from each apple, making sure to get rid of all seeds and the fibrous core. Finally, dice the apples into small, uniform pieces, aiming for roughly 1/2-inch to 3/4-inch cubes. Uniformity is absolutely crucial here; it ensures that all the apple pieces cook at the same rate, resulting in a consistent, tender, and delicious filling. If some pieces are too large and others too small, you’ll end up with a mix of mushy and crunchy apple bits, which isn’t what we want for our perfect puff pastry. As you dice them, you might want to place the apple pieces in a bowl with a splash of the lemon juice; this little trick helps prevent them from browning excessively while you prepare the rest of your ingredients, maintaining their fresh and appealing look.
- Sautéing the Apples to Perfection: In a large, heavy-bottomed skillet or a sauté pan, melt the 2 tablespoons of unsalted butter over medium heat. Once the butter is shimmering and fragrant, add your diced apples to the pan. Immediately pour in the 1 tablespoon of fresh lemon juice. Don’t skip the lemon juice! Not only does it help prevent the apples from oxidizing and turning brown, but it also brightens their flavor profile, adding a subtle tang that complements the sweetness of the sugars beautifully. Stir the apples frequently for about 5 to 7 minutes, allowing them to soften slightly but still retain some of their crispness. We’re looking for them to just begin to tenderize, not become fully mushy at this stage. This initial sautéing step starts to break down the apple’s structure, preparing them to absorb all the wonderful flavors we’re about to add.
- Infusing with Sweetness and Spice: Now it’s time to build the flavor profile of our “Classic Apple Puff Pastry” filling. Sprinkle in the 1/4 cup of granulated sugar and the 2 tablespoons of packed light brown sugar. The brown sugar adds a delightful molasses note and depth that granulated sugar alone can’t achieve. Next, add the 1 teaspoon of ground cinnamon, 1/4 teaspoon of ground nutmeg, and if you’re feeling adventurous, a tiny pinch of ground cloves. Stir everything together thoroughly, making sure the sugars and spices are evenly distributed and coat all the apple pieces. Continue to cook, stirring occasionally, for another 5 to 8 minutes. During this time, the sugars will dissolve and begin to caramelize slightly, and the apples will release their natural juices, creating a wonderfully aromatic liquid in the pan. The aroma filling your kitchen right now is simply divine!
- Thickening the Filling for Ideal Consistency: In a small bowl, whisk together the 1 tablespoon of cornstarch (or all-purpose flour) with the 1 tablespoon of cold water until you have a smooth, lump-free slurry. This slurry is our secret weapon for achieving the perfect filling consistency – thick enough to cling to the apples without being overly gluey, and preventing a watery mess that could seep out of our puff pastry. Once your apples have cooked down and released their juices, and the mixture is gently simmering, pour the cornstarch slurry directly into the skillet with the apples. Stir constantly for 1 to 2 minutes as the filling comes back to a gentle simmer. You’ll notice it magically thicken right before your eyes. Once it reaches a consistency where it coats the back of a spoon and looks glossy, remove the skillet from the heat. Stir in the 1/2 teaspoon of vanilla extract now, if using. Vanilla adds another layer of warmth and complexity that truly elevates the apple flavor.
- Cooling the Filling – A Crucial Step: Transfer the prepared apple filling to a separate bowl or baking dish and allow it to cool completely before you even think about assembling your pastries. This step is non-negotiable! If you try to assemble the puff pastries with warm or hot filling, the heat will melt the butter in the puff pastry, making it difficult to work with and preventing it from achieving that beautiful, airy puff when baked. I usually pop it in the refrigerator for at least 30-45 minutes, or even longer, to ensure it’s thoroughly chilled. You can even prepare the filling a day in advance and store it in the fridge.
Preparing the Puff Pastry for Assembly:
- Thawing Your Puff Pastry: The success of your “Classic Apple Puff Pastry” heavily relies on properly thawed puff pastry. Take your frozen puff pastry sheets out of the freezer and let them thaw in the refrigerator overnight for the best results. If you’re short on time, you can thaw them at room temperature for about 30-40 minutes, but be careful not to let them get too warm or soft, as this can make them sticky and difficult to handle. The pastry should be pliable enough to unfold without cracking but still cold to the touch. Each package typically contains two folded sheets. Gently unfold each sheet onto a lightly floured surface or a piece of parchment paper. If you notice any cracks, you can gently press them together with your fingers to seal them.
- Prepping Your Work Surface and Pastry: Lightly dust your countertop or a large cutting board with a little flour. Carefully unroll one sheet of thawed puff pastry onto the floured surface. You can use a rolling pin to very gently roll it out just a touch, if needed, to smooth out any creases or to slightly increase its surface area, perhaps to a 10×10 inch square or similar rectangle. Avoid overworking the pastry, as this can develop the gluten and make it less flaky. I like to keep my work area tidy and have a baking sheet lined with parchment paper ready nearby. This preparation ensures a smooth and efficient assembly process for your pastries.
- Cutting the Puff Pastry Shapes: Using a sharp knife or a pizza cutter, carefully cut each sheet of puff pastry into equal squares or rectangles. For most standard-sized pastries, I find cutting each sheet into 4 squares (making a total of 8 squares from two sheets) works wonderfully. Each square should be roughly 4×4 inches. For a slightly more elongated pastry, you could cut them into 3×5 inch rectangles. If you’re feeling fancy, you can even use a round cookie cutter to make circular pastries, though squares are generally easier to work with. Once cut, gently transfer the individual squares or rectangles onto your parchment-lined baking sheet, leaving ample space between them. Proper spacing is key to ensure even baking and allow the pastry to puff up beautifully without crowding.
Assembling the Classic Apple Puff Pastries:
- Prepare Your Egg Wash: In a small bowl, whisk together the 1 large egg with 1 tablespoon of milk or water until well combined and smooth. This egg wash is not just for shine; it helps the pastry brown beautifully and gives it that professional, golden finish. Set it aside for now.
- Filling the Pastries: Take one of your puff pastry squares. Place a generous spoonful, approximately 2 to 3 tablespoons, of the completely cooled apple filling onto the center of one half of the square. It is imperative that the filling is cool; otherwise, it will melt the butter in the pastry, preventing it from puffing properly. Leave a clean border of about 1/2 to 3/4 inch around the edges of the pastry. This border is essential for sealing the pastry shut. Be mindful not to overfill, as this can lead to the filling oozing out during baking.
- Sealing and Shaping Your Pastries: Once the filling is in place, gently fold the other half of the puff pastry square over the filling, creating a triangle or a rectangle (depending on your initial cut). Line up the edges precisely. Using your fingertips, gently press down around the edges of the pastry to seal them together. To ensure a secure seal and to create a lovely decorative edge, use the tines of a fork to crimp all around the sealed edges. This not only makes them look charming but also helps to prevent any precious apple filling from escaping during baking. A well-sealed edge is vital for a mess-free and attractive pastry. Repeat this process with all your remaining puff pastry squares and apple filling.
- Venting and Egg Washing for Golden Perfection: Once your pastries are assembled and sealed, use a sharp paring knife to make two or three small slits on the top of each pastry. These vents allow steam to escape during baking, preventing the pastries from bursting and ensuring an even puff. Now, using a pastry brush, lightly and evenly brush the entire surface of each assembled pastry with the egg wash. Be careful not to let the egg wash drip down the sides onto the baking sheet, as this can seal the layers of the puff pastry together and inhibit its ability to rise. If desired, sprinkle a pinch of turbinado sugar over the top of each pastry; this adds a wonderful crunch and sparkle.
- Arranging on Baking Sheets: Arrange your prepared “Classic Apple Puff Pastry” creations on your parchment-lined baking sheets, ensuring they are spaced at least 2 inches apart. This generous spacing is crucial to allow hot air to circulate freely around each pastry, promoting even baking and maximum puff. I usually can fit about 4-6 pastries per standard baking sheet.
Baking the Classic Apple Puff Pastries to Golden Flaky Perfection:
- Preheating Your Oven: Position an oven rack in the middle of your oven and preheat your oven to 400°F (200°C). A properly preheated oven is essential for the puff pastry to rise quickly and achieve its signature flaky texture. Give your oven ample time to reach the desired temperature, usually about 15-20 minutes after the light indicates it’s ready.
- The Initial High Heat Bake: Carefully transfer your baking sheets with the assembled pastries into the preheated oven. Bake at 400°F (200°C) for 12 to 15 minutes. During this initial phase, you’ll observe the magical transformation as the puff pastry dramatically rises and begins to turn a beautiful golden color. The high heat creates a burst of steam that lifts the many layers of butter and dough, resulting in that incredible flakiness we all adore in a “Classic Apple Puff Pastry.” Do not open the oven door during this crucial stage! Opening the door can cause the temperature to drop, deflating your pastries.
- Lowering the Temperature for Even Cooking: After 12-15 minutes, once the pastries have puffed up significantly and are golden, reduce the oven temperature to 375°F (190°C). Continue baking for another 10 to 15 minutes, or until the pastries are deeply golden brown all over, and the filling appears bubbly. If your oven tends to bake unevenly, you might want to rotate the baking sheets halfway through this second baking period to ensure uniform browning. The key is a rich, deep golden color, which indicates that the pastry is fully cooked and wonderfully crispy.
- Cooling for the Best Texture: Once baked to perfection, carefully remove the baking sheets from the oven. Using a spatula, immediately transfer the hot “Classic Apple Puff Pastry” to a wire cooling rack. This allows air to circulate around the pastries, preventing the bottoms from becoming soggy and ensuring they stay crisp and flaky. Allow them to cool for at least 15-20 minutes before serving. While tempting to dive in immediately, this cooling time is important for the filling to set properly and for the pastry to fully crisp up. Plus, the apple filling will be incredibly hot, so patience is a virtue here!
Optional Finishing Touches:
- Simple Glaze for Extra Sweetness: While the pastries are cooling, you can whip up a quick optional glaze. In a small bowl, whisk together the 1/2 cup of powdered sugar with 1-2 tablespoons of milk or cream and 1/4 teaspoon of vanilla extract. Start with 1 tablespoon of liquid and add more, a few drops at a time, until you reach a smooth, pourable consistency. Once the pastries have cooled slightly but are still warm, drizzle the glaze decoratively over the top. This adds an extra layer of sweetness and a beautiful visual appeal, making your “Classic Apple Puff Pastry” look even more irresistible.
- Dusting with Powdered Sugar: For a simpler finish, once the pastries are completely cool, you can lightly dust them with powdered sugar using a fine-mesh sieve. This adds a delicate sweetness and an elegant, snowy appearance, perfect for any occasion.
- Serving Suggestions: These “Classic Apple Puff Pastries” are absolutely delightful served warm or at room temperature. They are fantastic on their own, but if you want to elevate the experience, consider serving them with a scoop of vanilla bean ice cream, a dollop of fresh whipped cream, or a drizzle of caramel sauce. They make a wonderful dessert, a fancy breakfast treat, or an afternoon snack with a cup of tea. Enjoy every flaky, apple-filled bite!

Conclusion:
Well, friends, we’ve journeyed through the simple magic of creating something truly special, and I sincerely hope you’re as excited as I am about the results. This isn’t just another dessert; it’s an experience waiting to happen in your kitchen. Why is this recipe, specifically, an absolute must-try for everyone, from novice bakers to seasoned culinary adventurers? Firstly, its elegance belies its incredible simplicity. You get that stunning, golden-brown crust and a perfectly tender, spiced apple filling without hours of laborious work. The aroma alone, as it bakes, is enough to transform your home into the most inviting haven, promising warmth and deliciousness. This recipe truly delivers on all fronts: ease, beauty, and unforgettable flavor. It’s that perfect balance of comfort food and gourmet treat, making it suitable for virtually any occasion, whether it’s a casual Sunday brunch, a comforting evening dessert, or a show-stopping finish to a dinner party. You’ll find yourself reaching for this recipe again and again because it consistently delivers pure joy with minimal fuss, creating smiles with every flaky bite.
Now, let’s talk about making this delightful creation even more your own. While the core recipe is utterly fantastic as is, there are so many wonderful ways to serve it and introduce your unique twist. My absolute favorite way to enjoy a warm slice is with a generous scoop of good quality vanilla bean ice cream, allowing the cold, creamy sweetness to perfectly contrast with the warm, flaky pastry and the tender, spiced apples. The melt-in-your-mouth experience is truly unparalleled. Alternatively, a dollop of freshly whipped cream, perhaps infused with a hint of cinnamon or a splash of bourbon, elevates the experience beautifully. For those who enjoy a little extra richness, a drizzle of warm caramel sauce over the top adds a luxurious layer of flavor that’s hard to resist. Don’t underestimate the power of a simple dusting of powdered sugar or a sprinkle of demerara sugar before baking for an extra crunch and sparkle. For a cozy morning treat, try pairing it with a strong cup of coffee or a fragrant tea; it’s a delightful way to start any day. Imagine a leisurely weekend morning, the sun streaming through your window, and a warm slice of this pastry in hand – pure bliss!
But the fun doesn’t stop at serving suggestions; let’s explore some playful variations you might consider. If you’re feeling adventurous, you could experiment with different fruits. While apples are the classic choice for a reason, imagine this pastry filled with ripe, juicy pears, perhaps with a touch of ginger, or even a medley of berries for a summery twist. Peaches, especially when in season, would also make a divine filling, bringing their own unique sweetness and aroma. For an extra layer of texture and flavor, try sprinkling some chopped pecans or walnuts onto the apples before folding the pastry. A small amount of lemon zest mixed into the apple filling can brighten the flavors beautifully, offering a subtle tang that complements the sweetness. You could also brush the top of the pastry with an egg wash and sprinkle some cinnamon sugar for an even more pronounced spice kick and a gorgeous, caramelized finish. If you’re a fan of a slightly more complex flavor profile, a tiny splash of brandy or rum added to the apple mixture while it’s simmering can create a truly sophisticated depth of flavor. These simple modifications can truly transform the experience, making each bake a new adventure. The beauty of the Classic Apple Puff Pastry recipe lies not only in its inherent deliciousness but also in its incredible adaptability.
So, what are you waiting for? I wholeheartedly encourage you to roll up your sleeves, gather your ingredients, and give this wonderful recipe a try. You’ll be amazed at how effortlessly you can create something so incredibly satisfying and impressive. It’s more than just a recipe; it’s an invitation to create memories, fill your home with irresistible scents, and treat yourself and your loved ones to a moment of pure culinary delight. Once you’ve experienced the joy of baking and tasting your own creation, I would absolutely love to hear about it! Please, don’t be shy; share your triumphs, your clever variations, or any fun stories from your baking journey. Did you serve it with ice cream or whipped cream? Did you try a different fruit filling? Your experiences inspire us all and help others discover new ways to enjoy this fantastic treat. Happy baking, my friends, and may your kitchens always be filled with warmth and wonderful aromas!
Classic Apple Puff Pastry: Flaky & Sweet Dessert Recipe
Classic Apple Puff Pastry. Just the name itself conjures up images of golden, flaky layers, bursting with sweet-tart apple filling and the warm embrace of cinnamon. This beloved treat, while seemingly simple, holds a rich place in the pantheon of baked goods, evolving from humble fruit tarts into the sophisticated, multi-layered delight we cherish today. People adore this dish not only for its irresistible combination of crisp exterior and tender, spiced apple interior, but also for its incredible versatility.
Ingredients
Instructions
Important Information
Nutrition Facts (Per Serving)
It is important to consider this information as approximate and not to use it as definitive health advice.
Allergy Information
Please check ingredients for potential allergens and consult a health professional if in doubt.

Leave a Comment