
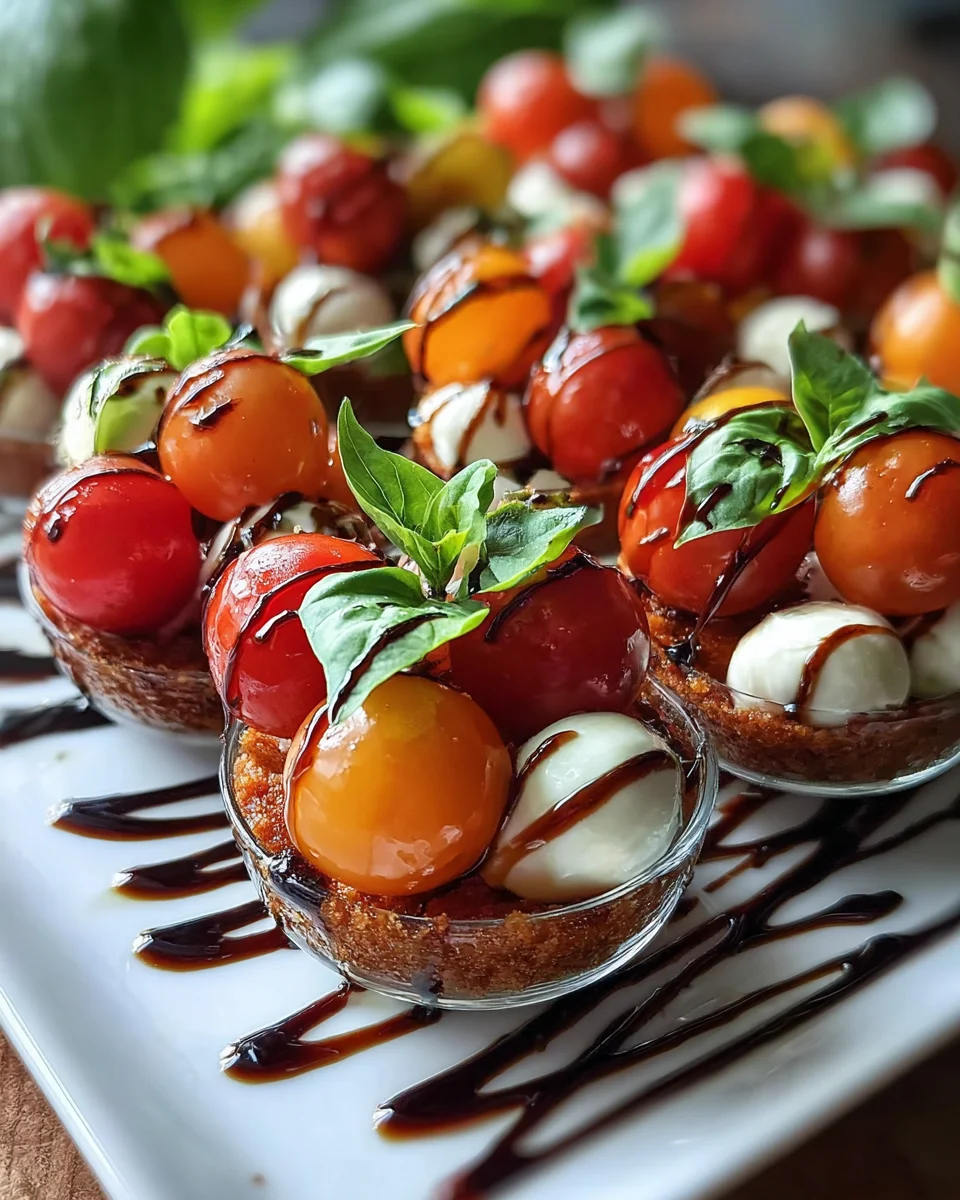
Christmas Mini Caprese Salad Cups are here to revolutionize your holiday entertaining! Forget fussy appetizers and complicated preparations; this delightful bite-sized wonder brings all the festive cheer and fresh flavors you could ever wish for, elegantly presented in individual portions. As someone who loves celebrating the holiday season with delicious food, I can confidently say that these charming little cups are an absolute game-changer for any festive gathering, offering both visual appeal and a burst of vibrant taste without the usual holiday stress.
The classic Caprese salad, with its vibrant trio of ripe tomatoes, fresh mozzarella, and aromatic basil, hails from the beautiful Italian island of Capri, embodying the simplicity and freshness of Mediterranean cuisine. It’s a dish beloved worldwide for its harmonious balance of flavors and eye-catching colors. This adaptation, featuring the iconic red, white, and green, transforms a timeless classic into the perfect holiday starter. People adore this dish not just for its incredibly fresh and clean taste, where the sweetness of cherry tomatoes meets the creamy tang of mozzarella and the peppery notes of basil, but also for its sheer convenience. Each individual cup is a burst of flavor, easy to pick up, and requires no cooking, making your holiday party planning infinitely simpler. These Christmas Mini Caprese Salad Cups are truly a testament to how effortlessly delicious and beautiful holiday food can be.
Ingredients:
I’m so excited to share my go-to recipe for the most delightful and festive appetizer that’s perfect for holiday gatherings: my Christmas Mini Caprese Salad Cups! This recipe makes approximately 24 individual servings, ideal for sharing joy with your guests.
- For the Christmas Mini Caprese Salad Cups:
-
2 pints (about 4 cups or 680g) ripe cherry or grape tomatoes, preferably a mix of vibrant red and bright yellow/orange for extra festive flair, though all red is perfectly traditional for Christmas.
-
2 (8-ounce / 226g) containers fresh mozzarella pearls (bocconcini or ciliegine). If you can only find larger balls, don’t worry, I’ll show you how to cut them into bite-sized pieces.
-
1 large bunch (about 2-3 ounces / 56-85g) fresh basil leaves. Look for vibrant green, unblemished leaves; this is key for flavor and presentation.
-
2 tablespoons extra virgin olive oil, a good quality one makes all the difference here, adding a subtle peppery note.
-
1/2 teaspoon fine sea salt, or to taste. This will bring out the natural sweetness of the tomatoes.
-
1/4 teaspoon freshly ground black pepper, or to taste. A little kick is wonderful.
-
Optional: A sprinkle of flaky sea salt (like Maldon) for finishing, adding a lovely textural crunch and burst of salinity right before serving.
-
- For the Balsamic Glaze (highly recommended for that signature sweet-tangy finish):
-
1 cup (240ml) good quality balsamic vinegar. You don’t need the most expensive aged variety, but a decent mid-range one will provide the best flavor for reduction.
-
1-2 tablespoons granulated sugar or maple syrup (optional, but I find it really enhances the glaze’s sweetness and helps with thickness, especially if your vinegar isn’t naturally sweet).
-
- For Assembling and Garnish:
-
24 small serving vessels: these could be mini shot glasses, small ramekins, espresso cups, or even sturdy cocktail picks if you prefer a skewer-style presentation for your Christmas Mini Caprese Salad Cups.
-
Fresh sprigs of basil or small basil leaves for garnishing each cup, truly making them pop.
-
Equipment You’ll Need:
Having the right tools on hand always makes cooking more enjoyable and efficient. For these delightful Christmas Mini Caprese Salad Cups, here’s what I recommend you gather before you begin:
- A sharp chef’s knife or paring knife for precise slicing.
- A cutting board that’s stable and clean.
- Several medium-sized mixing bowls for separating ingredients and tossing.
- A colander for rinsing tomatoes and draining mozzarella.
- Paper towels or a clean kitchen towel for drying ingredients thoroughly.
- A small, heavy-bottomed saucepan for making the balsamic glaze.
- A whisk or spoon for stirring the glaze.
- Measuring cups and spoons for accuracy.
- Small spoons or tongs for easy assembly of the individual Christmas Mini Caprese Salad Cups.
- Your chosen serving vessels (e.g., shot glasses, small cups, or skewers).
Preparing Your Christmas Mini Caprese Salad Cups: The Salad Components
Let’s dive into preparing the star ingredients for our incredibly fresh and vibrant Christmas Mini Caprese Salad Cups. Each component is important for the overall flavor and aesthetic, so let’s treat them with care!
-
Prepping the Tomatoes for Peak Flavor:
First things first, let’s get those beautiful tomatoes ready! Carefully rinse all your cherry or grape tomatoes under cool running water. It’s important to be gentle to avoid bruising them. After rinsing, spread them out on a clean kitchen towel or several layers of paper towels and allow them to air dry completely, or gently pat them dry. Any excess moisture can dilute the flavors of our dressing later, and we want every bite of these Christmas Mini Caprese Salad Cups to be absolutely perfect.
Once dry, using a sharp knife, carefully halve each tomato. If you’re feeling extra fancy or your tomatoes are particularly large, you can quarter them. For a consistent look, try to make all your cuts uniform. Place the halved (or quartered) tomatoes into a medium-sized mixing bowl. Drizzle them with about 1 tablespoon of the extra virgin olive oil, a pinch of sea salt, and a dash of freshly ground black pepper. Gently toss them to coat evenly. Set them aside to allow the flavors to meld while you prepare the other ingredients. This simple seasoning step truly enhances their natural sweetness and vibrancy, making them sing in your Christmas Mini Caprese Salad Cups.
-
Getting the Mozzarella Ready:
Next up, our creamy mozzarella! If you’re using fresh mozzarella pearls (bocconcini or ciliegine), drain them thoroughly. I usually empty them into a colander and let them sit for a good 5-10 minutes to ensure all the excess liquid is gone. This prevents our Christmas Mini Caprese Salad Cups from becoming watery at the bottom. Once drained, gently pat them dry with paper towels. You’ll find that some larger mozzarella pearls might be a bit too big for a single bite alongside a tomato half in a mini cup. In this case, you can carefully halve them. For the smaller ciliegine, they are usually perfect as is. Place the prepared mozzarella into a separate clean mixing bowl.
Drizzle the mozzarella with the remaining 1 tablespoon of extra virgin olive oil, another pinch of sea salt, and a little fresh black pepper. Toss gently to ensure each pearl is lightly coated. The oil and seasoning will prevent the mozzarella from sticking together and also add another layer of flavor to your Christmas Mini Caprese Salad Cups. Keep them separate from the tomatoes for now, as we want distinct layers when assembling.
-
Preparing the Fresh Basil:
Ah, basil – the fragrant heart of any Caprese salad! Carefully wash your fresh basil leaves under cool running water, making sure to remove any dirt or debris. Gently pat them completely dry with a paper towel or a clean kitchen cloth. This step is non-negotiable; wet basil will wilt faster and can taste diluted. For the most vibrant flavor and appealing presentation in your Christmas Mini Caprese Salad Cups, I recommend selecting smaller, younger leaves to keep whole. These look beautiful and offer a delightful burst of freshness. If your leaves are larger, you might consider a delicate chiffonade – stack a few leaves, roll them tightly like a cigar, and then slice thinly across the roll to create beautiful ribbons. This technique not only looks elegant but also evenly distributes the basil flavor throughout your Christmas Mini Caprese Salad Cups. If you decide to chiffonade, do this just before assembling to prevent browning. Place the prepared basil on a plate and keep it covered or loosely wrapped to maintain freshness.
Crafting the Festive Balsamic Glaze: A Sweet-Savory Drizzle
No Christmas Mini Caprese Salad Cups would be complete without that glossy, sweet-tangy balsamic glaze. It’s surprisingly simple to make at home and tastes so much better than store-bought. Plus, it adds that professional, gourmet touch that will impress all your holiday guests!
-
Starting the Reduction Process:
Pour your 1 cup of balsamic vinegar into a small, heavy-bottomed saucepan. A heavy bottom helps distribute heat more evenly and prevents burning. If you’re using sugar or maple syrup, now is the time to add 1 tablespoon of it to the vinegar. Give it a quick stir to dissolve. Place the saucepan over medium-high heat and bring the vinegar to a gentle simmer. You’ll start to notice steam rising, and a wonderfully pungent, sweet aroma will fill your kitchen – that’s a good sign!
-
Slow and Steady Wins the Glaze:
Once simmering, immediately reduce the heat to low. You want a very gentle, consistent simmer – just a few bubbles breaking the surface, not a rolling boil. This is a crucial step for a perfect glaze. Stir occasionally to prevent the vinegar from sticking to the bottom of the pan and to ensure even reduction. The goal here is to slowly evaporate the water content from the vinegar, leaving behind a thicker, more concentrated, and sweeter syrup. This process will typically take anywhere from 15 to 25 minutes, depending on your stovetop and the width of your saucepan. I find it therapeutic to watch it transform!
Patience is Key: Don’t try to rush this by increasing the heat. A high heat will likely burn the vinegar, resulting in a bitter, unpleasant glaze, and we definitely want a luscious, balanced flavor for our Christmas Mini Caprese Salad Cups.
-
Checking for the Perfect Consistency:
As the balsamic vinegar reduces, it will start to thicken. You’ll notice it coats the back of a spoon more readily. The color will also deepen, becoming richer and more opaque. To test for readiness, dip a clean spoon into the glaze and lift it out. If the glaze coats the spoon and you can draw a clear line through it with your finger, and the line holds without the glaze immediately running back together, it’s ready! Another good indicator is if the glaze drips slowly and thickly from the spoon, similar to warm honey or thin maple syrup. If it’s still too thin, continue to simmer for a few more minutes, checking frequently.
Important Tip: Remember that the balsamic glaze will thicken considerably more as it cools. It’s better to err on the side of slightly thinner when hot, as it will reach the perfect syrupy consistency once it comes to room temperature. If you accidentally reduce it too much and it becomes too thick when cool, you can gently warm it over very low heat with a tiny splash of water or regular balsamic vinegar to loosen it up.
-
Cooling and Storing Your Glaze:
Once you’ve achieved the desired consistency, remove the saucepan from the heat. If you opted to add a second tablespoon of sugar earlier and feel your glaze could be sweeter, you can stir it in now while the glaze is still warm to help it dissolve. Carefully pour the warm glaze into a small heatproof bowl or a squeeze bottle. Allow it to cool completely to room temperature. As it cools, it will thicken further into that beautiful, drizzly consistency we’re aiming for. This glaze can be made several days in advance and stored in an airtight container in the refrigerator. Just bring it to room temperature or gently warm it slightly before drizzling over your Christmas Mini Caprese Salad Cups to ensure it flows smoothly.
Assembling Your Elegant Christmas Mini Caprese Salad Cups
Now for the fun part – bringing all these beautiful components together to create your stunning Christmas Mini Caprese Salad Cups! This is where they truly transform into a festive masterpiece. The key here is layering for visual appeal and ease of eating.
-
Setting Up Your Assembly Station:
Before you begin, arrange your prepped ingredients – seasoned tomatoes, seasoned mozzarella, and fresh basil – along with your chosen serving vessels (shot glasses, mini cups, or skewers) and the cooled balsamic glaze. Having everything within reach will make the assembly process smooth and enjoyable. I always find a clean workspace helps my creativity flow!
-
Layering in the Cups (the Classic Method):
If you’re using mini cups or shot glasses, let’s create a lovely layered effect:
-
The Foundation – Tomatoes: Start by placing 2-3 halves of your seasoned cherry or grape tomatoes at the bottom of each cup. Try to arrange them so the cut side faces outwards or upwards if possible, showcasing their vibrant red color. You want to fill the bottom about a third of the way with tomatoes. This creates a sturdy base and a beautiful visual pop for your Christmas Mini Caprese Salad Cups.
-
The Creamy Layer – Mozzarella: Next, gently nestle 2-3 of the seasoned mozzarella pearls (or halves if you cut them) on top of the tomatoes. You might need to gently push them down a little to settle. The white of the mozzarella against the red of the tomatoes is already starting to look so festive!
-
The Aromatic Top – Basil: Crown the mozzarella with a small fresh basil leaf or a pinch of basil chiffonade. If using whole leaves, try to choose smaller ones that fit neatly within the cup without being too unruly. This green layer really completes the classic Caprese trio.
-
Repeat for Height and Fullness: Depending on the size of your cups, you might be able to repeat this layering process once more. Add another 2-3 tomato halves, followed by another 2-3 mozzarella pearls, and finish with another basil leaf or chiffonade. The goal is to fill the cup attractively without overflowing, making each Christmas Mini Caprese Salad Cup look abundant and inviting.
-
-
Assembling on Skewers (an Alternative Option):
If you prefer a skewer presentation, it’s just as simple and visually striking:
-
Start and End with Tomatoes: Thread a seasoned tomato half onto your cocktail pick or small skewer. This often forms a nice anchor. Then, thread a mozzarella pearl.
-
Add Basil: Gently fold a small basil leaf in half or scrunch it slightly and thread it onto the skewer after the mozzarella. This ensures the basil is hugged by the other ingredients and doesn’t fall off.
-
Repeat: Continue by adding another tomato half, then another mozzarella pearl, and finally, another basil leaf. You can vary the order, but I find tomato-mozzarella-basil-tomato-mozzarella-basil creates a very balanced and appealing look for these Christmas Mini Caprese Salad Cups. Finish with a final tomato on top if space allows.
-
Arrangement: Once assembled, you can stand these skewers upright in a larger shallow dish, or lay them elegantly on a platter. This style is particularly convenient for guests to grab and enjoy.
-
-
The Grand Finale – Drizzling the Balsamic Glaze:
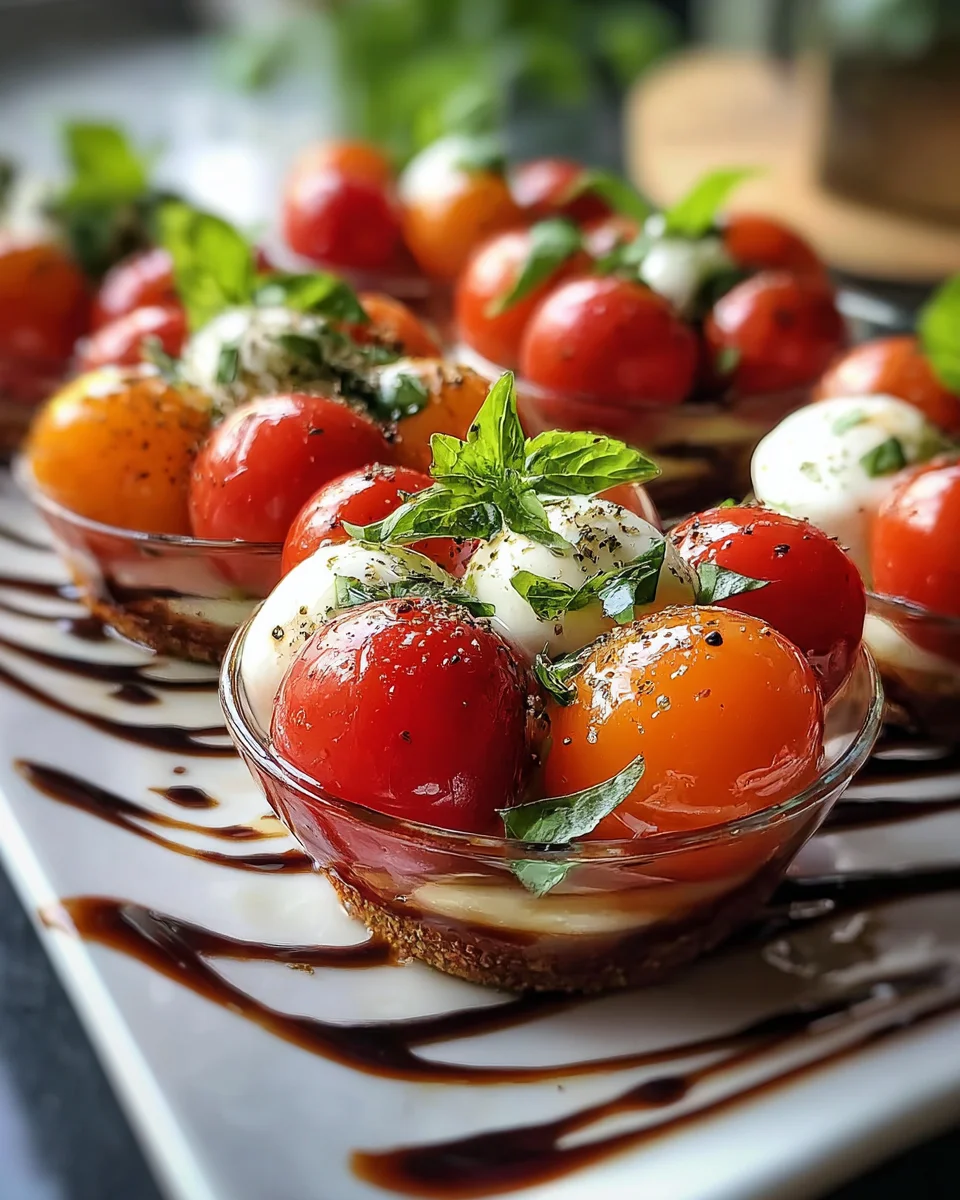
Once all your Christmas Mini Caprese Salad Cups are assembled, it’s time for the final touch! Take your cooled balsamic glaze (if it’s in a squeeze bottle, even better for control) and artfully drizzle a small amount over the top of each cup or skewer. A little goes a long way here; you want a delicate ribbon, not a puddle. The deep, rich color of the glaze against the red, white, and green is absolutely stunning and adds that perfect balance of sweetness and tanginess. If you like, you can also add a tiny sprinkle of flaky sea salt over the top of each cup for an extra textural element and a pop of salinity, enhancing all the fresh flavors.
Presentation and Serving Suggestions for Your Christmas Mini Caprese Salad Cups
You’ve put in all the work, and now it’s time to let your beautiful Christmas Mini Caprese Salad Cups shine! A thoughtful presentation can elevate this simple appetizer into a truly show-stopping party favor.
-
Garnishing for Maximum Impact:
Before serving, take a moment to inspect each cup. If any basil leaves look a little tired, replace them with fresh ones. A final small sprig of fresh basil, placed delicately on top, adds a touch of gourmet elegance. You can also lightly dust the serving platter with a tiny bit of freshly ground black pepper for a sophisticated look. Remember, presentation is half the experience, especially for a festive dish like these Christmas Mini Caprese Salad Cups!
-
Choosing the Perfect Platter:
Arrange your assembled cups or skewers on a beautiful serving platter. A white platter will make the vibrant red, white, and green colors pop even more. You could also use a festive, holiday-themed platter if you have one. For skewers, you can stand them upright in a decorative vase or a shallow dish filled with a layer of rock salt or even cranberries for an extra festive touch. If using cups, simply arrange them neatly in rows or a circular pattern. Consider placing a small bowl of extra balsamic glaze on the side for those who might want to add a bit more, although I find the pre-drizzled amount is usually just right.
-
Optimal Serving Temperature:
Christmas Mini Caprese Salad Cups are best served chilled or at cool room temperature. The flavors of the fresh ingredients truly shine when they aren’t overly cold. If you’ve refrigerated them, allow them to sit out for about 15-20 minutes before serving to let the flavors open up.
-
Making Ahead Tips:
This appetizer is fantastic for make-ahead convenience, which is a huge bonus during the busy holiday season! You can prepare the individual components (halved tomatoes, drained mozzarella, prepared basil) up to a day in advance and store them separately in airtight containers in the refrigerator. The balsamic glaze can also be made several days ahead and kept in a sealed container in the fridge. For the freshest appearance and best taste, I highly recommend assembling the Christmas Mini Caprese Salad Cups no more than 2-3 hours before your guests arrive. If you assemble them too far in advance, the basil might wilt, and the tomatoes could release more liquid, making the cups less appealing. Drizzle the balsamic glaze just before serving to maintain its beautiful sheen and prevent it from soaking into the other ingredients too much.
-
Serving Suggestions for Your Guests:
These individual Christmas Mini Caprese Salad Cups are designed to be a delightful finger food. Encourage your guests to grab a cup and enjoy! They pair wonderfully with other light appetizers, charcuterie boards, or as a fresh counterpoint to richer holiday dishes. Their vibrant colors and fresh flavors make them a refreshing addition to any festive spread. You’ll find these disappearing quickly, as they are always a crowd-pleaser and a beautiful burst of freshness!
Conclusion:
Well, my dear friends, we’ve come to the end of our journey with this absolutely delightful recipe, and I truly hope you’re as excited about it as I am! If there’s one dish I can wholeheartedly recommend for bringing a burst of freshness, color, and undeniable elegance to any gathering, it has to be these incredible Caprese creations. They’re more than just an appetizer; they’re a statement. We’ve talked about how effortless they are to assemble, requiring no baking, no complex techniques, just simple layering of vibrant, high-quality ingredients. Imagine the sighs of appreciation as your guests spot these little edible gems on your table. The combination of sweet, juicy cherry tomatoes, creamy mozzarella, and fragrant fresh basil, all tied together with a tangy-sweet balsamic glaze, is simply heavenly. It’s a symphony of textures and tastes that awakens the palate without being heavy. It’s a truly perfect bite-sized wonder that consistently impresses.
But beyond their inherent deliciousness, the real magic of these cups lies in their stunning visual appeal and incredible versatility. They are, quite frankly, a showstopper. Picture them gracing your holiday spread, their vibrant red, green, and white hues echoing the festive spirit. They are an absolute dream for holiday entertaining, and this is especially true for the Christmas Mini Caprese Salad Cups version, where their colors perfectly align with the season’s cheer. You can serve them artfully arranged on a large white platter, perhaps garnished with a few extra basil leaves or a sprinkle of flaky sea salt for that extra touch of gourmet sophistication. Or, for a more rustic, charming presentation, arrange them on a beautiful wooden board amidst other antipasto delights. They pair beautifully with almost any main course, from roasted chicken or turkey to a rich pasta dish, offering a light counterpoint to heavier flavors. They’re also fantastic alongside a cheese board, adding a fresh, zesty element that cuts through richer flavors.
Elevate Your Caprese Experience with These Delightful Variations
Now, let’s talk about making this recipe uniquely yours with some fun variations! While the classic combination is unbeatable, feel free to experiment. For a slightly different cheese experience, you could try using marinated mozzarella balls for an extra layer of herby flavor, or even a crumbled high-quality feta for a saltier, tangier profile that would surprise and delight. Don’t be afraid to play with other fresh herbs if basil isn’t your only love; a tiny sprig of fresh mint can add a refreshing zing, or a hint of fresh oregano might lend a more traditional Italian garden feel. Thinking beyond the core ingredients, a tiny sliver of sun-dried tomato could add a concentrated burst of umami and sweetness, or a few chopped Kalamata olives might introduce a briny counterpoint. For those who enjoy a carnivorous touch, a delicate wrap of prosciutto around a mozzarella ball before skewering it would be an indulgent addition, though it would change the classic vegetarian nature of the dish. You could even swap out the cherry tomatoes for heirloom grape tomatoes in various colors for a beautiful rainbow effect, though for the holiday keyword, the classic red is undeniably ideal. And if you’re feeling adventurous with the dressing, a light lemon vinaigrette instead of balsamic glaze could offer a brighter, more acidic finish. The possibilities are truly endless, making this a recipe that can evolve with your taste, the season, and any occasion you celebrate.
Your Next Culinary Triumph Awaits!
So, what are you waiting for? I sincerely encourage you, with all the enthusiasm of a passionate home cook, to make these amazing Caprese cups your next culinary adventure. They are incredibly simple, yet yield results that look and taste like they came straight from a gourmet kitchen. Trust me when I say that the joy of seeing your friends and family light up as they taste these little wonders is incredibly rewarding. Whether you’re hosting a grand holiday feast, a casual backyard barbecue, or just want to treat yourself to something fresh and beautiful, this recipe is your golden ticket. Once you’ve whipped up your own batch, I would absolutely love to hear about your experience. Did you stick to the classic? Did you try a fun variation? How did your guests react? Please, share your culinary triumphs and your delightful photos with me – I’m always so thrilled to see your creations! Let’s spread the joy of easy, elegant, and utterly delicious food. These Christmas Mini Caprese Salad Cups are more than just a recipe; they’re an invitation to create beautiful, memorable moments around the table. Happy cooking, and even happier eating!
Christmas Mini Caprese Salad Cups
Christmas Mini Caprese Salad Cups are here to revolutionize your holiday entertaining! This delightful bite-sized wonder brings all the festive cheer and fresh flavors you could ever wish for, elegantly presented in individual portions. It’s a game-changer for any festive gathering, offering both visual appeal and a burst of vibrant taste without the usual holiday stress.
Ingredients
Instructions
Important Information
Nutrition Facts (Per Serving)
It is important to consider this information as approximate and not to use it as definitive health advice.
Allergy Information
Please check ingredients for potential allergens and consult a health professional if in doubt.


Leave a Comment