
Cupcake Pull Apart Graduation Cap Cake
Oh my goodness, I am so excited to share this recipe with you! As graduation season approaches, finding that perfect celebratory dessert can be a little daunting, right? You want something that screams “Congratulations!”, is easy to serve, and looks absolutely stunning. Well, my friends, I’ve got just the thing: the Cupcake Pull Apart Graduation Cap Cake!
What makes this creation so incredibly special, you ask? It’s ingenious! We’re talking about all the visual impact of a grand celebratory cake, but with the delightful convenience of individual cupcakes. Imagine: no messy slicing, no awkward plating, just a beautiful, edible centerpiece where guests can simply ‘pull apart’ their own perfectly frosted cupcake. It’s a total game-changer for parties!
You are absolutely going to adore making this! Not only does it look incredibly impressive and perfectly capture the spirit of graduation with its iconic cap shape, but it’s also surprisingly simple to assemble. We’ll be arranging a batch of your favorite cupcakes – whether they’re vanilla, chocolate, or a mix – and frosting them together strategically to form that classic square cap and brim, complete with a celebratory tassel. It’s a showstopper that takes away all the serving stress, letting you focus on celebrating your amazing graduate. Get ready to impress everyone with this clever and delicious centerpiece!
Ingredient Notes
Making a Cupcake Pull Apart Graduation Cap Cake is such a fun and impressive way to celebrate your graduate! What I love most about this cake is its flexibility – you can tailor the flavors and colors to perfectly match your celebration. Here are the key ingredients I use and some ideas for variations.
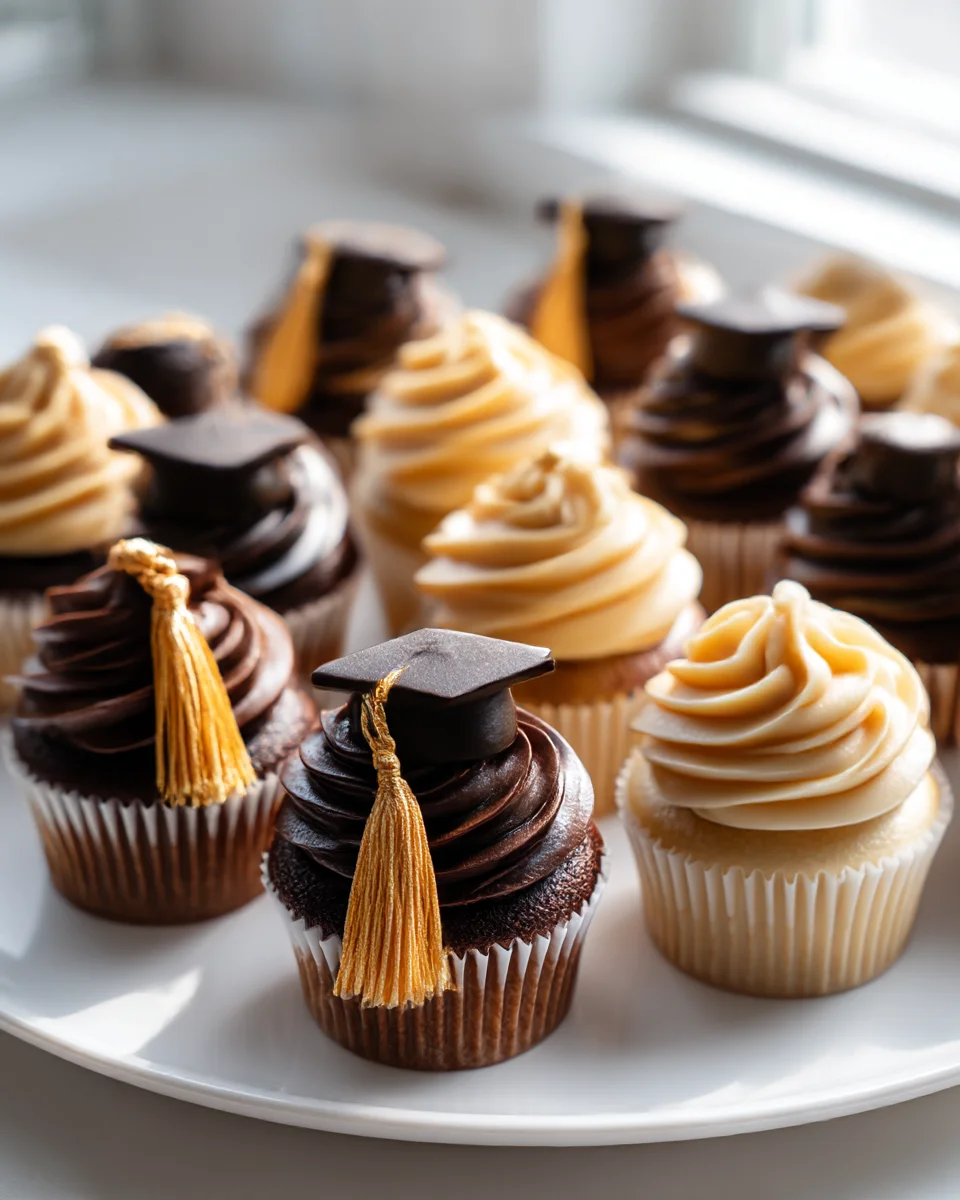
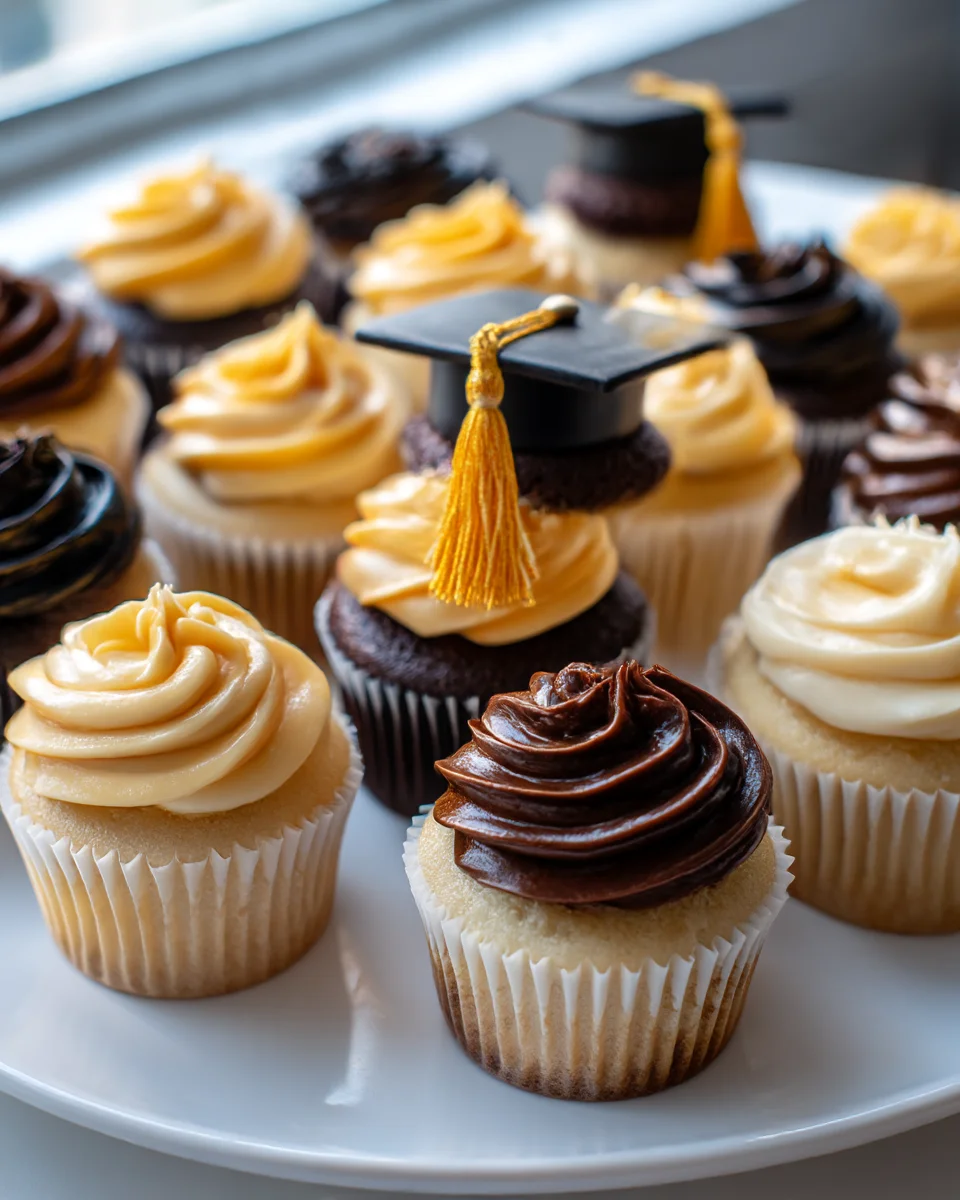
Cupcakes: For this project, you’ll need a good number of cupcakes, typically between 20-24, depending on the size of your cap. I often use my favorite vanilla cupcake recipe from scratch because I love the tender crumb, but a high-quality box mix works absolutely wonderfully too, especially when you’re short on time. I’ve found that a standard 12-cup batch usually yields enough for the brim and part of the cap, so you might need to bake two batches or adjust your recipe quantity. Feel free to use any flavor you or your graduate loves – chocolate, red velvet, lemon, or even a mix!
Buttercream Frosting: American buttercream is my go-to for this cake because it’s sturdy, easy to color, and holds its shape beautifully. You’ll need a generous amount, probably enough for about 4-5 cups of frosting. I recommend using unsalted butter, powdered sugar, a splash of milk or cream, and a touch of vanilla extract. For coloring, I always opt for gel food coloring, as it provides vibrant colors without thinning out the frosting too much. You’ll need a dark color for the cap itself (black or a deep navy blue are classic choices) and a contrasting bright color for the tassel (yellow or gold work perfectly).
Decorations: This is where the magic happens! For the tassel, I like to use edible gold or yellow sprinkles to add a celebratory sparkle. Sometimes I’ll also use a small piece of dark chocolate or a dollop of frosted meringue to create the “button” in the center of the cap where the tassel originates. Edible glitter or a spray of edible gold mist can also elevate the look. If you’re feeling extra creative, small fondant cut-outs of the graduation year or the school’s initial can be a lovely personal touch, but they’re entirely optional.
Substitutions & Variations:
- Cupcake Flavors: Don’t limit yourself to one! You can bake different flavors and strategically place them for a surprise element when guests pull them apart.
- Frosting Type: While American buttercream is sturdy, cream cheese frosting or even a Swiss meringue buttercream can be used. Just be mindful that softer frostings might require refrigeration, which can affect the texture of the cupcakes.
- Tassel Details: Instead of sprinkles, you could use edible gold dust brushed onto the piped frosting, thin strands of licorice laces (cut to size), or even finely shredded coconut dyed yellow for a unique texture.
- Colors: Always customize the cap and tassel colors to match the graduate’s school colors! It makes the cake feel so much more personal.
Step-by-Step Instructions
Creating this Cupcake Pull Apart Graduation Cap Cake is easier than it looks, I promise! The key is in the assembly and thoughtful decoration. Follow these steps, and you’ll have a stunning centerpiece for your graduation celebration.
Step 1: Bake and Cool the Cupcakes
First things first, bake your cupcakes according to your chosen recipe or box mix instructions. I usually aim for a slightly domed top, which helps create a nice seamless surface when frosted. Once baked, it’s absolutely critical that you let them cool completely on a wire rack. I mean completely. Trying to frost warm cupcakes will lead to a melty, messy disaster, and nobody wants that! This might mean letting them cool for a couple of hours or even overnight if you’re planning ahead.
Step 2: Arrange the Cupcakes into a Graduation Cap Shape
This is where the “pull apart” magic happens. On a large, sturdy serving platter or a cake board (at least 18×24 inches works well for 24 cupcakes), arrange your cooled cupcakes to form the shape of a graduation cap. I typically create a rectangular “brim” first – usually 3 rows of 6-8 cupcakes depending on the size of your board. Above that, I’ll form a square for the “top” of the cap, often a 3×3 or 4×4 arrangement. The key is to place them close enough so they are nearly touching. This allows the frosting to bridge the gaps and create the illusion of a single cake, while still being easy to pull apart later. Take your time with this step to ensure the shape is even and well-defined.
Step 3: Prepare and Color Your Frosting
Now it’s time to whip up your buttercream frosting until it’s light and fluffy. Divide your frosting into two portions. The larger portion will be for the main cap color (black or deep navy blue), and a smaller portion will be for the tassel (yellow or gold). When coloring with gel food coloring, remember that a little goes a long way, especially with dark colors. For black, I often start with a good amount of dark cocoa powder (if I’m making chocolate buttercream) or a touch of brown, then add black gel color. Let it sit for about 15-20 minutes after mixing; I’ve found that dark colors deepen and become richer over time. Mix your yellow or gold frosting to your desired hue as well.
Step 4: Frost the Cap Base
With your dark-colored frosting ready, it’s time to frost the entire surface of your arranged cupcakes. I like to use a large offset spatula or a piping bag fitted with a large round tip (like an Ateco 808 or 809) for this. Pipe or spread an even layer of frosting over all the cupcakes, making sure to fill in the small gaps between them. This is what creates the seamless “cake” look. Smooth out the top as best you can – it doesn’t have to be absolutely perfect, but a nice, even surface will make the tassel stand out beautifully. Don’t be shy with the frosting; you want good coverage.
Step 5: Add the Tassel
This is my favorite part because it really brings the graduation cap to life! First, take your yellow or gold frosting. I usually pipe a small, round dot or place a square of chocolate in the very center of the top square of cupcakes. This represents the button of the cap. From this “button,” carefully pipe a straight line of yellow/gold frosting extending to one of the corners of the top square. This forms the main string of the tassel. Then, at the end of that line, use a small star tip or simply pipe short, parallel lines to create the “fringe” of the tassel. To add extra sparkle, I then liberally sprinkle edible gold or yellow sprinkles over the entire tassel area. It truly makes it pop!
Step 6: Final Touches
Step back and admire your creation! If you want, you can add extra details now. Sometimes I use a fine piping tip to add the graduation year or the graduate’s initial onto the brim of the cap. A touch of edible glitter spray can add a magical shimmer to the entire cake. Once you’re happy with the look, your stunning Cupcake Pull Apart Graduation Cap Cake is ready to be presented!
Tips & Suggestions
Having made a few of these, I’ve picked up some tips that I think really help elevate this project from good to fantastic. My goal is always to make the process as enjoyable and stress-free as possible for you!
- Practice Placement: Before you even start frosting, I highly recommend doing a “dry run” of your cupcake arrangement on your chosen platter or cake board. This lets you confirm the size and shape, ensuring you have enough cupcakes and that they fit perfectly on your serving surface. There’s nothing worse than frosting half the cap and realizing you’re off-center!
- Frosting Consistency is Key: For both covering the cupcakes and piping the tassel, your buttercream needs to be just right. If it’s too soft, it won’t hold its shape or smooth out nicely. If it’s too stiff, it’ll be hard to spread and pipe. If it’s too soft, pop it in the fridge for 10-15 minutes, then re-whip. If it’s too stiff, add a tiny bit of milk or cream (half a teaspoon at a time) and whip until smooth.
- Achieving Dark Colors: Coloring frosting black or deep navy blue can be tricky. I find using gel food coloring is essential. For black, start with a good amount of gel color, mix well, and then let the frosting sit for at least 15-20 minutes. I often find that dark colors deepen significantly as they rest. If you’re really struggling, a touch of cocoa powder can also help deepen the black without altering the taste too much, even in vanilla frosting.
- Personalize it! This is such a great opportunity to make the cake truly special. Match the cap and tassel colors to the graduate’s school colors. You can pipe the graduation year, the graduate’s initials, or even a small celebratory message onto the brim of the cap. Fondant cut-outs are another option if you’re comfortable working with it.
- Transportation Made Easy: Since this “cake” is assembled on a board, it’s relatively easy to transport. Just make sure your board is sturdy! If you have a large, flat box, that’s ideal for keeping it secure during travel.
- The “Pull Apart” Advantage: Don’t forget to remind your guests that this is a pull-apart cake! It’s so much fun for a party because there’s no need for knives or plates; guests can simply grab a cupcake (or two!) and enjoy. This also makes serving super quick and mess-free.
- Flavor Variety: If you’re baking a lot of cupcakes, consider making a few different flavors. You can arrange them randomly, or even place different flavors in specific sections of the cap for a fun surprise.
Storage
Proper storage will help keep your Cupcake Pull Apart Graduation Cap Cake fresh and delicious for the celebration!
- At Room Temperature: If your cupcakes are unfrosted, they can be stored in an airtight container at room temperature for 1-2 days. Once frosted with American buttercream, the entire assembled cake can typically be left at cool room temperature (below 75°F or 24°C) for up to 1-2 days. Make sure it’s covered loosely with plastic wrap or a cake dome to prevent drying out and protect the decorations.
- Refrigeration: If you’re using a frosting that’s sensitive to heat (like cream cheese frosting, though I recommend American buttercream for this project’s stability), or if your environment is particularly warm, it’s best to refrigerate the cake. Cover it loosely to prevent condensation from forming on the frosting. It can be refrigerated for up to 3-4 days. I always recommend bringing it back to room temperature for about 30-60 minutes before serving, as this greatly improves the cupcake and frosting texture.
- Freezing: Unfrosted cupcakes freeze exceptionally well. Place them in an airtight container or freezer bag for up to 2-3 months. Thaw at room temperature before frosting. If you want to freeze the entire frosted cake, it’s a bit more challenging but possible. Flash freeze the assembled and decorated cake on the board for about 1-2 hours until the frosting is firm. Then, wrap it tightly in several layers of plastic wrap and then foil. It can be frozen for up to a month. Thaw in the refrigerator overnight, then bring to room temperature before serving. Be aware that colors might bleed slightly upon thawing.
Final Thoughts
And there you have it! I truly hope you’re feeling inspired to create this incredible dessert. The Cupcake Pull Apart Graduation Cap Cake isn’t just any cake; it’s a brilliant, no-fuss way to celebrate a momentous achievement. I absolutely love how it combines the individual joy of a cupcake with the impressive grandeur of a large cake, all while perfectly capturing the spirit of graduation.
Imagine the smiles and appreciative gasps when your graduate and their guests see this masterpiece. It’s practical, incredibly easy to serve without a single knife, and utterly charming. Making the Cupcake Pull Apart Graduation Cap Cake is more than just baking; it’s crafting a sweet, edible symbol of success that everyone can effortlessly enjoy. So go on, gather your ingredients, and get ready to bake some unforgettable memories!

Leave a Comment