
Garlic Parmesan Cheeseburger Bombs Recipe
Welcome, fellow food lovers! Get ready to discover your new favorite snack, appetizer, or even a fun weeknight dinner because the Garlic Parmesan Cheeseburger Bombs Recipe is here to completely blow your taste buds away. Trust me, I’ve made these countless times, and they are always, always a showstopper!
What makes these bombs so incredibly special? It’s the magical transformation of a classic cheeseburger into an irresistible, handheld pocket of pure joy. We’re talking about all the savory deliciousness of a juicy beef patty and gooey cheese, perfectly encased in a soft, golden dough. But it doesn’t stop there! What truly elevates these to “bomb” status is the glorious, aromatic garlic parmesan butter that gets brushed on top after baking. It’s that finishing touch that brings an unbelievable layer of savory, cheesy, garlicky goodness to every single bite, making them utterly addictive.
You are going to absolutely love making and devouring these. Why? Because they’re the ultimate crowd-pleaser! Whether you’re hosting a game day party, planning a casual movie night, looking for a fun school lunch idea, or just want an exciting twist on dinner, these bombs hit all the right notes. They’re easy to eat, less messy than a traditional burger, and offer an explosion of familiar yet exciting flavors. Imagine biting into a warm, tender dough revealing a perfectly seasoned beef and cheese filling, all infused with that incredible garlic parmesan crust – pure comfort and pure deliciousness!
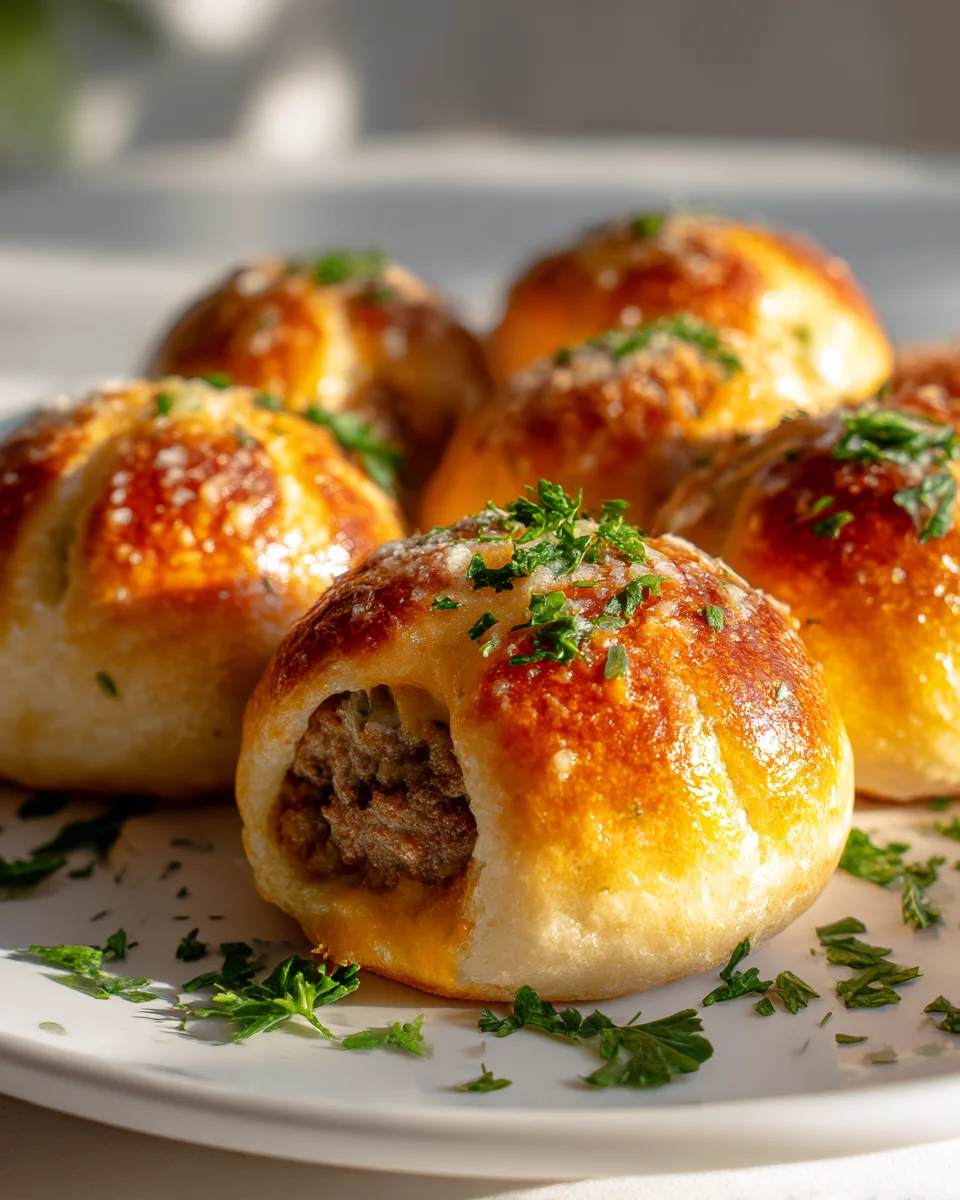
Get ready to elevate your snack game with these incredible Garlic Parmesan Cheeseburger Bombs! Imagine a juicy, seasoned beef and cheese filling, all encased in a soft, golden biscuit shell, then brushed with an irresistible garlic parmesan butter. It’s like a mini cheeseburger exploded with flavor, but in the best way possible. These bombs are perfect for parties, game nights, or just a fun family dinner. My family absolutely devours them, and I’m sure yours will too!
Ingredient Notes
Crafting the perfect Garlic Parmesan Cheeseburger Bombs starts with understanding the star players in our ingredient list. Each component plays a vital role in creating that explosion of flavor and texture we’re aiming for.
- Ground Beef: I always recommend using lean ground beef, about 85-90% lean. This helps prevent your bombs from becoming too greasy inside, which can make the biscuit dough soggy. If you use a fattier beef, just be sure to thoroughly drain off any excess grease after cooking it. For seasoning, I keep it classic – salt, black pepper, onion powder, and a touch of garlic powder are my go-to’s to give it that quintessential cheeseburger flavor. You can even add a dash of Worcestershire sauce (make sure it’s a non-alcoholic variety if that’s a preference) for a deeper savory note.
- Refrigerated Biscuit Dough: This is the “bomb” part of our recipe! I find that regular refrigerated flaky biscuit dough works wonderfully. Each biscuit becomes the perfect individual wrapper for our delicious filling. You can use an 8-count or 10-count package, depending on how big you want your bombs to be. Avoid the grand or jumbo biscuits, as they might be too large and difficult to seal properly around the filling.
- Cheese: We’re going for a double cheese whammy here! For the interior cheeseburger filling, I love using sharp cheddar cheese or American cheese. Shredded works well, or you can even cut small cubes of cheese to tuck inside, which creates a delightful molten cheese center when baked. For the “Garlic Parmesan” exterior, freshly grated Parmesan cheese is a must. The pre-grated stuff just doesn’t deliver the same punch of flavor or melt as beautifully.
- Fresh Garlic: Absolutely crucial for that vibrant garlic flavor! I recommend using fresh garlic, minced very finely, for the butter topping. It adds a pungent, aromatic kick that perfectly complements the Parmesan. Garlic powder is great for the beef, but for the butter, fresh is best.
- Butter: Unsalted butter is what I typically use, melted down for our glorious garlic Parmesan coating. It helps the seasoning stick to the bombs and contributes to that beautiful golden-brown crust.
- Optional Flavor Enhancers: Don’t be shy about adding other classic burger fixings to your beef mixture if you like! A tablespoon or two of finely diced yellow onion, cooked until softened, can add a nice texture and sweetness. You could also include a pinch of smoked paprika for a hint of smokiness. Just remember to keep the additions finely diced so they don’t tear the biscuit dough.
Step-by-Step Instructions
Let’s get down to business and assemble these flavor-packed Garlic Parmesan Cheeseburger Bombs! Follow these steps carefully, and you’ll be enjoying these delightful treats in no time.
- Prepare Your Cheeseburger Filling: First things first, we need to get our delicious beef mixture ready. In a large skillet, brown your ground beef over medium heat, breaking it up with a spoon as it cooks. Once it’s fully cooked and no longer pink, drain off any excess grease thoroughly. This step is super important to prevent soggy bombs! Return the beef to the skillet and season it generously with salt, black pepper, garlic powder, and onion powder to your liking. Stir it all together, then remove the skillet from the heat. Let the beef mixture cool down for about 10-15 minutes. This cooling period is key; putting hot filling into cold biscuit dough can make the dough difficult to work with and potentially tough.
- Preheat Oven & Prep Baking Sheet: While your beef is cooling, preheat your oven to the temperature specified on your biscuit dough package (usually around 375°F or 400°F / 190°C or 200°C). Line a large baking sheet with parchment paper or a silicone baking mat. This will prevent sticking and make cleanup a breeze.
- Prepare Your Biscuits: Open your can of refrigerated biscuit dough. Gently separate each biscuit. On a lightly floured surface or a clean cutting board, flatten each biscuit into a thin, roughly 4-inch circle. I usually just use my fingers, but you can use a rolling pin if you prefer. The goal is to make it wide enough to wrap around the filling without being too thick.
- Assemble the Bombs: Now for the fun part! Place about 1 to 1 ½ tablespoons of the cooled beef mixture in the center of each flattened biscuit. Don’t overfill, or they’ll be hard to seal. Top the beef with a small amount of shredded cheddar or American cheese (about a tablespoon) or a small cheese cube. Carefully gather the edges of the biscuit dough up over the filling, pinching them firmly together at the top to completely seal the bomb. Make sure there are no gaps where the cheese can escape! Gently roll the bomb between your palms to create a smooth, round ball. Place each seam-side down on your prepared baking sheet.
- Create the Garlic Parmesan Coating: In a small microwave-safe bowl, melt the unsalted butter. Add the minced fresh garlic and the grated Parmesan cheese to the melted butter. Stir until well combined. This is where the magic happens for the exterior!
- Coat and Bake: Using a pastry brush, liberally brush each cheeseburger bomb with the garlic Parmesan butter mixture. Make sure to get every surface! Once coated, bake the bombs in your preheated oven for 12-18 minutes, or until they are golden brown and puffed up, and the biscuit dough is fully cooked through. Cooking times can vary slightly depending on your oven and the brand of biscuit dough, so keep an eye on them.
- Serve Hot: As soon as they come out of the oven, they’ll be glistening and irresistible. Let them cool for just a minute or two (the cheese inside will be very hot!), then serve them immediately. They are fantastic on their own, but even better with a side of ketchup, mustard, or your favorite burger sauce for dipping!
Tips & Suggestions
To ensure your Garlic Parmesan Cheeseburger Bombs turn out perfect every single time, I’ve gathered some of my favorite tips and suggestions. These little tricks can make a big difference!
- Don’t Overfill: This is my number one tip! It’s tempting to cram as much delicious filling as possible into each biscuit, but resist the urge. Overfilling is the main culprit for bombs that burst open in the oven, leading to a cheesy mess on your baking sheet. Stick to the recommended amount, and you’ll have perfectly sealed, beautiful bombs.
- Seal Them Tightly: Once you’ve placed the filling and cheese inside the biscuit, take your time to really pinch the dough edges together securely. I like to gather the dough, pinch it, and then give it a gentle roll in my hands to ensure there are no weak spots. A good seal means all that delicious cheese stays where it belongs – inside the bomb!
- Cool the Filling: As mentioned in the steps, letting your cooked ground beef mixture cool down for 10-15 minutes before assembling is crucial. Hot filling can make the biscuit dough difficult to handle, more prone to tearing, and can even start to cook the dough prematurely, leading to a tough texture.
- Experiment with Cheese: While cheddar or American cheese are classic for the interior, feel free to get creative! A little bit of Monterey Jack, pepper jack for a kick, or even a smoked gouda could add an interesting twist to your cheeseburger bombs. Just ensure the cheese is firm enough to be contained within the bomb.
- Add Extra Flavor to the Beef: Want to take your cheeseburger filling up a notch? Before you add it to the biscuits, stir in a teaspoon of finely chopped pickles (drained very well) for a tangy crunch, or a tiny bit of cooked and crumbled bacon for a smoky, savory depth. Just remember, finely chopped additions work best.
- Serving Suggestions: These bombs are amazing as a standalone snack, but they’re also fantastic with dipping sauces. Think classic ketchup and mustard, a tangy secret sauce (mayo, ketchup, relish), or even a warm marinara or ranch dressing. For a fresher side, a simple green salad or some crisp pickle spears would be a great accompaniment.
- Don’t Skip the Garlic Parmesan Brush: That final brush of garlicky, buttery Parmesan isn’t just for flavor; it also helps create that beautiful golden-brown crust and gives the bombs a wonderful aroma. Don’t be shy with it!
Storage
While these Garlic Parmesan Cheeseburger Bombs are definitely best enjoyed fresh out of the oven, sometimes you have leftovers, or you want to make them ahead. Here’s how I handle storing these delicious treats.
- Refrigeration: If you happen to have any leftover bombs (a rare occurrence in my house!), allow them to cool completely to room temperature first. Once cool, transfer them to an airtight container. They will keep well in the refrigerator for up to 3-4 days. While they won’t be as crispy as when freshly baked, they’ll still be super flavorful.
- Reheating: For the best results when reheating, I highly recommend using your oven or an air fryer. This will help crisp up the biscuit dough again, making them much more enjoyable than a microwave.
- Oven: Preheat your oven to 350°F (175°C). Place the bombs on a baking sheet and heat for about 10-15 minutes, or until they are heated through and the biscuit is warm and slightly crisp.
- Air Fryer: If you have an air fryer, this is an excellent option for reheating! Place the bombs in a single layer in the air fryer basket. Air fry at 300°F (150°C) for about 5-8 minutes, or until heated through and crispy.
- Microwave: While convenient, a microwave will make the biscuit dough soft and potentially a bit chewy. If you’re in a pinch, microwave for 30-60 seconds, or until heated through.
- Freezing (Baked Bombs): If you want to freeze baked bombs, allow them to cool completely. Arrange them in a single layer on a baking sheet and freeze for about 1-2 hours until solid. Once frozen, transfer them to a freezer-safe bag or airtight container, removing as much air as possible. They can be stored in the freezer for up to 2-3 months. To reheat from frozen, you can bake them in a preheated oven at 350°F (175°C) for 20-25 minutes, or until heated through.
- Freezing (Unbaked Bombs): You can also freeze these bombs unbaked for future convenience! Once you’ve assembled and sealed the bombs (before brushing with butter), arrange them in a single layer on a parchment-lined baking sheet and freeze until solid. Then, transfer them to a freezer-safe bag. When you’re ready to bake, you can brush them with the garlic Parmesan butter and bake them from frozen. You’ll likely need to add an additional 5-10 minutes to the baking time. Keep an eye on them until they are golden brown and cooked through.

Final Thoughts
And there you have it, my friends! We’ve reached the delicious conclusion of our culinary journey with the incredible Garlic Parmesan Cheeseburger Bombs Recipe. I truly hope you’re as excited to try these as I am every time I make them. This isn’t just another appetizer or snack; it’s a flavor phenomenon that brings together everything we love about a classic cheeseburger – the savory beef, the melty cheese – all wrapped up in a tender, golden crust infused with irresistible garlic and parmesan.
The Garlic Parmesan Cheeseburger Bombs Recipe is a testament to how fun and satisfying homemade food can be. They’re perfect for game nights, casual get-togethers, or simply as a delightful family meal that everyone will eagerly devour. So, go ahead, gather your ingredients, and prepare to be amazed. I promise, once you experience the explosion of flavor from these little bombs, you’ll understand exactly why this recipe is a definite keeper. Happy cooking!


Leave a Comment