
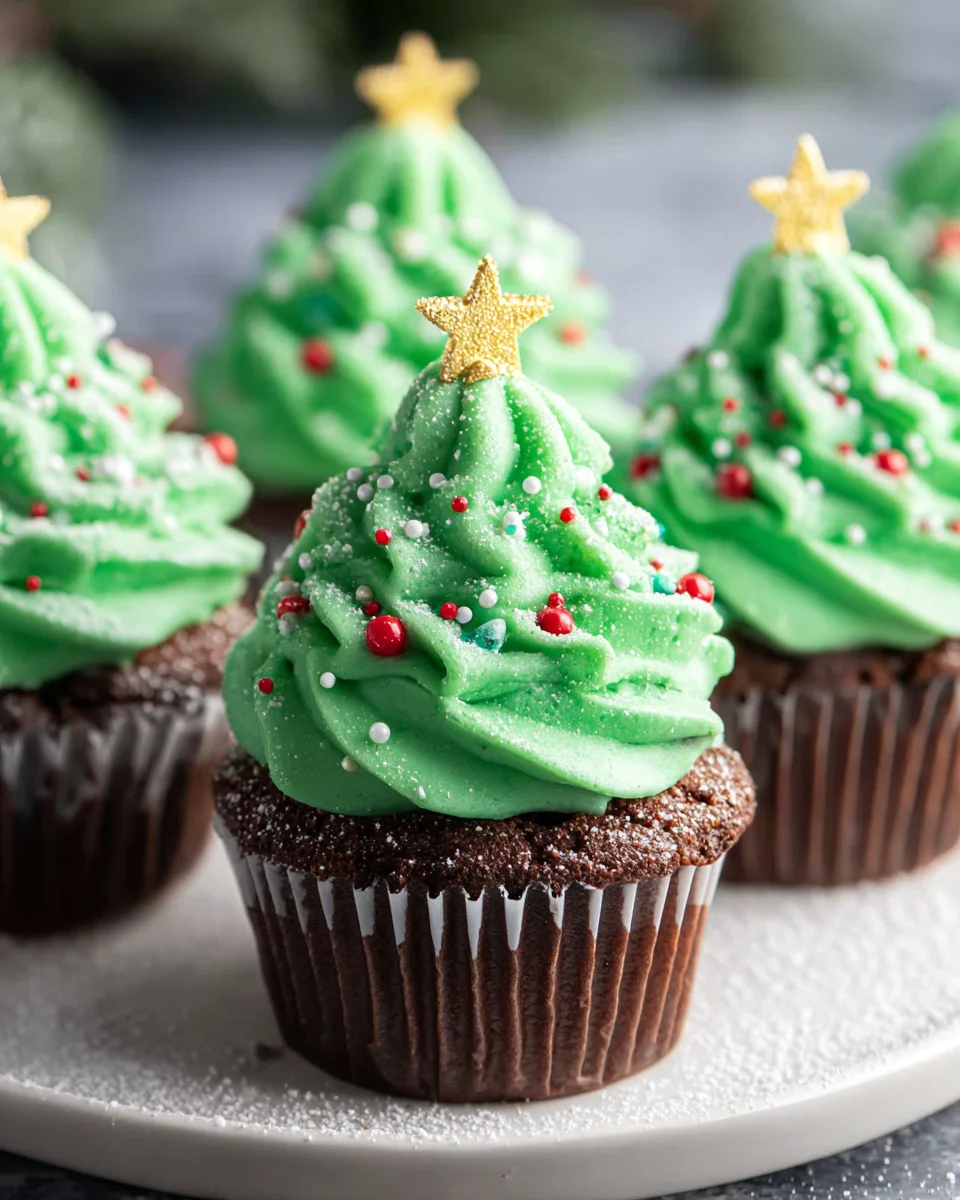
Christmas Tree Cupcakes are here to sprinkle some festive magic into your holiday celebrations, transforming simple treats into edible works of art that are sure to be the star of your dessert table! Imagine the collective delight on faces young and old as they gaze upon a miniature forest of beautifully decorated cupcakes, each one a charming testament to the joyous spirit of the season. While cupcakes themselves boast a long, beloved history as individual-portioned cakes, their creative transformation into iconic symbols like Christmas trees truly brings a unique charm and a touch of whimsy to our modern holiday traditions. They perfectly embody the warmth of shared family moments and the exciting anticipation of decorating, much like their larger, real-life counterparts.
I find that people absolutely adore these festive creations not just for their undeniably delicious, moist cake base and creamy frosting, but equally for the sheer fun and boundless creativity they inspire. They offer a delightful opportunity for families and friends to gather, decorate, and make cherished memories together during the most wonderful time of the year. Plus, they are incredibly versatile and perfectly portioned, making them ideal for any holiday gathering, from bustling school parties to elegant Christmas dinners. These delightful Christmas Tree Cupcakes are an absolute showstopper, bringing smiles, wonder, and festive cheer with every single bite and visual delight.
Ingredients:
- For the Fluffy Vanilla Cupcakes:
- 1 ½ cups (180g) all-purpose flour
- 1 ½ teaspoons baking powder
- ½ teaspoon salt
- ¾ cup (170g) unsalted butter, softened to room temperature – this is crucial for a smooth batter!
- 1 ½ cups (300g) granulated sugar
- 2 large eggs, also at room temperature
- 1 teaspoon pure vanilla extract – always go for pure vanilla for the best flavor.
- 1 cup (240ml) whole milk, at room temperature
- Paper cupcake liners
- For the Perfect Green Buttercream Frosting:
- 1 cup (226g) unsalted butter, softened – again, room temperature is key for creaming.
- 3-4 cups (360-480g) powdered sugar (confectioners’ sugar), sifted – sifting prevents lumps!
- 1 teaspoon pure vanilla extract
- 2-4 tablespoons whole milk or heavy cream, as needed for consistency
- Green gel food coloring – gel coloring provides vibrant color without thinning the frosting too much.
- Pinch of salt (optional, to balance sweetness)
- For the Festive Christmas Tree Decorations:
- Assorted Christmas sprinkles (nonpareils, jimmies, edible glitter, star sprinkles)
- Small candy stars or edible gold stars for the tree toppers
- Optional: Small candies like M&Ms or mini Reese’s Pieces for “ornaments”
Making the Fluffy Vanilla Cupcakes
Creating the perfect base for our Christmas Tree Cupcakes is where the magic begins! We want light, fluffy, and moist cupcakes that will stand up beautifully to our festive frosting. Follow these steps carefully, and you’ll have a batch of delicious vanilla cupcakes ready for their transformation.
- Prepare Your Workspace and Oven: First things first, preheat your oven to 350°F (175°C). While it’s heating up, line a standard 12-cup muffin tin with paper cupcake liners. I always find it helpful to have everything ready before I start mixing, it just makes the process so much smoother.
- Combine the Dry Ingredients: In a medium bowl, whisk together the 1 ½ cups of all-purpose flour, 1 ½ teaspoons of baking powder, and ½ teaspoon of salt. Give it a good whisk to ensure the baking powder and salt are evenly distributed throughout the flour. This step is important because it helps the cupcakes rise evenly and ensures a consistent texture. Set this bowl aside for a moment.
- Cream the Butter and Sugar: In a large mixing bowl (or the bowl of a stand mixer fitted with the paddle attachment), beat the ¾ cup of softened unsalted butter on medium speed until it’s creamy and light in color, which usually takes about 1-2 minutes. Then, gradually add the 1 ½ cups of granulated sugar to the butter, beating on medium-high speed for another 3-5 minutes. This step is crucial for light and airy cupcakes! You’re essentially whipping air into the butter and sugar, which contributes significantly to the final texture. The mixture should become pale yellow and fluffy. Scrape down the sides of the bowl as needed to ensure everything is incorporated.
- Incorporate Eggs and Vanilla: With the mixer still on medium speed, add the 2 large room temperature eggs one at a time, beating well after each addition. Make sure each egg is fully incorporated before adding the next. Once the eggs are in, stir in the 1 teaspoon of pure vanilla extract. The mixture might look a little curdled at this point, but don’t worry, it will come together as we add the dry ingredients.
- Alternate Dry and Wet Ingredients: Now it’s time to bring it all together. With the mixer on low speed, gradually add about one-third of the dry ingredient mixture to the wet mixture, mixing just until combined. Then, pour in half of the 1 cup of whole milk, mixing until just incorporated. Repeat this process: add another third of the dry ingredients, then the remaining milk, and finally, the last third of the dry ingredients. The key here is not to overmix! Overmixing develops the gluten in the flour too much, leading to tough, dense cupcakes instead of the soft, tender ones we’re aiming for. Mix only until the ingredients are just combined and no streaks of flour remain.
- Fill the Liners: Divide the cupcake batter evenly among the 12 prepared cupcake liners, filling each about two-thirds full. I like to use an ice cream scoop for this to ensure even portions, which helps them bake uniformly.
- Bake to Golden Perfection: Place the muffin tin in the preheated oven and bake for 18-22 minutes. Baking times can vary depending on your oven, so start checking around the 18-minute mark. You’ll know they’re done when a wooden skewer or toothpick inserted into the center of a cupcake comes out clean, or with just a few moist crumbs attached. The tops should be lightly golden and spring back when gently pressed.
- Cool Completely: Once baked, remove the muffin tin from the oven and let the cupcakes cool in the tin for about 5 minutes. After that, carefully transfer the cupcakes to a wire rack to cool completely. This step is non-negotiable! Frosting warm cupcakes is a messy business; the frosting will melt and slide right off. Patiently wait until they are entirely cool before moving on to the frosting stage.
Whipping Up the Perfect Buttercream Frosting
A beautiful Christmas tree needs vibrant green frosting that’s both delicious and holds its shape perfectly for piping. This classic vanilla buttercream is incredibly versatile and easy to make. Let’s get that luscious frosting ready!
- Cream the Butter: In a large mixing bowl (or the bowl of a stand mixer with the paddle attachment), beat the 1 cup of softened unsalted butter on medium speed for 2-3 minutes until it’s very light, creamy, and pale in color. Just like with the cupcake batter, we’re incorporating air here, which will make our frosting wonderfully fluffy.
- Gradually Add Powdered Sugar: With the mixer on low speed, gradually add the 3-4 cups of sifted powdered sugar, one cup at a time. I always recommend sifting your powdered sugar because it makes a huge difference in achieving a smooth, lump-free frosting. Start with 3 cups, and if you feel you need a thicker consistency later, you can add the fourth cup. Beat until fully incorporated after each addition. The mixture will be quite thick and crumbly at first.
- Add Flavor and Liquid: Once all the powdered sugar is mostly incorporated, add the 1 teaspoon of pure vanilla extract and the optional pinch of salt. Now, slowly add 2 tablespoons of whole milk or heavy cream. Start with 2 tablespoons, and then increase to 3 or 4 tablespoons, one teaspoon at a time, until your frosting reaches the desired consistency. For piping Christmas trees, you want a firm yet spreadable consistency – not too stiff that it’s hard to pipe, but not too thin that it won’t hold its shape. Beat on medium-high speed for another 3-5 minutes until the buttercream is incredibly light, fluffy, and smooth. This final beating step is what makes the buttercream so luxurious.
- Color Your Trees Green: Now for the fun part – turning our frosting into a beautiful shade of green! Add a few drops of green gel food coloring to the buttercream. Start with a small amount, mix it thoroughly, and then add more if needed until you achieve your desired shade of Christmas tree green. Remember, gel food coloring is highly concentrated, so a little goes a long way. I prefer gel over liquid because it gives a more vibrant color without adding too much moisture to the frosting, which could thin it out. Mix until the color is uniform throughout the frosting.
Transforming Them into Christmas Tree Cupcakes: The Fun Part!
This is where our vision comes to life! Turning simple cupcakes into festive Christmas Tree Cupcakes is incredibly rewarding and a joy for both bakers and eaters. Get ready to unleash your inner artist!
- Gather Your Tools: Make sure your cooled cupcakes are ready. You’ll need a piping bag fitted with a star tip (a Wilton 1M or 21 is perfect for a tree-like texture, or even a simple round tip for a smoother tree). Have your sprinkles, candy stars, and any other edible decorations laid out and ready to go. This makes the decorating process much more efficient and enjoyable.
- Fill the Piping Bag: Open your piping bag and fold the top edge down to create a cuff. Use a spatula to carefully scoop the green buttercream frosting into the bag. Fill it about two-thirds full to make it easier to handle. Twist the top of the bag to seal it, pushing the frosting down towards the tip.
- Pipe Your Christmas Trees:
Method 1: The Classic Star Tree (using a star tip like 1M or 21)
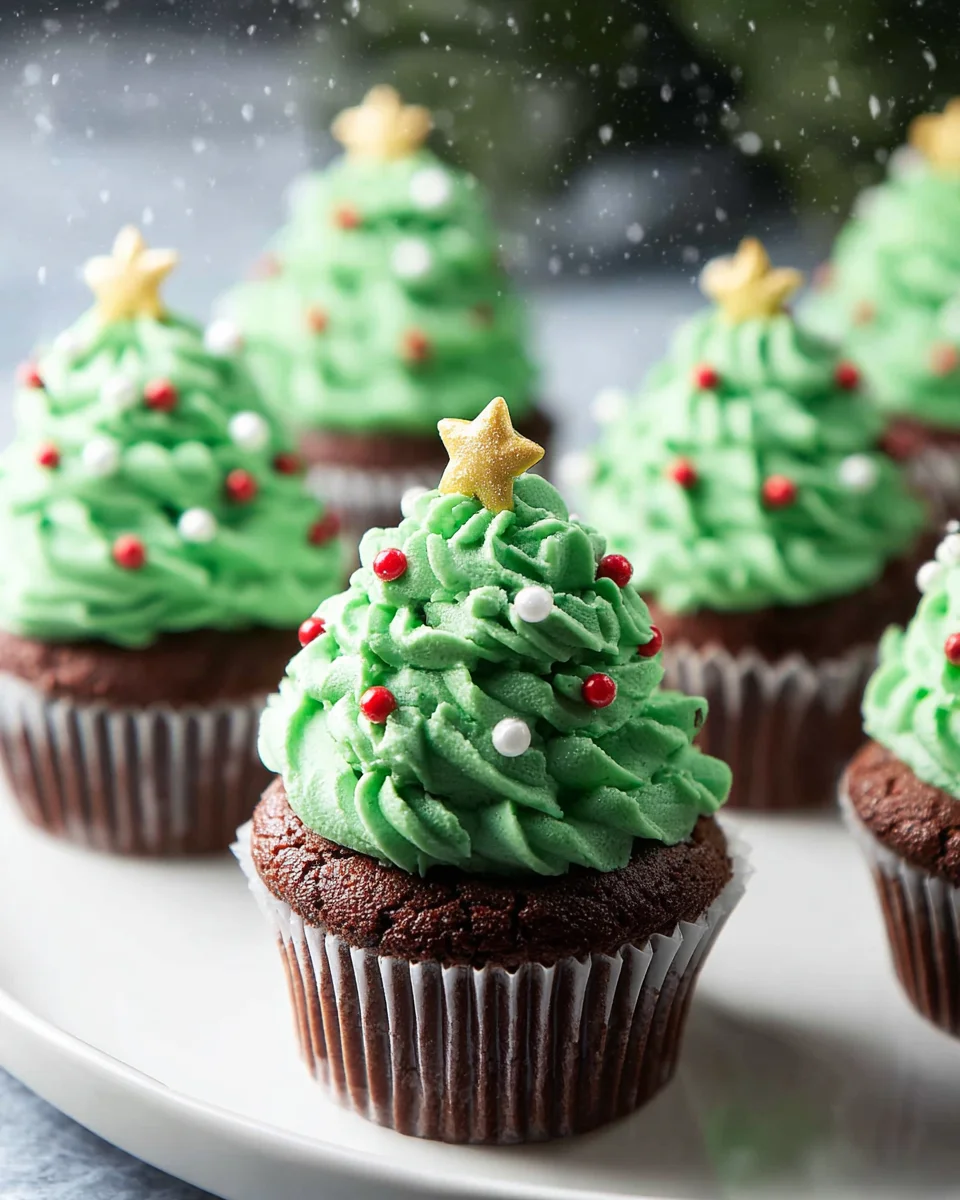
Hold the piping bag vertically directly over the center of a cupcake. Start by piping a small base of frosting in a circle on the cupcake, slightly wider than the base of your desired tree. Without lifting the tip completely, pipe a slightly smaller circle directly on top of the first, building upwards. Continue this process, making each subsequent layer smaller than the one below it, working your way up to a peak. This creates that iconic tiered Christmas tree effect. Apply steady, even pressure, and release pressure as you pull up to create a pointed top.
Method 2: The Swirl Tree (using a large round tip or star tip)
Begin at the outer edge of the cupcake, piping a generous circle of frosting. Then, continuing in a spiral motion, work your way inwards and upwards, gradually making the circles smaller and stacking them on top of each other, ending in a peak. This creates a beautifully swirled, conical tree shape.
Don’t be afraid to practice on a piece of parchment paper first! It takes a little coordination, but once you get the hang of it, you’ll be piping beautiful trees in no time.
- Adorn with Sprinkles: Immediately after piping each tree, while the frosting is still soft and tacky, generously sprinkle your assorted Christmas sprinkles all over the tree. You can gently press some into the frosting if they aren’t sticking well. This is where the magic really happens, transforming green frosting into a truly festive Christmas tree. Encourage your kids or friends to help with this part – it’s a lot of fun!
- Top with a Star: Carefully place a small candy star or edible gold star on the very top of each frosted Christmas tree cupcake. This is the crowning glory, making your tree complete and ready for display.
- Add Optional “Ornaments”: If you wish, you can also place tiny candies like mini M&Ms or small round sprinkles onto the tree as “ornaments” for an extra touch of detail and color. Just gently press them into the frosting wherever you like.
- Chill to Set: Once all your Christmas Tree Cupcakes are decorated, I recommend placing them in the refrigerator for about 15-30 minutes. This helps the buttercream set firmly, ensuring your beautiful decorations stay put, especially if you need to transport them.
Tips for Perfect Christmas Tree Cupcakes
To ensure your Christmas Tree Cupcakes are the star of any holiday gathering, here are a few extra tips I’ve picked up along the way:
- Room Temperature Ingredients are Non-Negotiable: I cannot stress this enough! For both the cupcakes and the buttercream, butter, eggs, and milk at room temperature will cream together smoothly, incorporate evenly, and create the best texture. Cold ingredients lead to lumpy batter and separated frosting.
- Do Not Overmix the Batter: After you add the flour, mix only until just combined. Overmixing develops gluten, which can make your cupcakes tough and dry. A few small lumps of flour are better than an overmixed, smooth batter.
- Achieving the Right Frosting Consistency: This is key for successful piping. If your frosting is too stiff, add milk or cream one teaspoon at a time. If it’s too thin, you can add more sifted powdered sugar, one tablespoon at a time, until you reach a pipeable consistency. A thick, stable buttercream holds its shape best for tree piping.
- Practice Makes Perfect (or at least better!): If you’re new to piping, don’t get discouraged if your first few trees aren’t perfect. Grab a piece of parchment paper and practice your technique before piping onto the actual cupcakes. You can always scrape the practice frosting back into the bag.
- Vibrant Green Hue: Always use gel food coloring for frosting. It provides a much richer and more vibrant color with less product, and it won’t thin out your buttercream like liquid food coloring can. Add it gradually until you reach your desired shade.
- Cool Cupcakes Completely: Seriously, resist the urge to frost warm cupcakes. The frosting will melt, slide off, and create a messy situation. Patience is a virtue here!
- Storage: Decorated Christmas Tree Cupcakes can be stored in an airtight container at room temperature for up to 2-3 days, or in the refrigerator for up to a week. If refrigerating, let them come to room temperature for about 30 minutes before serving for the best flavor and texture.
- Make-Ahead Magic: You can bake the cupcakes a day in advance and store them in an airtight container at room temperature. The buttercream can also be made ahead of time and stored in an airtight container in the refrigerator for up to a week. Just let it come to room temperature and give it a good whip with your mixer before piping to restore its fluffy texture.
- Get Creative with Decorations: While I’ve suggested classic Christmas sprinkles and stars, feel free to get creative! Small edible pearls, different colored sprinkles, or even edible glitter dust can add an extra sparkle to your Christmas Tree Cupcakes.
- Fun for All Ages: Decorating these Christmas Tree Cupcakes is a fantastic activity for kids and adults alike during the holiday season. Set up a decorating station, and let everyone personalize their own little edible trees!
Conclusion:
Welcome to the sweetest part of our journey together! As we wrap up this festive baking adventure, I truly hope you’re feeling inspired and ready to bring a touch of edible magic into your kitchen. These aren’t just any ordinary baked goods; they are little parcels of holiday cheer, designed to be as delightful to make as they are to eat. I’ve poured my heart into crafting a recipe that is not only incredibly straightforward but also promises a stunning, professional-looking result every single time. There’s something uniquely satisfying about creating treats that look like they belong in a holiday magazine, and I assure you, with this recipe, that feeling is well within your reach.
The beauty of this particular creation lies in its perfect blend of simplicity and spectacular presentation. You don’t need to be a seasoned baker to achieve Instagram-worthy results. From the moist, tender cake base to the vibrant, perfectly piped frosting, every element is designed for success. The ease of preparation means you can spend less time stressing in the kitchen and more time enjoying the festive season with your loved ones. Imagine the smiles when these appear on your dessert table! They are an absolute showstopper, guaranteed to elicit gasps of delight from both children and adults alike. It’s the kind of recipe that will undoubtedly become a cherished part of your annual holiday baking tradition, a sweet ritual that brings joy and deliciousness to your home year after year.
Serving Suggestions and Creative Variations
Now that you’ve mastered the art of making these wonderful treats, let’s talk about how to showcase them and how you can put your own unique spin on them. The possibilities are truly endless, allowing you to tailor them to any occasion or preference.
Serving Ideas:
- Holiday Parties: Arrange them on a tiered dessert stand for a truly magnificent centerpiece that will draw everyone’s eye. They are perfect for potlucks, family gatherings, or office parties.
- Edible Gifts: Individually wrap them in clear cellophane bags, tied with a festive ribbon, and they make thoughtful, homemade gifts for neighbors, teachers, or colleagues. Who wouldn’t love receiving such a charming, handcrafted treat?
- Cozy Evenings: Enjoy them with a warm mug of hot cocoa or a festive spiced tea by the fireplace. They’re the perfect indulgent treat for a quiet evening in.
- Kids’ Decorating Station: Bake the cupcakes and prepare the frosting, then let the kids do the decorating! Provide various sprinkles, candies, and edible glitter, turning it into a fun, interactive activity for the whole family.
Creative Variations:
- Flavor Adventures: While a classic vanilla base is always a hit, feel free to experiment with different cake flavors. A chocolate or red velvet base would be absolutely divine, providing a rich contrast to the green frosting. For an extra festive touch, consider adding a hint of peppermint extract to the cake batter or a touch of gingerbread spice.
- Frosting Fantasies: The green buttercream is iconic, but you could try a cream cheese frosting for a tangy counterpoint, or even a chocolate ganache topping before piping the green ‘tree’. Different shades of green, or even a mix of white and green ‘snowy’ tips, can add extra visual appeal. A touch of edible glitter dusted over the finished trees makes them truly sparkle!
- Topper Transformations: Beyond the classic star, think about mini candy canes, tiny edible pearls, or even miniature chocolate pretzels acting as tree trunks. For a rustic feel, you could use a small pretzel stick pushed into the base of the cupcake before frosting to create a ‘trunk’ effect.
- Dietary Adaptations: For those with dietary restrictions, this recipe is remarkably adaptable. Gluten-free flour blends work beautifully, and dairy-free milk and butter alternatives can be used without compromising on flavor or texture, ensuring everyone can enjoy these delightful treats.
So, my friends, I truly encourage you to step into your kitchen and give this recipe a whirl. Don’t just admire the photos; experience the joy of baking these fantastic holiday delights for yourself. The satisfaction of seeing your own beautifully crafted Christmas Tree Cupcakes come to life is immense, and the smiles they bring to faces around you are truly priceless. I am confident that once you try this recipe, it will become a cherished part of your holiday baking repertoire, a go-to treat that everyone looks forward to. I can’t wait to hear about your experiences! Please, do share your baking adventures, your delicious creations, and any fantastic variations you come up with. Tag me if you post them online or drop a comment below. Your feedback and photos inspire me and our entire community of enthusiastic bakers. Happy baking, and happy holidays!
Festive Christmas Tree Cupcakes
Christmas Tree Cupcakes are here to sprinkle some festive magic into your holiday celebrations, transforming simple treats into edible works of art. These charming cupcakes embody the warmth of shared family moments and the exciting anticipation of decorating, perfect for any holiday gathering.
Ingredients
Instructions
Important Information
Nutrition Facts (Per Serving)
It is important to consider this information as approximate and not to use it as definitive health advice.
Allergy Information
Please check ingredients for potential allergens and consult a health professional if in doubt.

Leave a Comment