
Feta Spring Flatbreads: Your New Go-To for Effortless Elegance and Vibrant Flavor!
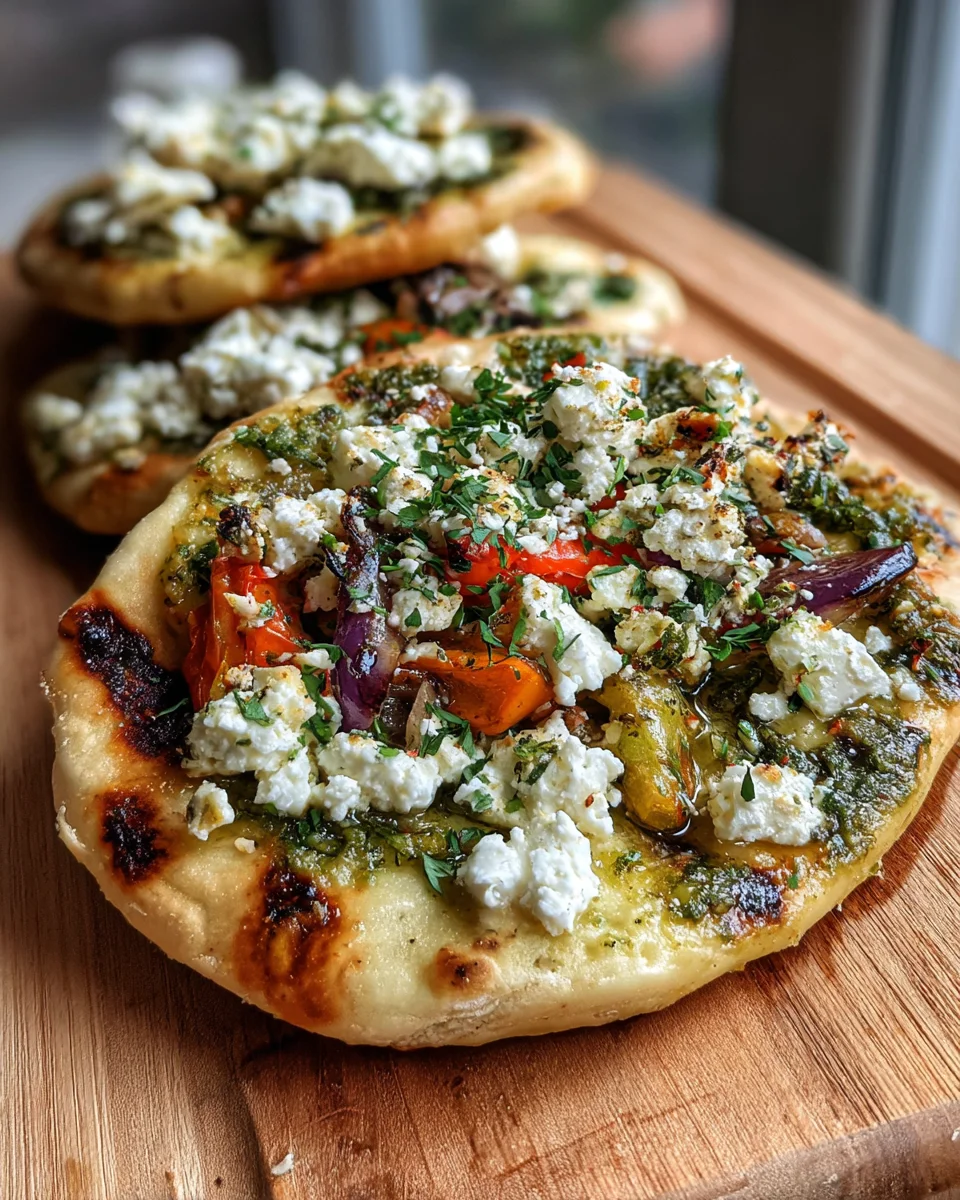
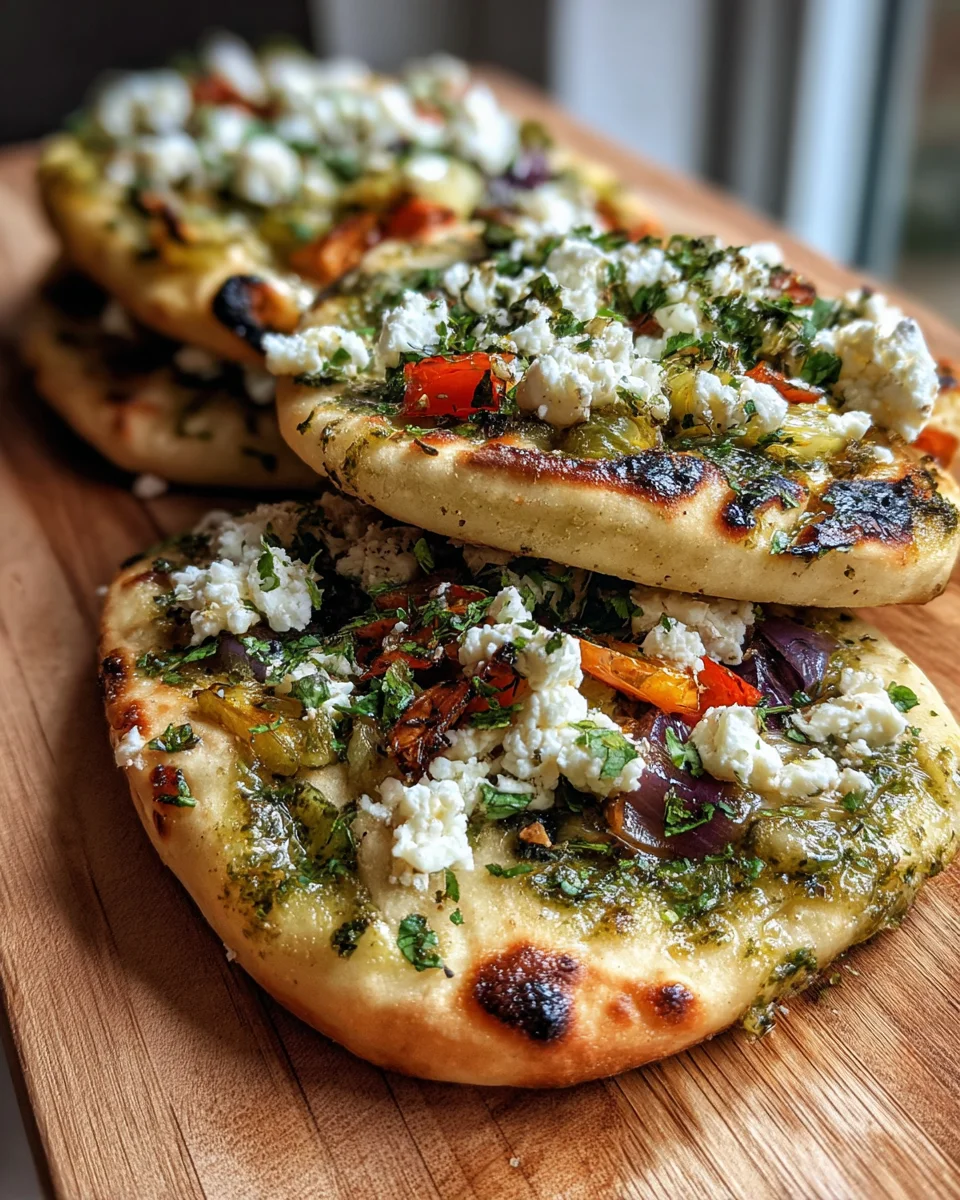
Feta Spring Flatbreads are about to become your new go-to recipe for effortless elegance and vibrant flavor. Imagine a golden, lightly charred flatbread, generously topped with creamy, tangy feta, crisp fresh spring vegetables, and fragrant herbs, all coming together in a symphony of tastes and textures. This dish isn’t just a meal; it’s a celebration of seasonal produce, perfect for a quick weeknight dinner or a delightful weekend brunch. I am absolutely thrilled to introduce you to this simple yet spectacular creation!
Historically, flatbreads have graced tables across the Mediterranean and Middle East for centuries, serving as the beloved foundation for countless delicious toppings and shared meals. Our modern rendition, these delightful Feta Spring Flatbreads, pays homage to that rich tradition while infusing it with the bright, refreshing essence of spring. I’ve found that people absolutely adore this dish because of its incredible versatility and how quickly it transforms simple ingredients into something truly extraordinary. The salty tang of the feta perfectly complements the sweetness of seasonal produce like peas or asparagus, while the chewy flatbread provides the ideal canvas. It’s truly a testament to how fresh, quality ingredients can elevate a meal from ordinary to unforgettable. I’m excited for you to experience the joy of preparing and savoring these.
Ingredients:
-
For the Feta Spring Flatbread Dough:
- All-Purpose Flour: 3 cups (about 360g), plus extra for dusting. I always recommend using a good quality unbleached flour for the best texture in your Feta Spring Flatbreads.
- Instant Yeast: 1 teaspoon. If you’re using active dry yeast, you’ll need to activate it in warm water first; otherwise, instant yeast can be mixed directly with the dry ingredients.
- Granulated Sugar: 1 teaspoon. This isn’t just for sweetness; it feeds the yeast and helps with browning.
- Fine Sea Salt: 1 teaspoon. Essential for flavor balance and controlling yeast activity.
- Warm Water: 1 cup (about 240ml), ideally between 105-115°F (40-46°C). Too hot will kill the yeast, too cold won’t activate it.
- Olive Oil: 2 tablespoons, plus more for greasing the bowl and pan. A good quality extra virgin olive oil adds a lovely richness and flavor to the dough of our Feta Spring Flatbreads.
-
For the Spring Feta Filling:
- Fresh Spinach: 5 ounces (about 140g), thoroughly washed and dried. You can use frozen spinach, but make sure to thaw and squeeze out all excess water.
- Frozen Peas: 1 cup (about 150g), thawed. These bring a burst of sweetness and vibrant green to our spring filling.
- Feta Cheese: 6 ounces (about 170g), preferably good quality Greek feta packed in brine, crumbled. The saltiness and tang of the feta are what truly make these Feta Spring Flatbreads sing!
- Spring Onions (Scallions): 3-4, thinly sliced, white and light green parts. These offer a mild oniony bite.
- Fresh Dill: 2 tablespoons, finely chopped. Dill is a classic pairing with feta and adds incredible freshness.
- Fresh Mint: 1 tablespoon, finely chopped. A touch of mint elevates the “spring” aspect of our flatbreads beautifully.
- Lemon Zest: 1 teaspoon, from one small lemon. Brightens all the flavors in the filling.
- Black Pepper: 1/2 teaspoon, freshly ground, or to taste.
- Red Pepper Flakes (Optional): 1/4 teaspoon, for a little kick.
- Extra Virgin Olive Oil: 1 tablespoon, for coating the vegetables.
-
For Serving:
- Extra Virgin Olive Oil: For drizzling.
- Lemon Wedges: For squeezing.
- Additional Fresh Herbs: Such as dill or parsley, for garnish.
Making the Flatbread Dough
- Activate the Yeast (if using active dry): In a large mixing bowl or the bowl of a stand mixer, combine the warm water (105-115°F), sugar, and instant yeast. Give it a gentle stir and let it sit for about 5-10 minutes. You should see a foamy layer forming on the surface, which indicates that your yeast is active and ready to make some beautiful Feta Spring Flatbreads. If you’re using instant yeast, you can technically skip this step and mix it directly with the flour, but I find a quick bloom ensures everything is working perfectly.
- Combine Dry Ingredients: To the yeast mixture (or directly to the flour if using instant yeast without blooming), add the all-purpose flour and fine sea salt. I always add salt at this stage; never directly on top of the yeast, as it can inhibit its activity. This combination forms the backbone of our dough, giving these Feta Spring Flatbreads their delightful texture.
- Mix and Knead the Dough: Pour in the 2 tablespoons of olive oil. Using a stand mixer with a dough hook attachment, mix on low speed for 2 minutes until the ingredients come together into a shaggy dough. If mixing by hand, use a sturdy spoon or your hands. Increase the speed to medium-low and knead for about 7-10 minutes until the dough becomes smooth, elastic, and pulls away from the sides of the bowl. If kneading by hand, turn the dough out onto a lightly floured surface and knead with the heel of your hand, pushing and folding, until it reaches the desired consistency. The dough for these Feta Spring Flatbreads should feel soft and pliable, not sticky. Don’t be tempted to add too much extra flour during kneading unless it’s truly unmanageable sticky, as this can make the flatbreads tough.
- First Rise (Bulk Fermentation): Lightly grease a clean large bowl with a little olive oil. Place the kneaded dough in the bowl, turning it once to coat all sides with oil. This prevents it from drying out. Cover the bowl tightly with plastic wrap or a clean kitchen towel. Find a warm, draft-free spot in your kitchen (perhaps a slightly warmed oven that’s turned off, or a sunny windowsill) and let the dough rise for 1 to 1.5 hours, or until it has doubled significantly in size. This first rise is crucial for developing the flavor and texture of your flatbreads, so don’t rush it! A good rise ensures light and airy Feta Spring Flatbreads.
- Punch Down and Divide: Once the dough has doubled, gently punch it down to release the air. This step helps redistribute the yeast and creates a finer crumb structure. Turn the dough out onto a lightly floured surface and divide it into 6-8 equal portions. I usually aim for 8 for slightly smaller, more manageable flatbreads, but 6 will give you larger ones. Roll each portion into a smooth ball. Cover the dough balls loosely with a clean kitchen towel to prevent them from drying out while you prepare the filling.
Preparing the Spring Feta Filling
- Prepare the Spinach: If using fresh spinach, ensure it’s thoroughly washed and dried. Excess water will make your filling soggy, which we definitely want to avoid for our Feta Spring Flatbreads. Roughly chop the spinach. If using frozen, thaw it completely and squeeze out as much water as you possibly can using a clean kitchen towel or paper towels.
- Prepare the Peas: If using frozen peas, simply thaw them under cold running water or by letting them sit at room temperature for a few minutes. If using fresh peas, you might want to quickly blanch them in boiling water for 1-2 minutes, then shock them in ice water to maintain their vibrant color and stop the cooking, though this isn’t strictly necessary. Drain them well.
- Chop the Aromatics and Herbs: Thinly slice your spring onions, finely chop the fresh dill, and finely chop the fresh mint. Zest your lemon, being careful to only get the yellow part and avoid the bitter white pith. The combination of these fresh “spring” ingredients is what gives our Feta Spring Flatbreads their unique character.
- Crumble the Feta: If your feta comes in a block, crumble it into small pieces with your fingers. I always recommend using a good quality Greek feta in brine for the best flavor and texture; pre-crumbled feta can sometimes be drier and less flavorful.
- Combine the Filling Ingredients: In a large mixing bowl, combine the chopped spinach, thawed peas, sliced spring onions, chopped dill, chopped mint, lemon zest, crumbled feta cheese, freshly ground black pepper, and optional red pepper flakes. Drizzle with 1 tablespoon of extra virgin olive oil. Gently toss all the ingredients together until they are well combined. Taste the filling at this stage! This is your chance to adjust the seasoning. You likely won’t need to add salt because the feta is quite salty, but a little more pepper or lemon zest can really brighten things up. This vibrant, fresh mixture is going to be the heart of your delicious Feta Spring Flatbreads.
Assembling Your Feta Spring Flatbreads
- Roll Out the Dough: On a lightly floured surface, take one of your dough balls. Using a rolling pin, roll it out into a circle or oval shape, approximately 6-8 inches in diameter and about 1/8 to 1/4 inch thick. Aim for an even thickness so it cooks uniformly.
- Add the Filling: Place a generous spoonful (about 2-3 tablespoons) of the spring feta filling onto one half of the rolled-out dough, leaving a small border (about 1/2 inch) around the edge. Make sure not to overfill, as this can make sealing difficult and might cause the flatbread to burst during cooking. Distribute the filling evenly to ensure every bite of your Feta Spring Flatbreads is flavorful.
- Seal the Flatbread: Carefully fold the empty half of the dough over the filling to create a half-moon shape. Gently press down on the edges to seal them. You can use your fingers to crimp the edges, or for a more secure seal, use the tines of a fork to press down all around the border. A good seal is important to keep all that delicious filling inside!
- Gently Flatten (Optional but Recommended): Once sealed, you can very gently pat or lightly roll the filled flatbread with your rolling pin to slightly flatten it again, being careful not to push too hard and burst the seams. This helps to distribute the filling evenly and ensures a consistent cooking time.
- Repeat: Continue this process with the remaining dough balls and filling. As you assemble them, place the filled flatbreads on a lightly floured baking sheet or parchment paper, covered loosely with a kitchen towel, to prevent them from sticking and drying out while you prepare the others.
Cooking the Flatbreads
- Heat the Pan: Heat a large, heavy-bottomed skillet or cast-iron pan over medium-high heat. I personally prefer a cast-iron skillet because it retains heat so well and gives a beautiful crust, which is perfect for our Feta Spring Flatbreads. Once hot, add a very small amount of olive oil (about 1/2 teaspoon) and swirl to coat the bottom, or you can cook them dry if you prefer a less oily finish. You want the pan hot enough to get a good sizzle but not so hot that the flatbreads burn before cooking through.
- Cook the First Side: Carefully place one or two of the assembled Feta Spring Flatbreads into the hot pan, depending on the size of your skillet – avoid overcrowding! Cook for 3-5 minutes, or until the bottom is beautifully golden brown and you see some bubbles forming on the top surface. The exact timing will depend on your stove and pan, so keep an eye on them.
- Flip and Cook the Second Side: Using a spatula, carefully flip the flatbreads over. Cook for another 3-5 minutes on the second side, until it also turns golden brown and the flatbread feels cooked through. You might notice the flatbread puffing up slightly; this is a good sign that steam is building inside and cooking the dough evenly. Press down gently with your spatula occasionally to ensure even contact with the pan and help them cook all the way through.
- Internal Doneness: The key to perfectly cooked Feta Spring Flatbreads is ensuring the dough is cooked through. If they are browning too quickly, reduce the heat slightly. They should be tender on the inside with a slightly crispy exterior.
- Repeat and Keep Warm: Remove the cooked flatbreads from the pan and place them on a plate. You can cover them loosely with foil or a clean kitchen towel to keep them warm while you cook the remaining flatbreads. Add a tiny bit more oil to the pan between batches if needed.
Serving Suggestions
- Immediate Enjoyment: Serve your delicious Feta Spring Flatbreads immediately while they are still warm! They are truly best enjoyed fresh from the pan.
- The Finishing Touch: Before serving, I love to drizzle each flatbread with a little extra virgin olive oil. The robust flavor of a good quality olive oil truly enhances the spring flavors and feta.
- A Squeeze of Zest: A fresh squeeze of lemon juice over the top just before eating is highly recommended; it adds another layer of brightness and really makes the flavors pop.
- Garnish: Garnish with a sprinkle of fresh dill or parsley for an extra touch of freshness and visual appeal. These Feta Spring Flatbreads are perfect on their own as a light meal, snack, or even a side dish.
- Pairing Ideas: They also pair wonderfully with a simple green salad, a dollop of Greek yogurt, or a light cucumber and tomato salad. Enjoy every flavorful bite of these wonderful Feta Spring Flatbreads!
Conclusion:
And there you have it, my friends! We’ve reached the delicious finale of our culinary journey with this truly exceptional recipe. If you’re looking for a dish that effortlessly marries vibrant flavors with incredible ease of preparation, then allow me to wholeheartedly declare that these Feta Spring Flatbreads are an absolute, undeniable must-try. Seriously, this isn’t just another meal; it’s an experience waiting to happen in your kitchen. I’ve found myself turning to this recipe time and time again, especially when I crave something fresh, satisfying, and bursting with the essence of the season. It’s the kind of food that brightens your plate and your mood, making it perfect for anything from a casual weeknight dinner to a sophisticated brunch spread or even a charming appetizer for your next gathering. The combination of salty feta, crisp spring vegetables, and a perfectly cooked flatbread base creates a symphony of textures and tastes that is genuinely addictive. It’s light yet filling, refreshing yet comforting, and above all, incredibly rewarding to create.
Serving Up Perfection: More Than Just a Meal
One of the many beauties of these magnificent flatbreads is their incredible versatility when it comes to serving. For a light lunch or dinner, I often serve them alongside a simple, crisp green salad dressed with a bright lemon vinaigrette – the fresh acidity beautifully cuts through the richness of the feta. If you’re feeling a little more adventurous, a vibrant Greek salad with Kalamata olives and cucumber would be a sensational pairing, echoing the Mediterranean vibes of the flatbreads themselves. They also make an absolutely stellar appetizer! Just slice them into smaller wedges or squares, arrange them artfully on a platter, and watch them disappear. I’ve found they’re fantastic for entertaining because they can be made slightly ahead of time and served warm or at room temperature, making your hosting duties a breeze. Don’t forget about brunch! Imagine these warm flatbreads alongside perfectly poached eggs, perhaps with a dollop of creamy Greek yogurt or homemade tzatziki. For a truly elevated experience, consider pairing them with a chilled glass of crisp Sauvignon Blanc or a light, refreshing rosé; the fruit and acidity will complement the savory notes of the feta and herbs beautifully. And for those warmer days, a tall glass of sparkling water infused with mint and lemon makes for a delightful and invigorating non-alcoholic accompaniment.
Endless Possibilities: Get Creative with Your Flatbreads
But wait, there’s more! Part of the joy of cooking is making a recipe your own, and these Feta Spring Flatbreads are incredibly adaptable. While the recipe as written is truly fantastic, don’t hesitate to experiment with variations to suit your taste or what you have on hand. Love more veggies? Feel free to add thinly sliced asparagus spears, a handful of fresh spinach, or even some roasted bell peppers for extra sweetness. If you’re not a fan of feta (though I truly hope you are!), goat cheese offers a lovely tangy alternative, while a sprinkle of fresh mozzarella or even crumbled halloumi could introduce a different texture and flavor profile. For a heartier meal, you could easily add some cooked, shredded chicken, grilled shrimp, or even crumbled lamb sausage to the topping before baking. Imagine a touch of spice by adding a pinch of red pepper flakes, or exploring different herbs like fresh dill, oregano, or marjoram for a new aromatic dimension. For those seeking a vegan option, there are now many fantastic plant-based feta alternatives that would work wonderfully, ensuring everyone can enjoy this delightful dish. You can even experiment with different flatbread bases – pita bread, naan, or even homemade pizza dough can serve as an excellent canvas for these incredible flavors. The possibilities are genuinely endless, and I encourage you to embrace your inner culinary artist!
So, my dear readers, if you take one piece of advice from me today, let it be this: please, please give these Feta Spring Flatbreads a try. They are straightforward to make, incredibly rewarding, and guaranteed to bring a burst of fresh flavor to your table. Don’t just read about them; go ahead and experience the magic for yourself! I truly believe you’ll be as smitten with them as I am. And once you’ve whipped up your own batch of this delightful creation, I would absolutely love to hear about your experience. What variations did you try? Who did you share them with? Your culinary adventures inspire me and our entire community. So, grab your apron, gather those gorgeous spring ingredients, and get cooking! I can’t wait to hear all about it!
Feta Spring Flatbreads
Effortless and vibrant, these Feta Spring Flatbreads feature a golden, lightly charred flatbread topped with creamy feta, fresh spring vegetables, and fragrant herbs. Perfect for a quick weeknight dinner or delightful weekend brunch.
Ingredients
Instructions
Important Information
Nutrition Facts (Per Serving)
It is important to consider this information as approximate and not to use it as definitive health advice.
Allergy Information
Please check ingredients for potential allergens and consult a health professional if in doubt.


Leave a Comment