
Frozen Yogurt Bites
Oh boy, do I have a treat for you today! Frozen Yogurt Bites are my absolute go-to when I’m craving something sweet, refreshing, and incredibly easy to whip up. Forget the complicated desserts; these little gems are here to save your day (and your sweet tooth!) without all the fuss or the guilt. What makes them so special? Well, for starters, they’re brilliantly simple, requiring just a handful of ingredients and minimal effort, making them perfect for busy bees like us.
I just know you’re going to fall head over heels for these Frozen Yogurt Bites because they’re the ultimate healthy indulgence. They hit that perfect sweet and tangy note, are wonderfully cool, and let’s be honest, they just feel good to eat! Plus, they’re ridiculously customizable, so you can truly make them your own with whatever fruits or toppings your heart desires. Imagine a grab-and-go snack that’s packed with the goodness of yogurt and fruit, satisfying your cravings in the most delightful way.
So, what exactly are we diving into? We’re talking about delightful, bite-sized frozen drops of creamy yogurt, often sweetened with a touch of honey or maple syrup, and studded with your favorite fresh fruits. They harden into perfect little nuggets of joy in the freezer, ready to be popped whenever you need a quick, healthy burst of flavor. Get ready to discover your new favorite snack!
Ingredient Notes
Creating delicious Frozen Yogurt Bites starts with understanding the star ingredients and knowing how to make them work for you. These bites are wonderfully simple, relying on just a few key components to deliver a refreshing, healthy treat.
The Yogurt Base
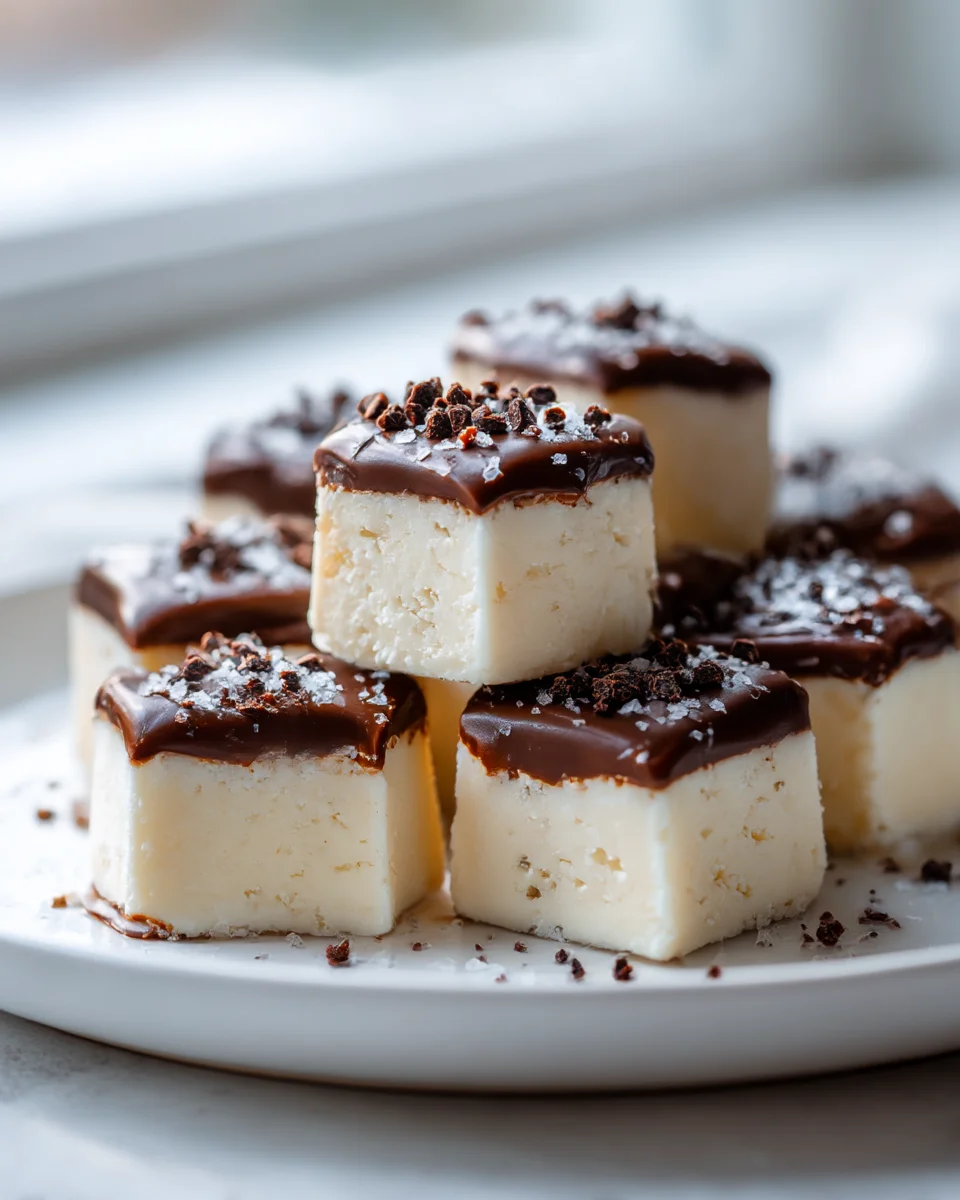
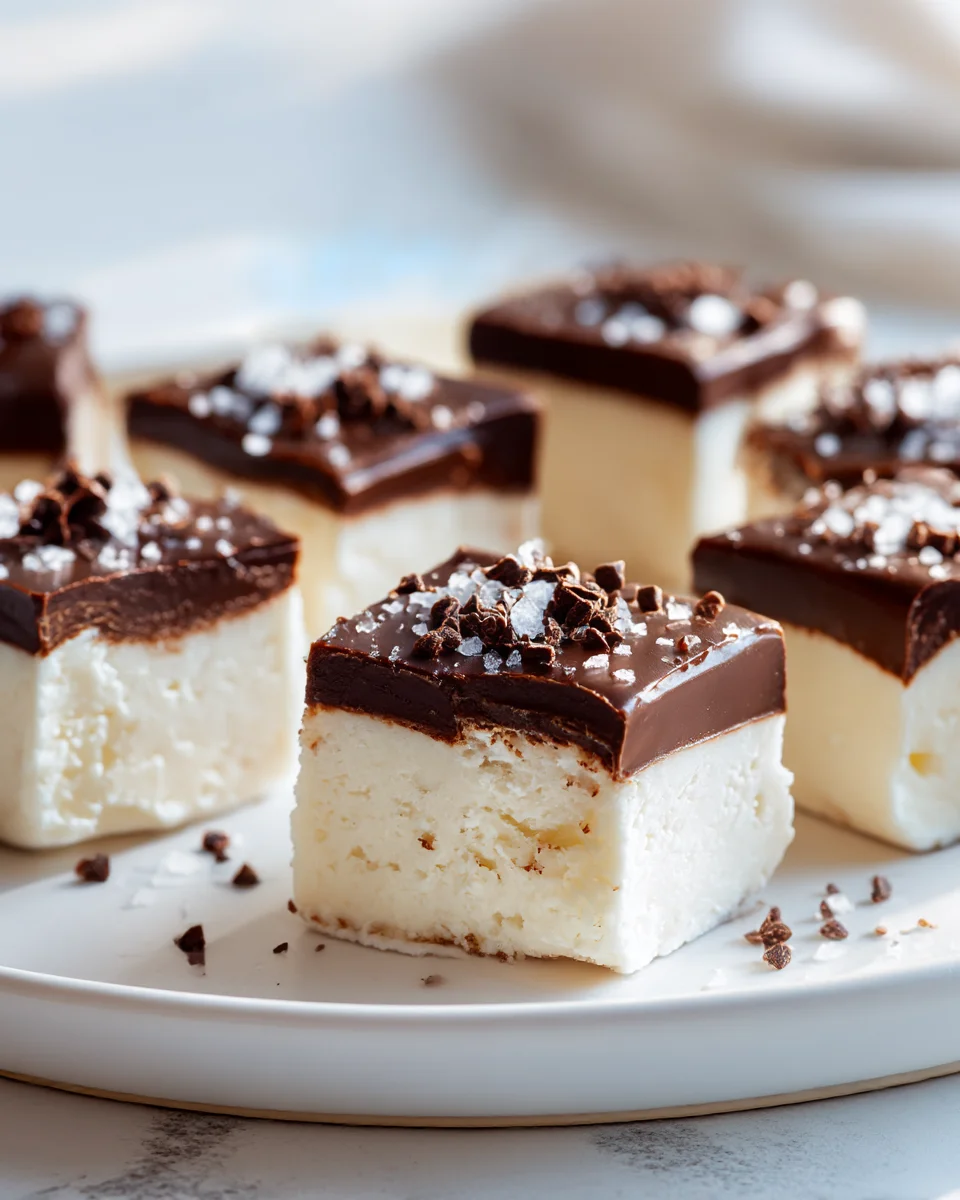
- Greek Yogurt: This is my absolute go-to for Frozen Yogurt Bites! Its thick, creamy consistency is paramount. It freezes beautifully, resulting in a firm yet smooth bite that isn’t icy. I prefer full-fat Greek yogurt for the richest flavor and best texture, but 2% will also work well. Avoid non-fat if possible, as it tends to be icier when frozen.
- Substitutions: If you’re dairy-free, don’t worry! Unsweetened plain dairy-free yogurts made from almond, coconut, or soy milk can be excellent alternatives. Just ensure they are thick varieties, similar to Greek yogurt, to prevent an overly icy texture. Regular, thinner yogurt can be used in a pinch, but the bites might be a bit softer and melt quicker; draining some of the liquid beforehand can help.
Sweeteners
- Maple Syrup or Honey: These are my preferred natural liquid sweeteners. They blend seamlessly into the yogurt and add a lovely depth of flavor without being overpowering. The amount you use will depend entirely on your personal sweetness preference and the tartness of your yogurt.
- Substitutions: Agave nectar is another fantastic liquid sweetener option. For a refined sugar-free approach, consider mashing a ripe banana into the yogurt for sweetness and extra fruitiness. If using a granulated sugar, make sure to dissolve it completely in the yogurt mixture to avoid a gritty texture.
Flavorful Mix-ins and Toppings
This is where the fun truly begins! The possibilities are endless, allowing you to customize your Frozen Yogurt Bites to your heart’s content.
- Fresh or Frozen Berries: Strawberries, blueberries, raspberries, and blackberries are absolute winners. I love chopping them into small pieces or mashing them slightly to create a ripple effect. If using frozen, let them thaw slightly and pat dry to avoid excess moisture.
- Fruit Purees: For a smoother flavor, blend fresh fruit into a puree and swirl it into the yogurt mixture.
- Chocolate Chips or Cacao Nibs: Mini chocolate chips work best, especially dark chocolate for a sophisticated twist. Cacao nibs add a delightful crunch and bitterness.
- Granola: A sprinkle of your favorite granola can add a wonderful textural contrast.
- Chopped Nuts: Almonds, walnuts, or pecans add healthy fats and a satisfying crunch.
- Vanilla Extract: A splash of good quality vanilla extract always enhances the overall flavor profile.
- Optional Flavorings: Lemon zest for brightness, a pinch of cinnamon, or even a drop of food-grade essential oil (like peppermint) can elevate your bites.
Step-by-Step Instructions
Making Frozen Yogurt Bites is incredibly straightforward, perfect for a quick project with kids or a simple treat to whip up for yourself. Follow these steps for perfect, refreshing bites every time!
Step 1: Prepare Your Yogurt Base
- In a medium-sized bowl, combine the Greek yogurt, your chosen sweetener (maple syrup or honey), and vanilla extract.
- Stir everything together thoroughly until the mixture is smooth and the sweetener is fully incorporated. Taste it and adjust the sweetness if desired. Remember, flavors can dull slightly when frozen, so you might want it a tiny bit sweeter than you prefer when fresh.
Step 2: Incorporate Your Mix-ins
- Gently fold in your chosen mix-ins. If you’re using chopped fruits, nuts, or chocolate chips, now’s the time to add them. If you prefer a swirled effect, add them in the next step when forming the bites.
- For fruit purees, you can either stir them in completely for a uniform color and flavor, or spoon dollops into the yogurt and gently swirl with a knife or skewer for a marbled look.
Step 3: Form Your Bites
You have a few options for shaping your Frozen Yogurt Bites, depending on your preference and what you have on hand:
- Method 1: Spooning onto Parchment Paper:
- Line a baking sheet or a large plate with parchment paper or a silicone baking mat.
- Using a small spoon (a teaspoon works well), drop spoonfuls of the yogurt mixture onto the lined surface. Aim for uniform sizes, roughly 1 to 1.5 inches in diameter. Leave a little space between each bite.
- If you want to add toppings like extra berries, granola, or sprinkles, do so now, gently pressing them into the top of each yogurt dollop.
- Method 2: Using Silicone Molds:
- Silicone molds (like mini muffin molds, candy molds, or even ice cube trays) are excellent for perfectly shaped bites.
- Spoon or pipe the yogurt mixture into each cavity, filling it almost to the top.
- Add any desired toppings on top of the yogurt in the molds.
- Method 3: Piping Bag for Precision:
- For more precise, uniform bites, transfer the yogurt mixture to a piping bag (or a sturdy resealable plastic bag with a corner snipped off).
- Pipe small rounds onto a parchment-lined baking sheet. This method gives you more control over the size and shape.
Step 4: Freeze Until Solid
- Carefully transfer the baking sheet or silicone molds to the freezer.
- Freeze for at least 2-3 hours, or until the bites are completely firm and frozen solid. The exact time will depend on the size of your bites and the temperature of your freezer.
Step 5: Store and Enjoy
- Once fully frozen, carefully peel the Frozen Yogurt Bites off the parchment paper or pop them out of the silicone molds.
- Transfer them immediately to an airtight freezer-safe container for storage.
- Enjoy them straight from the freezer for a refreshing, healthy snack!
Tips & Suggestions
To ensure your Frozen Yogurt Bites are the best they can be, and to explore fun variations, here are some of my top tips and suggestions:
- Choose the Right Yogurt: I can’t stress this enough – Greek yogurt is truly your best friend for this recipe. Its natural thickness minimizes ice crystal formation, giving you a smoother, creamier bite. If your yogurt is too thin, the bites will be more icy and less satisfying.
- Don’t Overfill: Whether you’re spooning onto parchment or using molds, avoid making the bites too large. Smaller bites freeze faster and are easier to eat, especially for kids. About 1 to 1.5 inches in diameter is ideal.
- Flat Freezing Surface: Always place your baking sheet or molds on a flat, level surface in the freezer. This prevents the yogurt from shifting or spilling before it sets.
- Layering with Parchment: When storing multiple layers of bites in a container, place a sheet of parchment paper between each layer. This prevents them from sticking together and makes it easy to grab just a few at a time.
- Flavor Combinations are Key: Get creative!
- Lemon & Blueberry: Mix lemon zest into the yogurt base and swirl in blueberry puree or small pieces of fresh blueberries.
- Strawberry & Banana: Mash ripe banana into the yogurt for natural sweetness, then swirl in chopped strawberries.
- Chocolate Peanut Butter: Swirl a tablespoon of natural peanut butter into the yogurt, then sprinkle with mini chocolate chips.
- Tropical Twist: Add finely diced mango or pineapple pieces, perhaps with a hint of coconut extract.
- Kid-Friendly Fun: This is a fantastic recipe to get children involved in the kitchen! Let them help choose the mix-ins, spoon the yogurt onto the parchment, or sprinkle on colorful sprinkles for an extra festive touch.
- Quick Thaw Reminder: Frozen Yogurt Bites melt relatively quickly, especially in warm hands or weather. Serve them immediately after taking them out of the freezer.
- Avoid Too Much Liquid: If adding very juicy fruits, try to pat them dry slightly first or use them sparingly. Excess moisture can lead to icier bites.
- Consider a Quick Dip: For a decadent touch, once your bites are frozen, you can quickly dip them halfway into melted chocolate (mix with a tiny bit of coconut oil for smoother melting) and refreeze until the chocolate sets.
Storage
Proper storage is crucial for keeping your Frozen Yogurt Bites fresh, delicious, and easy to grab whenever a craving strikes. They are meant to be enjoyed straight from the freezer!
Airtight is Essential
- Always transfer your completely frozen yogurt bites to an airtight, freezer-safe container. This is the most important step for long-term storage.
- An airtight container prevents freezer burn, which can make your bites develop an unpleasant icy texture and lose their fresh flavor.
Prevent Sticking
- If you’re storing more than one layer of bites in your container, place a piece of parchment paper or wax paper between each layer. This ensures they don’t stick together, making it simple to pull out just a few without having to pry apart a frozen block.
Freezer Life
- Frozen Yogurt Bites will keep beautifully in the freezer for up to 2-3 weeks. Beyond that, while still safe to eat, their texture and flavor might start to degrade slightly due to prolonged freezing.
Serving
- These bites are designed to be eaten directly from the freezer. Do not let them thaw completely, as they will become soft and lose their distinct “bite” texture.
- They melt quickly at room temperature, so be prepared to enjoy them shortly after removing them from the freezer. They make a fantastic, quick cool-down snack!
Final Thoughts
And there you have it! I truly believe that these Frozen Yogurt Bites are more than just a simple snack; they’re a delightful revelation. They’re incredibly easy to whip up, requiring minimal effort for maximum reward. What I love most is how effortlessly they combine health and indulgence, making them the perfect guilt-free treat for any time of day.
Whether you’re looking for a quick cool-down, a kid-friendly snack, or a refreshing dessert that won’t weigh you down, these Frozen Yogurt Bites tick all the boxes. Their customizable nature means you can experiment with endless fruit combinations, making each batch uniquely yours. I promise, once you try these little gems, they’ll become a staple in your freezer. Go ahead, give them a whirl – your taste buds (and your family) will thank you!

Leave a Comment