
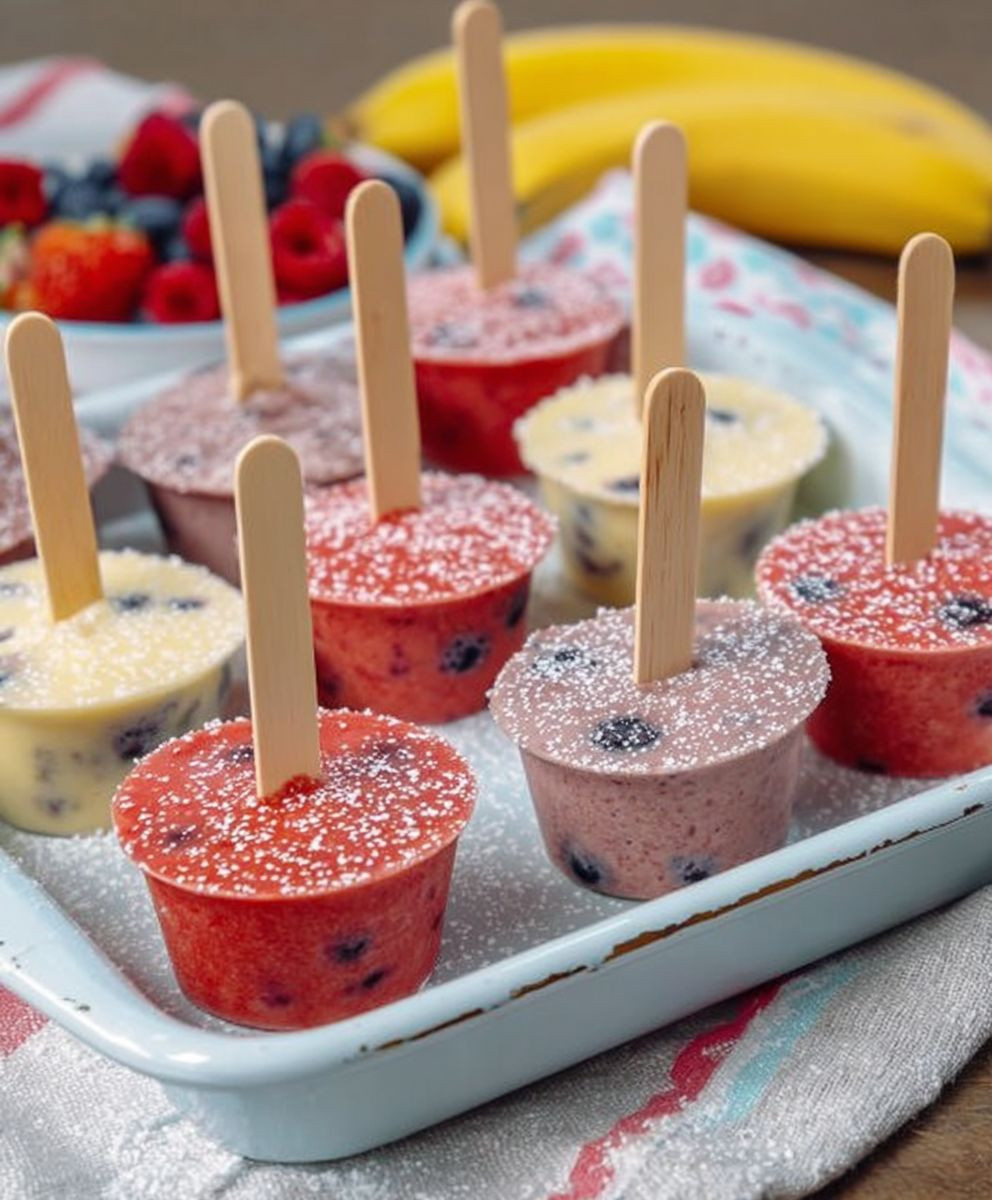
Frozen Yogurt Pops: the ultimate guilt-free summer treat that will have you saying goodbye to store-bought popsicles forever! Are you ready to ditch the artificial flavors and sky-high sugar content of commercial pops and embrace a refreshing, customizable delight that’s both healthy and incredibly delicious? I know I am!
While the exact origins of frozen desserts are debated, the concept of freezing yogurt and enjoying it on a stick is a relatively modern invention, gaining popularity alongside the rise of health-conscious eating. It’s a brilliant way to enjoy the creamy tang of yogurt in a fun, portable format, especially during those sweltering summer months.
What makes Frozen Yogurt Pops so irresistible? It’s the perfect combination of creamy texture, customizable flavors, and the sheer convenience of having a healthy snack ready to go in your freezer. People adore them because they’re a blank canvas for creativity! Add your favorite fruits, a swirl of honey, a sprinkle of granola, or even a drizzle of chocolate – the possibilities are endless. Plus, they’re a fantastic way to sneak in some extra probiotics and calcium, making them a win-win for both kids and adults. So, let’s dive into this simple yet satisfying recipe and create some frozen magic!
Ingredients:
- 4 cups plain Greek yogurt (full-fat or non-fat, your preference!)
- 1 cup fresh or frozen fruit (berries, mango, peaches – get creative!)
- 1/2 cup honey or maple syrup (adjust to your desired sweetness)
- 1 teaspoon vanilla extract (optional, but adds a nice touch)
- 1/4 cup milk or yogurt (if needed to thin the mixture)
- Optional toppings: granola, chocolate chips, shredded coconut, chopped nuts
Preparing the Fruit Puree:
Okay, let’s get started! The first thing we need to do is prepare our fruit. This step is super simple, but it’s crucial for getting that smooth, delicious texture in our frozen yogurt pops.
- If using fresh fruit: Wash your fruit thoroughly. If you’re using larger fruits like peaches or mangoes, peel them and chop them into smaller pieces, about 1-inch chunks. This will help them blend more easily.
- If using frozen fruit: No need to thaw! Frozen fruit actually works great because it helps to thicken the yogurt mixture. Just measure out your cup of frozen fruit.
- Blend the fruit: Place the fruit in a blender or food processor. Pulse a few times to break it down, then blend until it’s completely smooth. You might need to scrape down the sides of the blender a few times to ensure everything is incorporated. If the mixture is too thick, add a tablespoon or two of milk or yogurt to help it blend.
- Taste and adjust: Give the fruit puree a taste. If it’s not sweet enough for you, add a little more honey or maple syrup. Remember, the sweetness will be slightly dulled once it’s frozen, so it’s better to err on the side of being a little too sweet.
Mixing the Yogurt Base:
Now that our fruit puree is ready, let’s move on to the yogurt base. This is where the magic really happens!
- Combine the yogurt, sweetener, and vanilla: In a large bowl, combine the Greek yogurt, honey (or maple syrup), and vanilla extract (if using).
- Whisk until smooth: Use a whisk to thoroughly combine the ingredients. You want to make sure there are no lumps of yogurt and that the sweetener is evenly distributed.
- Adjust the consistency: The yogurt mixture should be thick but pourable. If it’s too thick, add a tablespoon or two of milk or yogurt until it reaches the desired consistency. You want it to be thin enough to easily pour into the popsicle molds, but not so thin that it’s watery.
- Taste and adjust again: Give the yogurt base a taste. Adjust the sweetness as needed. Remember, you can always add more sweetener, but you can’t take it away!
Combining Fruit and Yogurt:
Alright, we’re almost there! Now it’s time to bring the fruit puree and the yogurt base together.
- Gently fold in the fruit puree: Pour the fruit puree into the bowl with the yogurt base. Use a spatula to gently fold the puree into the yogurt. Be careful not to overmix, as this can make the yogurt mixture too thin. You want to see streaks of fruit throughout the yogurt.
- Create swirls (optional): If you want to create a swirled effect in your popsicles, don’t completely mix the fruit puree into the yogurt. Leave some streaks of fruit visible.
Filling the Popsicle Molds:
This is the fun part! Get your popsicle molds ready. I like to use silicone molds because they’re easy to clean and the popsicles release easily, but any type of popsicle mold will work.
- Prepare your molds: Make sure your popsicle molds are clean and dry.
- Pour the mixture into the molds: Carefully pour the yogurt mixture into the popsicle molds, filling them almost to the top. Leave a little bit of space at the top to allow for expansion as the popsicles freeze.
- Add toppings (optional): If you want to add any toppings, such as granola, chocolate chips, shredded coconut, or chopped nuts, now is the time to do it. Sprinkle them on top of the yogurt mixture in the molds.
- Insert popsicle sticks: Insert the popsicle sticks into the center of each mold. Make sure the sticks are securely in place.
Freezing the Popsicles:
Now comes the hardest part: waiting! But trust me, it’s worth it.
- Freeze for at least 4-6 hours: Place the popsicle molds in the freezer and freeze for at least 4-6 hours, or preferably overnight. You want to make sure the popsicles are completely frozen solid.
Releasing the Popsicles:
Finally, the moment we’ve all been waiting for! Time to enjoy our homemade frozen yogurt pops.
- Run the molds under warm water: To release the popsicles from the molds, run the molds under warm water for a few seconds. Be careful not to get the popsicles wet.
- Gently pull out the popsicles: Gently pull on the popsicle sticks to release the popsicles from the molds. If they’re still stuck, run the molds under warm water for a few more seconds.
- Enjoy immediately: Serve the frozen yogurt pops immediately and enjoy!
Tips and Variations:
Here are a few extra tips and ideas to help you customize your frozen yogurt pops:
- Use different fruits: Experiment with different fruits to find your favorite combinations. Some other great options include blueberries, raspberries, strawberries, pineapple, and kiwi.
- Add a layer of jam: For an extra burst of flavor, add a layer of jam to the bottom of the popsicle molds before pouring in the yogurt mixture.
- Make chocolate-covered popsicles: Dip the frozen yogurt pops in melted chocolate and sprinkle with your favorite toppings.
- Use different sweeteners: If you don’t want to use honey or maple syrup, you can use other sweeteners such as agave nectar, stevia, or even granulated sugar. Just be sure to adjust the amount to your desired sweetness.
- Add protein powder: For a protein-packed snack, add a scoop of your favorite protein powder to the yogurt mixture.
- Make them vegan: Use a plant-based yogurt alternative, such as coconut yogurt or almond yogurt, to make these popsicles vegan.
- Layer different flavors: Create layered popsicles by freezing one flavor of yogurt mixture, then adding another layer of a different flavor and freezing again.
Storage:
Store any leftover frozen yogurt pops in the freezer in an airtight container or freezer bag. They will keep for several weeks.

Conclusion:
This isn’t just another frozen treat; it’s a passport to pure, unadulterated summer joy! These Frozen Yogurt Pops are a must-try because they’re incredibly easy to make, bursting with fresh flavor, and a healthy alternative to store-bought popsicles loaded with artificial ingredients. Seriously, you’ll be amazed at how simple it is to whip up a batch of these refreshing delights. Forget complicated recipes and long ingredient lists – this one is all about simplicity and deliciousness.
But the real magic lies in the versatility. While the base recipe is fantastic as is, the possibilities for customization are endless! Feeling fruity? Add chunks of your favorite berries, like strawberries, blueberries, or raspberries. Want something a little more decadent? Swirl in some peanut butter or chocolate chips before freezing. For a tropical twist, try mango and pineapple. And if you’re feeling adventurous, a sprinkle of toasted coconut or a drizzle of honey can elevate these pops to a whole new level.
Serving suggestions? Oh, we’ve got you covered! These Frozen Yogurt Pops are perfect for a hot summer afternoon, a post-workout snack, or even a light and refreshing dessert. Serve them straight from the freezer for a cool and creamy treat. For a fun presentation, dip the finished pops in melted chocolate and sprinkle with your favorite toppings. They’re also a hit at parties and gatherings – kids and adults alike will love them! Imagine serving these at your next barbecue – instant crowd-pleaser!
And don’t think these are just for kids! Adults can enjoy them too, perhaps with a splash of rum or vodka for a grown-up twist. Think of a sophisticated strawberry daiquiri, but in popsicle form! Or maybe a creamy coconut and pineapple pop with a hint of rum – the possibilities are truly endless.
I truly believe that once you try this recipe, you’ll be hooked. It’s the perfect way to beat the heat and enjoy a healthy and delicious treat. Plus, it’s a great way to get creative in the kitchen and experiment with different flavors and combinations.
So, what are you waiting for? Grab your ingredients, dust off your popsicle molds, and get ready to create some frozen magic! I’m confident that you’ll love these Frozen Yogurt Pops as much as I do.
And most importantly, I want to hear about your experience! Did you try the recipe? What variations did you create? What were your favorite flavor combinations? Share your photos and stories in the comments below! I can’t wait to see what delicious creations you come up with. Let’s spread the joy of homemade frozen treats together! Happy popsicle-making! I am sure you will enjoy this recipe and make it your own. Don’t forget to tag me in your social media posts so I can see your creations!
Frozen Yogurt Pops: The Ultimate Guide to Homemade Treats
Cool off with these easy and delicious homemade frozen yogurt pops! Customize with your favorite fruits and toppings for a healthy and refreshing treat.
Ingredients
Instructions
Recipe Notes
- Fruit Variations: Experiment with different fruits like blueberries, raspberries, strawberries, pineapple, or kiwi.
- Jam Layer: Add a layer of jam to the bottom of the molds for extra flavor.
- Chocolate Covered: Dip frozen pops in melted chocolate and sprinkle with toppings.
- Sweetener Alternatives: Use agave nectar, stevia, or granulated sugar instead of honey/maple syrup.
- Protein Boost: Add a scoop of protein powder to the yogurt mixture.
- Vegan Option: Use plant-based yogurt like coconut or almond yogurt.
- Layered Flavors: Freeze one flavor, then add another layer of a different flavor.
- Storage: Store leftover popsicles in an airtight container or freezer bag for several weeks.

Leave a Comment