
Pistachio Mascarpone Layer Cake Recipe is a celebration of flavor and elegance, perfect for any occasion that calls for a delightful dessert. Imagine the delightful combination of creamy mascarpone cheese and the nutty crunch of pistachios, layered into a stunning cake that not only looks breathtaking but also tastes heavenly. This recipe has roots in traditional Italian desserts, where rich flavors and textures come together harmoniously. It’s no wonder that the Pistachio Mascarpone Layer Cake Recipe has become a favorite among dessert lovers, as it captivates the senses and adds a touch of sophistication to any gathering. Whether you’re serving it at a birthday party, a family gathering, or simply treating yourself, this cake is sure to impress.
What Is Pistachio Mascarpone Layer Cake Recipe
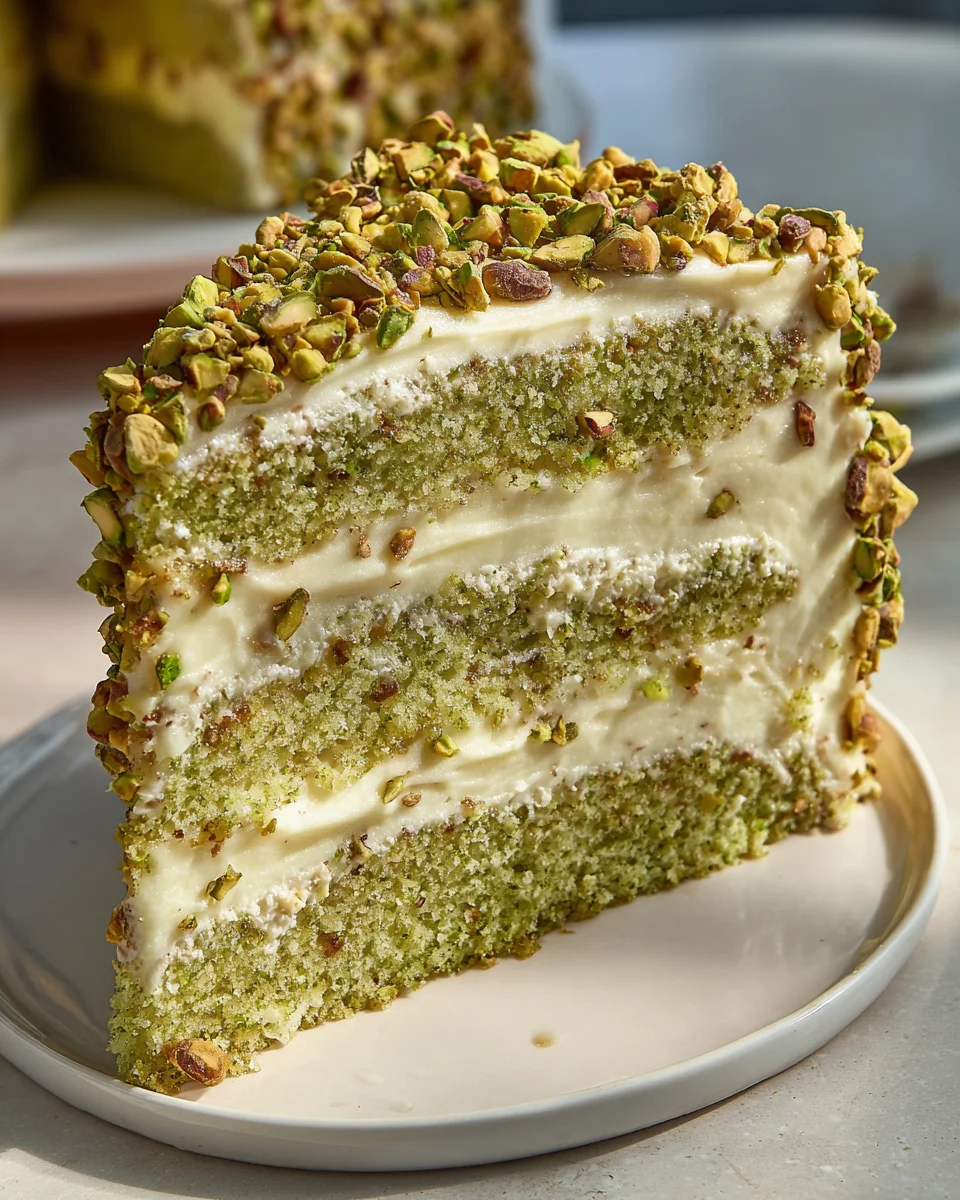
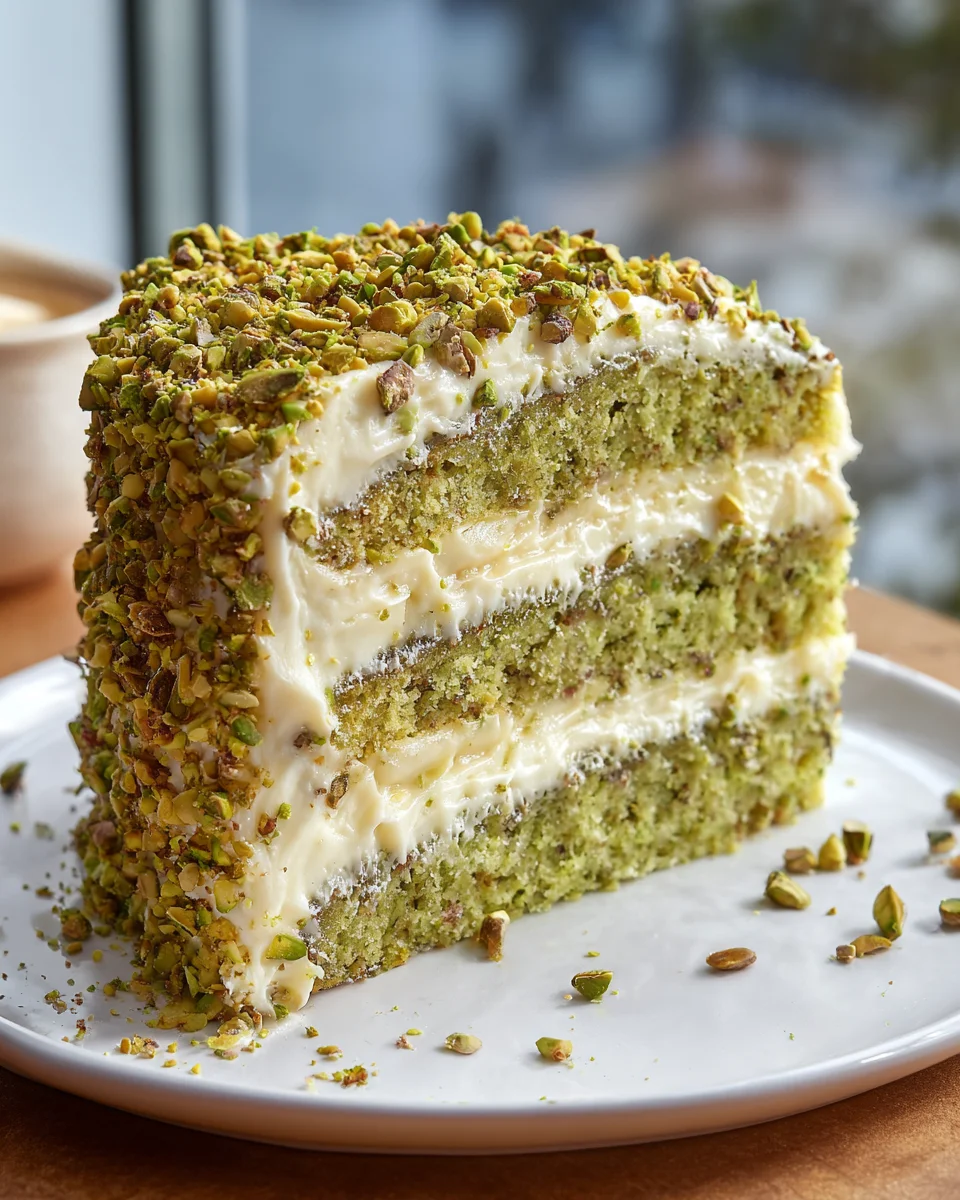
The Pistachio Mascarpone Layer Cake Recipe is a multi-layered cake that features light and fluffy cake layers infused with the delightful flavor of pistachios, generously filled and frosted with a creamy mascarpone frosting. The texture is a perfect balance of moist cake and velvety frosting, which makes each bite a luxurious experience. Unlike traditional buttercream cakes, the mascarpone adds a smooth richness that complements the subtle earthiness of the pistachios, making it a standout choice for anyone who enjoys unique desserts. It’s similar to a classic Italian tiramisu but with a twist that brings the nutty profile to the forefront.
Why You’ll Fall in Love with This Recipe
- Easy to follow with straightforward steps.
- Impressive yet approachable, perfect for both novice and experienced bakers.
- Deliciously creamy and nutty, a flavor combination that’s irresistible.
- Family-friendly and sure to please dessert lovers of all ages.
How Does It Taste?
When you take a bite of the Pistachio Mascarpone Layer Cake, you’re greeted with a delightful medley of flavors. The cake layers provide a light sweetness that perfectly balances the rich, creamy mascarpone frosting. As you chew, the slight crunch of the pistachios adds an unexpected texture that elevates the entire experience. The flavor profile is a harmonious blend of nutty and sweet, with hints of vanilla and a subtle creaminess that lingers on the palate. Each forkful is like a little piece of heaven, making it nearly impossible to stop at just one slice!
Health & Ingredient Benefits
The Pistachio Mascarpone Layer Cake Recipe features key ingredients that not only enhance the flavor but also offer some health benefits:
- Pistachios: High in protein and fiber, these nuts provide a satisfying crunch while promoting heart health.
- Mascarpone Cheese: A creamy source of calcium, this cheese adds a luxurious texture to the cake.
- Eggs: Rich in protein and essential nutrients, eggs help create a fluffy texture in the cake.
- Natural Sweeteners: Using alternatives to refined sugar can enhance the cake’s flavor while reducing blood sugar spikes.
Ingredients You’ll Need
- 2 cups all-purpose flour – Provides the base of the cake, giving it structure.
- 1 cup unsalted butter, softened – Adds richness and moisture to the cake layers.
- 1 ½ cups granulated sugar – Sweetens the cake, balancing the flavors.
- 4 large eggs – Acts as a binder, providing stability and texture.
- 1 teaspoon vanilla extract – Enhances the overall flavor profile.
- 1 teaspoon baking powder – Helps the cake rise, ensuring a light texture.
- ½ teaspoon baking soda – Works with the baking powder to give the cake a fluffy structure.
- ½ teaspoon salt – Balances sweetness and enhances flavor.
- 1 cup whole milk – Adds moisture and richness to the batter.
- 1 cup pistachios, shelled and finely chopped – Provides a unique flavor and texture in both the cake and frosting.
- 1 ½ cups mascarpone cheese – The star of the frosting, offering a smooth, creamy texture.
- 1 cup powdered sugar – Sweetens the mascarpone frosting without making it too heavy.
- 2 tablespoons heavy cream – Ensures the frosting is spreadable and adds richness.
- Optional: additional chopped pistachios for decoration – Adds a beautiful visual element and extra crunch.
Tools You’ll Need
- Mixing bowls – For combining ingredients.
- Electric mixer – To cream the butter and sugar effectively.
- Measuring cups and spoons – For accurate ingredient quantities.
- Rubber spatula – For folding pistachios into the batter and frosting.
- 3 round cake pans (8-inch) – For baking the cake layers evenly.
- Cooling rack – To cool the cake layers completely.
- Offset spatula – For spreading the mascarpone frosting smoothly.
Optional Substitutions & Additions
- Dairy-free options: Use vegan butter and a dairy-free mascarpone alternative.
- Gluten-free: Substitute all-purpose flour with a gluten-free blend.
- Flavor variations: Add a teaspoon of almond extract for a nuttier flavor.
- Extra texture: Incorporate a layer of raspberry or strawberry jam between the cake layers for a fruity contrast.
How to Make Pistachio Mascarpone Layer Cake Recipe
Step 1: Preheat the Oven
Start by preheating your oven to 350°F (175°C). This ensures that the cake bakes evenly and rises properly.
Step 2: Prepare the Cake Pans
Grease and flour your three 8-inch round cake pans. This will help the cakes release easily once baked.
Step 3: Cream Butter and Sugar
In a large mixing bowl, beat the softened butter and granulated sugar together using an electric mixer on medium speed until the mixture is light and fluffy, about 3-4 minutes. You’re looking for a pale yellow color.
Step 4: Add Eggs and Vanilla
With the mixer still running, add the eggs one at a time, ensuring each is fully incorporated before adding the next. Mix in the vanilla extract until well combined.
Step 5: Combine Dry Ingredients
In a separate bowl, whisk together the flour, baking powder, baking soda, and salt. This helps to evenly distribute the leavening agents.
Step 6: Alternate Adding Dry Ingredients and Milk
Gradually add the dry mixture to the creamed butter and sugar, alternating with the milk. Start and end with the dry ingredients, mixing just until combined. Avoid overmixing to keep the cake tender.
Step 7: Fold in Pistachios
Gently fold in the finely chopped pistachios using a rubber spatula. This adds flavor and texture to your cake.
Step 8: Bake the Layers
Divide the batter evenly among the prepared cake pans. Bake in the preheated oven for 25-30 minutes, or until a toothpick inserted in the center comes out clean. The tops should be lightly golden.
Step 9: Cool the Cakes
Once baked, remove the cakes from the oven and let them cool in the pans for 10 minutes. Then, transfer them to a cooling rack to cool completely.
Step 10: Make the Mascarpone Frosting
In a mixing bowl, combine the mascarpone cheese, powdered sugar, and heavy cream. Beat until smooth and creamy, ensuring there are no lumps. Adjust the sweetness to your liking.
Step 11: Assemble the Cake
Once the cake layers are completely cool, place one layer on a serving plate. Spread a generous layer of mascarpone frosting on top. Repeat with the second layer, and then place the final layer on top. Frost the top and sides of the cake with the remaining mascarpone frosting.
Step 12: Decorate
Finish by sprinkling additional chopped pistachios on top for a beautiful presentation. Chill the cake for at least 30 minutes to set the frosting before serving.
What to Serve With
This Pistachio Mascarpone Layer Cake pairs wonderfully with a cup of freshly brewed coffee or a light herbal tea. For a refreshing twist, consider serving it with a side of lemon sorbet or a fruit salad to cut through the richness of the cake.
Tips for Success
- Ensure all ingredients, especially the butter and eggs, are at room temperature for the best results.
- Don’t overmix the batter after adding the flour to keep the cake light and fluffy.
- Allow the layers to cool completely before frosting to prevent the mascarpone from melting.
- Use a serrated knife to level the tops of the cake layers for a more professional look.
Common Mistakes to Avoid
- Not measuring ingredients accurately can lead to an imbalanced cake.
- Overbaking the cake will result in a dry texture; keep an eye on the timer.
- Skipping the chilling step for the frosting can lead to a runny consistency.
- Frosting a warm cake can cause the frosting to melt and slide off.
How to Store & Reheat
Storing
To store the Pistachio Mascarpone Layer Cake, cover it with plastic wrap or place it in an airtight container. It will keep in the refrigerator for up to 5 days. For longer storage, you can freeze the un-frosted cake layers wrapped tightly in plastic wrap for up to 3 months.
Reheating
If you prefer to enjoy your cake slightly warmed, you can microwave a slice for about 10-15 seconds. Be careful not to overheat, as it may cause the frosting to melt too much.
Frequently Asked Questions
- Can I make this cake in advance? Yes! You can bake the layers a day or two ahead and frost them just before serving.
- Can I use roasted pistachios? Absolutely! Roasted pistachios add a deeper flavor, but be sure they are unsalted.
- Is there a non-dairy alternative for mascarpone? Yes, look for vegan mascarpone options available in stores for a dairy-free version.
- How can I make the cake more flavorful? Consider adding a layer of jam or a splash of almond extract for an additional flavor dimension.
Nutritional Info
This Pistachio Mascarpone Layer Cake is a delightful indulgence, with an estimated 400 calories per slice (1/12 of the cake). Each serving contains approximately 25g of carbohydrates, 25g of fat, and 6g of protein. Enjoy it as an occasional treat for a special occasion!
Final Thoughts
If you’re looking for a dessert that is as delightful to the eyes as it is to the palate, the Pistachio Mascarpone Layer Cake Recipe is an absolute must-try! This cake combines the rich, creamy texture of mascarpone with the nutty flavor of pistachios, creating a perfect harmony of taste. Each layer adds a touch of elegance, making it ideal for special occasions or simply to indulge yourself on a quiet afternoon. The lightness of the mascarpone paired with the crunch of pistachios ensures that every bite is a treat. So, gather your ingredients and give this recipe a go—you won’t regret bringing this stunning cake to your table!
Leave a Comment