
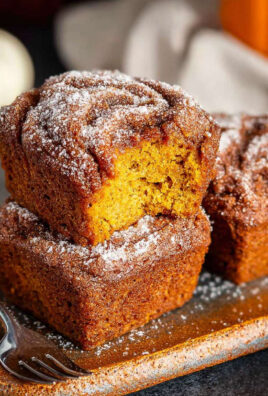
Cinnamon Rolls. Ah, the very words evoke a sensory symphony—the irresistible aroma of warm spices filling your home, the promise of a tender, yeasted dough swirled with sweet cinnamon sugar, and crowned with a luscious, creamy frosting. There’s truly nothing quite like freshly baked cinnamon rolls to transform an ordinary morning into something extraordinary. That first bite, where the soft, pillowy dough meets the gooey, spiced filling and the tangy-sweet glaze, is an experience that lingers and comforts.
While many associate these delectable treats with American diners and breakfast tables, their roots actually trace back to Sweden, where the ‘kanelbulle,’ or cinnamon bun, is a cherished fika staple—a delightful tradition of coffee and pastry. Over time, particularly in North America, these beloved pastries evolved, often growing larger, sweeter, and frequently adorned with a generous dollop of cream cheese frosting, cementing their place as an iconic comfort food, perfect for holidays, special brunches, or simply a cozy weekend indulgence.
What is it about this classic pastry that captures so many hearts?
I believe it’s the perfect harmony of textures and flavors: the delicate chew of the roll, the bold warmth of the cinnamon, and the indulgent sweetness of the glaze, creating a moment of pure bliss with every bite. Preparing homemade cinnamon rolls is a delightful journey, promising not just a delicious treat, but also the wonderful experience of baking from scratch and sharing warmth with loved ones.

Ingredients:
-
For the Soft & Fluffy Dough:
- 1 cup (240ml) Whole Milk: Warmed to about 105-115°F (40-46°C). This temperature is crucial for activating the yeast properly.
- 2 ¼ teaspoons (7g) Active Dry Yeast: One standard packet. Ensure it’s fresh for the best rise.
- ¼ cup (50g) Granulated Sugar: For feeding the yeast and adding a touch of sweetness to the dough.
- 1 large Egg: Room temperature, to enrich the dough and give it a lovely color.
- ¼ cup (57g) Unsalted Butter: Melted and slightly cooled, for tenderness and flavor.
- 1 teaspoon Vanilla Extract: Enhances the overall flavor profile of the dough.
- ½ teaspoon Salt: Balances the sweetness and strengthens the gluten structure.
- 3 ½ – 4 cups (420-480g) All-Purpose Flour: Divided. Start with 3 ½ cups and add more as needed during kneading until the dough is manageable.
-
For the Irresistible Cinnamon Filling:
- ½ cup (113g) Unsalted Butter: Softened to room temperature, not melted. This makes it easy to spread.
- 1 cup (200g) Light Brown Sugar: Packed. Its molasses content adds depth and moisture.
- 2 tablespoons Ground Cinnamon: High-quality cinnamon makes all the difference for that classic aroma and taste.
-
For the Creamy Dreamy Cream Cheese Frosting:
- 4 oz (113g) Cream Cheese: Full-fat, softened to room temperature. This is key for a smooth, lump-free frosting.
- ¼ cup (57g) Unsalted Butter: Softened to room temperature, complementing the cream cheese perfectly.
- 2 cups (240g) Powdered Sugar (Confectioners’ Sugar): Sifted, to ensure a silky-smooth texture.
- 1 teaspoon Vanilla Extract: A must-have for classic cream cheese frosting flavor.
- 1-2 tablespoons Whole Milk: As needed, to thin the frosting to your desired consistency.
Preparing the Dough – The Heart of Our Cinnamon Rolls
Making the perfect dough is truly the foundation for amazing homemade Cinnamon Rolls. It’s a journey, but a very rewarding one!
-
Activate the Yeast:
In a large mixing bowl (or the bowl of a stand mixer fitted with the dough hook attachment), pour in your warmed milk. It’s important that the milk is warm, like bathwater, but not too hot, as extreme heat can kill the yeast. Sprinkle the active dry yeast over the milk, then add a tablespoon of your granulated sugar. Give it a gentle stir. Let this mixture sit for 5-10 minutes. You’re looking for a foamy, bubbly layer to form on top – this is your visual cue that the yeast is alive and ready to work its magic. If you don’t see foam, your yeast might be expired, or your milk wasn’t the right temperature, and it’s best to start again.
-
Mix the Wet Ingredients:
Once your yeast is active and happy, add the remaining granulated sugar, the large room temperature egg, the melted and slightly cooled butter, vanilla extract, and salt to the bowl. Whisk everything together until it’s well combined. The mixture should be smooth and homogenous. Using room temperature ingredients, especially the egg, helps everything incorporate better and results in a more consistent dough texture.
-
Incorporate the Flour:
Gradually add 3 ½ cups of your all-purpose flour to the wet ingredients. If you’re using a stand mixer, start on low speed until the flour is just incorporated, then increase the speed to medium-low. If mixing by hand, use a sturdy spoon or spatula. Mix until a shaggy dough forms. At this stage, it will look quite sticky and unformed, which is perfectly normal.
-
Knead the Dough for Softness:
Now comes the kneading! If you’re using a stand mixer, let it knead for about 5-7 minutes. If kneading by hand, turn the dough out onto a lightly floured surface. Knead for 8-10 minutes. The goal is to develop the gluten, which gives our Cinnamon Rolls their signature chewiness and structure. As you knead, you’ll notice the dough transforming – it will become smoother, more elastic, and less sticky. It should feel soft and pliable, pulling away cleanly from the sides of the bowl or your hands. If it’s still too sticky, add the remaining ½ cup of flour, one tablespoon at a time, until it reaches the desired consistency. A good dough should be slightly tacky but not sticky.
-
First Rise (The Bulk Fermentation):
Lightly grease a large clean bowl with a little oil or cooking spray. Place your kneaded dough into the bowl, turning it once to coat the top lightly with oil. This prevents it from drying out. Cover the bowl tightly with plastic wrap or a clean kitchen towel. Place it in a warm, draft-free place to rise for 1-1 ½ hours, or until it has doubled in size. A warm oven (turned off, with just the light on) or a sunny spot on your counter works wonderfully. This first rise is crucial for flavor development and creating those wonderful air pockets that make Cinnamon Rolls so fluffy.
Making the Cinnamon Filling – The Sweet & Spicy Core
While your dough is happily rising, let’s prepare the star of the show: the incredibly fragrant cinnamon filling. This is what truly makes these “Cinnamon Rolls“!
-
In a medium bowl, combine the softened unsalted butter, packed light brown sugar, and ground cinnamon. Use a fork or a spoon to mix them together thoroughly. You want to achieve a consistent, spreadable paste. It shouldn’t be liquid; rather, it should be thick and uniform, ensuring an even layer of cinnamon goodness in every bite. If your butter is too cold, it will be hard to mix; if it’s melted, the mixture will be too runny and seep out during baking. Room temperature softened butter is absolutely key here.
Assembling the Cinnamon Rolls – Creating the Iconic Swirl
This is where our beautiful dough takes shape into those familiar spirals of deliciousness!
-
Prepare Your Work Surface:
Once your dough has doubled in size after its first rise, gently punch it down to release the air. This helps to create a more even texture in the final product. Lightly flour a clean, dry work surface – I often use a large cutting board or my kitchen counter. Turn the dough out onto the floured surface.
-
Roll Out the Dough:
Using a rolling pin, roll the dough into a large rectangle. Aim for dimensions of approximately 12 inches by 18 inches (30cm x 45cm) and about ¼ inch (0.6cm) thick. Try to keep the edges as straight as possible, as this will result in more uniform Cinnamon Rolls. Don’t press too hard, but ensure even thickness throughout the rectangle. If the dough resists rolling, let it rest for 5 minutes to relax the gluten, then continue rolling.
-
Spread the Filling:
Evenly spread your prepared cinnamon filling over the entire surface of the rolled-out dough, leaving a small ½-inch border along one of the longer edges. This border will help seal the roll. Use an offset spatula or the back of a spoon to ensure the filling is distributed from edge to edge, ensuring every bite of your Cinnamon Rolls is packed with flavor.
-
Roll Up the Dough:
Starting from the long edge opposite the ½-inch border you left, carefully and tightly roll the dough into a snug log. The tighter you roll it, the more beautiful and defined your swirls will be. Take your time and try to keep the roll as even as possible. Once rolled, pinch the seam closed along that ½-inch border you left, sealing the log securely. Gently press down on the seam to ensure it stays closed during baking.
-
Slice the Rolls:
Now, it’s time to slice your masterpiece! You can use a sharp, un-serrated knife, but my preferred method for perfectly round Cinnamon Rolls is using unflavored dental floss or a piece of thin kitchen string. Slide a piece of floss under the log, cross the ends over the top, and pull them tightly to slice through the dough. This technique prevents the rolls from getting squashed. Aim for slices about 1 ½ inches (3.8cm) thick. You should get 12 beautiful rolls from one log.
-
Second Rise (Proofing):
Lightly grease a 9×13 inch (23x33cm) baking dish. Arrange the sliced Cinnamon Rolls in the prepared dish, leaving a little space between each one, as they will expand. Cover the baking dish loosely with plastic wrap or a clean kitchen towel. Place it back in that warm, draft-free spot for another 30-45 minutes, or until the rolls have visibly puffed up and are almost touching each other. This second rise is called proofing, and it’s essential for achieving that ultimate soft, pillowy texture. Don’t rush this step!
Baking the Cinnamon Rolls – Golden Perfection
The moment of truth is here! Soon your kitchen will smell absolutely incredible.
-
Preheat the Oven:
About 15 minutes before the second rise is complete, preheat your oven to 375°F (190°C). Make sure the oven rack is in the middle position.
-
Bake to Golden Brown:
Once the Cinnamon Rolls have finished their second rise, remove the cover and place the baking dish into the preheated oven. Bake for 20-25 minutes, or until the tops are beautifully golden brown and the rolls are cooked through. If you notice them browning too quickly, you can loosely tent the dish with aluminum foil for the last few minutes of baking. The internal temperature should reach about 200°F (93°C) if you want to be precise with a thermometer. I love how the edges get slightly crispy while the centers remain incredibly soft!
-
Cool Slightly:
Once baked, remove the Cinnamon Rolls from the oven. Let them cool in the baking dish for about 5-10 minutes before frosting. This short cooling period allows them to set slightly and prevents the frosting from completely melting and running off, while still being warm enough for the frosting to soften and spread easily.
Preparing the Creamy Dreamy Cream Cheese Frosting
No Cinnamon Roll is complete without a generous slather of decadent cream cheese frosting! This is super simple to make and adds an essential tangy sweetness.
-
In a medium mixing bowl, combine the softened cream cheese and softened unsalted butter. Using an electric mixer (handheld or stand mixer with a paddle attachment), beat them together on medium speed until the mixture is completely smooth and creamy, with no lumps of cream cheese remaining. This usually takes 2-3 minutes. Ensure your cream cheese and butter are truly at room temperature for the smoothest result.
-
Add the sifted powdered sugar, vanilla extract, and one tablespoon of milk to the cream cheese mixture. Beat on low speed until the powdered sugar is just incorporated, then increase the speed to medium-high and beat for another 1-2 minutes until the frosting is light, fluffy, and completely smooth. If you desire a thinner frosting, add the second tablespoon of milk, a tiny bit at a time, until you reach your preferred consistency. Taste and adjust for sweetness if desired, though I find this balance just perfect.
Frosting and Serving – The Grand Finale
The moment we’ve all been waiting for!
-
While the Cinnamon Rolls are still warm (but not piping hot), generously spread the cream cheese frosting over the top. The warmth of the rolls will slightly soften the frosting, allowing it to melt into every crevice and create that luscious, gooey topping that everyone adores. Don’t be shy with the frosting!
-
Serve your glorious homemade Cinnamon Rolls immediately. They are truly at their absolute best when fresh from the oven, still warm and slathered with that heavenly frosting. These make the perfect breakfast, brunch treat, or even a delightful dessert. Leftovers, if there are any, can be stored in an airtight container at room temperature for a day or two, or refrigerated for up to a week. A quick reheat in the microwave for 15-20 seconds will bring them back to life.
Enjoy your amazing homemade Cinnamon Rolls!
After taking you through every step to achieve baking perfection, I truly believe this recipe for homemade Cinnamon Rolls isn’t just another set of instructions; it’s an invitation to experience pure culinary joy. There’s a magic that happens when you combine simple ingredients like flour, sugar, butter, and cinnamon, transforming them into something utterly irresistible. Imagine waking up to the intoxicating aroma filling your home, a scent that promises warmth, comfort, and a touch of indulgence. These aren’t just any pastries; they are meticulously designed to be incredibly fluffy, boasting that signature gooey center we all crave, generously swirled with aromatic cinnamon sugar, and crowned with the silkiest, most decadent cream cheese frosting you’ve ever tasted. Every single component works in harmony to create a bite that is simultaneously sweet, spicy, tender, and rich. Trust me when I say, once you’ve tried these specific Cinnamon Rolls, store-bought versions will simply pale in comparison. This recipe demystifies the process, making it accessible even for those who might feel intimidated by yeast baking, guaranteeing a triumph that will impress everyone fortunate enough to share in your bounty.
Baking these beauties isn’t just about the final product; it’s an experience in itself. From the moment you activate the yeast and watch it bloom, to the satisfying kneading of the dough, feeling it transform from a sticky mess into a smooth, elastic canvas, there’s a therapeutic rhythm to the process. The anticipation builds with each rise, the dough becoming plump and ethereal, ready to embrace its sweet, spicy filling. And oh, that filling! A perfect balance of brown sugar, butter, and a generous amount of fragrant cinnamon, melting into a glorious caramel during baking. Then comes the moment of truth: pulling the pan from the oven, the rolls golden brown and bubbling, their peaks glistening with melted sugar. The final touch, that luscious cream cheese frosting, cascading over each warm roll, seeping into every crevice, creating an unparalleled symphony of textures and flavors. It’s more than a breakfast item; it’s a moment of pure bliss, a cozy embrace on a chilly morning, or a delightful treat to share with loved ones during a relaxed weekend brunch. This recipe doesn’t just deliver a pastry; it delivers an unforgettable memory.
Now, while these Cinnamon Rolls are absolutely divine on their own, perhaps with a strong cup of coffee or a tall glass of cold milk, I encourage you to get creative! For an extra layer of flavor in your filling, consider adding a handful of finely chopped pecans or walnuts, which introduce a wonderful nutty crunch. A teaspoon of orange zest can elevate the entire profile, adding a bright, citrusy counterpoint to the warm spices. If you’re feeling adventurous with your glaze, try a maple cream cheese frosting for a distinct autumn vibe, or a simple vanilla bean glaze for a more classic approach. These rolls are perfect for a special holiday breakfast, a casual Sunday brunch, or even as a decadent dessert after a comforting family meal. For a truly show-stopping presentation, arrange them artfully on a large platter and watch them disappear! And for those busy mornings, remember you can prepare the dough the night before, let it have its second rise slowly in the refrigerator overnight, and simply bake them fresh in the morning — that way, you wake up to warm, fresh Cinnamon Rolls with minimal effort. They also freeze beautifully, allowing you to always have a quick, comforting treat on hand for unexpected guests or sudden cravings.
I genuinely hope you feel inspired and ready to roll up your sleeves and try this recipe. Don’t be shy; embrace the process, trust in the steps I’ve laid out, and prepare to be amazed by the results. There’s immense satisfaction in baking something so utterly delicious from scratch, and I promise you, the effort is truly worth it. These Cinnamon Rolls are destined to become a staple in your home, a beloved treat that brings smiles and warmth. Once you’ve baked your batch, I would absolutely love to hear about your experience! Did you add a unique twist? What was your favorite part of the process? Please share your thoughts, your successes, and even your questions in the comments below. Better yet, snap a photo of your magnificent creations and share it on social media, tagging me so I can celebrate your baking triumph with you! Let’s build a community of enthusiastic bakers, all enjoying the sweet, sticky, and utterly perfect world of homemade Cinnamon Rolls. Happy baking, my friends!
People Also Ask:
How long do homemade cinnamon rolls last?
Freshly baked homemade Cinnamon Rolls are best enjoyed the same day. However, properly stored in an airtight container at room temperature, they will stay delicious for up to 2-3 days. For longer storage, refrigeration can extend their life to about a week, but the dough might dry out slightly. A quick zap in the microwave can often revive them!
Can I freeze cinnamon rolls (baked or unbaked)?
Absolutely! You can freeze both baked and unbaked cinnamon rolls.
- Baked Rolls: Let them cool completely (without frosting). Wrap individually in plastic wrap, then place in a freezer-safe bag or container for up to 2-3 months. Thaw at room temperature and warm in the oven or microwave. Frost just before serving.
- Unbaked Rolls: After the second rise, cover the pan tightly with plastic wrap and foil. Freeze for up to 1 month. When ready to bake, transfer to the refrigerator overnight to thaw and finish rising, then bake as directed.
What makes cinnamon rolls soft and fluffy?
Several factors contribute to soft and fluffy Cinnamon Rolls:
- Yeast Activation: Ensuring your yeast is active and healthy is crucial for a good rise.
- Proper Kneading: Developing the gluten in the dough by kneading creates that elastic, chewy texture.
- Warm Environment: Dough needs a warm, draft-free place to rise effectively.
- Hydration: A well-hydrated dough (not too dry) leads to a softer crumb.
- Enrichments: Ingredients like milk, butter, and eggs add richness and moisture, contributing to a tender texture.
Can I prepare cinnamon rolls the night before?
Yes, this is a fantastic time-saving trick! After you’ve rolled, filled, and sliced your Cinnamon Rolls and placed them in the baking dish, cover the pan tightly with plastic wrap. Place them in the refrigerator overnight (for 8-12 hours). In the morning, take them out of the fridge and let them sit at room temperature for about 30-60 minutes while your oven preheats, to allow them to finish their final rise. Then, bake as directed.
Why isn’t my dough rising?
If your dough isn’t rising, here are the most common culprits:
- Dead Yeast: If your yeast didn’t foam when proofed in warm liquid, it’s likely dead.
- Water Temperature: Water that’s too hot will kill the yeast, too cold will inhibit its activity. Aim for 105-115°F (40-46°C).
- Expired Yeast: Always check the expiration date on your yeast packet.
- Cold Environment: Dough needs warmth to rise. A cold kitchen can significantly slow down or halt the process.
- Too Much Salt: Excessive salt can inhibit yeast activity.
What kind of cinnamon is best for cinnamon rolls?
For the classic, warm, and inviting flavor profile of Cinnamon Rolls, I highly recommend using Ceylon cinnamon (often labeled as “true cinnamon”) for a more delicate and complex flavor, or a good quality Vietnamese or Saigon cinnamon for a bolder, spicier kick. Both work wonderfully, but a higher quality cinnamon will make a noticeable difference in the overall aroma and taste of your rolls. Avoid generic, cheaper cinnamons if you want that truly standout flavor!
Irresistible Homemade Cinnamon Rolls with Creamy Glaze
Indulge in the irresistible aroma and taste of homemade cinnamon rolls featuring a tender, yeasted dough swirled with sweet cinnamon sugar and crowned with a luscious, creamy cream cheese glaze. Perfect for special mornings or a cozy weekend treat.
Ingredients
-
1 cup (240ml) Whole Milk, warmed to 100-110°F
-
2 ¼ teaspoons (7g) Active Dry Yeast (1 standard packet)
-
¼ cup (50g) Granulated Sugar
-
1 large Egg, room temperature
-
¼ cup (57g) Unsalted Butter, melted and slightly cooled
-
1 teaspoon Vanilla Extract
-
½ teaspoon Salt
-
3 ½ – 4 cups (420-480g) All-Purpose Flour, divided
-
½ cup (113g) Unsalted Butter, softened to room temperature (for filling)
-
1 cup (200g) Light Brown Sugar, packed (for filling)
-
2 tablespoons Ground Cinnamon (for filling)
-
4 oz (113g) Cream Cheese, full-fat, softened to room temperature (for frosting)
-
¼ cup (57g) Unsalted Butter, softened to room temperature (for frosting)
-
2 cups (240g) Powdered Sugar (Confectioners’ Sugar), sifted (for frosting)
-
1 teaspoon Vanilla Extract (for frosting)
-
1-2 tablespoons Whole Milk, as needed (for frosting)
Instructions
-
Step 1
Heat 1 cup milk to 100-110°F. Pour into a stand mixer bowl (or large mixing bowl). Sprinkle 2¼ tsp active dry yeast over milk, add 1 tbsp granulated sugar. Let bloom 5 mins until foamy. -
Step 2
Add remaining ¼ cup granulated sugar, 1 large room temperature egg, ¼ cup melted and cooled butter, 1 tsp vanilla extract, and ½ tsp salt to the yeast mixture. Whisk until well combined. -
Step 3
Gradually add 3½ cups all-purpose flour. Knead with a stand mixer (5-7 mins) or by hand (8-10 mins), adding up to ½ cup more flour if needed, until dough is smooth, elastic, and slightly tacky. -
Step 4
Lightly grease a bowl. Place dough in bowl, turn to coat. Cover tightly and let rise in a warm, draft-free place for 1-1½ hours, or until doubled in size. -
Step 5
While dough rises, combine ½ cup softened unsalted butter, 1 cup packed light brown sugar, and 2 tbsp ground cinnamon in a medium bowl. Mix thoroughly to form a consistent, spreadable paste. -
Step 6
Gently punch down risen dough. On a lightly floured surface, roll dough into a 12×18 inch rectangle, about ¼ inch thick. -
Step 7
Evenly spread cinnamon filling over dough, leaving a ½-inch border along one long edge. Tightly roll the dough from the long edge opposite the border into a snug log. Pinch seam closed securely. -
Step 8
Slice the log into 12 rolls, approximately 1½ inches thick, using a sharp, un-serrated knife or unflavored dental floss. -
Step 9
Lightly grease a 9×13 inch baking dish. Arrange sliced rolls, leaving space between them. Cover loosely and let rise in a warm, draft-free spot for 30-45 minutes, or until visibly puffed and nearly touching. -
Step 10
Preheat oven to 375°F (190°C) during the last 15 mins of the second rise. Bake rolls for 20-25 minutes, or until tops are golden brown. If browning too quickly, loosely tent with aluminum foil. -
Step 11
Remove from oven and let cool in the baking dish for 5-10 minutes before frosting. -
Step 12
In a medium bowl, beat 4 oz softened cream cheese and ¼ cup softened unsalted butter with an electric mixer until smooth and lump-free (2-3 mins). Add 2 cups sifted powdered sugar, 1 tsp vanilla extract, and 1 tbsp milk. Beat on low, then medium-high for 1-2 mins until light and fluffy. Add an additional 1 tbsp milk, a tiny bit at a time, if a thinner consistency is desired. -
Step 13
Generously spread cream cheese frosting over the warm (but not piping hot) cinnamon rolls. Serve immediately for best taste. Store leftovers in an airtight container at room temperature for 1-2 days, or refrigerated for up to a week. Reheat in the microwave for 15-20 seconds if desired.
Important Information
Nutrition Facts (Per Serving)
It is important to consider this information as approximate and not to use it as definitive health advice.
Allergy Information
Please check ingredients for potential allergens and consult a health professional if in doubt.
Printable Recipe Card
Want just the essential recipe details without scrolling through the article? Get our printable recipe card with just the ingredients and instructions.

Leave a Comment