
No Bake Strawberry Cheesecake Bars
Oh my goodness, do I have a treat for you today! When the sun is shining brightly and the last thing I want to do is turn on my oven, these No Bake Strawberry Cheesecake Bars come to the rescue. They are incredibly special because they deliver all the creamy, dreamy indulgence of a classic cheesecake without a single minute of baking time. Seriously, no oven needed! I know you’re going to absolutely adore them because they’re utterly refreshing, perfectly sweet, and so incredibly simple to whip up. Imagine impressing your friends and family with a show-stopping dessert that required minimal effort – that’s exactly what these bars do!
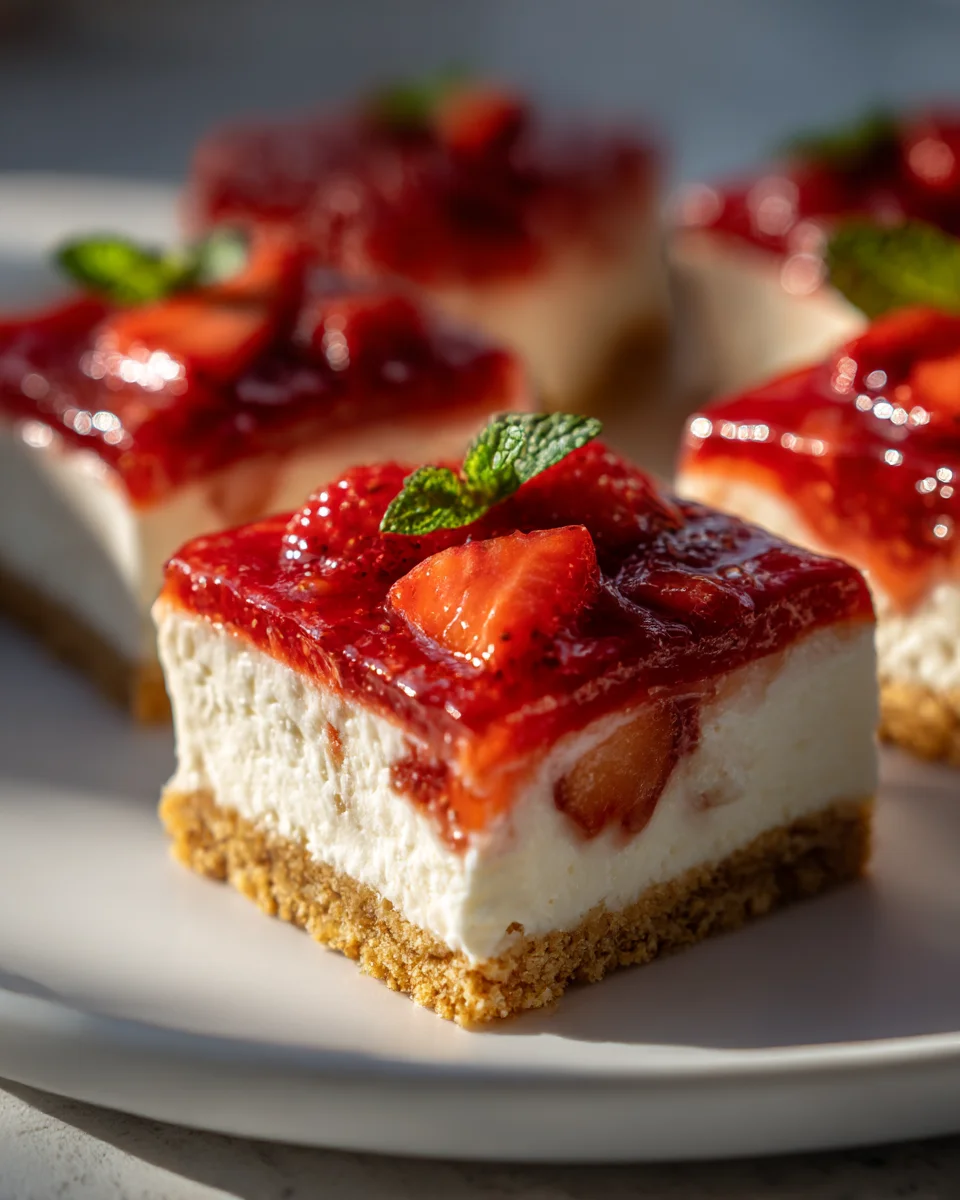
So, what exactly are we talking about with this delightful dish? We’re diving into a scrumptious combination of a buttery graham cracker crust, a lusciously smooth and tangy cream cheese filling, all crowned with a vibrant layer of fresh, juicy strawberries. Each bar is a little slice of heaven – cool, creamy, and bursting with fresh berry flavor. It’s truly the ultimate make-ahead dessert for picnics, potlucks, or just a sweet escape on a warm afternoon. You truly can’t go wrong with these easy, elegant, and irresistibly delicious bars!

Ingredient Notes
Creating these delightful No Bake Strawberry Cheesecake Bars starts with understanding the role each ingredient plays. Trust me, using good quality ingredients makes all the difference in achieving that perfectly creamy texture and vibrant strawberry flavor!
- Graham Cracker Crumbs: These form the classic crunchy base of our bars. I love how easily they come together with butter. If you can’t find graham crackers, digestive biscuits or even vanilla wafers make excellent substitutes. Just make sure to finely crush them.
- Unsalted Butter: Melted butter binds the crust together beautifully. Unsalted butter gives you control over the final saltiness, but salted butter can work if that’s all you have – just be mindful of any added salt elsewhere.
- Granulated Sugar: We use sugar in both the crust for a touch of sweetness, in the cheesecake filling for that classic sweet tang, and in the strawberry topping to balance the tartness of the fruit.
- Full-Fat Cream Cheese: This is the star of our creamy filling! It’s absolutely crucial to use full-fat cream cheese, and ensure it’s softened to room temperature. This will prevent any lumps and ensure a silky-smooth consistency when you beat it. Low-fat versions simply won’t yield the same rich texture or set as firmly.
- Heavy Cream (or Whipping Cream): This is whipped until stiff peaks form and then folded into the cream cheese mixture, giving the cheesecake its light, airy, yet stable structure without any baking. Make sure it’s very cold for the best whipping results.
- Vanilla Extract: A good quality vanilla extract enhances all the flavors in the cheesecake filling. If you prefer to avoid alcohol, alcohol-free vanilla essence works perfectly well without altering the taste.
- Fresh Lemon Juice: A squeeze of fresh lemon juice is a game-changer! It brightens up both the cheesecake filling and the strawberry topping, adding a lovely tart counterpoint that prevents the dessert from being overly sweet.
- Fresh Strawberries: Of course! These are the heart of our topping. Choose ripe, vibrant red strawberries for the best flavor and color. They’re cooked down slightly to create a beautiful, saucy layer.
- Cornstarch: This is used to thicken our strawberry topping, ensuring it sets nicely without being too runny. A little cornstarch slurry (cornstarch mixed with cold water) is all you need. Arrowroot powder can be used as an alternative if you prefer.
Step-by-Step Instructions
Let’s get those No Bake Strawberry Cheesecake Bars made! Follow these simple steps for a truly irresistible treat.
- Prepare the Crust:
- First things first, line an 8×8 or 9×9-inch square baking pan with parchment paper, leaving an overhang on two sides. This will make lifting and slicing your bars incredibly easy later on.
- In a medium bowl, combine 1 ½ cups of graham cracker crumbs with ¼ cup of granulated sugar. Pour in ½ cup of melted unsalted butter and mix well until the crumbs are evenly moistened.
- Press the mixture firmly and evenly into the bottom of your prepared pan. Use the back of a spoon or a flat-bottomed glass to really compact it.
- Place the crust in the refrigerator to chill for at least 15-20 minutes while you prepare the filling.
- Make the Cheesecake Filling:
- In a large mixing bowl, beat 16 ounces (two 8-ounce blocks) of softened full-fat cream cheese with ⅔ cup of granulated sugar using an electric mixer on medium speed. Beat until the mixture is completely smooth and creamy, with no lumps, which takes about 2-3 minutes.
- Stir in 1 teaspoon of vanilla extract (or alcohol-free vanilla essence) and 1 tablespoon of fresh lemon juice until just combined.
- In a separate, chilled bowl, whip 1 ½ cups of very cold heavy cream on high speed until stiff peaks form. Be careful not to over-whip it, or it might become grainy.
- Gently fold the whipped cream into the cream cheese mixture in two additions. Use a rubber spatula and a light hand to preserve the airiness of the whipped cream. Mix until just combined and smooth.
- Assemble the Cheesecake Base:
- Retrieve your chilled crust from the refrigerator.
- Carefully spread the cheesecake filling evenly over the graham cracker crust. Smooth the top with your spatula.
- Cover the pan loosely with plastic wrap and refrigerate for at least 3-4 hours, or ideally overnight, to allow the cheesecake layer to firm up properly. This is crucial for clean slices!
- Prepare the Strawberry Topping:
- While the cheesecake is chilling, you can prepare your topping. In a medium saucepan, combine 3 cups of hulled and sliced fresh strawberries, ½ cup of granulated sugar, and 1 tablespoon of fresh lemon juice.
- Cook over medium heat, stirring occasionally, until the strawberries soften and release their juices, about 5-7 minutes.
- In a small bowl, whisk together 1 tablespoon of cornstarch with 2 tablespoons of cold water to create a slurry.
- Pour the cornstarch slurry into the simmering strawberry mixture, stirring constantly. Continue to cook for another 1-2 minutes, until the mixture thickens and becomes glossy.
- Remove the saucepan from the heat and let the strawberry topping cool completely to room temperature before adding it to your cheesecake. If it’s warm, it will melt the cheesecake layer.
- Finish and Chill:
- Once the cheesecake layer is fully set and the strawberry topping is completely cool, pour the strawberry mixture evenly over the cheesecake.
- Return the bars to the refrigerator for at least another 1-2 hours to allow the topping to set and everything to meld together beautifully.
- Serve:
- When ready to serve, use the parchment paper overhang to lift the entire cheesecake out of the pan.
- Slice into bars using a sharp knife. For the cleanest cuts, wipe your knife clean between each slice.
- Enjoy your gorgeous No Bake Strawberry Cheesecake Bars!
Tips & Suggestions
Making No Bake Strawberry Cheesecake Bars is pretty straightforward, but a few insider tips can elevate your dessert from good to absolutely phenomenal! Here are my go-to suggestions:
- Room Temperature Cream Cheese is a Must: I cannot stress this enough! Cold cream cheese will result in a lumpy filling, no matter how long you beat it. Take your cream cheese out of the fridge at least an hour before you plan to start, or even longer if your kitchen is cool.
- Don’t Rush the Chill Time: This is arguably the most critical step for no-bake desserts. The longer you chill your bars, the firmer and easier they will be to slice. An overnight chill for the cheesecake layer, and then another hour or two once the topping is added, will give you the best results. Patience is key here!
- Whip Cream Properly: When whipping your heavy cream, ensure it’s very cold. If your bowl and whisk are also chilled, that’s even better! Watch it carefully and stop just as stiff peaks form. Over-whipped cream can become grainy and separate.
- Gentle Folding: When combining the whipped cream with the cream cheese mixture, fold gently. You want to incorporate them without deflating the air you’ve whipped into the cream, which is what gives the cheesecake its light texture.
- Cool the Topping Completely: Before pouring the strawberry topping over the chilled cheesecake layer, make absolutely sure it has cooled to room temperature. A warm topping will melt your perfectly set cheesecake, resulting in a messy, rather than a beautifully layered, bar.
- Clean Slices: For perfectly neat slices, use a sharp, thin knife. For extra clean cuts, you can dip your knife in hot water and wipe it dry between each slice. This warms the blade just enough to glide through the cheesecake and topping without dragging.
- Vary the Topping Texture: If you prefer a smoother strawberry topping, you can mash some of the strawberries after they’ve cooked down, or even blend a portion of the mixture before adding the cornstarch slurry. For a more rustic look, leave them mostly whole.
Storage
Once you’ve gone to the effort of making these delicious No Bake Strawberry Cheesecake Bars, you’ll want to make sure they stay fresh and fabulous for as long as possible! Here’s how I recommend storing them:
- Refrigeration is Essential: Because these bars contain dairy and are not baked, they must be stored in the refrigerator at all times. Leaving them at room temperature for extended periods will cause them to soften significantly and could lead to spoilage.
- Airtight Container: To keep your bars fresh, prevent them from drying out, and protect them from absorbing any unwanted odors from your fridge, store them in an airtight container. If you don’t have a container large enough for the whole pan, you can slice them first and then arrange the slices in a container with parchment paper between layers if stacking.
- How Long Do They Last?: When stored properly in the refrigerator, No Bake Strawberry Cheesecake Bars will stay fresh and delicious for 3 to 5 days. After that, the quality might start to decline, especially the texture of the crust and the freshness of the strawberry topping.
- Can You Freeze Them?: Yes, you can! Freezing these bars is a great option for longer storage.
- Method: I recommend freezing the bars before adding the strawberry topping for the best results, as fresh fruit can sometimes become watery after thawing. If you’ve already added the topping, that’s okay too!
- Slice the bars into individual portions. Wrap each slice tightly in plastic wrap, then again in aluminum foil.
- Place the wrapped slices in a freezer-safe bag or container. They can be frozen for up to 1-2 months.
- Thawing: To enjoy, simply transfer the frozen bars to the refrigerator and let them thaw for several hours or overnight. If you froze them without the topping, you can whip up a fresh batch of strawberry topping just before serving for that vibrant fresh flavor and texture.
Final Thoughts
And there you have it – my absolute go-to for a refreshingly sweet and effortlessly elegant dessert! These No Bake Strawberry Cheesecake Bars are more than just a recipe; they’re a revelation. I genuinely believe this dish is a must-try because it delivers all the luxurious creaminess of traditional cheesecake, infused with bright, fresh strawberry flavor, all without the need for an oven. It’s truly incredible how simple these bars are to assemble, yet they always impress with their vibrant taste and beautiful presentation. Whether you’re looking for a fuss-free treat for a potluck, a delightful ending to a weeknight meal, or just a sweet pick-me-up, I promise these No Bake Strawberry Cheesecake Bars will become a cherished favorite in your kitchen. Go ahead and give them a try – I just know you’re going to adore them as much as I do!
Leave a Comment