
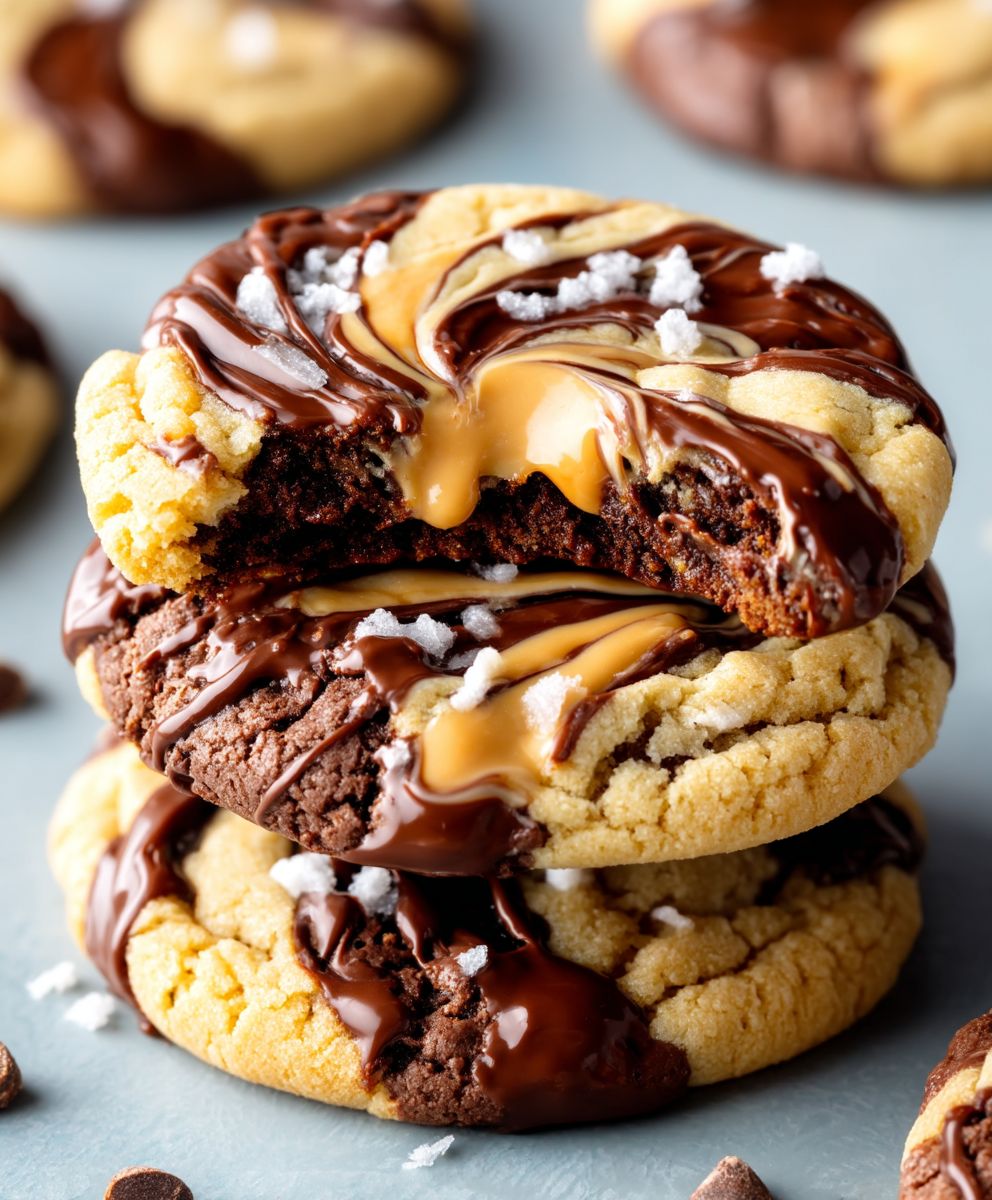
Peanut Butter Brownie Cookies: Prepare to have your dessert expectations gloriously shattered! Imagine the fudgy, intensely chocolatey goodness of a brownie, seamlessly blended with the nutty, comforting embrace of peanut butter, all in the convenient and utterly irresistible form of a cookie. Yes, you read that right. These aren’t just cookies; they’re a decadent experience.
While the exact origins of combining peanut butter and chocolate are somewhat debated, the pairing has become a beloved classic in American baking. It’s a flavor marriage made in heaven, a testament to the power of contrasting yet complementary tastes. The richness of the chocolate perfectly balances the salty, savory notes of the peanut butter, creating a symphony of flavor that dances on your palate.
What makes these Peanut Butter Brownie Cookies so universally appealing? It’s the perfect trifecta of taste, texture, and convenience. The chewy edges give way to a soft, fudgy center, delivering a textural delight with every bite. And let’s be honest, who can resist the ease of a cookie? They’re portable, shareable (if you’re feeling generous!), and require no forks or spoons. Whether you’re craving a sweet treat after dinner, need a crowd-pleasing dessert for a party, or simply want to indulge in a little bit of happiness, these cookies are guaranteed to hit the spot. So, grab your mixing bowl and let’s get baking!
Ingredients:
- 1 cup (2 sticks) unsalted butter, softened
- 1 cup granulated sugar
- 1 cup packed light brown sugar
- 2 large eggs
- 1 teaspoon vanilla extract
- 1 cup creamy peanut butter
- 1 cup all-purpose flour
- 1 cup unsweetened cocoa powder
- 1 teaspoon baking soda
- 1/2 teaspoon salt
- 1 cup semi-sweet chocolate chips
- 1/2 cup chopped peanuts, for topping (optional)
- Flaky sea salt, for sprinkling (optional)
Preparing the Dough:
- Cream the Butter and Sugars: In a large bowl, or the bowl of your stand mixer, cream together the softened butter, granulated sugar, and light brown sugar until light and fluffy. This usually takes about 3-5 minutes. Make sure to scrape down the sides of the bowl occasionally to ensure everything is evenly mixed. The mixture should be pale and airy.
- Incorporate the Wet Ingredients: Beat in the eggs one at a time, mixing well after each addition. Then, stir in the vanilla extract and peanut butter until fully combined. The mixture will be quite thick at this point, and that’s perfectly normal. Don’t overmix!
- Combine the Dry Ingredients: In a separate medium bowl, whisk together the all-purpose flour, cocoa powder, baking soda, and salt. Whisking ensures that the baking soda and salt are evenly distributed throughout the flour mixture, which is crucial for proper leavening and flavor.
- Gradually Add Dry Ingredients to Wet Ingredients: Gradually add the dry ingredients to the wet ingredients, mixing on low speed until just combined. Be careful not to overmix, as this can lead to tough cookies. Overmixing develops the gluten in the flour, resulting in a less tender cookie. Stop mixing as soon as you see the flour disappear.
- Stir in Chocolate Chips: Gently fold in the semi-sweet chocolate chips. I like to use a rubber spatula for this step to avoid overmixing. You can also use other types of chocolate chips, such as dark chocolate or milk chocolate, depending on your preference.
- Chill the Dough: Cover the bowl with plastic wrap and chill the dough in the refrigerator for at least 30 minutes, or up to 2 hours. Chilling the dough helps to prevent the cookies from spreading too much during baking and also allows the flavors to meld together. This step is important for achieving the desired texture. If you chill the dough for longer than 2 hours, you may need to let it sit at room temperature for a few minutes before scooping.
Baking the Cookies:
- Preheat the Oven: Preheat your oven to 350°F (175°C). Line baking sheets with parchment paper or silicone baking mats. Parchment paper helps to prevent the cookies from sticking to the baking sheet and makes cleanup easier. Silicone baking mats provide even heat distribution and also prevent sticking.
- Scoop the Dough: Use a cookie scoop or spoon to drop rounded tablespoons of dough onto the prepared baking sheets, leaving about 2 inches between each cookie. The cookies will spread during baking, so it’s important to leave enough space. I usually use a medium-sized cookie scoop, which yields cookies that are about 2-3 inches in diameter.
- Add Toppings (Optional): If desired, sprinkle the tops of the cookies with chopped peanuts and flaky sea salt before baking. The peanuts add a nice crunch and nutty flavor, while the sea salt enhances the sweetness of the chocolate and peanut butter. You can gently press the peanuts into the dough to help them adhere.
- Bake the Cookies: Bake for 10-12 minutes, or until the edges are set and the centers are still slightly soft. The baking time may vary depending on your oven, so it’s important to keep an eye on the cookies. They should be golden brown around the edges and slightly puffed up in the center.
- Cool the Cookies: Remove the baking sheets from the oven and let the cookies cool on the baking sheets for a few minutes before transferring them to a wire rack to cool completely. This allows the cookies to firm up slightly and prevents them from breaking when you move them.
Tips and Variations:
- Peanut Butter Swirl: For a more pronounced peanut butter flavor, reserve a small amount of peanut butter and swirl it into the tops of the cookies before baking.
- Chocolate Chunks: Substitute the chocolate chips with chopped chocolate chunks for a richer, more intense chocolate flavor.
- Different Nuts: Experiment with different types of nuts, such as walnuts, pecans, or almonds, instead of peanuts.
- Espresso Powder: Add a teaspoon of espresso powder to the dry ingredients to enhance the chocolate flavor.
- Make them Gluten-Free: Substitute the all-purpose flour with a gluten-free all-purpose flour blend. Be sure to use a blend that contains xanthan gum for best results.
- Storage: Store the cookies in an airtight container at room temperature for up to 3 days. You can also freeze the cookies for longer storage.
- Freezing the Dough: You can freeze the cookie dough for up to 2 months. Scoop the dough into balls and place them on a baking sheet lined with parchment paper. Freeze until solid, then transfer the frozen dough balls to a freezer bag. When ready to bake, bake from frozen, adding a few extra minutes to the baking time.
- Adjusting Sweetness: If you prefer a less sweet cookie, you can reduce the amount of sugar slightly. Start by reducing each sugar by 1/4 cup.
- Softening Butter Quickly: If you forgot to take the butter out of the refrigerator ahead of time, you can soften it quickly by cutting it into small cubes and microwaving it for a few seconds at a time, until it is softened but not melted. Be careful not to overheat the butter, as melted butter will affect the texture of the cookies.
- High Altitude Baking: If you live at a high altitude, you may need to adjust the recipe slightly. Try reducing the amount of baking soda by 1/4 teaspoon and adding an extra tablespoon of flour. You may also need to increase the baking time slightly.
Troubleshooting:
- Cookies are too flat: This could be due to several factors, such as using melted butter, not chilling the dough, or overmixing the dough. Make sure to use softened butter, chill the dough for at least 30 minutes, and avoid overmixing.
- Cookies are too dry: This could be due to overbaking or using too much flour. Make sure to bake the cookies for the correct amount of time and measure the flour accurately.
- Cookies are too hard: This could be due to overbaking or using too much sugar. Make sure to bake the cookies for the correct amount of time and reduce the amount of sugar slightly if desired.
- Cookies are not spreading: This could be due to using too much flour or not enough fat. Make sure to measure the flour accurately and use the correct amount of butter.
Enjoy your delicious Peanut Butter Brownie Cookies!

Conclusion:
Okay, friends, let’s be honest: you’ve scrolled this far because something about these Peanut Butter Brownie Cookies whispered your name, right? And trust me, that whisper was spot on. These aren’t just cookies; they’re a decadent, fudgy, peanut-buttery experience that will have you questioning every other cookie you’ve ever tasted. The rich, dark chocolate brownie base perfectly complements the salty-sweet peanut butter swirl, creating a symphony of flavors that dance on your tongue. They’re incredibly easy to make, require minimal ingredients, and deliver maximum impact. What more could you ask for?
But the real reason these cookies are a must-try? It’s the texture. We’re talking about a soft, chewy center with slightly crisp edges – the holy grail of cookie perfection. They’re not cakey, they’re not dry, they’re just…perfect. And the peanut butter? It’s not just mixed in; it’s swirled throughout, creating pockets of intense peanut butter flavor that will make your taste buds sing. Seriously, these cookies are dangerously addictive.
Serving Suggestions and Variations:
Now, let’s talk about how to enjoy these little slices of heaven. While they’re absolutely divine on their own, warm from the oven, there are plenty of ways to elevate your Peanut Butter Brownie Cookies experience. For the ultimate indulgence, try serving them with a scoop of vanilla ice cream and a drizzle of hot fudge sauce. Or, if you’re feeling adventurous, crumble them over a bowl of chocolate mousse for an extra layer of decadence.
Looking for variations? The possibilities are endless! Add a handful of chocolate chips to the batter for an extra chocolatey kick. Sprinkle some sea salt on top before baking to enhance the salty-sweet flavor. Or, for a truly unique twist, try using different nut butters, like almond or cashew butter, in place of the peanut butter. You could even add a layer of peanut butter cups in the middle of the cookie before baking for an extra peanut butter punch! Get creative and make them your own!
Don’t be intimidated by the “brownie” aspect – these cookies are surprisingly simple to make. The recipe is straightforward, and the results are consistently amazing. Even if you’re not a seasoned baker, I promise you can nail this one. The key is to not overbake them; you want them to be slightly soft in the center when you take them out of the oven. They’ll continue to set as they cool.
So, what are you waiting for? Preheat that oven, gather your ingredients, and get ready to experience the magic of Peanut Butter Brownie Cookies. I have no doubt that these will become a new favorite in your household. And when you do make them (because I know you will!), please, please, please share your experience! I’d love to hear what you think, what variations you tried, and how much everyone loved them. Tag me in your photos on social media – I can’t wait to see your creations! Happy baking!
I’m confident that after trying this recipe, you’ll agree that these are the best peanut butter brownie cookies you’ve ever had. They are a perfect blend of flavors and textures that will leave you wanting more. So go ahead, give them a try, and let me know what you think!
Peanut Butter Brownie Cookies: The Ultimate Recipe for Fudgy Goodness
Fudgy, chewy peanut butter and chocolate cookies that blend brownie and cookie textures perfectly.
Ingredients
Instructions
Recipe Notes
- Peanut Butter Swirl: For a more pronounced peanut butter flavor, reserve a small amount of peanut butter and swirl it into the tops of the cookies before baking.
- Chocolate Chunks: Substitute the chocolate chips with chopped chocolate chunks for a richer, more intense chocolate flavor.
- Different Nuts: Experiment with different types of nuts, such as walnuts, pecans, or almonds, instead of peanuts.
- Espresso Powder: Add a teaspoon of espresso powder to the dry ingredients to enhance the chocolate flavor.
- Make them Gluten-Free: Substitute the all-purpose flour with a gluten-free all-purpose flour blend. Be sure to use a blend that contains xanthan gum for best results.
- Storage: Store the cookies in an airtight container at room temperature for up to 3 days. You can also freeze the cookies for longer storage.
- Freezing the Dough: You can freeze the cookie dough for up to 2 months. Scoop the dough into balls and place them on a baking sheet lined with parchment paper. Freeze until solid, then transfer the frozen dough balls to a freezer bag. When ready to bake, bake from frozen, adding a few extra minutes to the baking time.
- Adjusting Sweetness: If you prefer a less sweet cookie, you can reduce the amount of sugar slightly. Start by reducing each sugar by 1/4 cup.
- Softening Butter Quickly: If you forgot to take the butter out of the refrigerator ahead of time, you can soften it quickly by cutting it into small cubes and microwaving it for a few seconds at a time, until it is softened but not melted. Be careful not to overheat the butter, as melted butter will affect the texture of the cookies.
- High Altitude Baking: If you live at a high altitude, you may need to adjust the recipe slightly. Try reducing the amount of baking soda by 1/4 teaspoon and adding an extra tablespoon of flour. You may also need to increase the baking time slightly.
- Cookies are too flat: This could be due to several factors, such as using melted butter, not chilling the dough, or overmixing the dough. Make sure to use softened butter, chill the dough for at least 30 minutes, and avoid overmixing.
- Cookies are too dry: This could be due to overbaking or using too much flour. Make sure to bake the cookies for the correct amount of time and measure the flour accurately.
- Cookies are too hard: This could be due to overbaking or using too much sugar. Make sure to bake the cookies for the correct amount of time and reduce the amount of sugar slightly if desired.
- Cookies are not spreading: This could be due to using too much flour or not enough fat. Make sure to measure the flour accurately and use the correct amount of butter.
Frequently Asked Questions
Printable Recipe Card
Want just the essential recipe details without scrolling through the article? Get our printable recipe card with just the ingredients and instructions.
Leave a Comment