
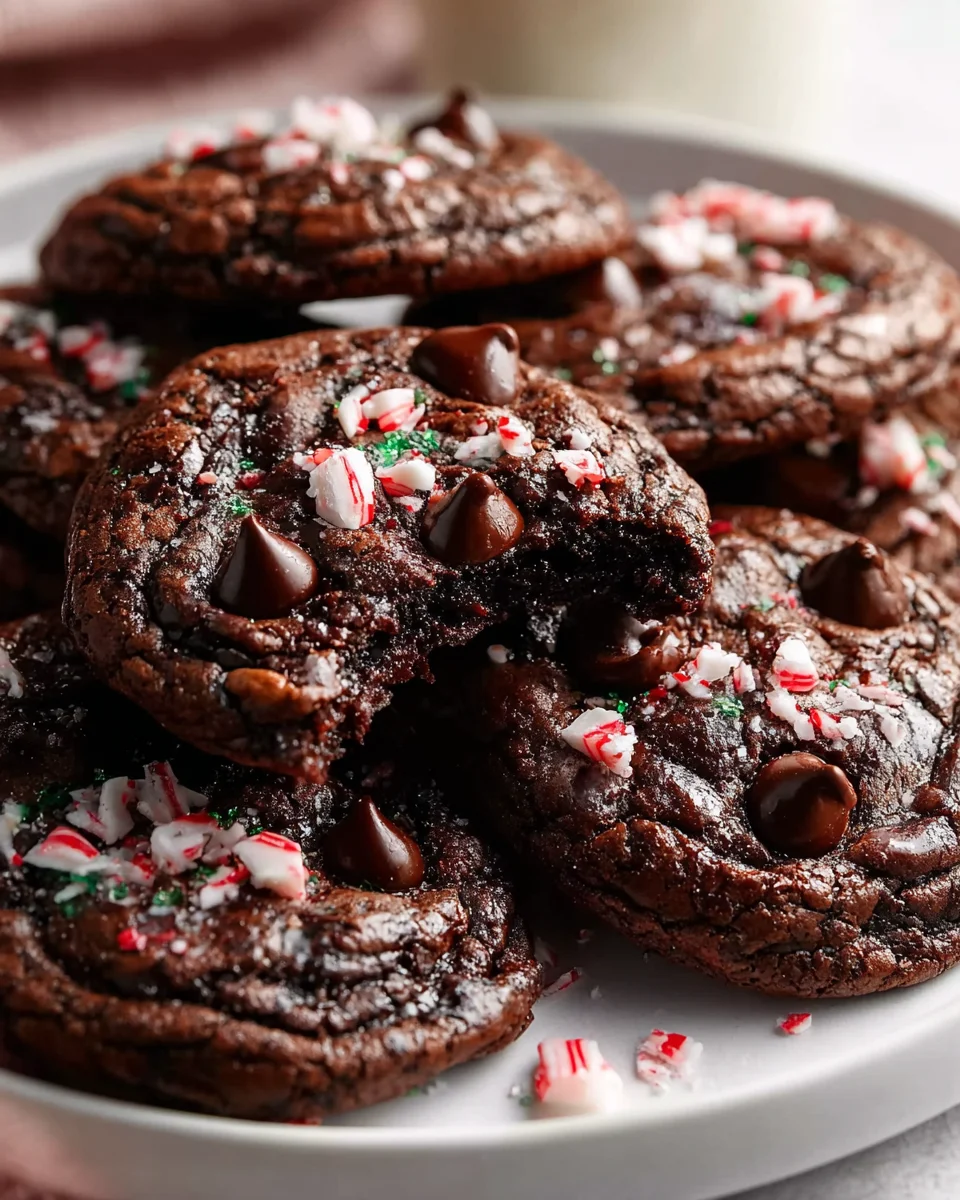
Peppermint Brownie Cookies are truly a magical creation, especially as the colder months approach. I find myself constantly drawn to treats that perfectly balance deep, decadent richness with an invigorating coolness, and these cookies deliver exactly that. Imagine sinking your teeth into a confection that offers the best of a fudgy brownie with the refreshing burst of fresh peppermint – it’s an experience that awakens the senses and brings a smile to your face!
While the history of brownies themselves is quite storied, tracing back to the late 19th century in America, the enchanting addition of peppermint transforms them into something truly spectacular. This delightful combination is often associated with festive gatherings and heartwarming holiday traditions, making them a staple for celebrating special moments. People simply adore this particular dish because it offers the comforting chewiness of a classic brownie cookie paired with that unmistakable, refreshing minty zing. These aren’t just any cookies; they are an invitation to joy, a perfect treat for sharing with loved ones, and I guarantee they will become a beloved staple in your baking repertoire. Get ready to fall in love with these irresistible Peppermint Brownie Cookies!
Ingredients:
-
For the Peppermint Brownie Cookies:
- 1 cup (2 sticks or 226g) unsalted butter, cut into pieces
- 4 ounces (113g) unsweetened chocolate, high quality recommended, chopped
- 2 cups (400g) granulated sugar
- 4 large eggs, at room temperature
- 2 teaspoons pure vanilla extract
- 1 teaspoon pure peppermint extract
- 1 ½ cups (180g) all-purpose flour, spooned and leveled
- ¾ cup (65g) good quality unsweetened cocoa powder (Dutch-processed recommended for a darker, richer color)
- 1 teaspoon baking powder
- ½ teaspoon salt
- 1 cup (170g) semi-sweet chocolate chips or chopped chocolate chunks (optional, but highly recommended for extra fudginess)
-
For the Peppermint Buttercream Frosting:
- 1 cup (2 sticks or 226g) unsalted butter, softened to room temperature
- 4 cups (480g) powdered sugar (confectioners’ sugar), sifted
- ¼ cup (60ml) heavy cream or milk, plus more if needed
- 1 teaspoon pure vanilla extract
- ½ teaspoon pure peppermint extract (start with ½ and add more to taste)
- Pinch of salt
- Optional: 1-2 drops green food coloring (gel food coloring for best results)
-
For the Topping:
- ½ cup crushed candy canes (about 5-6 regular-sized candy canes), plus more for garnish if desired
Preparing the Peppermint Brownie Cookie Dough
- Preheat and Prep: Before you even begin mixing, let’s get our workspace ready! Preheat your oven to 350°F (175°C). Line two large baking sheets with parchment paper. This is crucial for preventing sticking and ensuring an easy cleanup. I find that parchment paper really makes a difference for these fudgy brownie cookies.
-
Melt the Chocolate and Butter: In a medium-sized, heatproof bowl, combine the chopped unsweetened chocolate and the cubed unsalted butter. You have a couple of options here:
- Microwave Method: Heat in 30-second intervals, stirring well after each, until smooth and fully melted. Be very careful not to scorch the chocolate. This usually takes 1.5 to 2 minutes total.
- Double Boiler Method: Place the bowl over a saucepan of simmering water, ensuring the bottom of the bowl does not touch the water. Stir frequently until the chocolate and butter are completely melted and smooth. This method offers more gentle and even melting.
Once melted, set the mixture aside to cool slightly while you prepare the wet ingredients. You want it warm, not hot, when it joins the eggs.
- Combine Wet Ingredients: In a large mixing bowl (the bowl of a stand mixer fitted with the whisk attachment or a large bowl with a hand mixer works best here), combine the granulated sugar and the four large eggs. Beat them together on medium-high speed for about 3-5 minutes. You’re looking for a transformation here: the mixture should become very light in color, pale yellow, thick, and almost fluffy. It will increase significantly in volume and fall in thick ribbons when you lift the whisk. This step is absolutely vital for achieving that crackly top on your Peppermint Brownie Cookies! Don’t rush it.
- Incorporate Extracts and Chocolate Mixture: Reduce the mixer speed to low. Carefully pour the slightly cooled chocolate-butter mixture into the egg and sugar mixture. Mix until just combined. Next, add the pure vanilla extract and the pure peppermint extract. Mix for another 30 seconds until everything is well incorporated and fragrant. Scrape down the sides of the bowl with a rubber spatula to ensure no unmixed pockets remain.
- Whisk Dry Ingredients: In a separate medium bowl, whisk together the all-purpose flour, unsweetened cocoa powder, baking powder, and salt. Whisking ensures that these dry ingredients are evenly distributed and aerated, preventing lumps in your final cookie dough.
- Combine Wet and Dry: With the mixer on its lowest speed, or by hand using a sturdy spatula, gradually add the dry ingredient mixture to the wet ingredients. Mix just until no streaks of flour remain. It’s crucial not to overmix at this stage! Overmixing develops the gluten in the flour too much, which can lead to tough, chewy cookies instead of the desirable soft and fudgy texture we’re aiming for for our Peppermint Brownie Cookies. The dough will be thick and shiny.
- Fold in Chocolate Chips: If you’re using them (and I highly recommend it for extra richness!), gently fold in the semi-sweet chocolate chips or chopped chocolate chunks by hand using a rubber spatula. Distribute them evenly throughout the dough.
- Chill the Dough (Critical Step!): Cover the bowl with plastic wrap and refrigerate the dough for at least 30 minutes, or up to 2 hours. This chilling process allows the flour to fully hydrate, the flavors to meld, and most importantly, it makes the dough much easier to handle and helps prevent the cookies from spreading too much in the oven, ensuring they maintain that desirable thick, chewy texture.
Baking the Peppermint Brownie Cookies
- Scoop the Dough: Once the dough is adequately chilled, remove it from the refrigerator. Using a 1.5 to 2-tablespoon cookie scoop (or a well-rounded tablespoon), drop spoonfuls of the dough onto the prepared baking sheets, leaving about 2 inches of space between each cookie. The dough will be quite dense and sticky, but the chilling helps tremendously. For a truly uniform look, you can gently roll each scooped portion into a smooth ball before placing it on the baking sheet.
- Bake to Perfection: Place one baking sheet at a time in the preheated oven. Bake for 10-13 minutes. You’ll know they’re done when the edges are set and slightly cracked, but the centers still look a little soft and fudgy. Do not overbake! These Peppermint Brownie Cookies are meant to be gooey and rich in the middle. The residual heat from the baking sheet will continue to cook them slightly as they cool.
- Cooling Process: As soon as you remove the cookies from the oven, let them cool on the baking sheets for about 5 minutes. This allows them to firm up slightly before you attempt to move them. They will be delicate straight out of the oven. After 5 minutes, carefully transfer the cookies to a wire rack to cool completely. It’s absolutely essential that the cookies are completely cool before you even think about frosting them. Warm cookies will melt your beautiful buttercream, creating a messy situation.
Whipping Up the Peppermint Buttercream Frosting
- Cream the Butter: In the bowl of a stand mixer fitted with the paddle attachment (or a large bowl with a hand mixer), beat the softened unsalted butter on medium speed for 2-3 minutes. You want it to become light and fluffy, almost pale in color. This aerates the butter, which is key to a fluffy buttercream.
- Add Powdered Sugar: Gradually add the sifted powdered sugar to the butter, one cup at a time, mixing on low speed until combined after each addition. Once all the sugar is incorporated, increase the speed to medium-high and beat for another 2-3 minutes. The mixture will start to thicken and become creamy.
- Incorporate Liquids and Flavor: With the mixer still on low, pour in the heavy cream (or milk), vanilla extract, peppermint extract, and a pinch of salt. Mix until just combined.
- Beat to Fluffy Perfection: Increase the mixer speed to medium-high and beat for an additional 3-5 minutes. During this time, the buttercream will transform into a wonderfully light, fluffy, and spreadable consistency. It should be smooth and airy. If it’s too thick, add more heavy cream or milk, one teaspoon at a time, until you reach your desired consistency. If it’s too thin, you can add a little more sifted powdered sugar. Taste and adjust the peppermint extract if you desire a stronger mint flavor. Remember, a little goes a long way!
- Optional Green Color: If you’d like to add a festive touch to your Peppermint Brownie Cookies, add 1-2 drops of green gel food coloring to the frosting. Mix on low speed until the color is evenly distributed. Gel food coloring provides vibrant color without thinning out the frosting.
Assembling and Decorating Your Peppermint Brownie Cookies
- Prepare for Frosting: Ensure your Peppermint Brownie Cookies are completely cool to the touch. This is a non-negotiable step. If they’re even slightly warm, your beautiful buttercream will melt and slide right off.
-
Frosting the Cookies: You have a couple of options for applying the frosting:
- Spreading Method: Using an offset spatula or a butter knife, spread a generous dollop of peppermint buttercream onto the flat side of each cooled cookie. Spread it evenly to the edges. This gives a rustic, homemade look that is incredibly charming.
- Piping Method (for a fancier touch): Transfer the buttercream frosting to a piping bag fitted with your favorite decorative tip (a star tip or a round tip works wonderfully). Pipe a swirl or a simple mound of frosting onto each cookie. This method adds an elegant flair, perfect for holiday gatherings.
I usually opt for a generous spread, as it’s quicker and still looks absolutely delicious.
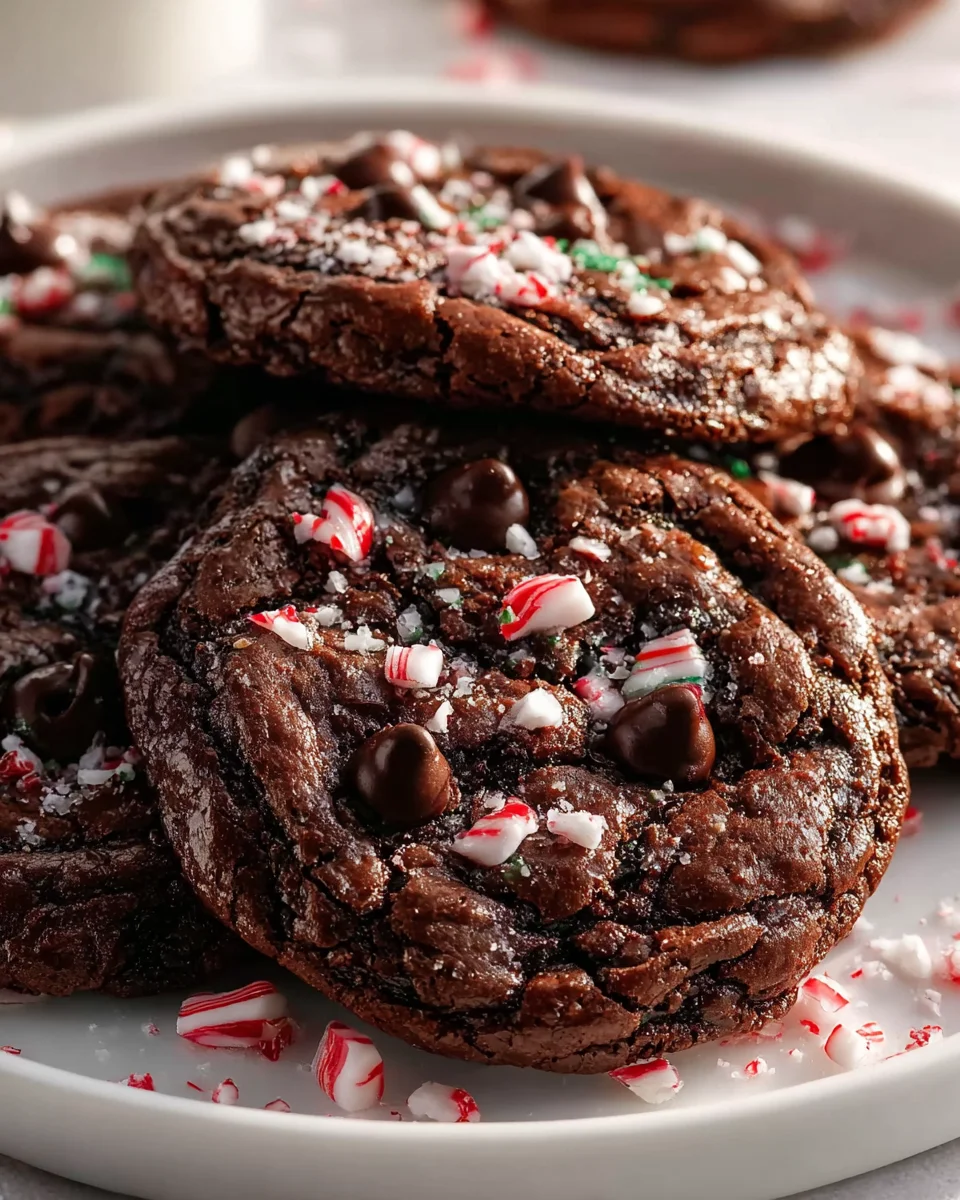
- Add Crushed Candy Canes: Immediately after frosting each cookie (while the frosting is still fresh and tacky), sprinkle a good amount of crushed candy canes over the top. The vibrant red and white bits of candy cane not only add a beautiful visual contrast and sparkle but also provide a delightful crunch and an extra burst of peppermint flavor that truly elevates these Peppermint Brownie Cookies. Gently press some of the candy cane pieces into the frosting if needed to ensure they adhere well.
- Allow to Set: Let the frosted Peppermint Brownie Cookies sit at room temperature for about 15-30 minutes, or until the frosting has slightly set. This helps the candy canes adhere more firmly.
- Storage: Store the finished Peppermint Brownie Cookies in an airtight container at room temperature for up to 3-4 days. For longer storage, you can refrigerate them for up to a week. If refrigerating, allow them to come to room temperature for about 15-20 minutes before serving for the best texture and flavor. They also freeze beautifully, unfrosted, for up to 2 months. Just thaw and frost when ready to enjoy!
- Serve and Enjoy: Gather your loved ones and delight in these decadent, fudgy, and wonderfully minty Peppermint Brownie Cookies. They are truly a showstopper and perfect for holiday entertaining or just a cozy treat. Every bite offers a rich chocolate experience with that invigorating peppermint kick. Enjoy the fruits of your labor!
Conclusion:
Well, my friends, we’ve reached the sweet end of our journey with this incredible recipe, and I truly hope you’re feeling as excited as I am about getting these beauties into your oven. If there’s one thing I want you to take away from this, it’s that these aren’t just any ordinary baked good; they are a revelation. These Peppermint Brownie Cookies are an absolute game-changer, perfectly marrying the rich, fudgy intensity of a classic brownie with the delightful chew of a perfect cookie, all while delivering that invigorating burst of cool peppermint. Imagine sinking your teeth into a warm, decadent treat that melts in your mouth, leaving behind a refreshing tingle that brightens your palate. This recipe isn’t just easy to follow; it consistently delivers results that will have everyone asking for more. It’s the kind of dessert that feels gourmet and sophisticated, yet is surprisingly simple to whip up, making it perfect for both seasoned bakers and those just starting their culinary adventures. Trust me, the sheer joy of creating and tasting these cookies is something you absolutely deserve to experience. They elevate any occasion, transforming a simple snack into a memorable moment of pure bliss. You’re not just baking cookies; you’re crafting edible happiness that will leave a lasting impression.
Now, let’s talk about enjoying your magnificent creations. While these Peppermint Brownie Cookies are utterly irresistible straight from the cooling rack, still warm and gooey, their versatility extends far beyond that. For an indulgent afternoon treat, pair them with a steaming mug of hot cocoa, perhaps even garnished with a dollop of whipped cream and a sprinkle of crushed candy canes for extra festive flair. A tall glass of cold milk is, of course, a timeless companion, offering a perfect counterpoint to the rich chocolate and vibrant peppermint. But why stop there? Imagine crumbling one over a scoop of vanilla bean ice cream, allowing the warmth of the cookie to slightly soften the ice cream into a delightful melange of flavors and textures. Or, for a truly decadent dessert experience, serve them alongside a shot of espresso, where the bitter coffee notes will beautifully complement the sweet, minty chocolate. They also make an incredibly thoughtful and impressive homemade gift; package them beautifully in a decorative tin or box, tied with a festive ribbon, and watch the smiles light up. They are a guaranteed showstopper on any holiday dessert platter, standing out with their unique charm and irresistible aroma. These cookies are truly a celebration in every bite, designed to bring warmth and cheer to any gathering or a quiet moment of self-indulgence.
One of the things I love most about this recipe is its inherent flexibility. While the classic Peppermint Brownie Cookies are absolutely divine as written, feel free to let your creativity soar! Want to switch things up slightly? Consider experimenting with different extracts; a touch of almond extract instead of peppermint could create a unique chocolate-almond cookie, or a hint of orange zest could add a beautiful citrusy note. You could also play with toppings: before baking, press a few mini chocolate chips onto the tops for extra chocolatey goodness, or after they’ve cooled, drizzle them with melted white chocolate for an elegant finish. For those looking to cater to specific dietary needs, many fantastic gluten-free all-purpose flour blends work beautifully in this recipe, allowing everyone to enjoy a taste of this magic. You can even explore vegan alternatives for butter and eggs to make these accessible to an even wider audience. Each variation opens up a new world of flavor, making this recipe a continuous source of inspiration in your kitchen. So, my dear bakers, I wholeheartedly encourage you to roll up your sleeves, preheat your ovens, and dive into the delightful process of making these cookies. I promise you, the aroma alone will be worth the effort, and the taste will transport you to a realm of pure culinary joy. Once you’ve experienced the magic, please don’t keep it to yourself! I would absolutely love to hear about your baking adventures. Share your successes, your serving ideas, and any creative variations you come up with in the comments section below, or even better, tag me on social media with your beautiful creations. Let’s build a community of happy bakers, one perfect cookie at a time. Happy baking!
Peppermint Brownie Cookies: Chewy, Minty Chocolate Treats!
Imagine sinking your teeth into a confection that offers the best of a fudgy brownie with the refreshing burst of fresh peppermint – it’s an experience that awakens the senses and brings a smile to your face!
Ingredients
Instructions
Important Information
Nutrition Facts (Per Serving)
It is important to consider this information as approximate and not to use it as definitive health advice.
Allergy Information
Please check ingredients for potential allergens and consult a health professional if in doubt.

Leave a Comment