
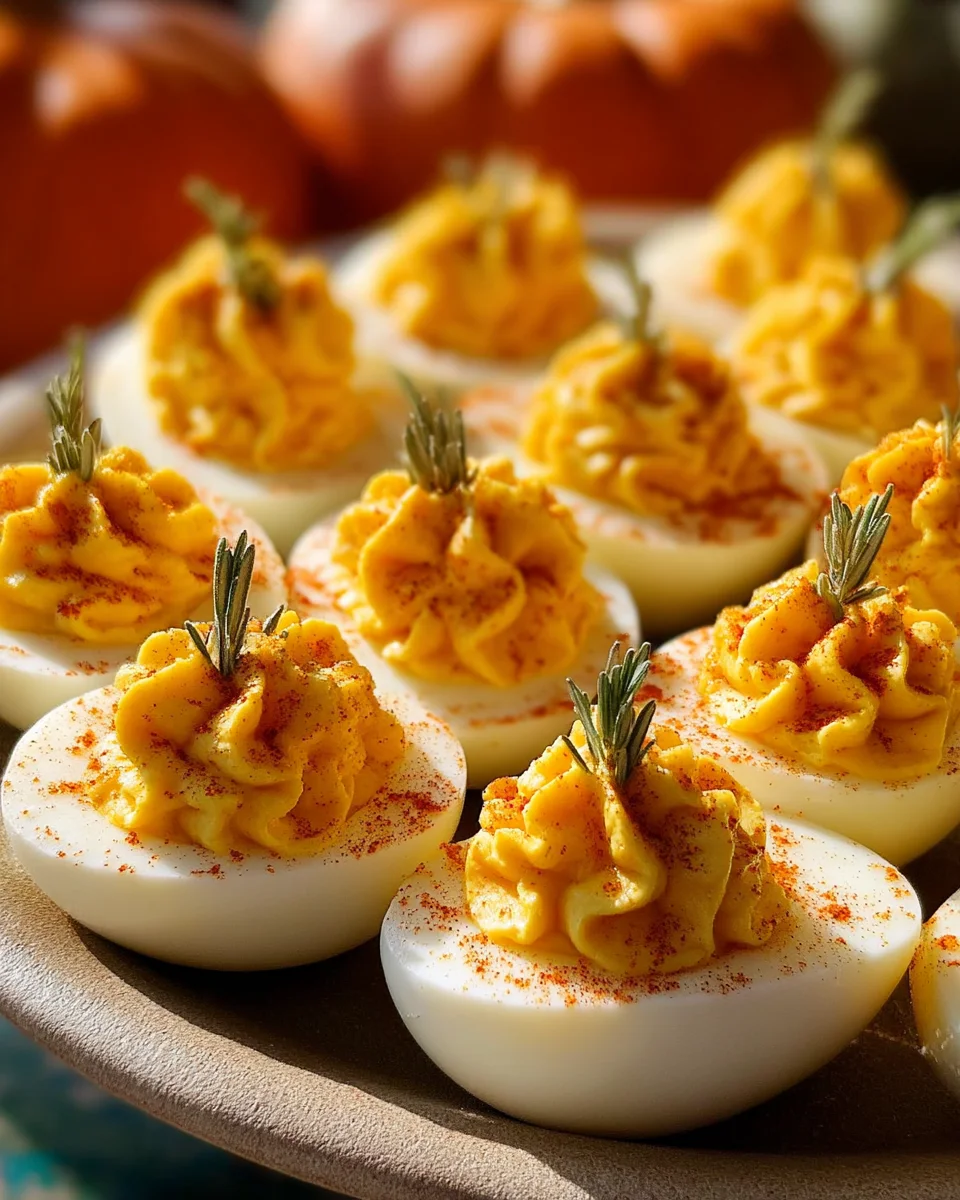
Pumpkin Patch Deviled Eggs are not just a dish; they’re a delightful celebration of autumn, a whimsical treat that brings a smile to every face. If you’re searching for a show-stopping appetizer that combines classic comfort with seasonal charm, then you’ve absolutely found your next culinary obsession. I remember the first time I conceptualized this recipe – a desire to infuse the nostalgic appeal of traditional deviled eggs with the vibrant spirit of the fall harvest. Deviled eggs themselves boast a rich history, gracing tables for centuries as a beloved finger food, perfect for gatherings from casual picnics to elegant soirées. This particular rendition elevates that timeless favorite, transforming it into a visually stunning masterpiece with subtle, savory hints that capture the essence of a crisp autumn day.
People adore deviled eggs for their irresistible creamy texture and perfectly balanced savory flavor, making them an undisputed crowd-pleaser. With our unique Pumpkin Patch Deviled Eggs, you get all that familiar deliciousness, plus an unexpected visual charm and a wonderfully subtle earthy note that is simply perfect for your fall festivities.
A Convenient and Festive Appetizer for Any Occasion
They are incredibly convenient to prepare ahead of time and incredibly easy for guests to enjoy, making them an ideal addition to any seasonal spread, from Halloween parties to Thanksgiving appetizers. Prepare to impress everyone with these delightful bites!

Ingredients:
- 12 large eggs, preferably organic and free-range for richer yolks and easier peeling
- ½ cup good quality mayonnaise, such as Hellmann’s or Duke’s, or your favorite homemade version
- 1 tablespoon Dijon mustard, for a subtle tang that complements the egg and pumpkin
- 1 teaspoon apple cider vinegar, to brighten the flavors and add a touch of acidity
- ¼ cup pumpkin puree, 100% pure pumpkin, not pumpkin pie filling – this is crucial for color and a delicate flavor
- ¼ teaspoon curry powder (optional, but I find it adds a lovely warmth and depth of color)
- ½ teaspoon salt, plus more to taste
- ¼ teaspoon freshly ground black pepper, plus more to taste
- Orange gel food coloring (optional, if you want a more intense, vibrant pumpkin color beyond what the puree provides)
- Fresh chives, for garnishing the “pumpkin stems”
- Fresh parsley or dill sprigs, for garnishing the “pumpkin leaves” or “vines”
Preparing the Perfect Hard-Boiled Eggs
Achieving the perfect hard-boiled egg is the foundation of any fantastic deviled egg recipe, especially our delightful “Pumpkin Patch Deviled Eggs.” I always aim for yolks that are fully cooked but still creamy, and whites that are tender, not rubbery. Overcooked eggs can lead to that unsightly green ring around the yolk, which we definitely want to avoid for our vibrant orange pumpkins!
- Start with Room Temperature Eggs (Optional but Recommended): While not strictly necessary, some chefs swear by letting eggs come to room temperature for about 30 minutes before boiling. The theory is that it helps prevent cracking when they hit the hot water and can lead to more evenly cooked whites. I often skip this step for convenience, and still get great results, but it’s a little trick up my sleeve if I have time.
- Gentle Placement in a Pot: Carefully place your 12 large eggs in a single layer at the bottom of a large saucepan. You don’t want to overcrowd the pot, as this can lead to uneven cooking and cracked shells.
- Cover with Cold Water: Add enough cold water to the pot to cover the eggs by at least one inch. I always make sure they’re fully submerged.
- Add a Pinch of Salt or Baking Soda (Optional): Many people, myself included, add a pinch of salt or about half a teaspoon of baking soda to the water. Some believe this helps with peeling, especially for fresher eggs, by altering the pH of the water. While the science on this is debated, I find it doesn’t hurt and might offer a little extra insurance.
- Bring to a Rolling Boil: Place the pot on the stovetop over high heat and bring the water to a rapid, rolling boil.
- Remove from Heat and Cover: As soon as the water reaches a full boil, immediately remove the pot from the heat. Cover the pot tightly with a lid. Do not lift the lid! This is where the magic happens and the residual heat cooks the eggs gently.
- Let Them Sit: For large eggs, let them sit in the hot water for exactly 12-14 minutes. For medium eggs, 10-12 minutes; for extra-large, 14-16 minutes. I’ve found 13 minutes to be my sweet spot for large eggs – perfectly set yolks without any hint of green.
- Prepare an Ice Bath: While the eggs are sitting, prepare a large bowl of ice water. Fill it generously with ice cubes and cold water. This ice bath is probably the most crucial step for easy peeling and stopping the cooking process dead in its tracks.
- Transfer to Ice Bath: As soon as the timer goes off, use a slotted spoon to carefully transfer the cooked eggs from the hot water directly into the ice bath. Let them cool in the ice bath for at least 10-15 minutes, or until they are completely cool to the touch. This rapid cooling causes the egg to contract, separating the white from the membrane just inside the shell, making peeling much easier.
- Peel with Care: Once the eggs are completely cool, it’s time to peel them. I like to crack the shell gently all over by tapping it on a hard surface, then roll it between my palms to loosen the shell further. Start peeling from the wider end, where the air pocket usually is. Peeling under cool running water can also help wash away tiny shell fragments and makes the process smoother. Take your time; a beautifully peeled egg is essential for our “Pumpkin Patch Deviled Eggs” presentation.
- Slice and Separate: Using a sharp knife, carefully slice each peeled egg in half lengthwise. Gently scoop out the bright yellow yolks into a medium-sized mixing bowl. Place the egg white halves on a platter, cut-side up, ready to be filled. If any of the whites tear slightly, don’t worry too much; the filling will cover most imperfections.
Crafting the “Pumpkin Patch” Yolk Filling
Now for the fun part – transforming those beautiful yolks into a rich, creamy, and vibrantly colored filling that truly embodies the spirit of our “Pumpkin Patch Deviled Eggs.” This is where the flavor profile comes alive, and we infuse it with that delightful autumn essence.
- Mash the Yolks Thoroughly: Using a fork, mash the reserved egg yolks in the mixing bowl until they are completely smooth and free of any lumps. I really work them over to ensure a super creamy texture for the filling. A smooth filling is key to a beautiful piped egg.
- Add the Core Flavorings: To the mashed yolks, add the mayonnaise, Dijon mustard, and apple cider vinegar. These are the classic components that give deviled eggs their signature tang and creaminess. Stir everything together until well combined.
- Introduce the Pumpkin and Seasonings: Now, let’s bring in the “pumpkin” element! Add the ¼ cup of pumpkin puree, ½ teaspoon of salt, ¼ teaspoon of black pepper, and the optional ¼ teaspoon of curry powder.
- Mix Until Smooth and Creamy: Stir all the ingredients together vigorously. You want the mixture to be incredibly smooth, light, and airy. I often use a spatula to really press against the sides of the bowl to ensure there are no hidden lumps. The pumpkin puree will immediately begin to tint the mixture a lovely pale orange.
- Adjust Color with Food Coloring (If Desired): If you’re looking for a more intense, vibrant orange – truly reminiscent of a bright autumn pumpkin – now is the time to add a tiny drop of orange gel food coloring. Gel food coloring is concentrated, so start with a toothpick’s worth and mix well. Add more, tiny amounts at a time, until you achieve your desired pumpkin hue. Remember, you can always add more, but you can’t take it away! I usually find a small amount is enough to make the color really pop.
- Taste and Adjust Seasoning: This is a crucial step! Always taste your filling before piping. Adjust the salt, pepper, or even add a touch more Dijon or vinegar if you feel it needs more zing. Ensuring the flavor is perfect at this stage guarantees a delicious end product.
- Prepare for Piping: To get that professional, swirled “pumpkin” look, transfer the yolk mixture into a pastry bag fitted with a star tip (I prefer a large open star tip, like an Ateco 826 or Wilton 1M, for a substantial swirl). If you don’t have a pastry bag, a sturdy Ziploc bag with a corner snipped off will work in a pinch, though the star effect won’t be there. Alternatively, for a more rustic look, you can simply spoon the filling into the egg white halves.
- Fill the Egg Whites: Carefully pipe or spoon the pumpkin-flavored yolk mixture back into each egg white half. Create a nice, generous mound that stands tall, mimicking the round shape of a small pumpkin. If using a star tip, pipe in a circular motion, starting from the outside and working your way inward to create a lovely rosette.
Decorating Your “Pumpkin Patch” Deviled Eggs
This is where our “Pumpkin Patch Deviled Eggs” truly come to life and become an edible work of art. The garnishes are simple yet incredibly effective in transforming a delicious deviled egg into an adorable mini pumpkin.
- Create the Chive Stems: Take a handful of fresh chives. I like to select longer, straighter pieces. With a sharp knife, cut them into small, approximately ½-inch to ¾-inch long segments. These will be our “pumpkin stems.”
- Insert the Stems: Gently insert one chive segment upright into the very center of the piped yolk filling on each deviled egg. Push it down just enough so it stands securely. The dark green chive against the bright orange filling creates a striking contrast that instantly screams “pumpkin!”
- Add the Greenery (Leaves/Vines): Now for the “leaves” or “vines” to complete our pumpkin look. Take small sprigs of fresh parsley or dill. I often pluck off tiny individual leaves or snip very small pieces.
- Position the Greenery: Carefully place one or two small parsley or dill sprigs next to the chive stem on each deviled egg. Arrange them artfully to resemble tiny leaves or tendrils curling around the pumpkin. The fresh green adds another layer of visual appeal and a burst of fresh herb flavor.
- Arranging on a Platter: Once all your “Pumpkin Patch Deviled Eggs” are decorated, arrange them beautifully on a serving platter. For an extra festive touch, you can place them on a bed of fresh kale or lettuce leaves to mimic a “patch.” A sprinkle of smoked paprika over the platter (not directly on the eggs) can also enhance the autumn vibe.
Chilling and Serving Your Autumn Delights
With all that care and attention to detail, you’re just a few steps away from enjoying these charming and delicious “Pumpkin Patch Deviled Eggs.” Proper chilling is essential not only for food safety but also for allowing the flavors to meld and the filling to firm up perfectly.
- Chilling is Key: Once decorated, your “Pumpkin Patch Deviled Eggs” need to chill in the refrigerator for at least 30 minutes. Ideally, I like to give them an hour or two. This time allows the flavors to fully develop and meld together, and it ensures the filling is perfectly set, making them easier and more pleasant to eat. Never serve deviled eggs at room temperature for extended periods.
- Cover for Freshness: While chilling, cover the platter loosely with plastic wrap. This prevents the eggs from drying out and absorbing any refrigerator odors. If you are making them ahead of time, a well-sealed container is even better.
- Serving Temperature: Deviled eggs are always best served chilled. Pull them out of the refrigerator just before you plan to serve them. They’re typically a starter or a side dish, perfect for autumn gatherings, Halloween parties, or Thanksgiving appetizers.
- Storage Tips: If you have any leftovers (which is rare with these!), store them in an airtight container in the refrigerator for up to 2-3 days. While they are still safe to eat, deviled eggs are always at their absolute best within the first 24 hours. The whites can start to dry out and the flavors can diminish slightly after that. For best results, I often prepare the filling and keep the egg white halves separate in the fridge, then fill and decorate just before serving. This ensures maximum freshness and presentation.
- Enjoy the Compliments: Prepare for a chorus of “oohs” and “aahs” when you present these adorable and flavorful “Pumpkin Patch Deviled Eggs.” They are a true conversation starter and a testament to how a little creativity can elevate a classic dish into something truly special and festive. These aren’t just deviled eggs; they’re a little bite of autumn magic!
Conclusion:
Well, my friends, we’ve reached the delicious finale, and I truly hope you’re feeling as excited as I am about these incredible creations. If you’ve been searching for that perfect appetizer to elevate your autumn gatherings, or simply a fun and festive way to surprise your taste buds, then look no further. This recipe isn’t just about making deviled eggs; it’s about crafting a centerpiece, a conversation starter, and an absolute delight that encapsulates the warmth and charm of the fall season. The unique presentation and carefully balanced flavors make these Pumpkin Patch Deviled Eggs an absolute must-try for anyone who appreciates culinary creativity and delicious simplicity. They take a beloved classic and infuse it with a whimsical, seasonal twist that is genuinely hard to resist, promising smiles and satisfied palates all around.
What sets this recipe apart is not just its undeniable visual appeal, though let’s be honest, they’re incredibly charming! It’s also the harmonious blend of creamy, tangy, and subtly spiced filling encased in perfectly cooked egg whites. Every bite delivers that familiar comfort of a classic deviled egg, but with an added layer of sophistication and autumnal joy. They’re deceptively easy to make, yet yield such a professional and impressive result that your guests will surely think you’ve spent hours meticulously preparing them. From the vibrant orange hue of the filling to the clever green “stem” garnish, every detail is designed to bring a touch of a cozy pumpkin patch right to your appetizer spread. They manage to be both elegant and playful, making them suitable for a wide array of occasions, from a sophisticated dinner party to a casual family brunch.
When it comes to serving these beauties, the possibilities are wonderfully varied. Imagine them gracing your Thanksgiving appetizer spread, adding a pop of color and unexpected flavor alongside traditional dishes. They’re an absolute hit at Halloween parties, where their festive look fits right in amongst spooky decor, offering a sophisticated (and tasty!) alternative to candy. Don’t limit them to just holidays, though! These would be fantastic for a fall potluck, a harvest festival celebration, or even a cozy Sunday brunch during the cooler months. Pair them with a crisp hard cider, a glass of sparkling rosé, or even a robust amber ale for a truly autumnal experience. For a casual setting, arrange them on a rustic wooden board with some assorted cheeses, cured meats, and crusty bread to create a delightful fall charcuterie experience. They hold up remarkably well, making them an excellent make-ahead option for busy hosts, allowing you more time to enjoy your guests and the festive atmosphere.
Feeling adventurous? These deviled eggs are also wonderfully adaptable, offering plenty of room for your own creative variations. For those who love a bit more heat, a pinch more cayenne pepper or a dash of hot sauce folded into the filling would provide a delightful kick. If you’re a fan of smoky flavors, a whisper of smoked paprika can deepen the earthiness and add another layer of complexity. Consider experimenting with different garnishes beyond the chive stem; a tiny sprig of fresh dill, a sprinkle of finely chopped crispy bacon bits, or even a dusting of black sesame seeds could add both visual interest and textural contrast. For a slightly different flavor profile, you could swap out some of the yellow mustard for a high-quality Dijon or a whole-grain mustard to introduce a sharper, more nuanced tang. Or, if you want to lean into the ‘pumpkin’ idea even more, a tiny, tiny pinch of pumpkin pie spice (be very careful not to overdo it!) could offer an unexpected aromatic note. The beauty of this recipe lies in its forgiving nature and its invitation for you to personalize it to your heart’s content.
So, what are you waiting for? I genuinely hope that this journey through the creation of these delightful Pumpkin Patch Deviled Eggs has inspired you to roll up your sleeves and give them a try. There’s an immense satisfaction that comes from creating something both beautiful and incredibly tasty, and I promise you, these eggs deliver on both fronts. Don’t be shy about experimenting with the flavors and garnishes – make them your own! Once you’ve whipped up your batch, I would absolutely love to hear about your experience. Did you add a secret ingredient? Did your guests rave about them? Please share your culinary adventures with me and the rest of our community! Snap a photo, drop a comment, or tag me on social media. Your feedback and creative twists inspire us all. Happy cooking, and enjoy every single delightful bite of these festive fall appetizers!
Pumpkin Patch Deviled Eggs
These festive Pumpkin Patch Deviled Eggs are a whimsical autumn treat, transforming a classic appetizer into a visually stunning masterpiece with subtle, savory hints of the fall harvest. Perfect for any seasonal gathering.
Ingredients
Instructions
Important Information
Nutrition Facts (Per Serving)
It is important to consider this information as approximate and not to use it as definitive health advice.
Allergy Information
Please check ingredients for potential allergens and consult a health professional if in doubt.

Leave a Comment