
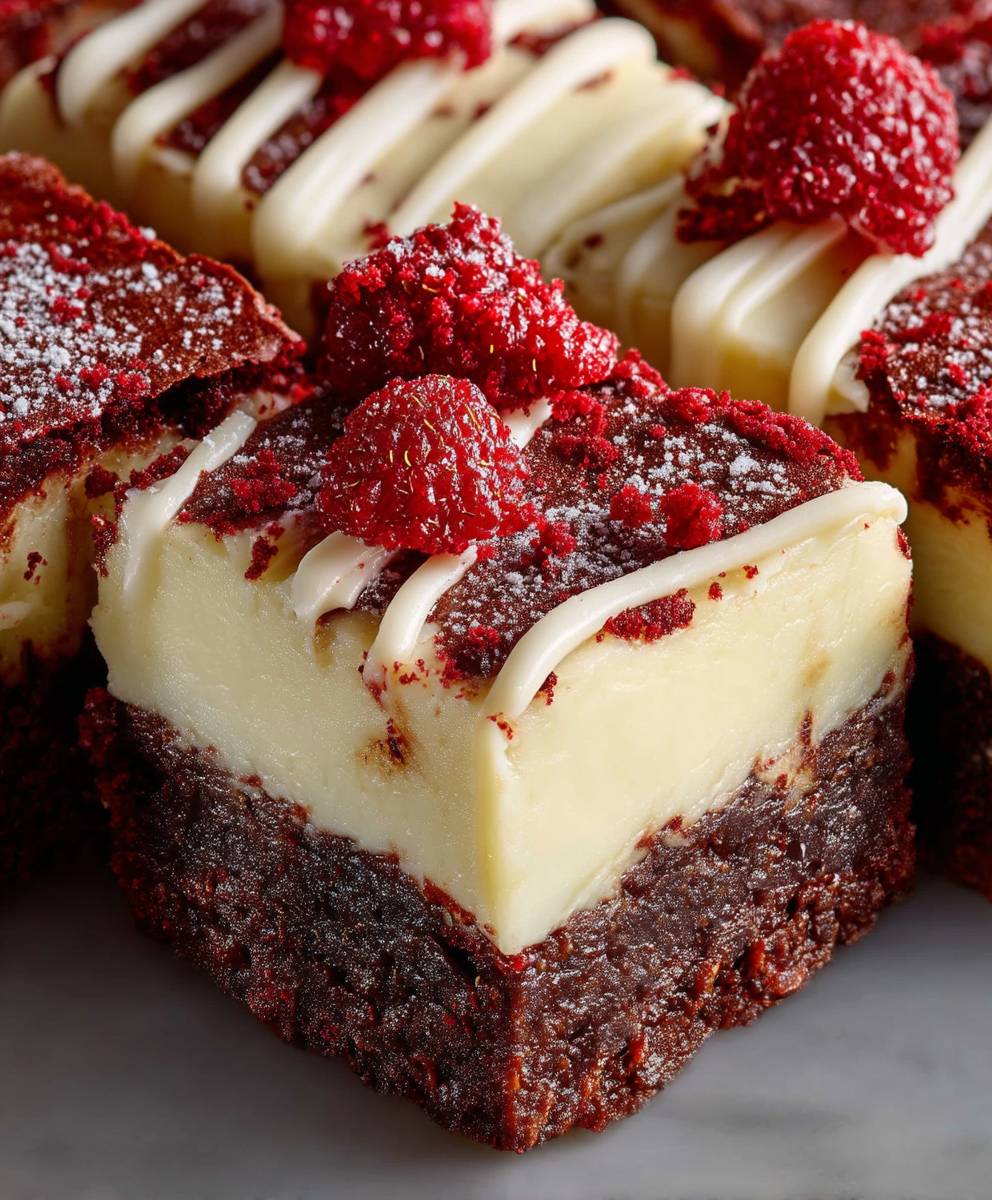
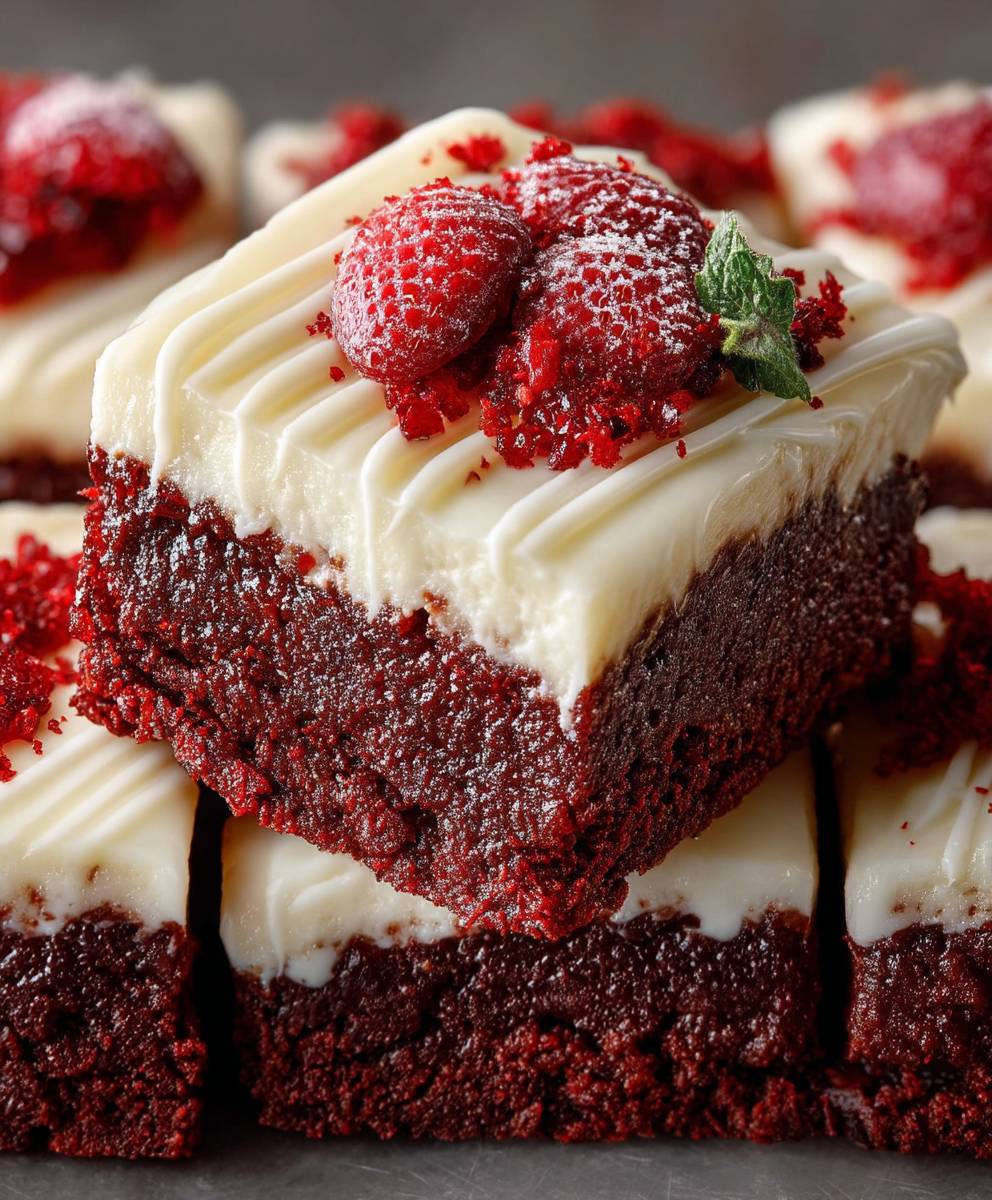
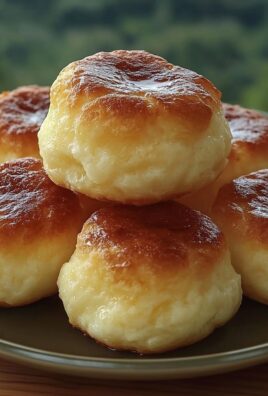
Red Velvet Brownies: Prepare to be utterly captivated by the fudgy, decadent delight that is about to grace your taste buds! Imagine the classic, comforting richness of a brownie, swirled with the unmistakable tang and vibrant color of red velvet cake. It’s a marriage made in dessert heaven, and I’m thrilled to share my foolproof recipe with you.
While the exact origins of red velvet are debated, its popularity soared in the mid-20th century, often associated with upscale hotels and bakeries. The distinctive red hue, originally achieved through a chemical reaction between cocoa powder and acidic ingredients, became a symbol of indulgence and sophistication. Today, we often rely on food coloring to achieve that signature vibrant red, but the essence of red velvet – its subtle cocoa flavor and tangy undertones – remains the same.
What makes these Red Velvet Brownies so irresistible? It’s the perfect balance of textures: a chewy edge, a fudgy center, and a creamy, melt-in-your-mouth sensation. The slight tang from the buttermilk (or vinegar, depending on your preference) cuts through the richness, preventing it from being overly sweet. Plus, they’re incredibly easy to make! Whether you’re baking for a special occasion or simply craving a comforting treat, these brownies are guaranteed to be a crowd-pleaser. Get ready to experience a brownie upgrade that will leave you wanting more!
Ingredients:
- For the Brownies:
- 1 cup (2 sticks) unsalted butter, melted
- 2 cups granulated sugar
- 4 large eggs
- 1 tablespoon red food coloring
- 1 teaspoon white vinegar
- 1 teaspoon vanilla extract
- 1 cup all-purpose flour
- ¾ cup unsweetened cocoa powder
- ½ teaspoon baking powder
- ¼ teaspoon salt
- For the Cream Cheese Frosting:
- 8 ounces cream cheese, softened
- ½ cup (1 stick) unsalted butter, softened
- 3 cups powdered sugar
- 1 teaspoon vanilla extract
- Pinch of salt
Preparing the Red Velvet Brownie Batter
- Melt the Butter: First things first, let’s melt that butter! You can do this in a saucepan over low heat or in the microwave in 30-second intervals, stirring in between, until completely melted. Be careful not to burn it! Once melted, set it aside to cool slightly. This is important because you don’t want to cook the eggs when you add them later.
- Combine Butter and Sugar: In a large mixing bowl, pour in the melted butter and add the granulated sugar. Using a whisk or an electric mixer, beat the butter and sugar together until well combined and smooth. This usually takes about 2-3 minutes. You want the mixture to be nice and creamy.
- Add the Eggs: Now, crack in the eggs one at a time, beating well after each addition. Make sure each egg is fully incorporated before adding the next. This helps to create a smooth and even batter. Overmixing at this stage can lead to tough brownies, so just mix until combined.
- Incorporate the Red Velvet Magic: This is where the red velvet magic happens! Add the red food coloring, white vinegar, and vanilla extract to the batter. Mix until everything is evenly distributed and the batter turns a vibrant red color. The vinegar helps to activate the red food coloring and gives the brownies that characteristic red velvet tang.
- Dry Ingredients Time: In a separate bowl, whisk together the all-purpose flour, unsweetened cocoa powder, baking powder, and salt. Whisking ensures that the baking powder and salt are evenly distributed throughout the flour mixture, which is crucial for proper leavening and flavor.
- Combine Wet and Dry Ingredients: Gradually add the dry ingredients to the wet ingredients, mixing on low speed or by hand until just combined. Be careful not to overmix! Overmixing develops the gluten in the flour, which can result in tough brownies. Stop mixing as soon as you no longer see streaks of flour. A few lumps are okay.
Baking the Brownies
- Prepare the Baking Pan: Preheat your oven to 350°F (175°C). Grease and flour a 9×13 inch baking pan. Alternatively, you can line the pan with parchment paper, leaving an overhang on the sides. This makes it super easy to lift the brownies out of the pan once they’re baked.
- Pour and Spread the Batter: Pour the brownie batter into the prepared baking pan and spread it evenly with a spatula. Make sure the batter reaches all the corners of the pan for even baking.
- Bake to Perfection: Bake for 25-30 minutes, or until a toothpick inserted into the center comes out with moist crumbs attached. The baking time may vary depending on your oven, so start checking for doneness around 25 minutes. Be careful not to overbake the brownies, as they will become dry and crumbly.
- Cool Completely: Once the brownies are baked, remove them from the oven and let them cool completely in the pan before frosting. This is important because if you frost them while they’re still warm, the frosting will melt and become runny. Patience is key!
Making the Cream Cheese Frosting
- Cream the Butter and Cream Cheese: In a large mixing bowl, beat the softened cream cheese and butter together until smooth and creamy. Make sure both the cream cheese and butter are at room temperature for the best results. This will prevent lumps in your frosting.
- Add the Powdered Sugar: Gradually add the powdered sugar, one cup at a time, beating on low speed until combined. Be careful not to add all the powdered sugar at once, as it can create a cloud of dust.
- Incorporate Vanilla and Salt: Add the vanilla extract and a pinch of salt to the frosting. Mix until everything is well combined and the frosting is smooth and fluffy. The salt helps to balance the sweetness of the frosting.
- Adjust Consistency (If Needed): If the frosting is too thick, add a tablespoon of milk or cream at a time until you reach your desired consistency. If the frosting is too thin, add a little more powdered sugar.
Frosting and Serving
- Frost the Brownies: Once the brownies are completely cooled, spread the cream cheese frosting evenly over the top. You can use a spatula or a knife to create a smooth and even layer of frosting.
- Chill (Optional): For best results, chill the frosted brownies in the refrigerator for at least 30 minutes before cutting and serving. This will allow the frosting to set and make the brownies easier to cut.
- Cut and Serve: Cut the brownies into squares and serve. You can garnish them with sprinkles, chocolate shavings, or a dusting of cocoa powder for an extra touch of elegance.
- Storage: Store leftover brownies in an airtight container in the refrigerator for up to 3-4 days. The cream cheese frosting needs to be refrigerated to prevent spoilage.
Conclusion:
So there you have it! These Red Velvet Brownies are truly something special, and I genuinely believe you need to experience them for yourself. They’re the perfect marriage of fudgy brownie goodness and that classic, slightly tangy red velvet flavor we all adore. The vibrant color alone makes them a showstopper, ideal for any occasion, from a casual weeknight treat to a more festive gathering. But beyond the aesthetics, it’s the taste and texture that will truly win you over. They’re rich, decadent, and incredibly moist – everything you could ever want in a brownie, and then some!
Why are these a must-try? Well, first and foremost, they’re incredibly easy to make. The recipe is straightforward, using ingredients you likely already have in your pantry. No fancy techniques or complicated steps are required, making them perfect for bakers of all skill levels. Secondly, they’re incredibly versatile. While they’re fantastic on their own, they also pair beautifully with a variety of toppings and accompaniments.
Speaking of which, let’s talk serving suggestions! For a simple yet elegant presentation, dust them with a light coating of powdered sugar. A scoop of vanilla ice cream on top takes them to a whole new level of indulgence. Or, if you’re feeling adventurous, try a dollop of cream cheese frosting – it perfectly complements the red velvet flavor. You could even drizzle them with melted white chocolate for an extra touch of sweetness and visual appeal.
And the variations? Oh, the possibilities are endless! If you’re a fan of nuts, add a handful of chopped pecans or walnuts to the batter for a delightful crunch. For a chocolatey boost, stir in some chocolate chips – milk, dark, or white, the choice is yours! You could even swirl in some raspberry jam for a fruity twist. And for those who love a little spice, a pinch of cinnamon or cayenne pepper will add a subtle warmth that enhances the red velvet flavor.
These Red Velvet Brownies are also fantastic for gifting. Imagine presenting a beautifully wrapped box of these to a friend or loved one – they’re sure to be impressed! They’re also a great option for bake sales or potlucks, as they’re always a crowd-pleaser.
I’ve poured my heart into perfecting this recipe, and I’m confident that you’ll love it as much as I do. The combination of the rich, fudgy texture, the distinctive red velvet flavor, and the ease of preparation makes these brownies a true winner. They’re a guaranteed hit with family and friends, and they’re sure to become a staple in your baking repertoire.
So, what are you waiting for? Grab your ingredients, preheat your oven, and get ready to bake up a batch of these irresistible Red Velvet Brownies. I promise you won’t regret it!
And most importantly, I want to hear about your experience! Once you’ve tried the recipe, please come back and leave a comment below. Let me know what you thought, what variations you tried, and any tips or tricks you discovered along the way. I love hearing from you and seeing your creations! Happy baking! I can’t wait to see your Red Velvet Brownie masterpieces.
Red Velvet Brownies: The Ultimate Recipe for Decadent Treats
Rich and fudgy red velvet brownies topped with a tangy cream cheese frosting. Perfect for a decadent dessert or special occasion.
Ingredients
Here’s the Red Velvet Brownies recipe presented in a more structured and easily digestible format:
**Recipe Name:** Red Velvet Brownies
**Description:** A decadent brownie recipe featuring a vibrant red velvet base topped with a creamy cream cheese frosting.
**Yields:** 12-16 brownies
**Prep Time:** 30 minutes
**Cook Time:** 25-30 minutes
**Total Time:** Approximately 1 hour (excluding chilling time)
**Ingredients:**
**A. Brownie Batter:**
* 1 cup (2 sticks) unsalted butter, melted
* 2 cups granulated sugar
* 4 large eggs
* 1 tablespoon red food coloring
* 1 teaspoon white vinegar
* 1 teaspoon vanilla extract
* 1 cup all-purpose flour
* ¾ cup unsweetened cocoa powder
* ½ teaspoon baking powder
* ¼ teaspoon salt
**B. Cream Cheese Frosting:**
* 8 ounces cream cheese, softened
* ½ cup (1 stick) unsalted butter, softened
* 3 cups powdered sugar
* 1 teaspoon vanilla extract
* Pinch of salt
**Equipment:**
* 9×13 inch baking pan
* Mixing bowls (at least 2)
* Whisk
* Electric mixer (optional, but recommended for frosting)
* Spatula
* Toothpick
* Saucepan (for melting butter – optional, microwave can be used)
**Instructions:**
**I. Preparing the Red Velvet Brownie Batter:**
1. **Melt Butter:** Melt butter in a saucepan over low heat or in the microwave in 30-second intervals, stirring in between, until completely melted. Let cool slightly.
2. **Combine Butter and Sugar:** In a large mixing bowl, combine melted butter and granulated sugar. Beat with a whisk or electric mixer until well combined and smooth (2-3 minutes).
3. **Add Eggs:** Crack in eggs one at a time, beating well after each addition until fully incorporated.
4. **Incorporate Red Velvet Ingredients:** Add red food coloring, white vinegar, and vanilla extract. Mix until evenly distributed and the batter is a vibrant red.
5. **Prepare Dry Ingredients:** In a separate bowl, whisk together all-purpose flour, unsweetened cocoa powder, baking powder, and salt.
6. **Combine Wet and Dry:** Gradually add the dry ingredients to the wet ingredients, mixing on low speed or by hand until *just* combined. Avoid overmixing; stop when you no longer see streaks of flour.
**II. Baking the Brownies:**
1. **Preheat Oven & Prepare Pan:** Preheat oven to 350°F (175°C). Grease and flour a 9×13 inch baking pan or line with parchment paper.
2. **Pour and Spread Batter:** Pour brownie batter into the prepared pan and spread evenly with a spatula.
3. **Bake:** Bake for 25-30 minutes, or until a toothpick inserted into the center comes out with moist crumbs attached.
4. **Cool Completely:** Remove from oven and let cool completely in the pan before frosting.
**III. Making the Cream Cheese Frosting:**
1. **Cream Butter and Cream Cheese:** In a large mixing bowl, beat softened cream cheese and butter together until smooth and creamy.
2. **Add Powdered Sugar:** Gradually add powdered sugar, one cup at a time, beating on low speed until combined.
3. **Incorporate Vanilla and Salt:** Add vanilla extract and a pinch of salt. Mix until well combined, smooth, and fluffy.
4. **Adjust Consistency (Optional):**
* *Too Thick:* Add milk or cream, 1 tablespoon at a time, until desired consistency is reached.
* *Too Thin:* Add a little more powdered sugar.
**IV. Frosting and Serving:**
1. **Frost Brownies:** Once brownies are completely cooled, spread cream cheese frosting evenly over the top.
2. **Chill (Optional):** For best results, chill frosted brownies in the refrigerator for at least 30 minutes before cutting.
3. **Cut and Serve:** Cut brownies into squares and serve.
4. **Garnish (Optional):** Garnish with sprinkles, chocolate shavings, or a dusting of cocoa powder.
5. **Storage:** Store leftover brownies in an airtight container in the refrigerator for up to 3-4 days.
This structured format provides a clearer overview of the recipe, making it easier to follow and understand. The use of headings and subheadings breaks down the process into manageable steps.
Instructions
- Melt the Butter: Melt butter in a saucepan over low heat or in the microwave in 30-second intervals, stirring in between, until completely melted. Set aside to cool slightly.
- Combine Butter and Sugar: In a large mixing bowl, pour in the melted butter and add the granulated sugar. Using a whisk or an electric mixer, beat the butter and sugar together until well combined and smooth (2-3 minutes).
- Add the Eggs: Crack in the eggs one at a time, beating well after each addition. Mix until combined.
- Incorporate the Red Velvet Magic: Add the red food coloring, white vinegar, and vanilla extract to the batter. Mix until evenly distributed and the batter turns a vibrant red color.
- Dry Ingredients Time: In a separate bowl, whisk together the all-purpose flour, unsweetened cocoa powder, baking powder, and salt.
- Combine Wet and Dry Ingredients: Gradually add the dry ingredients to the wet ingredients, mixing on low speed or by hand until just combined. Stop mixing as soon as you no longer see streaks of flour.
- Prepare the Baking Pan: Preheat your oven to 350°F (175°C). Grease and flour a 9×13 inch baking pan or line with parchment paper.
- Pour and Spread the Batter: Pour the brownie batter into the prepared baking pan and spread it evenly with a spatula.
- Bake to Perfection: Bake for 25-30 minutes, or until a toothpick inserted into the center comes out with moist crumbs attached.
- Cool Completely: Once the brownies are baked, remove them from the oven and let them cool completely in the pan before frosting.
- Cream the Butter and Cream Cheese: In a large mixing bowl, beat the softened cream cheese and butter together until smooth and creamy.
- Add the Powdered Sugar: Gradually add the powdered sugar, one cup at a time, beating on low speed until combined.
- Incorporate Vanilla and Salt: Add the vanilla extract and a pinch of salt to the frosting. Mix until well combined and the frosting is smooth and fluffy.
- Adjust Consistency (If Needed): If the frosting is too thick, add a tablespoon of milk or cream at a time until you reach your desired consistency. If the frosting is too thin, add a little more powdered sugar.
- Frost the Brownies: Once the brownies are completely cooled, spread the cream cheese frosting evenly over the top.
- Chill (Optional): For best results, chill the frosted brownies in the refrigerator for at least 30 minutes before cutting and serving.
- Cut and Serve: Cut the brownies into squares and serve. Garnish with sprinkles, chocolate shavings, or a dusting of cocoa powder.
- Storage: Store leftover brownies in an airtight container in the refrigerator for up to 3-4 days.
Notes
Here’s the Red Velvet Brownies recipe presented in a more structured and easily digestible format:
**Recipe Name:** Red Velvet Brownies
**Description:** A decadent brownie recipe featuring a classic red velvet flavor profile, topped with a creamy cream cheese frosting.
**Yields:** 12-16 brownies
**Prep Time:** 30 minutes
**Cook Time:** 25-30 minutes
**Total Time:** Approximately 1 hour (excluding chilling time)
**Ingredients:**
**A. Brownies:**
* 1 cup (2 sticks) unsalted butter, melted
* 2 cups granulated sugar
* 4 large eggs
* 1 tablespoon red food coloring
* 1 teaspoon white vinegar
* 1 teaspoon vanilla extract
* 1 cup all-purpose flour
* ¾ cup unsweetened cocoa powder
* ½ teaspoon baking powder
* ¼ teaspoon salt
**B. Cream Cheese Frosting:**
* 8 ounces cream cheese, softened
* ½ cup (1 stick) unsalted butter, softened
* 3 cups powdered sugar
* 1 teaspoon vanilla extract
* Pinch of salt
**Equipment:**
* 9×13 inch baking pan
* Mixing bowls (at least 2)
* Whisk
* Electric mixer (optional, but recommended for frosting)
* Spatula
* Toothpick
* Saucepan (for melting butter, optional – microwave can be used)
**Instructions:**
**I. Preparing the Red Velvet Brownie Batter:**
1. **Melt Butter:** Melt butter in a saucepan over low heat or in the microwave in 30-second intervals, stirring in between, until completely melted. Let cool slightly.
2. **Combine Butter and Sugar:** In a large mixing bowl, combine melted butter and granulated sugar. Beat with a whisk or electric mixer until well combined and smooth (2-3 minutes).
3. **Add Eggs:** Crack in eggs one at a time, beating well after each addition. Mix until combined.
4. **Incorporate Red Velvet Flavor:** Add red food coloring, white vinegar, and vanilla extract to the batter. Mix until evenly distributed and the batter is a vibrant red color.
5. **Combine Dry Ingredients:** In a separate bowl, whisk together all-purpose flour, unsweetened cocoa powder, baking powder, and salt.
6. **Combine Wet and Dry Ingredients:** Gradually add the dry ingredients to the wet ingredients, mixing on low speed or by hand until *just* combined. Avoid overmixing; stop when you no longer see streaks of flour.
**II. Baking the Brownies:**
1. **Preheat Oven & Prepare Pan:** Preheat oven to 350°F (175°C). Grease and flour a 9×13 inch baking pan or line with parchment paper.
2. **Pour and Spread Batter:** Pour the brownie batter into the prepared baking pan and spread evenly with a spatula.
3. **Bake:** Bake for 25-30 minutes, or until a toothpick inserted into the center comes out with moist crumbs attached.
4. **Cool Completely:** Remove from oven and let cool completely in the pan before frosting.
**III. Making the Cream Cheese Frosting:**
1. **Cream Butter and Cream Cheese:** In a large mixing bowl, beat the softened cream cheese and butter together until smooth and creamy.
2. **Add Powdered Sugar:** Gradually add the powdered sugar, one cup at a time, beating on low speed until combined.
3. **Incorporate Vanilla and Salt:** Add the vanilla extract and a pinch of salt to the frosting. Mix until well combined and the frosting is smooth and fluffy.
4. **Adjust Consistency (Optional):**
* *Too Thick:* Add a tablespoon of milk or cream at a time until desired consistency is reached.
* *Too Thin:* Add a little more powdered sugar.
**IV. Frosting and Serving:**
1. **Frost Brownies:** Once the brownies are completely cooled, spread the cream cheese frosting evenly over the top.
2. **Chill (Optional):** For best results, chill the frosted brownies in the refrigerator for at least 30 minutes before cutting and serving.
3. **Cut and Serve:** Cut the brownies into squares and serve.
4. **Garnish (Optional):** Garnish with sprinkles, chocolate shavings, or a dusting of cocoa powder.
**V. Storage:**
* Store leftover brownies in an airtight container in the refrigerator for up to 3-4 days.
Printable Recipe Card
Want just the essential recipe details without scrolling through the article? Get our printable recipe card with just the ingredients and instructions.
Leave a Comment