
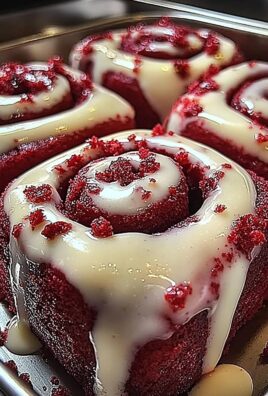
Red Velvet Cheesecake Brownies: Prepare to be utterly captivated! Imagine sinking your teeth into a decadent treat that perfectly marries the rich, fudgy goodness of a brownie with the creamy, tangy delight of cheesecake, all swirled together with the unmistakable allure of red velvet. It’s a symphony of flavors and textures that will leave you craving more.
The story of red velvet itself is shrouded in a bit of mystery, with some attributing its origins to the Depression era when bakers used beet juice to enhance the color and moisture of their cakes. Others point to the Waldorf-Astoria Hotel in New York City as the birthplace of this iconic flavor. Regardless of its true beginnings, red velvet has become a beloved classic, synonymous with indulgence and celebration. And what better way to elevate this classic than by combining it with two other universally adored desserts?
People adore these Red Velvet Cheesecake Brownies for their irresistible combination of textures and tastes. The fudgy brownie base provides a comforting, familiar foundation, while the creamy cheesecake swirl adds a luxurious tang that cuts through the richness. The vibrant red hue, of course, adds a visual appeal that makes them perfect for any occasion, from casual gatherings to elegant dessert tables. Plus, they’re surprisingly easy to make, making them a convenient and impressive treat to whip up for friends, family, or even just yourself! Get ready to experience dessert perfection!

Ingredients:
- For the Brownie Layer:
- 1/2 cup (1 stick) unsalted butter, melted
- 1 cup granulated sugar
- 2 large eggs
- 1 teaspoon vanilla extract
- 1/4 cup unsweetened cocoa powder
- 1 teaspoon red food coloring (gel is recommended for vibrant color)
- 1/2 cup all-purpose flour
- 1/4 teaspoon salt
- For the Cheesecake Layer:
- 8 ounces cream cheese, softened
- 1/3 cup granulated sugar
- 1 large egg
- 1/2 teaspoon vanilla extract
Preparing the Brownie Layer:
- Preheat your oven to 350°F (175°C). Grease and lightly flour an 8×8 inch baking pan. This will prevent the brownies from sticking and make them easy to remove. I like to use parchment paper as well, leaving an overhang to easily lift the brownies out after baking.
- In a medium bowl, whisk together the melted butter and granulated sugar until well combined. Make sure the butter isn’t too hot, or it might cook the eggs when you add them.
- Add the eggs one at a time, whisking well after each addition. This helps to incorporate air into the batter, which will give the brownies a slightly fudgy texture.
- Stir in the vanilla extract and red food coloring. The red food coloring is what gives these brownies their signature red velvet color. Gel food coloring is recommended because it’s more concentrated and won’t thin out the batter as much as liquid food coloring. Mix until the batter is evenly colored. Don’t be afraid to add a little more if you want a deeper red!
- In a separate bowl, whisk together the cocoa powder, flour, and salt. This ensures that the dry ingredients are evenly distributed throughout the batter.
- Gradually add the dry ingredients to the wet ingredients, mixing until just combined. Be careful not to overmix, as this can lead to tough brownies. A few streaks of flour are okay at this point.
Preparing the Cheesecake Layer:
- In a separate bowl, beat the softened cream cheese and sugar together until smooth and creamy. It’s important that the cream cheese is softened, or you’ll end up with lumps in your cheesecake layer. I usually leave mine out at room temperature for about an hour before I start baking.
- Add the egg and vanilla extract and beat until just combined. Again, be careful not to overmix.
Assembling and Baking:
- Pour the brownie batter into the prepared baking pan and spread it evenly.
- Spoon the cheesecake batter over the brownie batter. You can either dollop it on top and swirl it with a knife or offset spatula for a marbled effect, or you can spread it evenly over the brownie layer. I personally prefer the marbled effect, as it adds a bit of visual appeal.
- Bake for 30-35 minutes, or until a toothpick inserted into the center comes out with moist crumbs. Be careful not to overbake, as this will result in dry brownies. The cheesecake layer should be set, but still slightly jiggly.
- Let the brownies cool completely in the pan before cutting into squares. This is important because the brownies will continue to set as they cool. If you try to cut them while they’re still warm, they’ll be messy and fall apart. I usually let them cool for at least an hour at room temperature, then transfer them to the refrigerator to chill for another hour or two. This makes them easier to cut and also enhances the flavor.
Tips and Variations:
Adding Chocolate Chips:
For an extra chocolatey treat, you can add 1/2 cup of chocolate chips to the brownie batter. I recommend using semi-sweet chocolate chips, but you can use any kind you like.
Using Different Extracts:
You can experiment with different extracts to change the flavor of the brownies. For example, you could use almond extract instead of vanilla extract for a slightly nutty flavor. Or, you could use peppermint extract for a festive holiday treat.
Adding Nuts:
If you like nuts in your brownies, you can add 1/2 cup of chopped nuts to the brownie batter. Walnuts, pecans, or almonds would all be delicious.
Making it Gluten-Free:
To make these brownies gluten-free, simply substitute the all-purpose flour with a gluten-free all-purpose flour blend. Make sure to use a blend that contains xanthan gum, as this will help to bind the ingredients together.
Swirl Techniques:
For a more intricate swirl pattern, try using a skewer or toothpick to drag the cheesecake batter through the brownie batter in a figure-eight motion. You can also create a more abstract design by swirling the batter in random directions.
Storage Instructions:
These brownies can be stored in an airtight container at room temperature for up to 3 days, or in the refrigerator for up to a week. They can also be frozen for up to 2 months. To freeze, wrap the brownies tightly in plastic wrap and then place them in a freezer-safe bag or container. Thaw them in the refrigerator overnight before serving.
Serving Suggestions:
These red velvet cheesecake brownies are delicious on their own, but they’re even better with a scoop of vanilla ice cream or a dollop of whipped cream. You can also drizzle them with chocolate sauce or sprinkle them with powdered sugar.
Troubleshooting:
Brownies are too dry:
This could be due to overbaking. Make sure to check the brownies frequently while they’re baking and remove them from the oven as soon as a toothpick inserted into the center comes out with moist crumbs. Also, make sure you’re not overmixing the batter, as this can also lead to dry brownies.
Brownies are too gooey:
This could be due to underbaking. If the brownies are still too gooey after the recommended baking time, continue baking them for a few more minutes, checking them frequently. Also, make sure you’re using the correct size baking pan. If the pan is too small, the brownies will be thicker and will take longer to bake.
Cheesecake layer is cracked:
Cracking in the cheesecake layer can be caused by several factors, including overbaking, rapid temperature changes, or too much air in the batter. To prevent cracking, make sure to bake the brownies at the correct temperature and avoid opening the oven door frequently. You can also try placing a pan of water on the bottom rack of the oven to create a more humid environment. Finally, be careful not to overmix the cheesecake batter.
Brownies are sticking to the pan:
To prevent the brownies from sticking to the pan, make sure to grease and flour the pan thoroughly before pouring in the batter. You can also line the pan with parchment paper, leaving an overhang to easily lift the brownies out after baking.
Why Red Velvet Works:
The combination of cocoa powder and buttermilk (though we’re not using buttermilk in this recipe, the red food coloring mimics the effect) creates a slightly tangy flavor that complements the sweetness of the sugar and the richness of the cream cheese. The red food coloring adds a visual appeal that makes these brownies extra special.
Baking Time Adjustments:
Keep in mind that baking times can vary depending on your oven. It’s always best to start checking the brownies a few minutes before the recommended baking time and adjust accordingly. A toothpick inserted into the center should come out with moist crumbs, not wet batter.
Ingredient Quality:
Using high-quality ingredients will always result in a better-tasting final product. I recommend using good-quality chocolate, vanilla extract, and cream cheese for the best results.
Cooling is Key:
I cannot stress enough how important it is to let these brownies cool completely before cutting into them. This allows the flavors to meld together and the texture to set properly. If you’re impatient, you can speed up the cooling process by placing the brownies in the refrigerator, but be sure to let them cool completely before cutting.

Conclusion:
So there you have it! These Red Velvet Cheesecake Brownies are truly a decadent treat that deserves a spot in your baking repertoire. I know, I know, it might seem like a lot, but trust me, the payoff is HUGE. The fudgy, intensely chocolatey brownie base, swirled with that tangy, creamy cheesecake layer, and that signature red velvet flavor… it’s a symphony of textures and tastes that will have everyone begging for more.
Why is this recipe a must-try? Well, beyond the sheer deliciousness, it’s the perfect balance of comfort and elegance. It’s homey enough for a casual weeknight dessert, yet sophisticated enough to impress at a potluck or even a slightly fancier gathering. Plus, it’s a guaranteed crowd-pleaser. I’ve never met anyone who could resist a bite of these beauties! The combination of red velvet, cheesecake, and brownie is just irresistible.
But the best part? It’s surprisingly adaptable! Feel free to experiment with different variations to make it your own.
Serving Suggestions and Variations:
* Dust with powdered sugar: A simple dusting of powdered sugar adds a touch of elegance and visual appeal.
* Drizzle with chocolate ganache: For the ultimate chocolate lover, a drizzle of dark or white chocolate ganache takes these brownies to the next level.
* Top with fresh berries: Add a pop of color and freshness with a handful of raspberries, strawberries, or blueberries.
* Add chocolate chips: Fold in some white chocolate chips or dark chocolate chunks into the brownie batter for an extra layer of chocolatey goodness.
* Use different extracts: Experiment with different extracts in the cheesecake layer, such as almond or vanilla bean paste, to customize the flavor.
* Make it gluten-free: Substitute the all-purpose flour with a gluten-free blend for a gluten-free version. Just be sure to use a blend that’s designed for baking.
* Add a swirl of raspberry jam: For a fruity twist, swirl a spoonful of raspberry jam into the cheesecake layer before baking.
* Make mini brownies: Bake the batter in a mini muffin tin for individual brownie bites, perfect for parties or portion control.
I truly believe that these Red Velvet Cheesecake Brownies are something special. They’re more than just a dessert; they’re an experience. They’re a way to show someone you care, a way to celebrate a special occasion, or simply a way to treat yourself to something truly indulgent.
So, what are you waiting for? Preheat your oven, gather your ingredients, and get ready to bake up a batch of these amazing brownies. I promise you won’t regret it! And when you do, please, please, please share your experience with me! I’d love to hear how they turned out, what variations you tried, and what your friends and family thought. You can leave a comment below, tag me on social media, or send me an email. I’m always eager to see your creations and hear your feedback. Happy baking! Let me know if you have any questions, and I can’t wait to see your Red Velvet Cheesecake Brownie masterpieces!
Red Velvet Cheesecake Brownies: The Ultimate Dessert Recipe
Decadent red velvet brownies with a creamy cheesecake swirl. A perfect combination of fudgy brownie and tangy cheesecake in every bite!
Ingredients
- 1/2 cup (1 stick) unsalted butter, melted
- 1 cup granulated sugar
- 2 large eggs
- 1 teaspoon vanilla extract
- 1/4 cup unsweetened cocoa powder
- 1 teaspoon red food coloring (gel recommended)
- 1/2 cup all-purpose flour
- 1/4 teaspoon salt
- 8 ounces cream cheese, softened
- 1/3 cup granulated sugar
- 1 large egg
- 1/2 teaspoon vanilla extract
Instructions
- Prepare Brownie Layer: Preheat oven to 350°F (175°C). Grease and flour an 8×8 inch baking pan (or line with parchment paper).
- In a medium bowl, whisk melted butter and sugar until combined.
- Add eggs one at a time, whisking well after each addition.
- Stir in vanilla extract and red food coloring until evenly colored.
- In a separate bowl, whisk together cocoa powder, flour, and salt.
- Gradually add dry ingredients to wet ingredients, mixing until just combined. Do not overmix.
- Prepare Cheesecake Layer: In a separate bowl, beat softened cream cheese and sugar until smooth and creamy.
- Add egg and vanilla extract and beat until just combined. Do not overmix.
- Assemble and Bake: Pour brownie batter into the prepared pan and spread evenly.
- Spoon cheesecake batter over the brownie batter. Swirl with a knife or offset spatula for a marbled effect, or spread evenly.
- Bake for 30-35 minutes, or until a toothpick inserted into the center comes out with moist crumbs.
- Let the brownies cool completely in the pan before cutting into squares.
Notes
- Adding Chocolate Chips: Add 1/2 cup chocolate chips to the brownie batter for extra chocolate flavor.
- Extract Variations: Experiment with different extracts like almond or peppermint.
- Adding Nuts: Add 1/2 cup chopped nuts (walnuts, pecans, almonds) to the brownie batter.
- Gluten-Free Option: Substitute all-purpose flour with a gluten-free all-purpose flour blend (containing xanthan gum).
- Swirl Techniques: Use a skewer or toothpick for intricate swirl patterns.
- Storage: Store in an airtight container at room temperature for up to 3 days, or in the refrigerator for up to a week. Freeze for up to 2 months.
- Serving Suggestions: Serve with vanilla ice cream, whipped cream, chocolate sauce, or powdered sugar.
- Troubleshooting:
- Dry Brownies: Avoid overbaking and overmixing.
- Gooey Brownies: Bake longer, ensure correct pan size.
- Cracked Cheesecake: Bake at correct temperature, avoid opening oven door, don’t overmix.
- Sticking Brownies: Grease and flour pan thoroughly or use parchment paper.
- Why Red Velvet Works: The combination of cocoa powder and red food coloring creates a slightly tangy flavor that complements the sweetness of the sugar and the richness of the cream cheese.
- Baking Time Adjustments: Keep in mind that baking times can vary depending on your oven. It’s always best to start checking the brownies a few minutes before the recommended baking time and adjust accordingly. A toothpick inserted into the center should come out with moist crumbs, not wet batter.
- Ingredient Quality: Using high-quality ingredients will always result in a better-tasting final product. I recommend using good-quality chocolate, vanilla extract, and cream cheese for the best results.
- Cooling is Key: I cannot stress enough how important it is to let these brownies cool completely before cutting into them. This allows the flavors to meld together and the texture to set properly. If you’re impatient, you can speed up the cooling process by placing the brownies in the refrigerator, but be sure to let them cool completely before cutting.
Printable Recipe Card
Want just the essential recipe details without scrolling through the article? Get our printable recipe card with just the ingredients and instructions.
Leave a Comment