
Skinny No Bake Oreo Cheesecake Bites
Oh my goodness, do I have a treat for you today! I’m so excited to share my recipe for Skinny No Bake Oreo Cheesecake Bites. If you’re anything like me, you adore cheesecake, especially when it involves the magical combination of Oreos. But let’s be real, sometimes you want that indulgent flavor without all the fuss, or the guilt. That’s exactly what makes these bites so incredibly special!
What truly sets these apart? Well, for starters, they’re ‘No Bake’! That’s right, no oven required. Perfect for hot summer days, busy schedules, or when you just want a delicious dessert without turning your kitchen into a baking war zone. And the ‘Skinny’ part? We’ve lightened things up just enough so you can enjoy that rich, creamy cheesecake experience without feeling like you need to run a marathon afterwards. It’s the ultimate guilt-free indulgence!
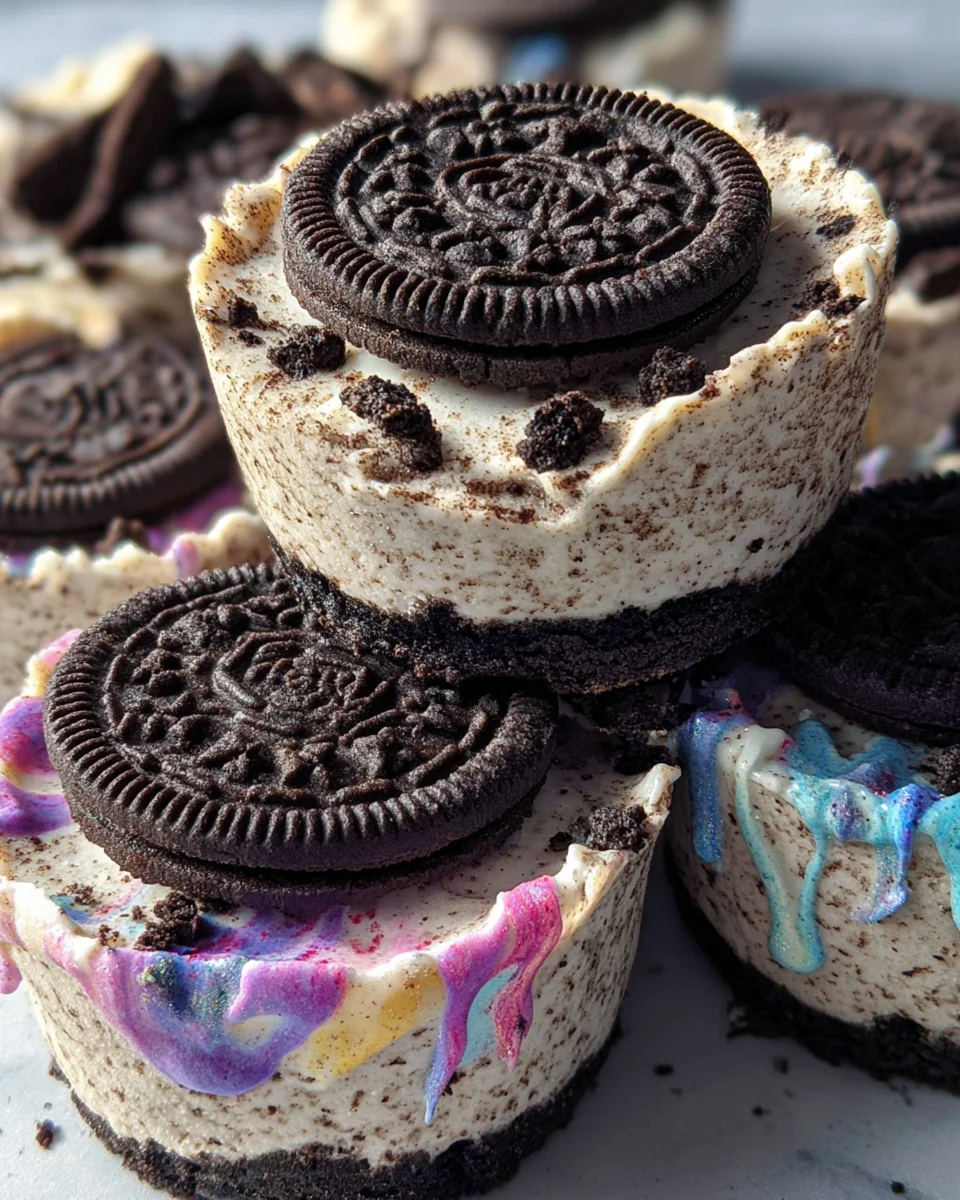
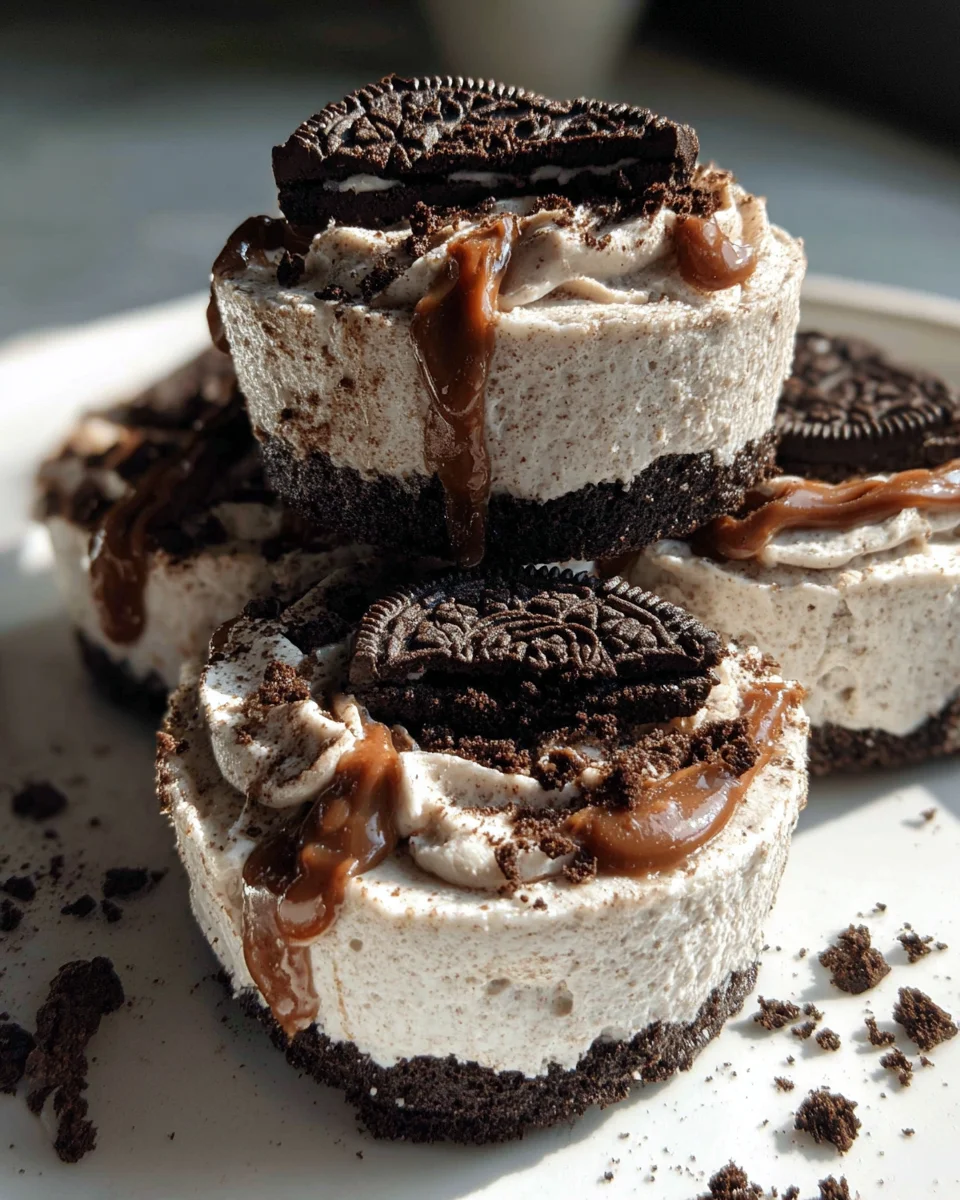
Imagine: a perfectly crunchy Oreo crust, topped with a luscious, creamy, vanilla-kissed cheesecake filling, all swirled with even more chunks of delightful Oreo cookies. And because they’re bites, they’re perfectly portioned and absolutely adorable for serving at parties, a cozy night in, or just for satisfying that sweet tooth craving whenever it strikes. Get ready to fall in love with your new favorite easy dessert!
Hey there, fellow dessert lovers! I’m so excited to share one of my absolute favorite guilt-free treats with you today: these amazing Skinny No Bake Oreo Cheesecake Bites. Seriously, they’re everything you love about a rich, creamy cheesecake, but in a lighter, bite-sized package, and without even turning on the oven! Perfect for satisfying that sweet tooth without derailing your healthy eating goals. Let’s dive into making these irresistible little gems!
Ingredient Notes
Making these Skinny No Bake Oreo Cheesecake Bites truly comes down to selecting the right ingredients that deliver on flavor without packing on the extra calories. I’ve carefully chosen components that maintain that luscious cheesecake texture and iconic Oreo taste while keeping things light. Here’s a rundown of what you’ll need and some clever substitutions I often use.
- Oreo Cookies (Reduced-Fat or Regular): These are the stars, providing both the iconic chocolatey crust and delightful chunks in the filling. For a “skinny” version, I often opt for reduced-fat Oreos, but regular ones work perfectly fine too if you’re not strictly counting every calorie. You’ll need about 15-18 cookies in total; some for the crust and some for folding into the filling. I find crushing them in a food processor yields the most uniform crumbs for the crust, but a Ziploc bag and a rolling pin work wonders too.
- Light Cream Cheese (Block): This is where a significant portion of the “skinny” aspect comes in. I always go for a block of light cream cheese (Neufchâtel cheese works wonderfully here) rather than the whipped or spreadable kind, as the block form provides the necessary structure and richness for a firm, no-bake cheesecake. Ensure it’s at room temperature before you start – this is absolutely crucial for a smooth, lump-free filling!
- Granulated Sweetener (Erythritol/Stevia Blend or Reduced Sugar): To keep the sugar content down, I usually reach for a granulated erythritol or stevia blend. These sweeteners provide excellent sweetness without the calories or the glycemic impact. If you prefer, you can use regular granulated sugar, or even reduce the amount you’d normally use in a full-fat recipe. Adjust to your personal taste – you might find you need less than you think!
- Pure Vanilla Extract: This is a non-negotiable for me! A good quality vanilla extract enhances the overall flavor of the cheesecake, adding warmth and depth that complements the chocolate and cream cheese beautifully. Don’t skimp on this one.
- Unsalted Butter (Melted): Just a touch of melted butter binds the cookie crumbs together for the crust. Using unsalted butter allows you to control the overall saltiness. If you’re looking for a dairy-free or even “skinnier” option, melted coconut oil can be a fantastic substitute for the butter, though it might impart a very subtle coconut flavor.
- Mini Muffin Liners/Paper Cups: These are essential for creating the perfect bite-sized portions and making them super easy to remove and serve. I prefer using paper liners over silicone for these, as they’re just so convenient.
Substitutions:
- Cream Cheese Alternatives: If Neufchâtel cheese isn’t available, you could try a blend of light cream cheese and a spoonful of plain Greek yogurt for added tang and protein, though this might slightly alter the texture. Ensure the Greek yogurt is very thick to avoid a watery filling.
- Cookie Crust Variations: While Oreos are classic, feel free to experiment! Gluten-free chocolate sandwich cookies are an obvious swap. You could also try crushed graham crackers with a tablespoon of cocoa powder added, or even a mix of crushed chocolate wafers for a different spin.
- Sweetener Adjustments: If you’re not a fan of alternative sweeteners, you can certainly use regular granulated sugar. Start with about half the amount you’d typically use and taste as you go, adjusting until it reaches your desired sweetness. For a finer texture in the filling, you could even use powdered sugar (confectioners’ sugar), but remember it often contains cornstarch, which can slightly alter the “skinny” profile if you’re meticulously counting.
- Flavor Boosters: A tiny pinch of salt in the filling can really bring out the flavors. You could also add a touch of almond extract for a nutty undertone, or even a hint of peppermint extract around the holidays for a festive twist!
Remember, the goal is to enjoy a delicious treat that feels indulgent but is mindful of your dietary goals. Don’t be afraid to make these recipe adjustments your own!
Step-by-Step Instructions
Creating these Skinny No Bake Oreo Cheesecake Bites is delightfully simple, and the best part is, you don’t need any special baking skills or even an oven! Just follow these clear steps, and you’ll have a batch of delectable treats ready to chill.
- Prepare Your Muffin Tin: First things first, grab a mini muffin tin. Line each cavity with a mini paper liner. This step is crucial for easy removal and portion control. I like to use about 12-18 liners, depending on how many bites I want to make and the size of my tin.
- Crush the Oreos for the Crust: Take about 10-12 of your Oreo cookies (reduced-fat or regular) and crush them finely. I typically use a food processor for this, pulsing until they resemble fine crumbs. If you don’t have a food processor, place the cookies in a sealed plastic bag and crush them with a rolling pin or the bottom of a heavy glass until they’re finely ground.
- Make the Crust: In a small bowl, combine your finely crushed Oreo crumbs with the melted unsalted butter (or coconut oil). Mix well until the crumbs are evenly moistened and resemble wet sand. Now, spoon about 1 heaping teaspoon of this mixture into the bottom of each prepared mini muffin liner. Using the back of a spoon or your fingertips, gently press the crumbs down firmly to create a compact crust. Once all crusts are formed, pop the muffin tin into the refrigerator while you prepare the filling. This helps the crust set a little.
- Prepare the Cheesecake Filling: In a medium-sized mixing bowl, combine the room temperature light cream cheese, granulated sweetener (your erythritol/stevia blend or reduced sugar), and pure vanilla extract. Using an electric mixer (handheld or stand mixer with a paddle attachment), beat the mixture on medium speed until it’s completely smooth, creamy, and lump-free. This usually takes about 2-3 minutes. Make sure to scrape down the sides of the bowl occasionally to ensure everything is incorporated evenly.
- Add More Oreo Goodness: Now for the star flavor! Take the remaining 5-6 Oreo cookies and roughly chop them into small pieces. You want visible chunks here, not fine crumbs, to add texture and bursts of Oreo flavor to the filling. Gently fold these chopped Oreos into the prepared cream cheese mixture using a spatula. Be careful not to overmix; you just want to distribute the cookie pieces evenly.
- Assemble the Bites: Retrieve your muffin tin with the chilled crusts from the refrigerator. Spoon or pipe the cheesecake filling evenly over each cookie crust. I find using a small cookie scoop or two spoons works best for neat distribution. Fill each liner almost to the top.
- Chill, Chill, Chill!: This is the most important step for any no-bake cheesecake. Once all the bites are assembled, place the muffin tin back into the refrigerator. Let them chill for at least 4 hours, but preferably overnight. This allows the cheesecake filling to set completely, ensuring a firm, delicious bite every time. Trust me, the wait is worth it!
- Garnish and Serve: Once fully chilled and set, carefully remove the Skinny No Bake Oreo Cheesecake Bites from the muffin tin. You can peel off the paper liners or serve them with the liners on. For an extra touch of flair (and more Oreo!), you can sprinkle a few extra crushed Oreo crumbs or a mini Oreo on top of each bite just before serving. Enjoy your delicious, guilt-free treats!
Tips & Suggestions
Making these Skinny No Bake Oreo Cheesecake Bites is already pretty straightforward, but I’ve picked up a few tricks along the way that can elevate your experience and ensure perfect results every single time. These tips are specific to making sure your “skinny” and “no-bake” aspects shine!
- Room Temperature Cream Cheese is King: I cannot stress this enough! For the smoothest, most lump-free cheesecake filling, your light cream cheese MUST be at room temperature. If it’s cold, it won’t incorporate properly with the sweetener and vanilla, leaving you with a chunky, unappealing mixture. Take it out of the fridge at least 30-60 minutes before you plan to start mixing.
- Don’t Overmix the Filling: Once your cream cheese, sweetener, and vanilla are smooth and creamy, stop mixing. Overmixing can incorporate too much air into the filling, which might make it a bit too light and airy instead of the dense, rich texture we’re aiming for in a cheesecake. When folding in the chopped Oreos, do it gently with a spatula.
- The Chill Factor is Crucial: Since there’s no baking involved, the refrigerator does all the heavy lifting in terms of setting the cheesecake. Resist the urge to cut the chilling time short! A minimum of 4 hours is necessary, but I always recommend an overnight chill if you can manage it. This ensures the bites are perfectly firm, easy to handle, and have the best texture.
- Portion Control Perfection: These are called “bites” for a reason! The mini muffin liners are fantastic for naturally controlling portion sizes, which is a key component of keeping this dessert “skinny.” It’s easy to grab just one or two and feel satisfied without overindulging.
- Crushing Oreos for Texture: For the crust, you want finely crushed crumbs so it compacts well. For the filling, I prefer roughly chopped pieces. This gives you delightful little bursts of crunchy cookie within the smooth, creamy cheesecake. Don’t be afraid to vary the size of your chopped Oreos for textural interest.
- Easy Release from Liners: While paper liners usually work great, if you’re worried about sticking, you can lightly spray the inside of each paper liner with a non-stick cooking spray before adding the crust. This is usually overkill, but a good trick if you’ve had issues in the past.
- Creative Garnishes: While extra crushed Oreos are classic, don’t hesitate to get creative! A tiny drizzle of sugar-free chocolate syrup, a few mini chocolate chips, or even a fresh raspberry on top can add a lovely touch both visually and flavor-wise. For holidays, a tiny sprinkle of colored sprinkles or a drop of peppermint extract in the filling (and a candy cane sprinkle on top) makes them festive.
- Make Ahead Magic: These bites are fantastic for making ahead! Their no-bake nature means they hold up beautifully in the fridge. Prepare them a day or two in advance for parties or meal prep, and they’ll be perfectly set and ready to enjoy.
Storage
One of the many beautiful things about these Skinny No Bake Oreo Cheesecake Bites is how wonderfully they store. They’re a fantastic make-ahead dessert, perfect for parties, meal prep, or simply having a delicious, guilt-free treat on hand whenever a craving strikes. Proper storage ensures they maintain their delightful texture and flavor for days!
Refrigerator Storage:
Once your cheesecake bites are fully set and you’ve enjoyed a few (or a lot!), the rest need to be stored in the refrigerator. Here’s how I do it:
- Airtight Container is Key: Transfer the cheesecake bites to an airtight container. This is crucial for preventing them from absorbing any unwanted odors from other foods in your fridge and, most importantly, for keeping them from drying out.
- Layering: If you have multiple layers of bites, place a piece of parchment paper or wax paper between each layer to prevent them from sticking together. This makes it much easier to grab just one without disturbing the others.
- Duration: Stored correctly in an airtight container, these Skinny No Bake Oreo Cheesecake Bites will stay fresh and delicious in the refrigerator for up to 5 days. After that, while still safe to eat, their texture might start to degrade slightly.
- Ready to Enjoy: The best part? They’re ready to eat straight from the fridge! No need for thawing or extra steps.
Freezer Storage:
If you’ve made a big batch or simply want to keep some on hand for longer, these cheesecake bites freeze beautifully! They’re perfect for having a quick, portion-controlled dessert whenever you desire.
- Initial Freeze (Flash Freeze): Arrange the fully set cheesecake bites (without their paper liners, if possible, or very carefully with them on) in a single layer on a baking sheet lined with parchment paper. Place the baking sheet in the freezer for about 1-2 hours, or until the bites are completely frozen solid. This step prevents them from sticking together when transferred to a larger container.
- Transfer to Airtight Container or Freezer Bag: Once flash-frozen, transfer the solid cheesecake bites into a freezer-safe airtight container or a heavy-duty freezer bag. If using a container, you can layer them with parchment paper in between. Squeeze out as much air as possible from freezer bags to prevent freezer burn.
- Duration: Stored properly, these Skinny No Bake Oreo Cheesecake Bites will maintain their quality in the freezer for up to 1 month. Beyond that, they might still be safe to eat, but their texture and flavor might start to diminish.
- Thawing: When you’re ready to enjoy a frozen bite, simply transfer it from the freezer to the refrigerator a few hours (2-3 hours) before serving. You can also let them sit at room temperature for about 15-30 minutes for a softer texture, though I often enjoy them slightly frozen, like a mini ice cream cake!
With these storage tips, you can always have a stash of these delightful Skinny No Bake Oreo Cheesecake Bites ready to satisfy your sweet cravings!
Final Thoughts
And there you have it – my absolute go-to recipe for a dessert that’s as delightful as it is easy! I truly believe these Skinny No Bake Oreo Cheesecake Bites are a game-changer. What I adore most is the sheer simplicity; the “no bake” aspect means absolutely no oven required, which is perfect for any skill level and fantastic for those days when you just want a quick, satisfying treat without heating up the kitchen. The “skinny” part is the cherry on top, allowing you to enjoy that rich, creamy cheesecake and iconic Oreo flavor without a hint of guilt!
I can confidently say that every single bite of these Skinny No Bake Oreo Cheesecake Bites offers an irresistible blend of smooth, tangy cheesecake and crunchy, chocolatey Oreo pieces. They’re not just a dessert; they’re a little moment of joy. Whether you’re looking for a fuss-free party contribution, a quick afternoon pick-me-up, or just a sweet escape, I promise you this recipe will become a cherished favorite. Give these wonderful Skinny No Bake Oreo Cheesecake Bites a try – I know you’ll fall in love with their convenience and incredible taste!


Leave a Comment