
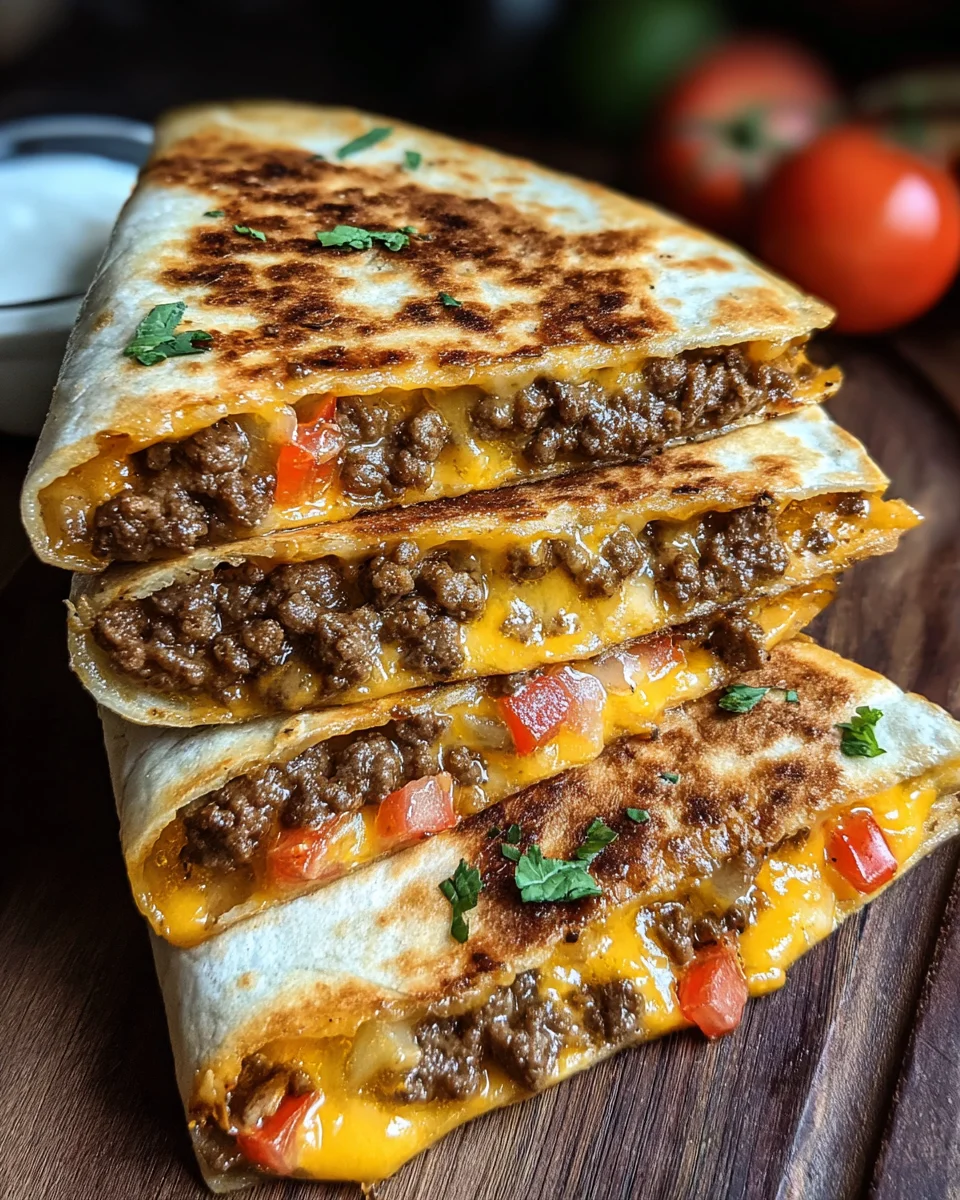
Smashburger Quesadillas represent a culinary revolution that I am incredibly excited to share with you, taking two of my most beloved comfort foods and fusing them into an utterly irresistible creation. Have you ever dreamed of a meal that combines the crispy, caramelized perfection of a smashburger with the gooey, cheesy embrace of a classic quesadilla? Well, I can tell you, your dream is about to become a delicious reality!
This innovative dish isn’t just a fleeting trend; I believe it’s a stroke of genius born from a desire to elevate familiar flavors. While traditional quesadillas boast a rich heritage in Mexican cuisine, a staple that has nourished families for centuries, and the smashburger technique has rapidly gained a passionate following for its unparalleled flavor development, bringing them together creates something truly spectacular. It’s a modern American classic in the making, celebrating the best of both worlds with a respectful nod to their individual legacies.
Why You’ll Fall in Love with Smashburger Quesadillas
I know you’ll adore this ingenious concoction for so many reasons. The unique cooking method for the beef ensures a deeply savory crust that contrasts beautifully with the tender interior, all enveloped in layers of melty cheese and a perfectly toasted tortilla. It offers the satisfying flavor profile of your favorite burger, complete with all the trimmings, in a convenient, handheld format that’s less messy and incredibly fun to eat. Get ready to experience a burst of flavor and texture that will quickly make Smashburger Quesadillas a new staple in my kitchen, and I bet yours too!
Ingredients:
- For the Smashburger Patties:
- 1.5 pounds (about 680g) 80/20 or 85/15 ground beef, chilled
- 1 teaspoon kosher salt, plus more to taste
- 1/2 teaspoon black pepper, freshly ground, plus more to taste
- 2-3 tablespoons high smoke point oil (like vegetable, canola, or grapeseed oil)
- For the Quesadillas:
- 8 large (10-12 inch) flour tortillas
- 2 cups (about 8 oz / 225g) shredded Monterey Jack cheese
- 2 cups (about 8 oz / 225g) shredded sharp cheddar cheese (or your favorite blend)
- 1/2 cup finely diced yellow or white onion
- 1/2 cup finely chopped dill pickles
- 2 tablespoons unsalted butter, softened, for grilling tortillas (optional, but highly recommended)
- For the Special Smashburger Sauce:
- 1/2 cup mayonnaise
- 1/4 cup ketchup
- 2 tablespoons yellow mustard
- 1 tablespoon sweet pickle relish (or finely minced dill pickle if preferred)
- 1 teaspoon white vinegar (apple cider vinegar also works)
- 1/2 teaspoon Worcestershire sauce
- 1/4 teaspoon garlic powder
- 1/4 teaspoon onion powder
- 1/4 teaspoon smoked paprika
- Pinch of cayenne pepper or a dash of your favorite hot sauce (optional, for a little kick)
- Salt and black pepper to taste
Prepare Your Ingredients
Alright, let’s get everything prepped and ready to go! This is where we lay the groundwork for our amazing Smashburger Quesadillas. Trust me, a little organization here makes the whole cooking process smoother and way more enjoyable. First things first, get that ground beef out of the fridge. For the absolute best smashburger experience, you want your beef to be cold; this helps it hold its shape before the smash and allows for those incredible crispy edges we’re aiming for.
- Portion the Beef: I like to gently divide the ground beef into 8 equal portions, forming them into very loose, rustic balls, each weighing about 3 ounces (around 85 grams). Do not pack them tightly, as this can make your burgers tough. Just form them enough so they hold together. Place these beef balls back on a plate or baking sheet and return them to the refrigerator while you prep everything else. Keeping them cold is key!
- Shred the Cheese: If you’re using block cheese, now is the time to shred it. I always recommend shredding your own cheese from a block rather than buying pre-shredded. Why? Pre-shredded cheese often contains anti-caking agents that can make it melt less smoothly. For quesadillas, we want maximum ooey-gooeyness, so fresh is best! Combine your Monterey Jack and cheddar in a bowl.
- Dice the Aromatics and Pickles: Grab your onion and finely dice it. We want small pieces here so they distribute evenly in the quesadilla and provide a little textural crunch without being overwhelming. Do the same for your dill pickles. The pickles add that essential tangy, briny counterpoint that truly makes a burger a burger, and having them finely chopped means they integrate beautifully into each bite of your quesadilla.
- Gather Sauce Ingredients: Set out all the components for your special sauce. Having everything measured and ready will make mixing it a breeze. This sauce is a cornerstone of the Smashburger Quesadillas flavor profile, so give it the attention it deserves!
Make the Special Smashburger Sauce
This sauce, my friends, is the secret weapon that ties all the glorious flavors of our Smashburger Quesadillas together. It’s a riff on a classic burger sauce, elevated with a few extra touches that make it truly irresistible. Don’t skip this step; it’s essential for that authentic burger joint flavor!
- Combine Wet Ingredients: In a medium-sized bowl, combine the mayonnaise, ketchup, yellow mustard, sweet pickle relish (or minced dill pickle), white vinegar, and Worcestershire sauce. Give it a good whisk to ensure everything is well incorporated.
- Add Dry Spices: Now, sprinkle in the garlic powder, onion powder, smoked paprika, and if you’re feeling adventurous, that pinch of cayenne pepper or dash of hot sauce. These spices add depth and a subtle warmth that complements the richness of the beef and cheese beautifully.
- Whisk and Taste: Whisk everything together until the sauce is smooth and uniformly colored. Now, for the crucial step: taste it! This is your sauce, so feel free to adjust it to your preference. Do you want it a little tangier? Add a tiny bit more vinegar. A bit more smoky? A touch more paprika. Need a little more punch? A whisper more Worcestershire. Season with a pinch of salt and black pepper to taste. Remember, the flavors will meld and deepen a bit as it sits.
- Chill for Flavor Development: Once you’re happy with the taste, cover the bowl and pop it into the refrigerator for at least 15-20 minutes. Ideally, I like to make this sauce an hour or two ahead of time, or even the day before. This chilling period allows all those wonderful flavors to truly marry and develop, making your sauce even more delicious.
Cook the Smashburger Patties
Here’s where the “smash” in Smashburger Quesadillas truly comes alive! This technique is all about maximizing flavor and texture by creating a super crispy, caramelized crust on your beef. You’ll need a heavy-bottomed pan, preferably cast iron, and a sturdy spatula with a flat bottom, or even a second flat object like a pot or pan bottom wrapped in foil, for the smashing itself.
- Preheat Your Pan: Place your large, heavy-bottomed skillet or cast iron griddle over medium-high heat. Allow it to preheat for at least 5-7 minutes until it’s screaming hot. You want to see wisps of smoke – that’s how you know it’s ready for the smash! Add 1-2 tablespoons of your high smoke point oil to the pan and let it get shimmering hot. The oil should look almost wavy.
- The “Smash”: Carefully place 2-3 of your chilled, loosely formed beef balls onto the hot oiled surface, making sure not to overcrowd the pan. Immediately, using your sturdy spatula and a second smashing tool (or just pressing down very firmly with the spatula itself), smash each beef ball down flat into a very thin patty, about 1/4 inch thick. Press hard and quickly. The goal is to maximize contact with the hot pan, creating those beautiful lacy, crispy edges. You should hear an immediate, satisfying sizzle.
- Season Generously: Once smashed, immediately season the exposed side of each patty generously with salt and freshly ground black pepper. Don’t be shy with the seasoning; it forms part of that delicious crust.
- Cook for Crispy Perfection: Let the patties cook undisturbed for about 2-3 minutes. Resist the urge to move them! This is crucial for developing that incredible brown, crispy crust. You’ll see the edges becoming dark and caramelized, and a little liquid might start to pool on top.
- Scrape and Flip: After 2-3 minutes, use your sturdy spatula to scrape underneath each patty, getting all that glorious crust off the pan. Flip the patties. You should see a beautiful, deeply browned and crispy surface. Season the second side with a little more salt and pepper.
- Quick Cook Second Side: Cook on the second side for only about 1 minute, just until the beef is cooked through. Because they are so thin, they cook very quickly. There’s no need to smash again on the second side.
- Break and Remove: Once cooked, remove the patties from the pan. You can leave them whole, but for quesadillas, I find it best to roughly chop or break them into smaller, irregular pieces right on the cutting board. This makes them easier to distribute evenly in the quesadilla and prevents large, unwieldy chunks. Repeat this process with the remaining beef balls, adding more oil to the pan as needed for each batch. Keep your cooked smashburger pieces warm while you prepare for assembly.
Pro Tip for Smashes:
Don’t be afraid to really lean into the smash! The harder and quicker you press, the thinner and crispier your patties will be. Just make sure your pan is screaming hot. If it’s not hot enough, the beef will steam rather than sear, and you’ll miss out on that amazing crust.
Assemble and Cook the Smashburger Quesadillas
Now for the grand finale – assembling and cooking these masterpieces! This is where the magic truly happens, bringing together all those delicious components into one gloriously cheesy, meaty, and crispy package. Get ready for some serious satisfaction.
- Preheat Your Griddle/Skillet: Place a large, clean non-stick skillet or flat-top griddle over medium heat. We want a moderate heat here, enough to brown the tortilla and melt the cheese without burning anything. If you’re using butter, you can add about half a tablespoon to the pan now, letting it melt and coat the surface.
- Prepare Your Tortillas: Lay out a flour tortilla on a clean work surface. I like to spread a thin, even layer of our delicious special smashburger sauce over half of the tortilla. This ensures that every bite gets that signature flavor.
- Layer the Cheese: On the half of the tortilla with the sauce, sprinkle a generous amount of your shredded cheese mixture. I find about 1/4 to 1/3 cup per quesadilla is just right. The cheese acts as a delicious glue and provides that essential gooey texture.
- Add the Smashburger Goodness: Evenly distribute a portion of your broken-up smashburger meat over the cheese. Don’t overload it, but make sure you get a good amount of that crispy, flavorful beef in there.
- Scatter Onions and Pickles: Sprinkle some of your finely diced onions and chopped pickles over the meat. These add freshness, crunch, and that characteristic burger tang that we love.
- More Cheese (The Secret to Success!): Top the meat, onion, and pickle layer with another sprinkle of cheese. This top layer of cheese is crucial because it helps to hold everything together once melted and ensures every component is hugged by gooey deliciousness.
- Fold and Transfer: Gently fold the empty half of the tortilla over the filled half, creating a half-moon shape. Carefully transfer the folded quesadilla to your preheated, lightly buttered (or oiled) skillet.
- Grill to Golden Perfection: Cook the quesadilla for 3-4 minutes per side, or until the tortilla is golden brown and crispy, and the cheese inside is completely melted and bubbly. You might need to adjust the heat slightly to prevent burning while ensuring the cheese melts through. Don’t rush this step! The golden-brown crust is part of the experience. If you’re making multiple quesadillas, you can do them in batches, adding more butter or oil to the pan as needed. If your cheese isn’t melting fast enough, you can cover the pan for a minute or two to trap the heat, which helps the cheese get extra gooey.
- Repeat: Continue assembling and cooking the remaining quesadillas until all your ingredients are used up.
Tortilla Strategy:
You can also opt for a “stacked” quesadilla by placing one full tortilla in the pan, layering all ingredients on top, and then placing a second full tortilla on top. I usually prefer the folded half-moon because it’s easier to flip and holds its shape better, especially with all these delicious fillings. But experiment and see what works best for you!
Serve Your Delicious Smashburger Quesadillas
Congratulations! You’ve just created culinary magic. These Smashburger Quesadillas are truly something special, combining the best of two beloved worlds. Now, let’s get them from the pan to your plate and into your belly!
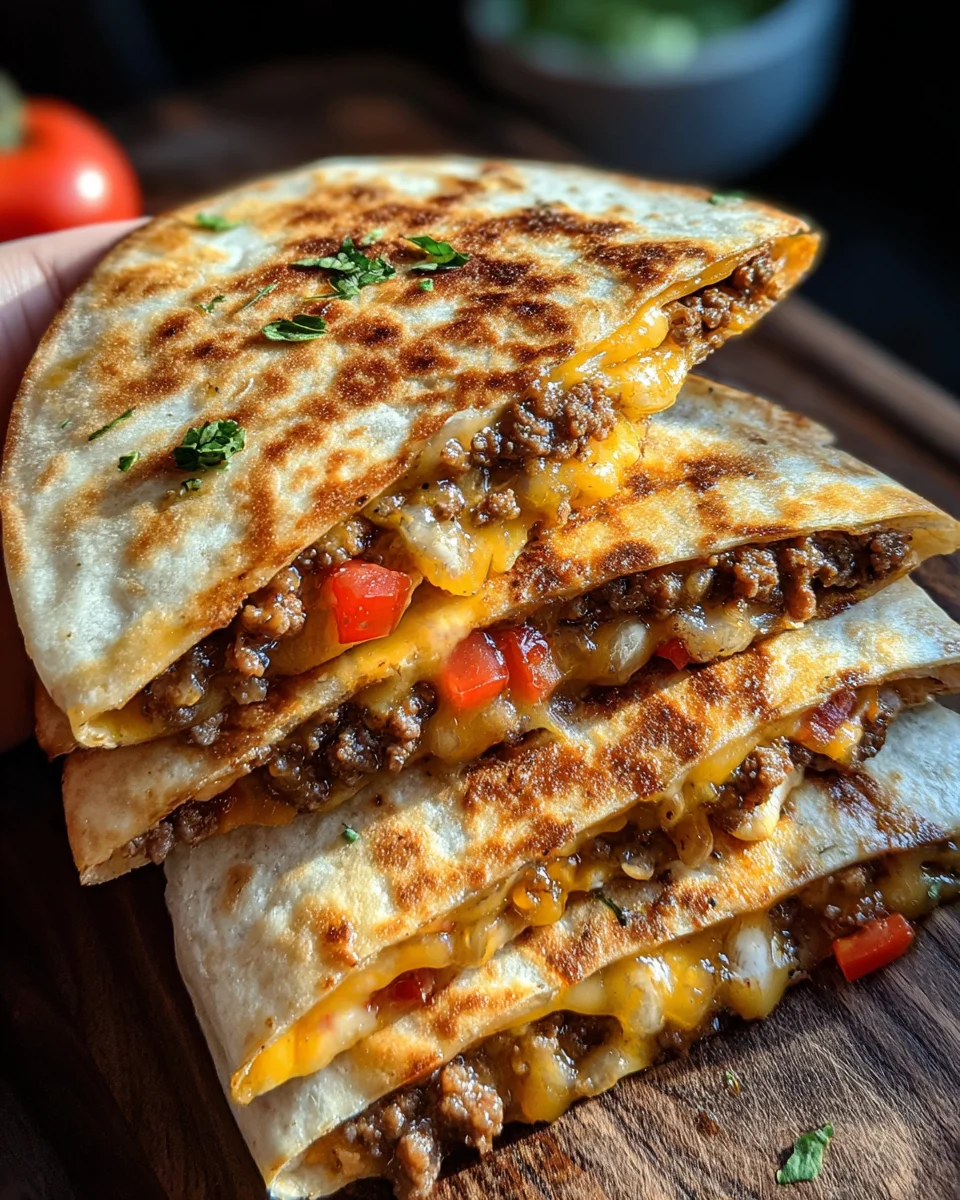
- Rest and Slice: Once each quesadilla is perfectly golden brown and the cheese is gloriously melted, transfer it to a cutting board. I recommend letting it rest for just a minute or two before slicing. This brief rest allows the cheese to set slightly, preventing all the delicious filling from spilling out when you cut into it.
- Slice for Sharing (or Not!): Using a sharp knife or a pizza cutter, slice each half-moon quesadilla into 2 or 3 wedges. I usually go for three, as it makes them perfect for dipping and easy to handle.
- Garnish and Serve Immediately: Arrange the sliced quesadilla wedges on a serving platter. For an extra flourish, you can offer additional sides of your special smashburger sauce for dipping. A sprinkle of fresh chopped chives or parsley could also add a lovely touch of color and freshness, though it’s totally optional.
- Enjoy! Serve these Smashburger Quesadillas immediately while they are hot, crispy, and the cheese is still wonderfully gooey. Each bite delivers that incredible smashburger flavor – crispy beef, tangy pickles, fresh onion, and that irresistible special sauce, all wrapped in a perfectly grilled, cheesy tortilla. Get ready for rave reviews! These are perfect for a fun dinner, game night, or any time you’re craving something truly comforting and delicious.
Pairing Suggestions:
While these are incredibly satisfying on their own, they pair wonderfully with a simple green salad to cut through the richness, or even a side of crispy homemade French fries for the ultimate burger-joint experience. A cold beer or your favorite soda would also be fantastic companions.
Conclusion:
I genuinely believe that this recipe for Smashburger Quesadillas is more than just a meal; it’s a culinary revelation, a true game-changer that combines the absolute best elements of two universally adored comfort foods into one irresistible, crispy, cheesy, and utterly satisfying package. From the moment that seasoned ground beef hits the hot griddle, smashing down to create those coveted crispy edges, to the satisfying sizzle as the cheese melts and fuses everything together within a perfectly golden tortilla, you’re not just cooking – you’re crafting an experience. This isn’t just another weeknight dinner idea; it’s an occasion, a flavor explosion that will undoubtedly become a staple in your kitchen. I’ve found that the sheer speed and simplicity of preparation, coupled with the phenomenal depth of flavor, makes these quesadillas a consistent winner. They offer that juicy, savory burger essence wrapped in the ultimate cheesy embrace of a quesadilla, delivering a textural delight with every bite – from the slight crunch of the tortilla to the tender, flavorful meat and the gooey, stretching cheese. It truly checks all the boxes for ultimate comfort food, perfect for warding off hunger on a busy evening or treating yourself to something spectacularly delicious after a long week. It’s the kind of dish that brings smiles to faces and quiet satisfaction to hungry bellies, proving that sometimes, the most innovative ideas come from cleverly combining two already fantastic things.
Elevate Your Smashburger Quesadilla Experience with These Perfect Pairings and Variations!
To truly unlock the full potential of your Smashburger Quesadillas, I urge you to explore a variety of serving suggestions and creative variations. For classic dipping pleasure, a dollop of cool, tangy sour cream is always a winner, as is a vibrant, chunky salsa or a generous scoop of creamy guacamole. These fresh, bright condiments offer a wonderful contrast to the rich, savory filling. But don’t stop there! I often like to whip up a quick homemade sauce to take things to the next level. A smoky chipotle mayonnaise, made by stirring a little adobo sauce from canned chipotles into your favorite mayo, adds a fantastic kick. Or, for a zesty twist, try a spicy ranch or even a secret “burger sauce” concoction involving ketchup, mustard, relish, and mayonnaise. Inside the quesadilla, the possibilities are equally exciting. While classic American cheese is perfect for melting, consider a blend of Monterey Jack and sharp cheddar for a more complex flavor, or even a pepper jack for a touch of heat. Caramelized onions, thinly sliced and slowly cooked until sweet and golden, can add incredible depth. For those who love a bit of tang, finely diced dill pickles or pickled jalapeños can be tucked inside before folding, or served on the side for a burst of briny freshness. Crispy bacon bits, sautéed mushrooms, or even a sprinkle of fresh cilantro can transform the classic. For a side, a pile of perfectly golden, seasoned french fries or crispy onion rings is a match made in heaven, turning your meal into a full-on gourmet burger experience. Alternatively, a simple crisp green salad with a light vinaigrette can provide a refreshing counterpoint to the richness. Don’t be afraid to experiment with different ground meats too, though the “smashburger” technique truly shines with beef for that signature texture and flavor.
Your Culinary Adventure Awaits!
Now that you have all the insider tips and tricks, I sincerely hope you feel inspired to dive into your kitchen and give these incredible quesadillas a try. I promise you, the joy of biting into your very own perfectly crafted Smashburger Quesadilla is immensely rewarding. Don’t hesitate to customize them to your heart’s content – that’s the beauty of home cooking! Whether you stick to the classic formula or venture into bold new variations with extra toppings and sauces, I am confident that you’ll be absolutely thrilled with the results. Once you’ve experienced the magic, I would absolutely love for you to share your culinary adventure with me. What variations did you try? What did your family and friends think? Did you discover a new favorite condiment or a brilliant serving suggestion? Your insights and feedback are invaluable, and they help create a wonderful community of enthusiastic home cooks. So, go forth, smash, melt, and enjoy – and please, don’t forget to tell me all about it!
Smashburger Quesadillas: Ultimate Beefy Comfort Food
A culinary revolution fusing the crispy, caramelized perfection of a smashburger with the gooey, cheesy embrace of a classic quesadilla. This innovative dish offers the satisfying flavor profile of your favorite burger in a convenient, handheld format.
Ingredients
Instructions
Important Information
Nutrition Facts (Per Serving)
It is important to consider this information as approximate and not to use it as definitive health advice.
Allergy Information
Please check ingredients for potential allergens and consult a health professional if in doubt.
Leave a Comment