
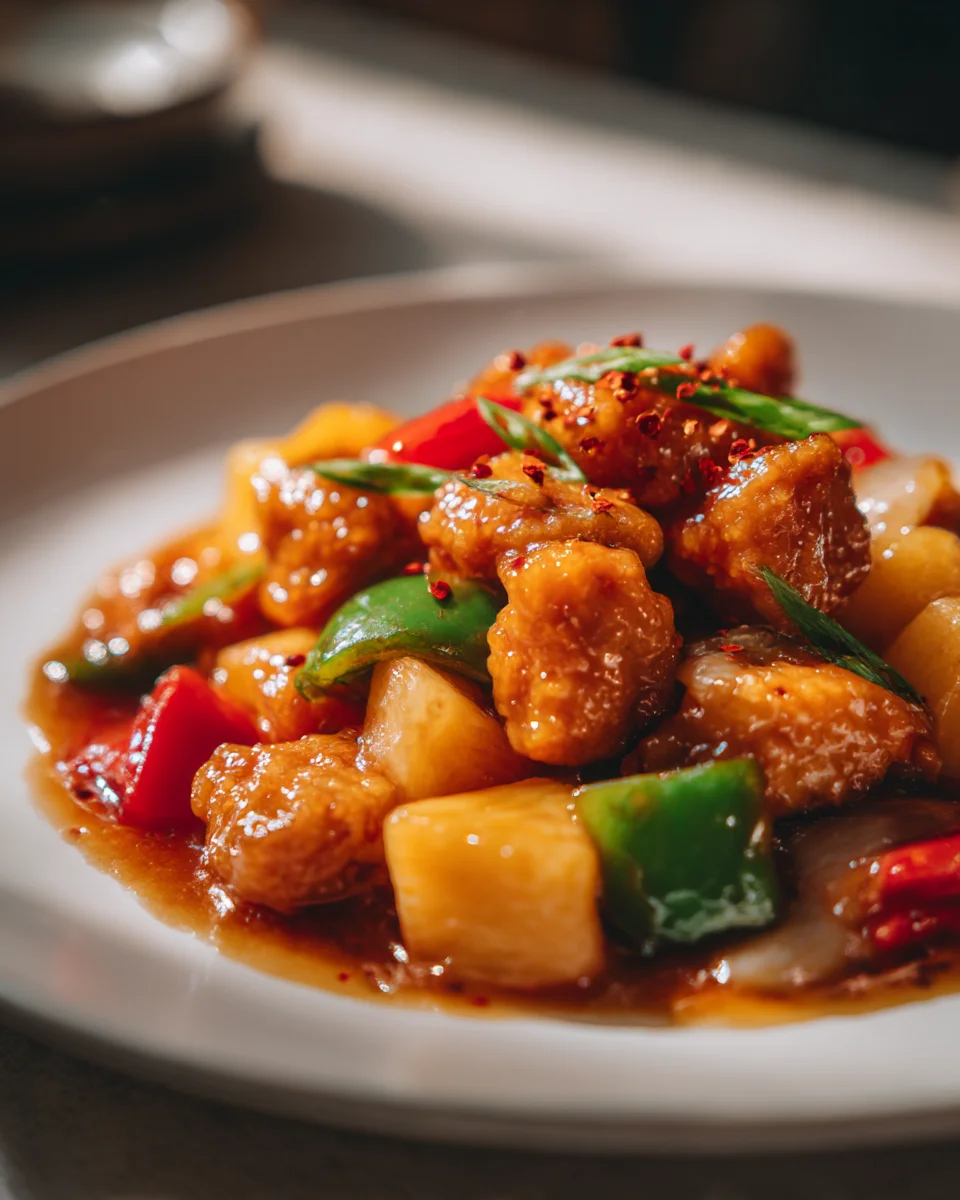
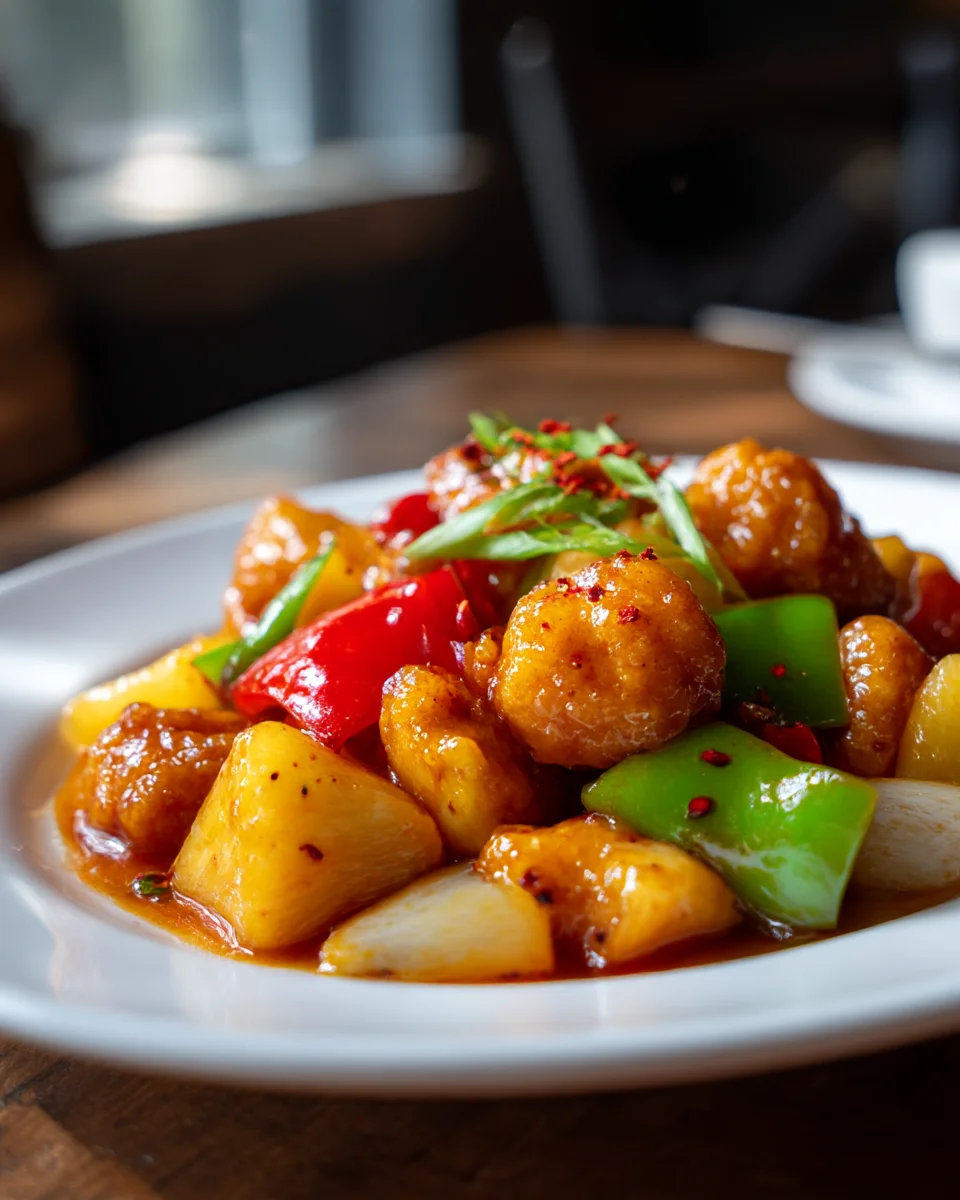
Sweet And Sour Chicken Recipe
Hello there, fellow food lover! If there’s one dish that perfectly captures the magic of a good takeout meal, it’s Sweet and Sour Chicken. And today, I’m absolutely thrilled to share my go-to recipe with you. This isn’t just any version; this is the one I perfected over countless attempts, ensuring that every bite delivers that quintessential sweet, tangy, and utterly addictive flavour profile we all crave.
What makes this specific Sweet and Sour Chicken Recipe truly stand out is the incredible crispness of the chicken, even after it’s coated in that glorious, glossy sauce, and the perfect harmony of flavours in the sauce itself. It strikes that delicate balance – not too sweet, not too sour – but just right, making your taste buds sing. I promise you, once you taste how simple it is to achieve such vibrant, restaurant-quality results in your own kitchen, you’ll wonder why you ever ordered in. It’s a guaranteed crowd-pleaser, an instant mood lifter, and honestly, just a joy to make and eat.
In a nutshell, we’re talking about tender, succulent pieces of chicken – coated and fried to a golden crisp – then lovingly tossed in a homemade sweet and sour sauce bursting with bright flavours, complemented by colourful bell peppers, onions, and juicy pineapple chunks. It’s a feast for the eyes and the palate!
Ingredient Notes
Hey there, fellow food lovers! Let’s dive into the heart of our Sweet and Sour Chicken recipe – the ingredients. Getting these right is key to that perfect balance of tangy and sweet, and that irresistible crispy chicken. I’ve gathered my go-to items here, along with some handy substitutions to make sure you can whip this up no matter what’s in your pantry.
For the Crispy Chicken
- Boneless, Skinless Chicken: I usually opt for about 1.5 pounds of chicken breast because it’s lean and cooks quickly, but chicken thighs are fantastic too if you prefer a juicier, more tender bite. Just cut your chosen chicken into 1-inch bite-sized pieces. This size ensures they cook evenly and are easy to manage.
- Cornstarch: This is our secret weapon for that glorious crispy coating. It creates a light, shatteringly crisp exterior when fried.
- Egg White: A single egg white helps bind the cornstarch to the chicken, creating a better crust.
- Salt and Pepper: Essential for seasoning the chicken from the inside out.
- Oil for Frying: A neutral oil with a high smoke point like vegetable, canola, or peanut oil is ideal for achieving that beautiful golden crispness.
For the Vibrant Sweet and Sour Sauce
- Ketchup: This provides the classic base, offering a lovely tang and a hint of sweetness. Don’t skip it!
- Rice Vinegar: Crucial for the “sour” part of our dish. It’s milder than white vinegar and has a slightly sweet undertone. If you’re out, apple cider vinegar can work in a pinch, but you might want to start with a bit less and taste as you go.
- Granulated Sugar: To balance the tang and create that irresistible sweetness.
- Soy Sauce: Adds depth, umami, and a touch of saltiness. I use regular soy sauce, but low-sodium is fine too.
- Pineapple Juice: This is my favorite fruit juice for sweet and sour sauce. It adds a wonderful tropical sweetness and acidity that complements the chicken so well. If you don’t have pineapple juice, orange juice can be a nice alternative for a different but equally delicious citrusy note.
- Water or Chicken Broth: To thin the sauce to the perfect consistency. Broth adds a little more flavor.
- Cornstarch Slurry: A mix of cornstarch and a little water, this is what thickens our sauce to that luscious, glossy texture we all love.
For the Colorful Vegetables and Aromatics
- Bell Peppers: I love using a mix of red, green, and yellow bell peppers. They bring beautiful color, a sweet crunch, and lots of vitamin C. Cut them into 1-inch pieces to match the chicken.
- Onion: Half an onion, roughly chopped, adds a savory base.
- Canned Pineapple Chunks: Drained, these add bursts of sweet, juicy flavor. Fresh pineapple works wonderfully too if you have it!
- Garlic and Ginger: Freshly minced garlic and grated ginger are non-negotiable for that authentic aromatic flavor. They truly elevate the dish.
Substitutions and Variations
- Protein Swap: While chicken is king here, this recipe is incredibly versatile. You could easily substitute the chicken with about 1.5 pounds of lean beef sirloin, cut into 1-inch pieces, following the same coating and frying steps. For a vegetarian option, firm tofu (pressed and cubed) works beautifully.
- Vinegar Alternatives: As mentioned, apple cider vinegar can substitute for rice vinegar, though it has a stronger flavor, so use it sparingly at first.
- Extra Veggies: Feel free to toss in other quick-cooking vegetables like sliced carrots, snap peas, water chestnuts, or even broccoli florets for more texture and nutrition. Add them along with the bell peppers.
Step-by-Step Instructions
Ready to get cooking? I’ll walk you through each step to create your very own delicious Sweet and Sour Chicken. It’s easier than you think, and the results are so rewarding!
- Prepare the Chicken: First things first, grab your boneless, skinless chicken (breast or thigh) and cut it into uniform 1-inch bite-sized pieces. Pat them dry with paper towels – this helps the coating stick better. In a medium bowl, toss the chicken with a pinch of salt and pepper. Now, crack in that egg white and mix well until each piece is lightly coated. Finally, add the cornstarch and toss again until the chicken pieces are evenly coated. They should look slightly pasty.
- Fry the Chicken: Heat about 1-2 inches of neutral oil in a large skillet or Dutch oven over medium-high heat until it reaches around 350°F (175°C). Carefully place the chicken pieces into the hot oil, making sure not to overcrowd the pan. Fry in batches if necessary; overcrowding lowers the oil temperature and makes the chicken less crispy. Fry for 3-5 minutes per side, or until golden brown and cooked through. Once done, use a slotted spoon to transfer the crispy chicken to a plate lined with paper towels to drain any excess oil. Set aside.
- Whisk the Sauce: While the chicken is frying (or even before you start), it’s a good idea to prepare your sauce. In a medium bowl, whisk together the ketchup, rice vinegar, granulated sugar, soy sauce, pineapple juice, and water or chicken broth. In a separate small bowl, combine 1 tablespoon of cornstarch with 2 tablespoons of cold water to create a slurry. Set both aside.
- Sauté the Aromatics and Vegetables: Carefully pour out most of the frying oil from your skillet, leaving about 1 tablespoon. Return the skillet to medium heat. Add the minced garlic and grated ginger and sauté for about 30 seconds until fragrant – be careful not to burn them! Now, add the chopped onion and bell peppers. Sauté for 3-4 minutes until the vegetables are tender-crisp. You want them to retain a little bite, so don’t overcook them.
- Add Pineapple and Sauce: Stir in the drained pineapple chunks with the vegetables. Give your whisked sweet and sour sauce another quick stir, then pour it into the skillet with the vegetables. Bring the sauce to a gentle simmer.
- Thicken the Sauce: Once the sauce is simmering, give your cornstarch slurry a quick whisk again (cornstarch tends to settle at the bottom). Slowly pour the slurry into the simmering sauce, stirring constantly. Continue to stir until the sauce thickens and becomes glossy, which usually takes about 1-2 minutes.
- Combine and Serve: Finally, add your crispy fried chicken back into the skillet with the thickened sweet and sour sauce and vegetables. Gently toss everything together until the chicken pieces are well coated in the luscious sauce. Serve immediately over a bed of fluffy steamed white rice, brown rice, or noodles. Enjoy your hard work!
Tips & Suggestions
Making a truly memorable Sweet and Sour Chicken goes beyond just following the steps. Here are some of my favorite tips and suggestions to elevate your dish and ensure it turns out perfect every time:
- The Secret to Super Crispy Chicken: Don’t overcrowd your pan when frying! This is probably the most crucial tip. Frying in batches ensures the oil temperature stays high, resulting in beautifully golden and crisp chicken. If you want extra crispy chicken, you can double-fry it: fry it once until lightly golden, remove it, let it cool for a few minutes, then fry it again for 1-2 minutes until deeply golden and super crunchy.
- Achieving Sauce Nirvana: Taste your sauce before you add the cornstarch slurry. This is your chance to adjust the sweet and sour balance to your preference. If it’s too sour, add a little more sugar. If it’s too sweet, a splash more rice vinegar or even a squeeze of fresh lemon juice can help. A tiny pinch of red pepper flakes can also add a subtle background warmth if you like a hint of spice.
- Keep Veggies Crisp-Tender: We’re not aiming for soggy vegetables here! Sauté your bell peppers and onions just until they start to soften but still have a bit of a bite. This adds a fantastic textural contrast to the dish. Adding them too early or cooking them for too long will make them mushy.
- Uniformity is Key: Cut your chicken and vegetables into roughly the same size (about 1-inch pieces). This ensures everything cooks evenly and makes for a more aesthetically pleasing and easier-to-eat dish.
- Prep Ahead for Ease: This recipe involves a few different components, so save yourself some stress by doing a little mise en place. You can cut your chicken and veggies, whisk together the sauce ingredients, and mince your aromatics all ahead of time. This makes the actual cooking process much faster and more enjoyable.
- Serving Suggestions: While classic steamed white rice is always a winner, don’t limit yourself! Sweet and Sour Chicken is also delicious with brown rice, quinoa, cauliflower rice (for a low-carb option), or even tossed with some stir-fried noodles. A sprinkle of toasted sesame seeds and chopped green onions as a garnish adds a nice touch of freshness and presentation.
- Fresh Pineapple vs. Canned: Both work great! Canned pineapple is super convenient and always sweet. If you opt for fresh pineapple, it will lend a brighter, more vibrant flavor profile, which I absolutely love when I have the time.
Storage
You’ve whipped up a fantastic batch of Sweet and Sour Chicken, and if there are any leftovers (a rare occurrence in my house!), you’ll want to store them properly to enjoy later. Here’s what I recommend:
- Refrigeration: Sweet and Sour Chicken stores quite well in the refrigerator. Transfer any leftovers into an airtight container. It will keep fresh for about 3-4 days. The sauce tends to meld even more wonderfully with the chicken and vegetables overnight, so sometimes it tastes even better the next day!
- Reheating:
- Microwave: For a quick reheat, place your desired portion in a microwave-safe dish and heat on medium power for 1-2 minutes, stirring halfway through, until thoroughly warmed. Be aware that the crispy coating on the chicken might soften a bit in the microwave.
- Stovetop: To help retain some of the chicken’s texture, you can reheat it in a skillet on the stovetop over medium-low heat. Add a splash of water or chicken broth if the sauce seems too thick. Stir occasionally until heated through. The chicken might not be as crispy as freshly fried, but it will still be delicious.
- Freezing: Freezing Sweet and Sour Chicken is generally okay, but there are a few things to consider. The sauce freezes beautifully, but the fried chicken can lose its crispness and become a bit mushy or rubbery once thawed and reheated. The vegetables might also become softer than desired.
- Best Practice: If you’re thinking of making a large batch for future meals, I recommend freezing the sweet and sour sauce separately. You can store the sauce in an airtight container or freezer-safe bag for up to 2-3 months. When you’re ready to eat, thaw the sauce, then fry a fresh batch of chicken and cook the vegetables, combining them with the reheated sauce at the very end. This way, you get the best of both worlds – convenience with fresh textures.
- Freezing the Combined Dish: If you do decide to freeze the complete dish, ensure it’s completely cooled before transferring it to freezer-safe containers. It can be frozen for up to 1-2 months. Thaw overnight in the refrigerator before reheating gently on the stovetop.
Final Thoughts
There’s something truly magical about the perfect balance of flavors in a well-made Sweet And Sour Chicken Recipe, and I truly believe this version hits all the right notes. It’s more than just a meal; it’s an experience that brightens any dinner table with its vibrant colors and irresistible aroma. I’ve poured my heart into crafting this recipe to ensure every bite delivers that delightful interplay of tanginess and sweetness, perfectly complemented by tender pieces of chicken.
What makes this particular Sweet And Sour Chicken Recipe a must-try is its remarkable ability to bring joy and a touch of the exotic right into your home, effortlessly. Whether you’re preparing it for a quick weeknight dinner or a special gathering, its appeal is universal. Plus, with its inherent versatility, you can easily adapt it, perhaps even swapping the chicken for tender beef, or using non-alcohol alternatives to suit all preferences without compromising on flavor. I’m confident that once you taste this incredible dish, you’ll understand why this Sweet And Sour Chicken Recipe is destined to become a beloved staple in your culinary repertoire. Go ahead, give it a try – your taste buds will thank you!

Leave a Comment