
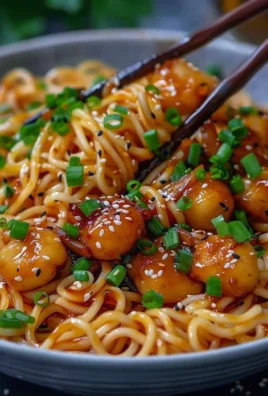
Honey Sesame Chicken is more than just a meal; it’s a culinary experience that brings the beloved flavors of your favorite takeout right into your own kitchen, often surpassing it in freshness and taste. Imagine sinking your teeth into perfectly crispy, tender pieces of chicken, each one generously coated in a shimmering, sticky glaze that beautifully balances the sweetness of honey with the distinct, nutty aroma of toasted sesame. This dish has truly earned its place as a modern comfort food classic, a testament to how simple ingredients can come together to create something utterly irresistible.
While the precise historical roots of this delightful creation are a fusion of various Asian culinary inspirations adapted for a global palate, its widespread popularity is undeniable. People absolutely adore this dish not only for its incredible taste profile—the harmonious blend of savory, sweet, and a hint of umami—but also for its fantastic texture. The contrast between the succulent chicken and the slightly caramelized, glossy sauce, often garnished with an extra sprinkle of sesame seeds, is simply divine. It’s an accessible yet incredibly satisfying dish, perfect for a quick weeknight dinner or for impressing guests. Preparing Honey Sesame Chicken at home allows you to control the quality of ingredients and truly customize the flavor to your liking, promising a delightful meal every time.
Ingredients:
Creating truly spectacular Honey Sesame Chicken at home requires a thoughtful selection of fresh, high-quality ingredients. Trust me, the extra effort in sourcing these elements will shine through in every delicious bite.
- For the Chicken:
- 1.5 lbs (about 680g) boneless, skinless chicken thighs or breasts, cut into 1-inch bite-sized pieces. I personally find chicken thighs offer a juicier, more tender result, but breasts work beautifully if you prefer leaner meat.
- 1/2 teaspoon salt
- 1/4 teaspoon black pepper, freshly ground is always best for a noticeable kick.
- 1 large egg, whisked
- 1/2 cup cornstarch (also known as cornflour), for that irresistible crispy coating.
- 1/4 cup all-purpose flour, to work in harmony with the cornstarch for ultimate crispiness.
- 2-3 cups vegetable oil, canola oil, or peanut oil for frying. You need enough to submerge the chicken pieces adequately, ensuring even cooking and a golden-brown finish.
- For the Honey Sesame Sauce:
- 1/2 cup low-sodium soy sauce. Using low-sodium gives you more control over the overall saltiness of the dish.
- 1/4 cup honey. Choose a good quality, flavorful honey – it’s a star ingredient!
- 2 tablespoons rice vinegar (unseasoned). This adds a crucial tang that balances the sweetness and richness.
- 1 tablespoon sesame oil. A little goes a long way here; it adds that characteristic nutty, aromatic depth.
- 2 tablespoons brown sugar, packed. Light or dark brown sugar works; dark brown will offer a slightly deeper molasses note.
- 1 teaspoon fresh ginger, grated. Fresh is non-negotiable for vibrant flavor!
- 2 cloves garlic, minced. Again, fresh is key for punchy flavor.
- 1/2 teaspoon red pepper flakes (optional, for a hint of heat). Adjust to your preference – I love a little warmth in my Honey Sesame Chicken.
- 1 tablespoon cornstarch, mixed with 2 tablespoons cold water (this is your cornstarch slurry, essential for thickening).
- For Garnish and Serving:
- 2 tablespoons toasted sesame seeds. Toasting them yourself really brings out their flavor, but pre-toasted works too.
- 1/4 cup green onions (scallions), thinly sliced, for freshness and a pop of color.
- Cooked white rice or brown rice, for serving.
- Steamed broccoli or your favorite stir-fried vegetables, to complete the meal.
Preparing the Chicken for Ultimate Crispiness:
Mastering the Perfect Texture for Your Honey Sesame Chicken
The secret to exceptional Honey Sesame Chicken truly lies in the preparation of the chicken itself. We’re aiming for that irresistible crispy exterior that holds up beautifully, even when coated in our luscious sauce.
- Prepare the Chicken: First things first, let’s get our chicken ready. If you’re using chicken breasts, I recommend cutting them into even 1-inch bite-sized pieces. For chicken thighs, which are usually a bit more irregular, trim any excess fat and then cut them into similar 1-inch chunks. Consistency in size is paramount here because it ensures all pieces cook evenly and reach that perfect golden crispiness at the same time. Once cut, gently pat the chicken pieces thoroughly dry with paper towels. This step is crucial! Excess moisture is the enemy of crispiness, preventing our coating from adhering properly and leading to a soggy result.
- Season and Marinate Briefly: In a medium bowl, sprinkle the chicken pieces with 1/2 teaspoon of salt and 1/4 teaspoon of freshly ground black pepper. Toss gently to ensure every piece is lightly seasoned. While this isn’t a long marination, this initial seasoning lays a foundational layer of flavor that complements the sauce beautifully.
- Create the Crispy Coating: Now for the magic coating! In a separate, shallow bowl, whisk the large egg until it’s well beaten. In another shallow dish or a wide, shallow bowl, combine the 1/2 cup of cornstarch and 1/4 cup of all-purpose flour. Whisk these dry ingredients together until they’re thoroughly mixed. The combination of cornstarch and flour gives us that superb, extra-crispy texture that holds up so well in a saucy dish like Honey Sesame Chicken.
- Coat the Chicken: Take your seasoned chicken pieces and first dip them into the whisked egg, ensuring each piece is fully coated. Let any excess egg drip off before transferring them to the cornstarch and flour mixture. Generously coat each piece, pressing gently to make sure the flour mixture adheres well. You want a substantial, even layer of coating on every piece. Set the coated chicken pieces aside on a wire rack over a baking sheet. Allowing them to rest for about 5-10 minutes helps the coating adhere even better, preventing it from falling off during frying.
Crafting the Irresistible Honey Sesame Sauce:
The Sweet and Savory Heart of Our Honey Sesame Chicken
While the chicken is resting, let’s turn our attention to the star of the show – the incredible honey sesame sauce. This sauce is a symphony of sweet, savory, tangy, and a hint of spice, designed to perfectly complement our crispy chicken.
- Combine Wet Ingredients: In a medium bowl or a liquid measuring cup, combine the 1/2 cup of low-sodium soy sauce, 1/4 cup of honey, 2 tablespoons of unseasoned rice vinegar, 1 tablespoon of sesame oil, and 2 tablespoons of packed brown sugar. Whisk these ingredients together until the brown sugar is mostly dissolved and everything is well combined. I often find a small whisk works wonders here to ensure everything is fully incorporated.
- Add Aromatics and Spice: Next, stir in the 1 teaspoon of freshly grated ginger and 2 cloves of minced garlic. Using fresh ginger and garlic is a game-changer for this sauce; their vibrant, pungent flavors are absolutely essential to the authentic taste of Honey Sesame Chicken. If you like a little heat, now is the time to add the 1/2 teaspoon of red pepper flakes. Give it another good stir. At this stage, you’ll already get a delightful aroma that hints at the deliciousness to come!
- Prepare the Cornstarch Slurry: In a small separate bowl, combine 1 tablespoon of cornstarch with 2 tablespoons of cold water. Whisk this until no lumps remain. This is your cornstarch slurry, and it’s what will thicken our sauce to that perfect glossy consistency. Make sure the water is cold, as hot water can cause the cornstarch to clump instantly. Set this aside for when we cook the sauce.
Cooking and Assembling Your Honey Sesame Chicken:
Bringing All the Delicious Elements Together
This is where the magic truly happens! We’ll fry the chicken to golden perfection and then bring it all together with our incredible homemade sauce. Get ready for your kitchen to smell absolutely amazing!
- Heat the Oil for Frying: Pour 2-3 cups of vegetable oil (or your preferred frying oil) into a large, heavy-bottomed pot or a deep skillet. You need enough oil so that the chicken pieces can be at least partially submerged, ensuring even cooking. Heat the oil over medium-high heat until it reaches 350-375°F (175-190°C). If you don’t have a thermometer, you can test the oil by dropping a tiny pinch of the flour mixture into it; if it sizzles vigorously and floats to the top immediately, it’s ready. Maintaining the correct oil temperature is crucial for crispy chicken that isn’t greasy.
- Fry the Chicken in Batches: Carefully add the coated chicken pieces to the hot oil, ensuring you don’t overcrowd the pot. Frying in batches is absolutely essential! Overcrowding will drop the oil temperature too much, resulting in soggy, greasy chicken instead of crispy perfection. Fry for 4-6 minutes, or until the chicken is golden brown and cooked through. The exact time will depend on the size of your chicken pieces and the oil temperature. Once cooked, use a slotted spoon or spider strainer to transfer the fried chicken to a wire rack set over a baking sheet to drain any excess oil. Repeat with the remaining chicken until all pieces are beautifully golden and crispy.
- Cook the Honey Sesame Sauce: Once all the chicken is fried and draining, carefully pour out most of the frying oil from your skillet, leaving only about 1 tablespoon behind. If you used a pot, transfer the tablespoon of oil to a clean skillet. Heat this residual oil over medium heat. Pour the prepared honey sesame sauce mixture (from step 1 of sauce preparation) into the skillet. Bring it to a gentle simmer, stirring occasionally.
- Thicken the Sauce: As soon as the sauce starts to simmer, give your cornstarch slurry (from step 3 of sauce preparation) a quick whisk again, as cornstarch tends to settle. Slowly pour the slurry into the simmering sauce while continuously whisking. Continue to whisk gently until the sauce thickens to your desired consistency – it should be glossy and able to coat the back of a spoon. This usually takes about 1-2 minutes. Be patient and don’t rush this step; a perfectly thickened sauce is key to the overall experience of your Honey Sesame Chicken.
- Combine Chicken and Sauce: Remove the skillet from the heat. Add all the crispy fried chicken pieces back into the skillet with the thickened sauce. Use a spatula or tongs to gently toss the chicken, ensuring every single piece is evenly coated in that glorious, sticky honey sesame sauce. This is the moment where the dish truly comes together, transforming simple fried chicken into a vibrant, flavorful masterpiece.
Serving and Enjoying Your Homemade Honey Sesame Chicken:
The Grand Finale: Presenting Your Culinary Creation
Congratulations, you’ve just created a truly fantastic dish! Now comes the fun part: serving up your delicious Honey Sesame Chicken and basking in the compliments. Presentation can really elevate the dining experience, and these garnishes add both visual appeal and complementary flavors.
- Garnish Generously: Transfer the saucy Honey Sesame Chicken to a serving platter or individual plates. Immediately sprinkle generously with toasted sesame seeds and thinly sliced green onions. The sesame seeds add a lovely crunch and nutty aroma, while the green onions provide a fresh, slightly pungent counterpoint and a beautiful pop of color. Don’t be shy with these; they are integral to the dish’s aesthetic and flavor profile.
- Serve Immediately: For the best texture and flavor, serve your Honey Sesame Chicken hot and fresh. The crispiness of the chicken is at its peak right after it’s tossed in the sauce, and the flavors are most vibrant.
- Accompaniments: This dish pairs perfectly with a side of fluffy white rice or nutritious brown rice, which soaks up the extra sauce wonderfully. To make it a complete meal, consider serving it alongside some steamed broccoli, stir-fried snow peas, or any of your favorite Asian-inspired vegetables. The freshness of the vegetables provides a fantastic contrast to the rich, savory chicken.
- Enjoy Every Bite: Gather your loved ones and savor the fruits of your labor! This homemade Honey Sesame Chicken is far superior to any takeout, and you’ll taste the care and fresh ingredients in every single bite. I promise, this recipe will become a household favorite.
Pro Tips for Perfect Honey Sesame Chicken:
To ensure your Honey Sesame Chicken is a resounding success every time, here are a few extra pointers I’ve learned along the way:
- Don’t Skimp on Patting Dry: I cannot emphasize enough how important it is to thoroughly pat your chicken dry. It genuinely makes all the difference in achieving that perfectly crisp crust.
- Oil Temperature Control: If you don’t have a thermometer, a small piece of bread or a wooden chopstick can tell you if the oil is ready. If a piece of bread sizzles and browns in about 30 seconds, or small bubbles form rapidly around a chopstick, your oil is likely in the right range. Too cool and the chicken will be greasy; too hot and the coating will burn before the chicken cooks through.
- Batch Frying is Non-Negotiable: Resist the urge to rush! Overcrowding cools the oil and results in less crispy chicken. Give your chicken pieces room to breathe and fry properly.
- Adjust Sweetness/Heat: Taste the sauce before thickening it. If you prefer it sweeter, add a little more honey or brown sugar. If you like it spicier, a few extra red pepper flakes won’t hurt!
- Make Ahead Option for Sauce: The honey sesame sauce can be made a day in advance and stored in the refrigerator. Just whisk it well before heating and thickening. This can be a real time-saver on a busy weeknight.
- Leftovers: While best enjoyed fresh, leftovers can be stored in an airtight container in the refrigerator for up to 3 days. Reheat gently in a skillet over medium-low heat or in the oven at 350°F (175°C) to help retain some crispiness. Microwaving is quick but will likely soften the coating significantly.
There you have it – a comprehensive guide to making the most delicious, restaurant-quality Honey Sesame Chicken right in your own kitchen. Enjoy the process and the incredibly flavorful results!
Conclusion:
Well, my friends, we’ve reached the end of our culinary journey for today, but truly, it’s just the beginning of a delicious adventure for your taste buds. This recipe for Honey Sesame Chicken isn’t just another dinner idea; it’s a gateway to creating restaurant-quality flavors right in your own kitchen, without all the fuss or the takeout menu. I wholeheartedly believe this dish is a must-try for anyone who appreciates a perfect balance of sweet, savory, and a hint of umami, all coated in that glossy, irresistible sauce.
I’ve poured my heart into perfecting this recipe because I genuinely want you to experience the joy of biting into tender, succulent chicken pieces, each one drenched in that beautifully sticky, golden-brown glaze. What makes this recipe truly stand out is its incredible versatility and the sheer satisfaction it brings. It’s the kind of dish that makes you feel like a culinary superstar, even if you’re just starting your cooking journey. Forget bland, forget complicated; this Honey Sesame Chicken is all about vibrant flavors and a surprisingly straightforward process that yields truly spectacular results every single time. It’s a guaranteed crowd-pleaser, perfect for a busy weeknight yet impressive enough to serve guests.
Why This Honey Sesame Chicken Recipe is a Game-Changer
First and foremost, the flavor profile is simply unparalleled. We’re talking about a symphony of tastes that dance on your palate – the subtle sweetness of honey, the nutty depth of sesame, a touch of garlic and ginger for warmth, and a savory kick from soy sauce. This harmonious blend elevates humble chicken pieces into something truly extraordinary. Secondly, it’s incredibly adaptable. You’re not just making a meal; you’re crafting an experience that can be tailored to your liking. The sauce, in particular, is a thing of beauty – thick, glossy, and clinging to every piece of chicken, ensuring each bite is bursting with flavor. And let’s be honest, who doesn’t love a dish that tastes like a treat but is made with wholesome ingredients you control? This is your answer to those takeout cravings, but infinitely fresher and more satisfying.
Unleash Your Inner Chef: Customization and Serving Ideas
One of my favorite things about this Honey Sesame Chicken is how well it plays with others! For serving, I always recommend a bed of fluffy white rice or jasmine rice to soak up every last drop of that incredible sauce. Steamed broccoli or blanched snap peas make excellent green accompaniments, adding a fresh crunch and vibrant color that perfectly complements the rich chicken. If you’re looking for something a bit lighter, quinoa or even cauliflower rice would be fantastic options. For an extra touch of authenticity, a sprinkle of toasted sesame seeds and thinly sliced green onions not only adds visual appeal but also a lovely textural contrast and a hint of fresh oniony bite.
But don’t stop there! Feel free to get creative with variations. Love a little heat? Add a pinch of red pepper flakes to the sauce for a subtle kick, or a dash of sriracha for more pronounced warmth. For a different protein, shrimp or even firm tofu can be swapped in, just be sure to adjust cooking times accordingly. If you’re looking to sneak in more veggies, you can easily turn this into a full-blown stir-fry by adding bell peppers, carrots, or even mushrooms to the pan after the chicken is cooked, then tossing everything together with the sauce. Imagine wrapping this glorious chicken in lettuce cups for a lighter, refreshing meal, or even shredding it for an incredible sandwich filling. The possibilities are truly endless, and each variation promises to be just as delightful as the original.
So, there you have it. My heartfelt plea to you is this: please, please give this recipe a try. I promise you won’t be disappointed. It’s a dish that brings smiles to faces, satisfies hungry bellies, and leaves everyone asking for seconds. Once you experience the magic of homemade Honey Sesame Chicken, you’ll wonder how you ever lived without it. When you do make it, I would absolutely love to hear from you! Come back and share your experience in the comments below, or better yet, snap a photo and share it on your social media, tagging me so I can see your magnificent creation! Happy cooking, my friends, and enjoy every single mouthwatering bite!
Frequently Asked Questions (FAQs)
Q: Can I make Honey Sesame Chicken ahead of time?
A: Absolutely! The beauty of this dish is its flexibility. You can prep the chicken by marinating it in the sauce components (minus the cornstarch) for up to 24 hours in the refrigerator. This allows the flavors to really meld. You can also make the full sauce ahead of time and store it in an airtight container in the fridge for a few days. When you’re ready to cook, simply heat the sauce and proceed with cooking the chicken as directed. Leftovers also store wonderfully in the fridge for 3-4 days, making it perfect for meal prep!
Q: What are the best side dishes for Honey Sesame Chicken?
A: For me, nothing beats classic steamed white rice or jasmine rice to soak up all that delicious sauce. Other excellent choices include brown rice, quinoa, or even cauliflower rice for a lighter option. For vegetables, I love serving it with steamed broccoli florets, sautéed snap peas, or stir-fried mixed vegetables like bell peppers, carrots, and bok choy. A light Asian-inspired salad or some fresh cucumber slices also provide a nice contrast to the richness of the chicken.
Q: How can I make the sauce thicker?
A: The key to a perfectly thick, glossy sauce is the cornstarch slurry. If you find your sauce isn’t as thick as you’d like after adding the slurry, you can easily make another small slurry (1 teaspoon cornstarch mixed with 1 tablespoon cold water) and slowly whisk it into the simmering sauce. Let it cook for another minute or two, and it should thicken up beautifully. Remember, the sauce will also thicken slightly as it cools.
Q: Is this recipe gluten-free friendly?
A: Yes, it can be easily adapted! The main ingredient to watch out for is soy sauce, which typically contains wheat. Simply swap out regular soy sauce for a certified gluten-free tamari. All other ingredients in my recipe are naturally gluten-free. Always double-check labels on ingredients like honey and sesame oil to ensure they don’t have any hidden gluten-containing additives, though this is rare.
Q: Can I use chicken thighs instead of breasts?
A: Absolutely, and I highly recommend it for extra flavor and tenderness! Chicken thighs are more forgiving and tend to stay juicier. The cooking time might need to be adjusted slightly; they generally take a bit longer to cook through than breasts. Just ensure your chicken reaches an internal temperature of 165°F (74°C). The preparation method remains exactly the same.
Sweet Sticky Honey Sesame Chicken
Honey Sesame Chicken is a culinary experience bringing beloved takeout flavors into your kitchen. Enjoy perfectly crispy, tender chicken coated in a shimmering, sticky glaze. A modern comfort food classic, proving simple ingredients create irresistible taste.
Ingredients
-
1 ½ lb chicken breast or thighs, cut into 1-inch pieces
-
1 tsp chicken bouillon powder
-
½ tsp white pepper
-
1 tbsp water (for chicken)
-
2 large eggs
-
½ cup all-purpose flour
-
½ cup cornstarch
-
2 tsp baking powder
-
½ tsp salt
-
¼ cup water (for sauce)
-
2 tsp vegetable oil
-
3 tbsp light soy sauce
-
1 tbsp oyster sauce
-
2 tbsp rice vinegar
-
2 tbsp ketchup
Instructions
-
Step 1
Pat chicken pieces thoroughly dry. In a bowl, season chicken with 1 tsp chicken bouillon powder, ½ tsp white pepper, and 1 tbsp water. Toss to coat. -
Step 2
In a shallow bowl, whisk the 2 large eggs. In another shallow dish, combine ½ cup all-purpose flour, ½ cup cornstarch, 2 tsp baking powder, and ½ tsp salt. Whisk dry ingredients together. -
Step 3
Dip seasoned chicken pieces into the whisked egg, letting excess drip off. Then, dredge each piece thoroughly in the flour mixture, pressing gently to ensure an even, substantial coating. Set aside. -
Step 4
In a medium bowl, whisk together 3 tbsp light soy sauce, 1 tbsp oyster sauce, 2 tbsp rice vinegar, 2 tbsp ketchup, and ¼ cup water until well combined. -
Step 5
Heat 2 tsp vegetable oil in a large skillet over medium-high heat. Pan-fry coated chicken in batches for 3-5 minutes per side, or until golden brown and cooked through. Transfer cooked chicken to a plate. -
Step 6
Add the prepared sauce mixture to the same skillet. Bring to a gentle simmer, stirring occasionally, until the sauce slightly thickens. Return the cooked chicken pieces to the skillet and toss gently to coat every piece evenly with the sauce. -
Step 7
Serve the Sweet Sticky Honey Sesame Chicken hot and fresh. Pair with rice or your favorite vegetables for a complete meal.
Important Information
Nutrition Facts (Per Serving)
It is important to consider this information as approximate and not to use it as definitive health advice.
Allergy Information
Please check ingredients for potential allergens and consult a health professional if in doubt.
Printable Recipe Card
Want just the essential recipe details without scrolling through the article? Get our printable recipe card with just the ingredients and instructions.

Leave a Comment