
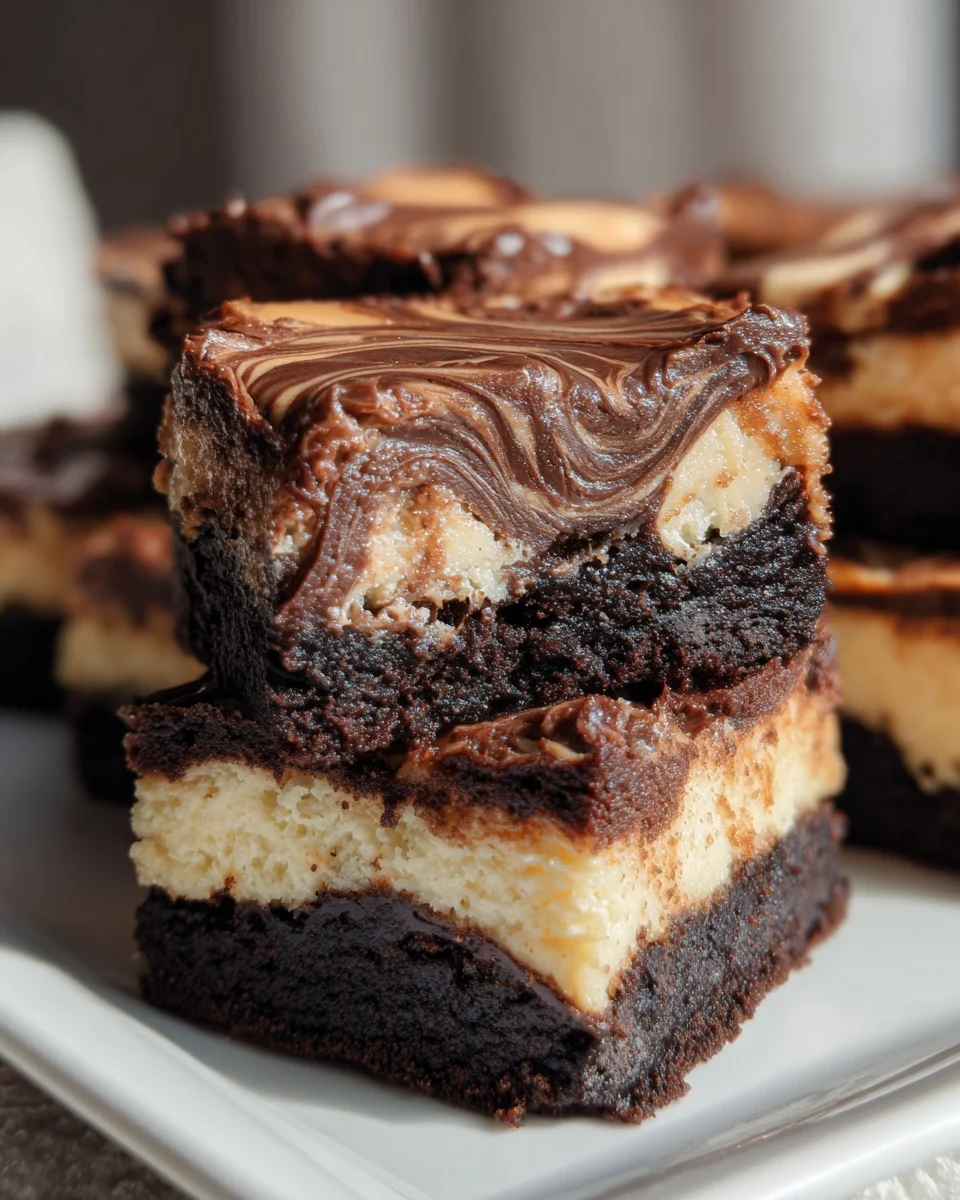
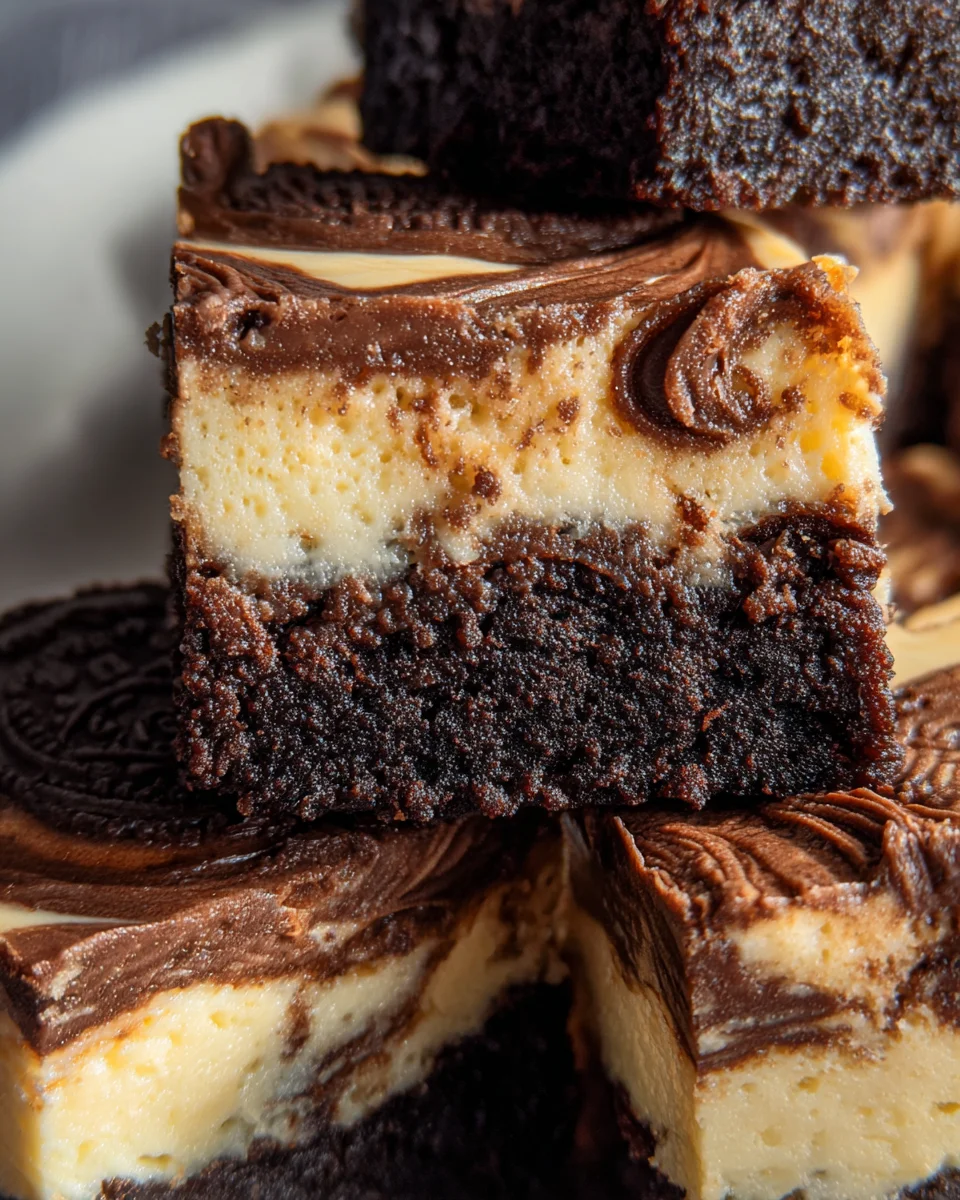
Brownie Bottom Bars are a quintessential dessert that masterfully marries the rich, fudgy delight of a classic brownie with an irresistible, often creamy or chewy, topping. Imagine sinking your teeth into a treat where the deep, intense chocolate of a perfectly baked brownie provides the ultimate foundation for a layer of sweet indulgence above. It’s a dessert that promises pure bliss with every single bite, a true showstopper for any occasion that will leave everyone asking for the recipe.
While the beloved brownie itself boasts a fascinating American origin story, evolving from a delightful kitchen accident into a universal staple, the ingenious concept of a “bar” dessert builds upon this legacy. It offers a more convenient, sliceable format that makes sharing a dream, transforming two separate joys into one harmonious confection. This brilliant combination truly elevates the dessert experience, making it both accessible and extraordinary.
People absolutely adore Brownie Bottom Bars because they genuinely offer the best of both worlds. You get that satisfyingly dense, chocolatey chew from the bottom, contrasted beautifully with the smooth texture and complementary flavors of the top layer. They’re incredibly versatile, often simpler to prepare and serve at gatherings than individual cookies or cupcakes, and they unequivocally satisfy any craving for something extraordinarily sweet and comforting. I find myself constantly drawn to their rich taste and delightful texture, making them a personal favorite for any celebration or simply a cozy evening treat.
Ingredients:
Creating these incredible Brownie Bottom Bars requires a few distinct sets of ingredients for each delightful layer. I always find it helpful to gather everything before I start, so you’re not scrambling mid-recipe!
For the Rich Brownie Layer:
- Unsalted Butter: 1 cup (2 sticks or 226g). I prefer unsalted so I can control the salt content precisely.
- Unsweetened Chocolate: 4 ounces (113g), chopped. High-quality baking chocolate makes a huge difference here!
- Granulated Sugar: 1¾ cups (350g). This gives our brownies that perfect level of sweetness and chewiness.
- Large Eggs: 4, at room temperature. Room temperature eggs emulsify better and create a smoother batter.
- Vanilla Extract: 1 tablespoon. Pure vanilla extract enhances all the chocolatey goodness.
- All-Purpose Flour: 1 cup (120g). Spooned and leveled, please!
- Unsweetened Cocoa Powder: ½ cup (45g). Again, a good quality cocoa powder will elevate the flavor.
- Salt: ½ teaspoon. Essential for balancing the sweetness and deepening the chocolate flavor.
- Optional Mix-ins: 1 cup chocolate chips, chopped nuts, or even M&M’s for an extra burst of flavor and texture.
For the Creamy Cheesecake Layer:
- Cream Cheese: 24 ounces (three 8-ounce blocks or 680g), full-fat, softened to room temperature. This is crucial for a lump-free, smooth cheesecake.
- Granulated Sugar: ¾ cup (150g). Just enough sweetness to complement the brownie without overpowering it.
- Large Eggs: 2, at room temperature.
- Vanilla Extract: 1 teaspoon.
For the Optional Topping (Because More Chocolate is Always a Good Idea!):
- Semi-Sweet or Dark Chocolate Chips: ½ cup (90g).
- Heavy Cream: ¼ cup (60ml).
Miscellaneous:
- Non-stick cooking spray or butter for greasing the pan.
- Parchment paper for easy removal.
Preparing the Brownie Layer
The foundation of our magnificent Brownie Bottom Bars is, naturally, a dense, chewy, and intensely chocolatey brownie layer. Getting this right sets us up for success!
- Prepare Your Baking Pan: First things first, let’s get our pan ready. I typically use a 9×13-inch baking pan for these Brownie Bottom Bars. It’s important to grease it well, then line it with parchment paper, leaving an overhang on two sides. This overhang acts as “handles” later, making it incredibly easy to lift the entire batch of bars out of the pan. Give the parchment paper a light spray with non-stick cooking spray too, just for extra assurance. Preheat your oven to 350°F (175°C). This ensures a consistent baking temperature from the moment your bars go in.
- Melt the Butter and Chocolate: In a large, microwave-safe bowl, combine your 1 cup of unsalted butter and 4 ounces of chopped unsweetened chocolate. Microwave in 30-second intervals, stirring well after each, until completely melted and smooth. Be careful not to overheat the chocolate, as it can seize. Alternatively, you can use a double boiler over simmering water for a gentler melt. Once smooth, set it aside to cool slightly. You don’t want to add hot chocolate to your eggs later, or you’ll end up with scrambled eggs in your brownie batter – definitely not what we’re going for in our Brownie Bottom Bars!
- Whisk Eggs and Sugar: In a separate large bowl, combine the 1¾ cups of granulated sugar and the 4 large room temperature eggs. Using an electric mixer (handheld or stand mixer), beat on medium-high speed for about 5-7 minutes. You’re looking for a mixture that is light in color, thick, and fluffy, almost like a pale yellow mousse. This step is crucial for achieving that characteristic crackly top and fudgy texture in the brownies. It incorporates air, which contributes to the bar’s overall lift and chewiness.
- Combine Wet Ingredients: Once your egg mixture is beautifully light and airy, slowly pour the slightly cooled melted butter and chocolate mixture into it, continuing to beat on low speed until just combined. Next, stir in the 1 tablespoon of vanilla extract. Make sure everything is well incorporated but be careful not to deflate all the air you worked so hard to incorporate into the eggs.
- Add Dry Ingredients: In a medium bowl, whisk together the 1 cup of all-purpose flour, ½ cup of unsweetened cocoa powder, and ½ teaspoon of salt. This pre-mixing ensures that the dry ingredients are evenly distributed throughout the batter. Gradually add the dry ingredients to the wet ingredients, mixing on low speed or by hand with a rubber spatula until just combined. Overmixing here is the enemy of a fudgy brownie; it develops the gluten too much, leading to tough brownies. If you’re adding optional mix-ins like chocolate chips or nuts, fold them in gently now.
- Pour into Pan and Bake (Partially): Pour the brownie batter evenly into your prepared 9×13-inch pan. Spread it out with a spatula so it forms a consistent layer. Place the pan in the preheated 350°F (175°C) oven and bake for 20-25 minutes. We are only partially baking the brownie layer at this stage. It should be set around the edges but still a bit soft and gooey in the center. This partial bake prevents the cheesecake layer from sinking into the brownie and ensures both layers finish baking perfectly at the same time. While it’s baking, let’s get ready for the next delicious layer!
Making the Creamy Cheesecake Layer
Now for the star of the show, the luscious cheesecake layer that makes these truly exceptional Brownie Bottom Bars!
- Soften Cream Cheese: While your brownie layer is doing its initial bake, take out your three 8-ounce blocks of full-fat cream cheese. It is absolutely paramount that the cream cheese is at room temperature. If it’s cold, you’ll end up with lumps, no matter how much you beat it, and we want a silky smooth cheesecake. You can leave it on the counter for at least an hour or two, or if you’re in a pinch, microwave each block for 15-20 seconds until just softened.
- Beat Cream Cheese and Sugar: In a large mixing bowl, preferably using a stand mixer with the paddle attachment or a handheld electric mixer, beat the softened cream cheese on medium speed for about 2-3 minutes until it’s completely smooth and creamy. Scrape down the sides of the bowl frequently to ensure there are no unmixed lumps. Once smooth, gradually add the ¾ cup of granulated sugar, continuing to beat on medium speed until the sugar is fully incorporated and the mixture is light and fluffy. This step creates the foundation for our wonderfully creamy cheesecake layer for the Brownie Bottom Bars.
- Add Eggs and Vanilla: Reduce the mixer speed to low. Add the 2 room temperature large eggs, one at a time, mixing just until each egg is incorporated. After the second egg, stir in the 1 teaspoon of vanilla extract. It’s crucial not to overmix the cheesecake batter once the eggs are added. Overmixing introduces too much air, which can cause the cheesecake to puff up too much during baking and then crack as it cools. We want a dense, creamy texture, not an airy soufflé.
- Pour Over Brownie: Carefully remove the partially baked brownie layer from the oven. Gently pour the cheesecake batter evenly over the warm brownie layer. You can use an offset spatula or the back of a spoon to spread it out smoothly to the edges of the pan. Ensure the cheesecake layer is as flat and even as possible for uniform baking and presentation of your finished Brownie Bottom Bars.
Baking Your Brownie Bottom Bars
The moment of truth! Baking these beauties to perfection is key for both layers to shine.
- Bake the Bars: Return the pan to your preheated 350°F (175°C) oven. Bake for an additional 40-50 minutes. The baking time can vary slightly depending on your oven, so keep an eye on it. The cheesecake layer should appear mostly set around the edges, but the very center might still have a slight wobble when you gently shake the pan. This slight jiggle is perfectly normal and indicates that it’s just right – it will firm up further as it cools.
- Check for Doneness: To ensure the brownie layer is fully cooked and the cheesecake is set, you can insert a wooden skewer or toothpick into the center of the cheesecake layer, about halfway between the edge and the very center. It should come out with moist crumbs attached, but not wet batter. If it comes out clean, your cheesecake might be slightly overbaked, but it will still be delicious!
- Cool Completely: This step requires patience, but it’s incredibly important for perfect Brownie Bottom Bars. Once baked, remove the pan from the oven and place it on a wire rack to cool completely at room temperature. This gradual cooling prevents cracking in the cheesecake layer. Do not skip this step or try to rush it by putting it straight into the fridge. It could take 2-3 hours for it to cool down fully.
Adding Optional Toppings and Serving
The final touches make these Brownie Bottom Bars truly irresistible!
- Prepare Optional Topping (If Using): If you’ve opted for a glorious chocolate ganache topping, now is the time to prepare it. In a small, microwave-safe bowl, combine ½ cup of semi-sweet or dark chocolate chips and ¼ cup of heavy cream. Microwave in 15-second intervals, stirring well after each, until the chocolate is melted and the mixture is smooth and glossy. Alternatively, you can heat the heavy cream in a small saucepan until it just begins to simmer, then pour it over the chocolate chips in a heatproof bowl and let it sit for 5 minutes before whisking until smooth. Once your ganache is ready, pour it evenly over the cooled Brownie Bottom Bars. You can spread it gently with an offset spatula.
- Chill the Bars: Once the bars are completely cool (and the ganache, if used, is poured), cover the pan loosely with plastic wrap and transfer it to the refrigerator. Chill for at least 4 hours, or ideally, overnight. Chilling is crucial for the cheesecake layer to fully set, ensuring clean, perfect slices of your Brownie Bottom Bars. It also allows the flavors to meld beautifully.
- Slice and Serve: After chilling, use the parchment paper overhangs to carefully lift the entire slab of Brownie Bottom Bars out of the pan and onto a cutting board. For the neatest slices, I like to use a large, sharp knife. For really clean cuts, run your knife under hot water, wipe it dry, and then slice. Repeat this process for each cut. This prevents the cheesecake from sticking and tearing. You can cut them into squares, rectangles, or even smaller bite-sized pieces for a party platter. I find 16-24 bars is a good yield for a 9×13-inch pan.
- Storage Tips: Store any leftover Brownie Bottom Bars in an airtight container in the refrigerator for up to 5-7 days. While they are delicious fresh, I find the flavors often deepen even more after a day or two in the fridge. These bars also freeze beautifully. Wrap individual bars or small portions tightly in plastic wrap, then aluminum foil, and store in a freezer-safe bag or container for up to 3 months. Thaw in the refrigerator overnight before serving. Enjoy your delicious homemade Brownie Bottom Bars!
Conclusion:
And there you have it! We’ve journeyed through the creation of what I firmly believe will become your new go-to dessert for any occasion. This isn’t just another recipe; it’s an invitation to experience pure, unadulterated joy in every single bite. The magic of these Brownie Bottom Bars lies in their irresistible duality: the bottom layer delivers that deep, dark, fudgy brownie experience we all crave, rich with intense chocolate flavor and a delightfully chewy texture that clings to your palate. Then, seamlessly, we transition to the top layer – a sweet, often contrasting, and utterly delectable element that provides a perfect complement. It’s the harmonious marriage of these two distinct textures and flavors that elevates these bars from merely good to absolutely extraordinary, making them a truly unforgettable treat.
I can confidently say that these bars are a must-try for anyone who appreciates a truly satisfying dessert. They offer a complexity of flavor that belies their straightforward preparation, making them a fantastic choice whether you’re a seasoned baker or just starting your culinary journey. Imagine the aroma filling your kitchen as they bake – that warm, sweet, chocolatey scent that promises something wonderful is about to emerge from the oven. They strike that perfect balance between elegant enough for a special gathering and comforting enough for a cozy night in. Forget choosing between a brownie and another bar dessert; with this recipe, you get the absolute best of both worlds, crafted into one perfect, portable square of deliciousness.
Serving Suggestions to Elevate Your Experience:
While these bars are absolutely divine straight out of the pan, still slightly warm, there are countless ways to enjoy and enhance them. For an ultimate indulgence, serve a warm bar with a generous scoop of premium vanilla bean ice cream. The hot-and-cold contrast, coupled with the melting creaminess against the chewy bar, is simply heavenly. A drizzle of rich caramel sauce or a scattering of toasted pecans over the top can add another layer of flavor and texture that’s simply irresistible. For a touch of sophistication, a light dusting of flaky sea salt on the chocolate layer before baking, or even after, can truly amplify the depth of the chocolate and cut through the sweetness beautifully.
Consider serving them with a dollop of freshly whipped cream, perhaps infused with a hint of espresso for an added caffeine kick, or a splash of orange zest for a bright, citrusy note that complements the chocolate wonderfully. They’re also magnificent at room temperature, making them perfectly portable for potlucks, picnics, or as a delightful surprise in a lunchbox. For a festive touch during the holidays, crush some peppermint candy canes and sprinkle them over the bars while they’re still warm, creating a beautiful crunch and a cool, minty flavor. During the warmer months, a handful of fresh berries – raspberries, strawberries, or blueberries – can provide a vibrant pop of color and a tart counterpoint to the richness, transforming them into a summer sensation.
Get Creative with Your Brownie Bottom Bars:
One of the aspects I love most about this recipe is its incredible versatility. Don’t hesitate to experiment and make these bars truly your own! You could introduce different types of chocolate chips into the brownie base – white chocolate, milk chocolate, or even a mix for varied flavor profiles. For the top layer, think beyond the classic. A swirl of peanut butter, a layer of chopped nuts, or even a different type of cookie crumbled over the top before baking could yield exciting new textures and tastes. Imagine a cheesecake swirl on top for a decadent twist, or maybe even a blondie-style topping for a double-layer bar delight.
You can also play with extracts. A touch of almond extract in the top layer can add a sophisticated nutty undertone, while a hint of coconut extract could transport your taste buds to a tropical paradise. For a spice-lover, a dash of cinnamon or even a pinch of chili powder can add an unexpected warmth and depth to the chocolate. The possibilities are genuinely endless, and I encourage you to unleash your inner pastry chef and personalize these already fantastic bars to suit your unique preferences and whatever ingredients you have on hand. Each variation you try will open up a new world of flavor, ensuring that your Brownie Bottom Bars are always a fresh and exciting experience.
Your Turn to Bake and Share!
Now that you’ve got the blueprint, the inspiration, and all the encouragement you need, it’s your moment to shine in the kitchen. I truly believe that once you try this recipe, it will become an instant favorite, a staple in your baking repertoire. There’s an unparalleled satisfaction in creating something so delicious from scratch, and even greater joy in sharing it with friends, family, or even just savoring it all by yourself (no judgment here!). So, gather your ingredients, preheat that oven, and prepare to fill your home with the most incredible aromas imaginable. The anticipation alone is half the fun!
I absolutely cannot wait to hear about your baking adventures. Please, come back and share your experiences in the comments section below. Did you try one of the suggested variations? Did you invent your own spectacular twist? What was the biggest hit at your gathering? Or perhaps, what was your favorite moment in the baking process? Share your triumphs, your tips, your photos – seeing your beautiful creations truly makes my day and inspires me and other readers! This isn’t just about following a set of instructions; it’s about connecting over a shared love for delicious food and the joy of creation. So go forth, bake these magnificent bars, and spread the deliciousness!
Ultimate Brownie Bottom Bars
Indulge in these delightful Brownie Bottom Bars, a perfect marriage of fudgy brownie, creamy cheesecake, and a hint of Oreo crunch, all topped with a luscious chocolate ganache. Easy to prepare and a guaranteed crowd-pleaser!
Ingredients
Instructions
Important Information
Nutrition Facts (Per Serving)
It is important to consider this information as approximate and not to use it as definitive health advice.
Allergy Information
Please check ingredients for potential allergens and consult a health professional if in doubt.

Leave a Comment