
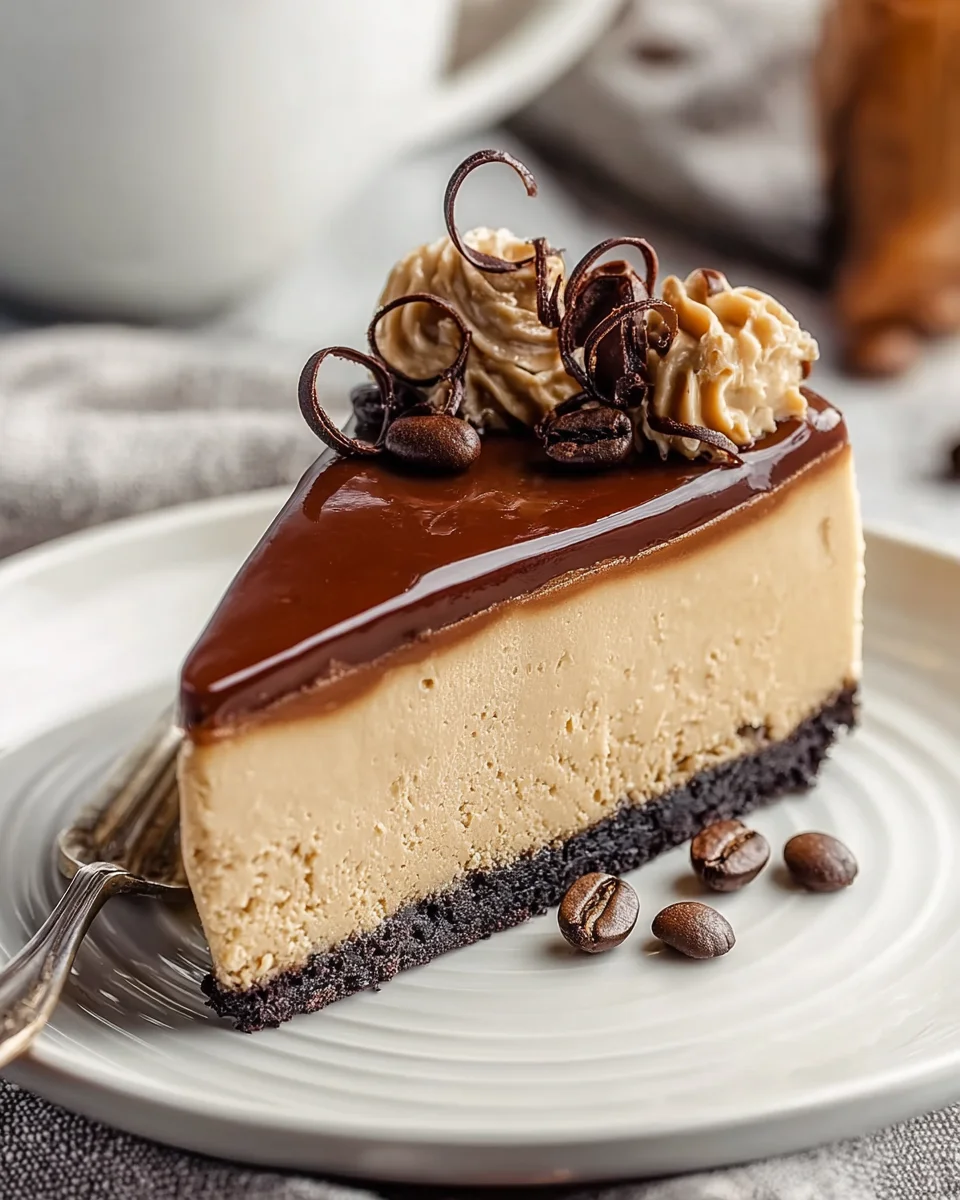
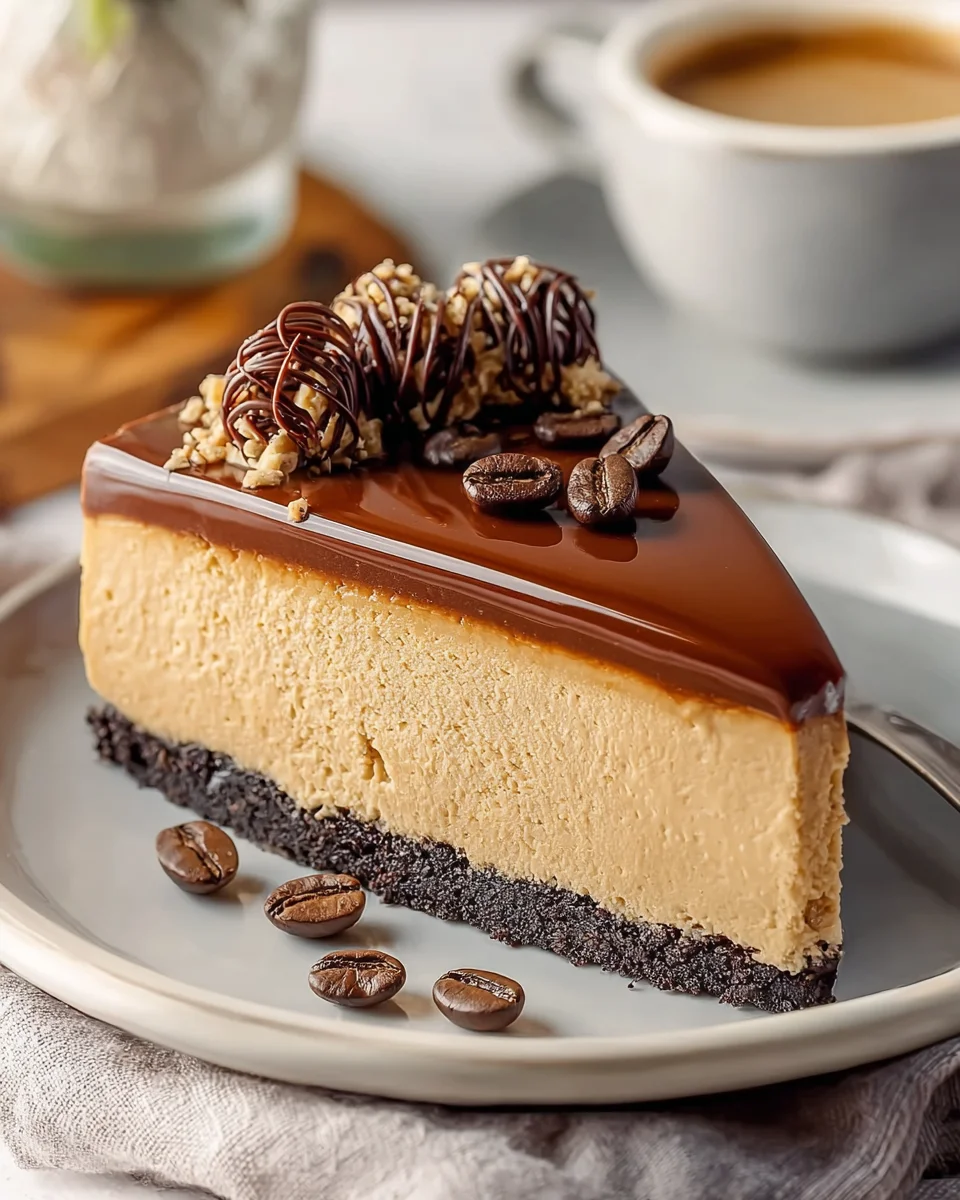
Coffee Cheesecake
Oh, prepare yourselves, because I’m about to share one of my absolute favorite creations: Coffee Cheesecake. Seriously, if you’re a coffee enthusiast like me and you also have a soft spot for decadent desserts, then this recipe is your new best friend. What makes this particular cheesecake so special, you ask? It’s the magical marriage of two universally adored flavors – the rich, aromatic depth of a good cup of coffee and the unbelievably creamy, tangy indulgence of a classic cheesecake. It’s not just a dessert; it’s an experience!
You are absolutely going to adore this. Imagine sinking your fork into a velvety smooth, melt-in-your-mouth filling, where every bite is bursting with that comforting, sophisticated coffee flavor, perfectly balanced by the sweet, luscious cream cheese. All of this rests on a delightfully crisp, buttery crust. It’s an elevated treat that feels incredibly luxurious, yet I promise you, it’s totally achievable in your own kitchen. This Coffee Cheesecake is truly a showstopper, ideal for impressing guests or simply treating yourself to something truly extraordinary. It’s the kind of dessert that coffee shop dreams are made of, right at your fingertips!
Ingredient Notes
Crafting the perfect coffee cheesecake begins with understanding the role each ingredient plays. I’ve carefully chosen these components to ensure a rich, creamy texture and that unmistakable coffee punch. Let’s dive into what you’ll need and some helpful substitutions.
For the Crust
- Graham Crackers: These are my go-to for their subtle sweetness and sandy texture, which forms a sturdy base. You’ll need about 1 ½ cups of finely crushed crumbs.
- Substitution: Digestive biscuits or vanilla wafers work beautifully if graham crackers aren’t available. For an extra coffee kick, you can add a teaspoon of instant espresso powder to the crumbs before mixing with butter.
- Granulated Sugar: Just a touch to sweeten the crust and help it bind.
- Unsalted Butter (Melted): This is the glue that holds your crust together. Make sure it’s fully melted so it can evenly coat the crumbs.
- Substitution: If you’re looking for a non-dairy option, a good quality vegan butter substitute will work just as well.
For the Coffee Cheesecake Filling
- Full-Fat Cream Cheese: This is the star of the show! Full-fat cream cheese (like Philadelphia brand) is non-negotiable for that signature creamy, rich, and decadent texture. Make sure it’s at room temperature – this is crucial for a smooth, lump-free batter.
- Substitution: While lower-fat cream cheese can be used, be aware that it will slightly alter the texture, making the cheesecake a bit less rich and potentially more prone to cracks.
- Granulated Sugar: Sweetens the filling perfectly, balancing the tang of the cream cheese and the bitterness of the coffee.
- Large Eggs: Eggs provide structure and help the cheesecake set. Again, room temperature eggs are essential for seamless incorporation into the batter.
- Sour Cream (or Heavy Cream): This adds a lovely tang and extra creaminess, contributing to the cheesecake’s silky smooth texture. It also helps prevent cracking during baking.
- Substitution: Full-fat plain Greek yogurt can be used in place of sour cream, though it might impart a slightly different tang. Heavy cream (whipping cream) is also an excellent alternative for added richness.
- Vanilla Extract: A splash of good quality vanilla enhances all the other flavors without overpowering the coffee.
- Instant Espresso Powder (or Strong Brewed Coffee Concentrate): This is where our coffee cheesecake gets its distinctive flavor! High-quality instant espresso powder dissolves easily and delivers a robust coffee punch.
- Substitution: If you don’t have instant espresso powder, you can use 2-3 tablespoons of very strong, cooled brewed coffee or coffee concentrate. Ensure it’s very concentrated to avoid adding too much liquid to your batter. For a decaffeinated version, simply use decaf instant espresso powder or decaf coffee concentrate.
- Cornstarch (or All-Purpose Flour): A small amount of cornstarch acts as a stabilizer, helping to prevent cracks and achieve that perfect, uniform texture.
- Substitution: All-purpose flour can be used in an equal amount if you don’t have cornstarch on hand.
Step-by-Step Instructions
Let’s get baking! Follow these steps carefully to ensure your coffee cheesecake turns out beautifully. Remember, patience is key for a perfect cheesecake.
-
Prepare Your Pan and Oven:
Preheat your oven to 325°F (160°C). Grease the bottom and sides of a 9-inch springform pan. I like to line the bottom with a circle of parchment paper for easy removal. Wrap the outside of the springform pan securely with two layers of heavy-duty aluminum foil. This is crucial if you’re using a water bath to prevent any water from seeping in.
-
Make the Crust:
In a medium bowl, combine the finely crushed graham cracker crumbs, granulated sugar, and melted butter. Mix well until the crumbs are evenly moistened. Press this mixture firmly and evenly into the bottom of the prepared springform pan. You can use the bottom of a glass or your fingers. Bake the crust for 8-10 minutes, then remove from the oven and let it cool slightly while you prepare the filling.
-
Prepare the Coffee Essence:
If using instant espresso powder, dissolve it in 1 tablespoon of hot water to create a strong coffee concentrate. If using brewed coffee concentrate, ensure it’s cooled to room temperature.
-
Make the Cheesecake Filling:
In a large bowl, using an electric mixer on low speed, beat the softened cream cheese until completely smooth and creamy. This should take about 2-3 minutes. Scrape down the sides of the bowl frequently to ensure no lumps remain.
-
Add Sugar and Stabilizer:
Gradually add the granulated sugar to the cream cheese mixture, beating on low speed until just combined and smooth. Then, add the cornstarch and mix until no lumps are visible. This helps prevent cracks.
-
Incorporate Wet Ingredients:
Add the sour cream (or heavy cream), vanilla extract, and your prepared coffee essence to the cream cheese mixture. Beat on low speed until just combined. Be careful not to overmix at this stage.
-
Add Eggs (Gently!):
Add the eggs one at a time, beating on the lowest speed possible just until each egg is incorporated. Stop mixing as soon as the yolk disappears. Overmixing after adding the eggs can incorporate too much air, which can lead to cracks in your baked cheesecake.
-
Pour and Prepare Water Bath:
Pour the cheesecake filling over the cooled crust in the prepared springform pan. Smooth the top with a spatula. Place the foil-wrapped springform pan into a larger roasting pan. Carefully pour hot water into the roasting pan until it comes halfway up the sides of the springform pan. The water bath provides a moist, even baking environment.
-
Bake the Cheesecake:
Carefully transfer the roasting pan with the cheesecake to the preheated oven. Bake for 60-75 minutes, or until the edges are set, but the center still jiggles slightly when gently shaken. The internal temperature should be around 150°F (65°C).
-
Cool Gradually:
Turn off the oven and prop the oven door open slightly (about 2-3 inches). Leave the cheesecake in the water bath inside the oven for 1 hour. This slow cooling prevents sudden temperature changes that can cause cracks.
-
Final Cooling and Chilling:
After 1 hour, carefully remove the springform pan from the water bath and the foil. Transfer it to a wire rack to cool completely at room temperature for another 1-2 hours. Once cooled to room temperature, cover the cheesecake loosely with plastic wrap and refrigerate for at least 6-8 hours, or preferably overnight. Chilling is crucial for the cheesecake to firm up properly and for the flavors to fully develop.
-
Serve:
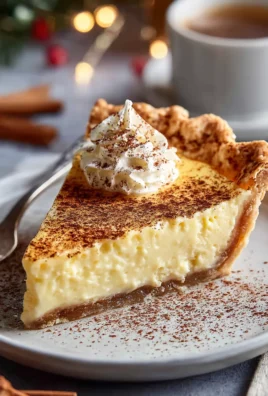
Once thoroughly chilled, carefully run a thin knife around the edge of the pan before releasing the springform sides. Slice and serve! I often dust mine with a little cocoa powder or finely grated chocolate for an extra touch of elegance.
Tips & Suggestions
Achieving a perfect coffee cheesecake isn’t just about following the steps; it’s also about understanding the nuances. Here are my top tips and suggestions to help you bake like a pro:
- Room Temperature Ingredients are Non-Negotiable: I cannot stress this enough! Cream cheese, eggs, and sour cream absolutely must be at room temperature. Cold ingredients won’t emulsify properly, leading to a lumpy batter and an inferior texture. Plan ahead and take them out of the fridge at least an hour or two before you start.
- Don’t Overmix the Batter: This is a golden rule for all cheesecakes, and especially for your coffee cheesecake. Once you add the eggs, mix only until they are just incorporated. Overmixing introduces too much air, which expands during baking and then collapses during cooling, almost guaranteeing cracks.
- The Power of the Water Bath (Bain-Marie): Using a water bath creates a moist, steamy environment in your oven. This helps the cheesecake bake gently and evenly, preventing the edges from cooking too quickly and cracking, while also promoting that signature silky texture. Don’t skip this step!
- Slow and Steady Cooling: Just as important as the water bath is the gradual cooling process. Leaving the cheesecake in the turned-off oven with the door ajar allows it to cool down slowly, minimizing the thermal shock that can cause cracks. Resist the urge to pull it out immediately!
- Choose Your Coffee Wisely: The quality and strength of your instant espresso powder or coffee concentrate will directly impact the coffee flavor of your cheesecake. Opt for a high-quality brand of instant espresso for the best results. You can adjust the amount slightly to suit your preference for a milder or bolder coffee taste.
- Preventing a Soggy Crust: Make sure to wrap your springform pan thoroughly with heavy-duty foil for the water bath. If you’re nervous, you can even place the foil-wrapped pan inside an oven bag before putting it in the water bath for extra protection against leaks. Baking the crust briefly also helps create a barrier.
- For a Flavor Boost: If you enjoy a hint of an adult beverage, a tablespoon of coffee liqueur (like Kahlúa or Tia Maria) can be added to the filling along with the coffee essence for an even deeper coffee flavor. If you prefer a non-alcoholic alternative, a few drops of coffee extract or a bit more coffee concentrate will enhance the flavor beautifully. You could also drizzle a coffee-flavored caramel sauce over the chilled cheesecake before serving.
- Know When It’s Done: The cheesecake is ready when the edges are set and lightly puffed, but the very center (about 2-3 inches in diameter) still has a slight wobble like Jell-O. It will continue to set as it cools and chills.
- Garnish for Impact: Consider garnishing your chilled coffee cheesecake with a dusting of cocoa powder, chocolate shavings, a swirl of whipped cream, or even a few chocolate-covered espresso beans for an elegant presentation and an extra layer of flavor.
Storage
Proper storage is essential to keep your delicious coffee cheesecake fresh and tasting its best. Here’s how I recommend storing it:
- Refrigeration: Cheesecake is a perishable item and must be stored in the refrigerator. Cover the cheesecake loosely with plastic wrap or place it in an airtight container to prevent it from drying out or absorbing other odors from your fridge. Stored this way, it will remain fresh for up to 5-7 days.
- Freezing Whole Cheesecake: If you’ve baked a whole cheesecake and want to save some for later, you can freeze it. Once completely chilled in the refrigerator, remove it from the springform pan. Wrap the entire cheesecake tightly in several layers of plastic wrap, then an additional layer of aluminum foil. This double wrapping helps prevent freezer burn. It can be frozen for up to 1-2 months.
- Freezing Individual Slices: For convenient portion control, I often freeze individual slices. Cut the chilled cheesecake into slices. Place each slice on a small piece of parchment paper, then wrap each slice tightly in plastic wrap, followed by foil. Store these in a freezer-safe bag or airtight container. They will last for about 1 month.
- Thawing Frozen Cheesecake: To thaw a frozen cheesecake (whole or slices), transfer it to the refrigerator and let it thaw slowly overnight. This gradual thawing helps maintain its texture. Avoid thawing at room temperature, as this can affect the texture and potentially cause condensation. Once thawed, enjoy within 2-3 days.
- Serving Temperature: While it’s best served chilled, letting it sit at room temperature for about 15-20 minutes before serving can enhance its creamy texture and allow the flavors to bloom slightly. However, don’t leave it out for too long, especially in warm environments.
Final Thoughts
And there you have it – your very own Coffee Cheesecake! I truly hope you’ve enjoyed the process of creating this incredible dessert. The rich aroma of coffee combined with that perfectly smooth, creamy texture is something truly special that you just have to experience. This Coffee Cheesecake isn’t just a dessert; it’s an experience, a moment of pure bliss with every single bite. I wholeheartedly encourage you to whip up this amazing Coffee Cheesecake and share it with loved ones, or simply savor a slice all to yourself. It’s a guaranteed crowd-pleaser and a treat you absolutely deserve!
Leave a Comment