
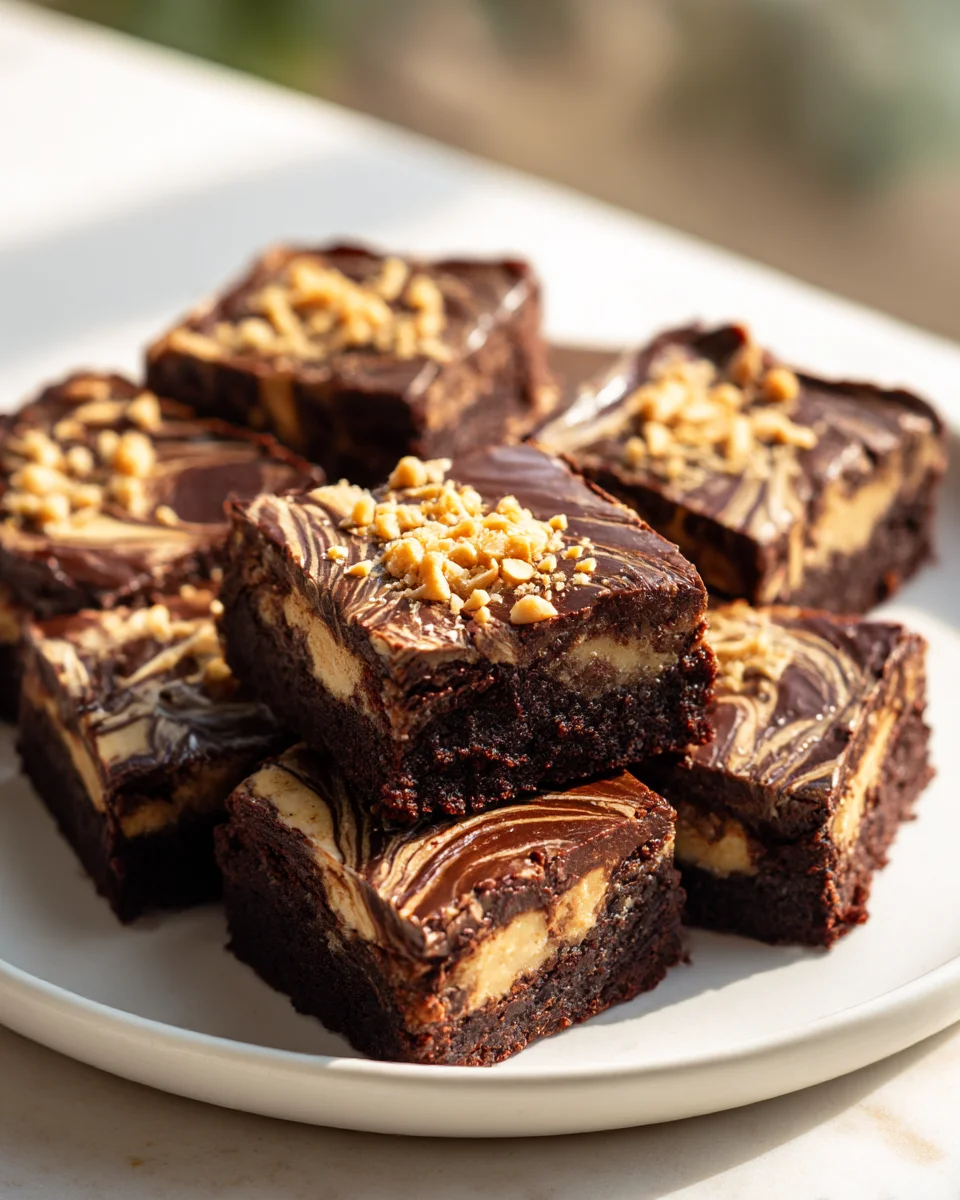
Peanut Butter Chocolate Brownie Pudding Bars
Oh boy, have I got a treat for you today! Get ready to sink your teeth into the ultimate dessert experience: Peanut Butter Chocolate Brownie Pudding Bars. This isn’t just any dessert; it’s a symphony of flavors and textures designed to absolutely blow your mind. What makes these bars so incredibly special, you ask? Well, it’s the magical triple threat combination that takes all your favorite indulgences and layers them into one glorious bite.
You’ll start with a wonderfully rich, fudgy brownie base – think deep chocolatey goodness that melts in your mouth. But we don’t stop there! On top of that decadent brownie sits a thick, creamy, and irresistibly smooth peanut butter pudding layer. Yes, you read that right – peanut butter pudding. It’s like a cloud of nutty bliss. And because we can never have enough chocolate, we crown it all with a luscious chocolate topping, bringing everything full circle into a harmonious dessert.
Readers will absolutely adore these bars because they hit every single sweet spot. The contrast between the dense brownie, the airy peanut butter pudding, and the smooth chocolate is simply divine. They’re incredibly satisfying, perfect for sharing (or not, I won’t tell!), and surprisingly easy to assemble, making you look like a total dessert hero. Trust me, once you try these, you’ll understand why I’m so excited about Peanut Butter Chocolate Brownie Pudding Bars – they’re pure, unadulterated happiness in bar form!
Ingredient Notes
Crafting the perfect Peanut Butter Chocolate Brownie Pudding Bars is all about understanding the interplay between a few key ingredients that create distinct, delicious layers. I always think of this recipe as a symphony of textures and flavors, from the fudgy base to the creamy pudding and the decadent peanut butter topping.
Brownie Base Essentials
- Unsweetened Cocoa Powder: For a deep, rich chocolate flavor in your brownie base, unsweetened cocoa powder is my go-to. I recommend using a good quality Dutch-processed cocoa if you have it, as it creates a darker, less acidic brownie.
- All-Purpose Flour: Standard all-purpose flour works wonderfully here, providing structure without making the brownies cakey. If you’re looking for a gluten-free option, a 1:1 gluten-free baking flour blend (ensure it contains xanthan gum) can be substituted directly.
- Granulated Sugar & Brown Sugar: A combination of both gives the brownies the perfect balance of sweetness and moisture. Granulated sugar provides crispness, while brown sugar adds chewiness and a hint of molasses flavor.
- Eggs: These are crucial for binding the brownies together and creating that signature fudgy texture. Large eggs are usually what recipes call for.
- Butter: Melted unsalted butter contributes richness and helps achieve a super moist crumb. Don’t skimp on it!
- Vanilla Extract: A touch of pure vanilla extract enhances all the other flavors. I always make sure to use a good quality one.
- Chocolate Chips (Optional but Recommended): For an extra layer of chocolatey goodness, I love folding in a handful of semi-sweet or dark chocolate chips into the brownie batter.
Pudding Layer Specifics
- Instant Chocolate Pudding Mix: This is where the “pudding” in our bars truly shines and makes this recipe quick and easy. I usually opt for a 3.4 oz box of instant chocolate pudding mix. You could experiment with other pudding flavors like cheesecake or French vanilla for a different twist, but chocolate really complements the peanut butter.
- Cold Milk: Whole milk is my preference for the pudding layer because it results in a creamier, richer set. Skim or low-fat milk will work but might yield a slightly less luxurious texture. For a dairy-free alternative, unsweetened almond milk or oat milk can often be used with instant pudding, but be aware that setting times and final consistency might vary slightly.
- Whipped Topping or Whipped Cream Cheese (Optional): To give the pudding layer an even more luscious, stable, and slightly tangy quality, I sometimes like to fold in a cup of thawed whipped topping or softened cream cheese once the pudding has thickened. This adds another dimension to the “pudding bar” experience.
Peanut Butter Topping & Garnish
- Creamy Peanut Butter: The star of the show! Use a good quality creamy peanut butter for a smooth, spreadable topping. Natural peanut butters (the kind you have to stir) can sometimes separate, making the topping less consistent, so I usually stick with conventional creamy varieties for this application.
- Powdered Sugar (Confectioners’ Sugar): This provides sweetness and helps create a smooth, firm topping that sets nicely.
- Softened Butter: A little softened butter helps bind the peanut butter topping and makes it incredibly creamy and rich.
- Milk or Cream: A splash can be added to the peanut butter topping if it’s too thick to spread easily.
- Melted Chocolate for Drizzle: A final flourish! I usually melt some semi-sweet chocolate chips with a tiny bit of coconut oil or shortening to make it easy to drizzle.
- Chopped Peanuts or Mini Peanut Butter Cups (Garnish): For a final textural contrast and visual appeal, a sprinkle of chopped roasted peanuts or mini peanut butter cups is fantastic.
Step-by-Step Instructions
Making these Peanut Butter Chocolate Brownie Pudding Bars is a joyful experience, and I’m going to walk you through each step to ensure your bars turn out perfectly fudgy, creamy, and utterly irresistible.
Step 1: Prepare Your Fudgy Brownie Base
- Preheat Oven & Prepare Pan: First things first, preheat your oven to 350°F (175°C). Line a 9×13-inch baking pan with parchment paper, leaving an overhang on the sides. This parchment “sling” will make it incredibly easy to lift the entire batch of bars out of the pan once they’re cooled and ready to cut. I also give it a light spray with non-stick cooking spray for extra assurance.
- Melt Butter & Chocolate: In a microwave-safe bowl or a double boiler, melt your butter. Once melted, stir in the granulated and brown sugars until well combined.
- Add Wet Ingredients: Whisk in the eggs one at a time until fully incorporated and the mixture is glossy. Stir in the vanilla extract.
- Combine Dry Ingredients: In a separate bowl, whisk together the all-purpose flour, unsweetened cocoa powder, and a pinch of salt.
- Combine Wet & Dry: Gradually add the dry ingredients to the wet ingredients, mixing until just combined. Be careful not to overmix; overmixing can lead to tougher brownies. If you’re using chocolate chips, fold them in now.
- Bake the Brownies: Pour the batter evenly into your prepared baking pan. Bake for 20-25 minutes, or until a toothpick inserted into the center comes out with moist crumbs, not wet batter. Remember, we want fudgy brownies, so don’t overbake!
- Cool Completely: This is a crucial step! Allow the brownie base to cool completely in the pan on a wire rack. I often let mine cool for at least an hour, or even pop it in the fridge for 30 minutes to speed things up once it’s no longer hot. A fully cooled brownie base is essential for the pudding layer to set properly on top.
Step 2: Create the Creamy Pudding Layer
- Prepare Pudding: In a medium-sized bowl, whisk together the instant chocolate pudding mix with the cold milk. Whisk vigorously for about 2 minutes, or until the mixture starts to thicken. Don’t worry if it seems a little loose at first; it will continue to thicken as it sits.
- Enhance if Desired: If you’re adding whipped topping or softened cream cheese, gently fold it into the thickened pudding until smooth. This makes the layer even more decadent and stable.
- Spread Pudding: Carefully spread the thickened pudding mixture evenly over the completely cooled brownie base.
- Chill to Set: Place the pan back in the refrigerator and chill for at least 30 minutes to allow the pudding layer to set firmly. This helps prevent the peanut butter topping from sinking in.
Step 3: Make the Decadent Peanut Butter Topping
- Cream Ingredients: In a medium bowl, combine the creamy peanut butter, softened butter, and powdered sugar. Using an electric mixer (handheld or stand mixer) on medium speed, beat until light, fluffy, and well combined. If the mixture seems too thick to spread, add milk or cream, one teaspoon at a time, until you reach a spreadable consistency.
- Spread Topping: Carefully spread the peanut butter mixture evenly over the chilled chocolate pudding layer. Take your time to get an even layer without disturbing the pudding.
Step 4: Drizzle and Chill
- Melt Chocolate for Drizzle: In a small microwave-safe bowl, melt your chocolate chips (with a tiny bit of coconut oil or shortening, if using) in 30-second intervals, stirring after each, until smooth and pourable.
- Drizzle & Garnish: Drizzle the melted chocolate decoratively over the peanut butter topping. If you’re adding chopped peanuts or mini peanut butter cups, sprinkle them on top now.
- Final Chill: Return the pan to the refrigerator for at least 1-2 hours, or until the peanut butter topping is firm and everything is well set. This final chill is vital for clean slices!
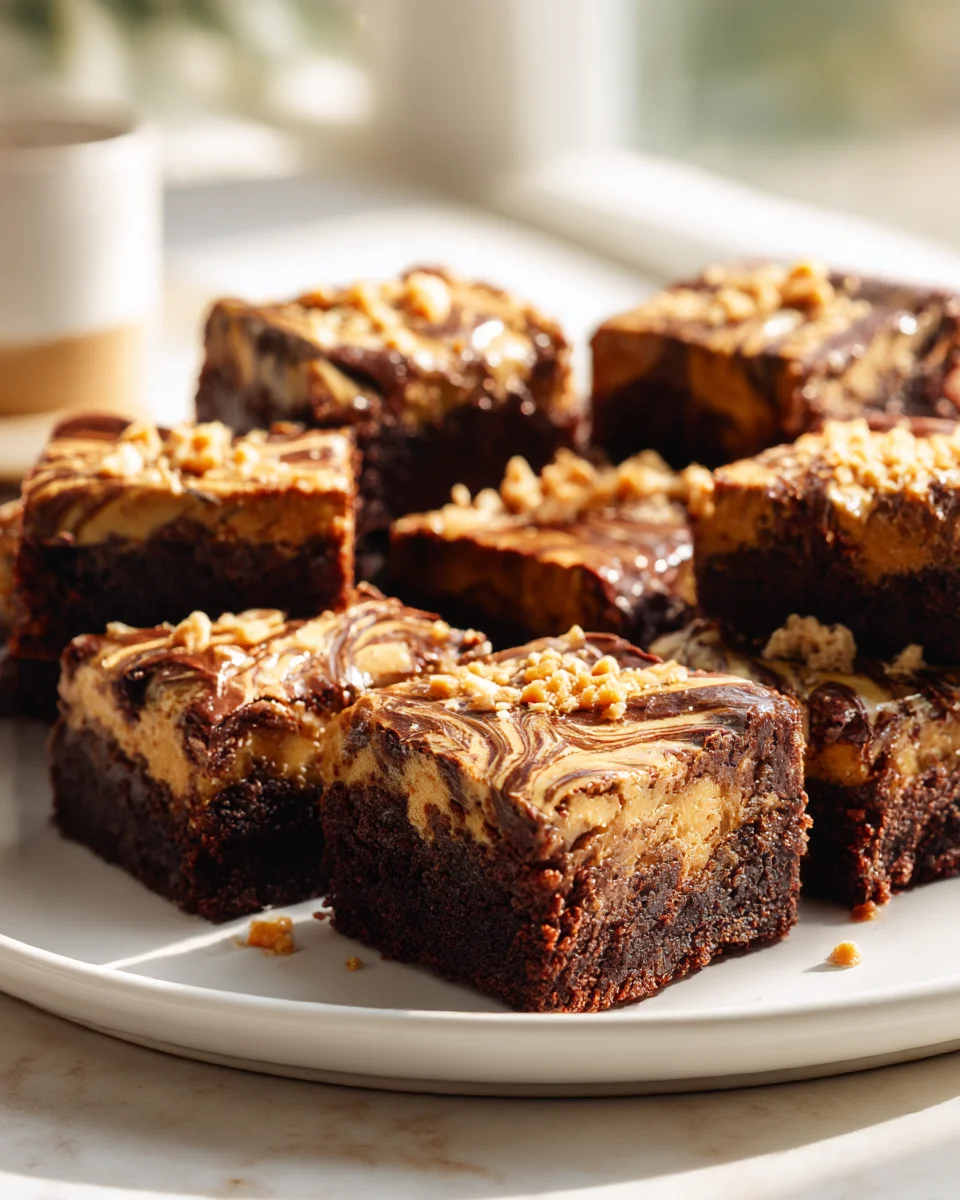
Step 5: Cut and Serve
- Lift & Cut: Once fully chilled, use the parchment paper overhang to lift the entire slab of Peanut Butter Chocolate Brownie Pudding Bars out of the pan and onto a cutting board.
- Clean Slices: For super clean cuts, I always recommend dipping a sharp knife into hot water, wiping it dry, and then making each slice. Repeat this process for every cut. Slice into squares or rectangular bars of your desired size.
- Serve & Enjoy: Serve immediately and watch them disappear!
Tips & Suggestions
I’ve made these Peanut Butter Chocolate Brownie Pudding Bars countless times, and I’ve picked up a few tricks along the way that I love to share. These tips will help you achieve perfection every time and even inspire you to get creative!
- The Importance of Cooling: I cannot stress this enough – each layer needs to be properly cooled before adding the next. If your brownie base is warm, it will melt the pudding. If the pudding isn’t set, the peanut butter topping will just sink into it. Patience is key for those beautiful, defined layers! I often pop the pan into the fridge for 30 minutes to an hour after the brownies are out of the oven, and again after the pudding layer, to speed things up.
- Achieving Clean Cuts: For picture-perfect bars, here’s my secret: once the bars are fully chilled and set, lift them out of the pan using the parchment paper. Dip a long, sharp knife into very hot water, wipe it completely dry, and then make a clean cut. Repeat this hot water dip and wipe for every single slice. This warms the blade just enough to glide through the layers without dragging.
- Pudding Consistency Matters: When mixing the instant pudding, make sure you whisk it vigorously for the full 2 minutes as instructed on the package. If it still seems a little loose after that, don’t worry too much – it will continue to thicken as it chills. Adding whipped topping or cream cheese, as I mentioned in the ingredients, really helps solidify and enrich this layer.
- Peanut Butter Topping Adjustments: If your peanut butter topping seems too stiff to spread easily, add a tiny bit of milk or cream (1 teaspoon at a time) until it’s spreadable. Conversely, if it seems too soft, you can add a tablespoon or two more powdered sugar to firm it up. It should be thick but manageable.
- Get Creative with Garnishes: While a simple chocolate drizzle is classic, feel free to get creative! You could sprinkle a touch of flaky sea salt over the chocolate for a salted caramel-like effect, or chop up your favorite peanut butter candy bars (like Reese’s) and scatter them on top. Crushed pretzels would also add a fun salty crunch!
- Make Ahead: These bars are fantastic for making ahead! They need a good chill anyway, so preparing them the day before you plan to serve them is ideal. The flavors actually meld even better overnight in the fridge.
- Pan Size Matters: Stick to the 9×13-inch pan for this recipe. Using a smaller pan will result in much thicker layers, which might alter baking times and the overall balance of the bar. A larger pan might make the layers too thin.
Storage
Proper storage is essential to keep your Peanut Butter Chocolate Brownie Pudding Bars tasting fresh, firm, and absolutely delicious. Because of the pudding layer, these bars require special attention, but I promise it’s worth it to keep them in peak condition!
Refrigeration
- Airtight Container is Key: My number one rule for these bars is to store them in an airtight container. This prevents them from drying out, absorbing any fridge odors, and keeps the pudding and peanut butter layers from getting crusty or gooey.
- Always Refrigerate: Due to the dairy-based pudding and the rich peanut butter topping, these bars must be stored in the refrigerator at all times. They won’t hold up well at room temperature for extended periods, especially on a warm day, and the dairy could spoil.
- Shelf Life: When properly stored in an airtight container in the refrigerator, these Peanut Butter Chocolate Brownie Pudding Bars will stay fresh and delicious for up to 5-7 days. I find they taste best within the first 3-4 days, but they’re still perfectly safe and enjoyable beyond that.
- Layering for Storage: If you have multiple layers of bars to store in one container, I recommend placing a piece of parchment paper or wax paper between the layers. This prevents them from sticking together and makes it easier to grab a single bar without disturbing the others.
Freezing
- Freezing for Longer Storage: Yes, you can freeze these bars! It’s a fantastic option if you’ve made a big batch or want to save some for later.
- Prepare for Freezing: First, ensure the bars are fully chilled and set. Cut them into individual servings.
- Wrap Individually: For best results, I like to wrap each individual bar tightly in plastic wrap, and then place the wrapped bars into a freezer-safe airtight container or a heavy-duty freezer bag. This double layer of protection helps prevent freezer burn.
- Freezer Life: When stored this way, the Peanut Butter Chocolate Brownie Pudding Bars can be kept in the freezer for up to 1-2 months. Beyond that, the quality might start to decline, particularly the texture of the pudding layer, which can become a bit icy.
- Thawing Instructions: To enjoy a frozen bar, simply transfer it from the freezer to the refrigerator and let it thaw overnight, or for a few hours. I don’t recommend thawing them at room temperature for food safety reasons, and also because the pudding layer could become too soft too quickly. They are best enjoyed slightly chilled after thawing.
Following these storage guidelines will ensure that every bite of your Peanut Butter Chocolate Brownie Pudding Bars is as delightful as the first!
Final Thoughts
And there you have it! My absolute favorite, the incredible Peanut Butter Chocolate Brownie Pudding Bars. I truly believe this recipe is a must-try for anyone who loves the classic combination of peanut butter and chocolate, elevated to an entirely new level. The fudgy, rich brownie base, the smooth, creamy pudding layer, and that delightful chocolate and peanut butter topping create a symphony of textures and flavors that is simply irresistible. I promise you, these Peanut Butter Chocolate Brownie Pudding Bars are more than just a dessert; they’re an experience that will have everyone asking for the recipe. So, gather your ingredients, get baking, and prepare to fall in love!

Leave a Comment